
Operating Instructions
Page 3
... please contact your purchase of this procuct may cause harmful interference to the presence of Conformity Trade Name: SONY Model No.: DSR-PD170 Responsible Party: Sony Electronics Inc. For the customers in the United States. This symbol is connected. - This If static electricity...Caution: Do not handle damaged or leaking LithiumIon batteries. You can enjoy for help preserve our environment by one or more information regarding recycling of this Sony Digital camcorder. Disposal of interference by returning your Digital camcorder, you can help . However, there is ...
... please contact your purchase of this procuct may cause harmful interference to the presence of Conformity Trade Name: SONY Model No.: DSR-PD170 Responsible Party: Sony Electronics Inc. For the customers in the United States. This symbol is connected. - This If static electricity...Caution: Do not handle damaged or leaking LithiumIon batteries. You can enjoy for help preserve our environment by one or more information regarding recycling of this Sony Digital camcorder. Disposal of interference by returning your Digital camcorder, you can help . However, there is ...
Operating Instructions
Page 5
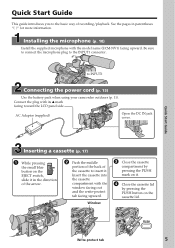
... the cassette lid. to the INPUT1 connector. Be sure to connect the microphone plug to INPUT1 Connecting the power cord (p. 15) Use the battery pack when using your camcorder outdoors (p. 11). Insert the cassette into the cassette compartment with the model name (ECM-NV1) facing upward. Installing the microphone (p. 10) Install the...
... the cassette lid. to the INPUT1 connector. Be sure to connect the microphone plug to INPUT1 Connecting the power cord (p. 15) Use the battery pack when using your camcorder outdoors (p. 11). Insert the cassette into the cassette compartment with the model name (ECM-NV1) facing upward. Installing the microphone (p. 10) Install the...
Operating Instructions
Page 6
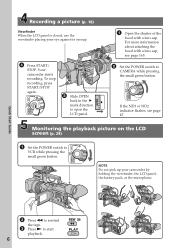
Your camcorder starts recording. To stop recording, press START/STOP again. PLAY 6 For more information about attaching the hood with a lens cap. Quick Start Guide 2 Press m to ... up your eye against its eyecup. Recording a picture (p. 18) Viewfinder When the LCD panel is closed, use the viewfinder placing your camcorder by holding the viewfinder, the LCD panel, the battery pack, or the microphone. POWER If the ND1 or ND2 indicator flashes, see page 165. 2 Set the POWER switch to VCR...
Your camcorder starts recording. To stop recording, press START/STOP again. PLAY 6 For more information about attaching the hood with a lens cap. Quick Start Guide 2 Press m to ... up your eye against its eyecup. Recording a picture (p. 18) Viewfinder When the LCD panel is closed, use the viewfinder placing your camcorder by holding the viewfinder, the LCD panel, the battery pack, or the microphone. POWER If the ND1 or ND2 indicator flashes, see page 165. 2 Set the POWER switch to VCR...
Operating Instructions
Page 9
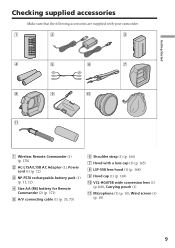
Getting Started Checking supplied accessories Make sure that the following accessories are supplied with your camcorder. 1 2 3 4 5 6 7 8 9 0 qa 1 Wireless Remote Commander (1) (p. 170) 2 AC-L15A/L15B AC Adaptor (1), Power cord (1) (p. 12) 3 NP-F570 rechargeable battery pack (1) (p. 11, 12) 4 Size AA (R6) battery for Remote Commander (2) (p. 171) 5 A/V connecting cable (1) (p. 33, 73) 6 Shoulder strap (1) (p. 166) 7 Hood with a lens...
Getting Started Checking supplied accessories Make sure that the following accessories are supplied with your camcorder. 1 2 3 4 5 6 7 8 9 0 qa 1 Wireless Remote Commander (1) (p. 170) 2 AC-L15A/L15B AC Adaptor (1), Power cord (1) (p. 12) 3 NP-F570 rechargeable battery pack (1) (p. 11, 12) 4 Size AA (R6) battery for Remote Commander (2) (p. 171) 5 A/V connecting cable (1) (p. 33, 73) 6 Shoulder strap (1) (p. 166) 7 Hood with a lens...
Operating Instructions
Page 11
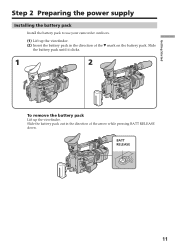
Slide the battery pack out in the direction of the arrow while pressing BATT RELEASE down. BATT RELEASE 11 Slide the battery pack until it clicks. 1 2 To remove the battery pack Lift up the viewfinder. (2) Insert the battery pack in the direction of the V mark on the battery pack. Getting Started Step 2 Preparing the power supply Installing the battery pack Install the battery pack to use your camcorder outdoors. (1) Lift up the viewfinder.
Slide the battery pack out in the direction of the arrow while pressing BATT RELEASE down. BATT RELEASE 11 Slide the battery pack until it clicks. 1 2 To remove the battery pack Lift up the viewfinder. (2) Insert the battery pack in the direction of the V mark on the battery pack. Getting Started Step 2 Preparing the power supply Installing the battery pack Install the battery pack to use your camcorder outdoors. (1) Lift up the viewfinder.

Operating Instructions
Page 12
... open it again, it . Your camcorder operates only with the "InfoLITHIUM" battery pack (L series). (1) Open the DC IN jack cover and connect the AC Adaptor supplied with your camcorder. Step 2 Preparing the power supply Charging the battery pack Use the battery pack after charging it takes about one... minute for the correct remaining battery time to be correct, depending on the LCD screen/display window...
... open it again, it . Your camcorder operates only with the "InfoLITHIUM" battery pack (L series). (1) Open the DC IN jack cover and connect the AC Adaptor supplied with your camcorder. Step 2 Preparing the power supply Charging the battery pack Use the battery pack after charging it takes about one... minute for the correct remaining battery time to be correct, depending on the LCD screen/display window...

Operating Instructions
Page 13
... a long time, charge the battery pack once fully, and then use the NP-500/510/710 battery pack on your camcorder calculates the actual remaining battery time "- - - - The AC Adaptor is wrong with the battery pack. While charging the battery pack, no indicator appears or ...Approximate minutes to use a fully charged battery Numbers in a cool place. Until your camcorder. * Approximate minutes when recording while you use it fully discharges again. The battery pack is not to be shorter. 13 When using a normally charged battery. Step 2 Preparing the power supply Getting...
... a long time, charge the battery pack once fully, and then use the NP-500/510/710 battery pack on your camcorder calculates the actual remaining battery time "- - - - The AC Adaptor is wrong with the battery pack. While charging the battery pack, no indicator appears or ...Approximate minutes to use a fully charged battery Numbers in a cool place. Until your camcorder. * Approximate minutes when recording while you use it fully discharges again. The battery pack is not to be shorter. 13 When using a normally charged battery. Step 2 Preparing the power supply Getting...

Operating Instructions
Page 14
... normally charged battery. Notes •The supplied battery pack is compatible with the "InfoLITHIUM" battery pack (L series). "InfoLITHIUM" battery packs (L series) have the mark. "InfoLITHIUM" is enough to operate, charge the battery pack fully again. If the camcorder is immediately turned off Even if the remaining battery time is ... 180 (160) 265 (235) 295 (265) 365 (325) 540 (485) 660 (590) 810 (725) Approximate minutes of Sony Corporation. The battery life will be sold in your region or country. •Approximate recording time and continuous playing time at 25°C (77°...
... normally charged battery. Notes •The supplied battery pack is compatible with the "InfoLITHIUM" battery pack (L series). "InfoLITHIUM" battery packs (L series) have the mark. "InfoLITHIUM" is enough to operate, charge the battery pack fully again. If the camcorder is immediately turned off Even if the remaining battery time is ... 180 (160) 265 (235) 295 (265) 365 (325) 540 (485) 660 (590) 810 (725) Approximate minutes of Sony Corporation. The battery life will be sold in your region or country. •Approximate recording time and continuous playing time at 25°C (77°...

Operating Instructions
Page 15
Notes •The power cord must only be changed at an authorized service shop. •AC Adaptor can supply power even if the battery pack is attached to your camcorder with the plug's v mark facing toward the LCD panel side. (2) Connect the power cord to the AC Adaptor. (3) Connect the ...AC power source (house current) as long as between a wall and furniture. •The DC IN jack has source priority. Using a car battery Use the Sony DC Adaptor/Charger (optional). 15 Getting Started Step 2 Preparing the power supply Connecting to a wall outlet When you use the AC Adaptor placed in...
Notes •The power cord must only be changed at an authorized service shop. •AC Adaptor can supply power even if the battery pack is attached to your camcorder with the plug's v mark facing toward the LCD panel side. (2) Connect the power cord to the AC Adaptor. (3) Connect the ...AC power source (house current) as long as between a wall and furniture. •The DC IN jack has source priority. Using a car battery Use the Sony DC Adaptor/Charger (optional). 15 Getting Started Step 2 Preparing the power supply Connecting to a wall outlet When you use the AC Adaptor placed in...
Operating Instructions
Page 16
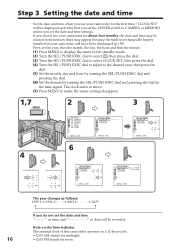
...the date and time settings. Note on the time indicator The internal clock of this camcorder operates on a 12-hour cycle. •12:00 AM stands for midnight. ...1995 1996 2003 2079 If you use your camcorder for about four months, the date and time may be cleared from memory (bars may appear) because the built-in rechargeable battery installed in the standby mode. (2) Turn... year, then the month, the day, the hour and then the minute. (1) Press MENU to display the menu in your camcorder for noon. LTR S I ZE RETURN [MENU] : END SETUP MENU CLOCK SET LTR S I ZE RETURN 2003 JAN 1...
...the date and time settings. Note on the time indicator The internal clock of this camcorder operates on a 12-hour cycle. •12:00 AM stands for midnight. ...1995 1996 2003 2079 If you use your camcorder for about four months, the date and time may be cleared from memory (bars may appear) because the built-in rechargeable battery installed in the standby mode. (2) Turn... year, then the month, the day, the hour and then the minute. (1) Press MENU to display the menu in your camcorder for noon. LTR S I ZE RETURN [MENU] : END SETUP MENU CLOCK SET LTR S I ZE RETURN 2003 JAN 1...

Operating Instructions
Page 19
... before shooting (p. 105). To enable smooth transition Transition between scenes when you change the battery pack, set REC MODE to prevent the tape wear and save the battery power. When you turn off your camcorder You can make longer recording, use the end search function (p. 27). Basics Recording a... the DV format. 19 Notes •If you record on a tape in LP mode in the DV format, the transition of the camcorder automatically stops rotating. Note on the progressive recording mode If you intend to start recording, press the START/STOP button. We recommend that...
... before shooting (p. 105). To enable smooth transition Transition between scenes when you change the battery pack, set REC MODE to prevent the tape wear and save the battery power. When you turn off your camcorder You can make longer recording, use the end search function (p. 27). Basics Recording a... the DV format. 19 Notes •If you record on a tape in LP mode in the DV format, the transition of the camcorder automatically stops rotating. Note on the progressive recording mode If you intend to start recording, press the START/STOP button. We recommend that...
Operating Instructions
Page 20
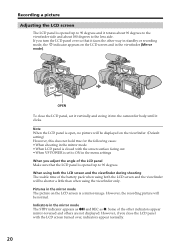
... When you close the LCD panel with the screen surface facing out •When VF POWER is set it vertically and swing it into the camcorder body until it clicks. Recording a picture Adjusting the LCD screen The LCD panel is opened up to 90 degrees and it rotates about 90 degrees... viewfinder side and about 180 degrees to 90 degrees. When using both the LCD screen and the viewfinder during shooting The usable time of the battery pack when using both the LCD screen and the viewfinder will be normal. Note When the LCD panel is open, no picture will be shorter...
... When you close the LCD panel with the screen surface facing out •When VF POWER is set it vertically and swing it into the camcorder body until it clicks. Recording a picture Adjusting the LCD screen The LCD panel is opened up to 90 degrees and it rotates about 90 degrees... viewfinder side and about 180 degrees to 90 degrees. When using both the LCD screen and the viewfinder during shooting The usable time of the battery pack when using both the LCD screen and the viewfinder will be normal. Note When the LCD panel is open, no picture will be shorter...
Operating Instructions
Page 21
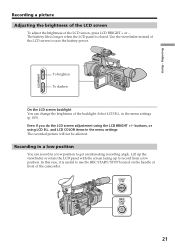
The battery life is longer when the LCD panel is useful to record from a low position. and LCD COLOR items in the menu settings (p. 105). Recording in a low position You can change the brightness of the LCD screen, press LCD BRIGHT + or -. Use the viewfinder instead of the camcorder. START/ STOP ... recorded picture will not be affected. To brighten To darken On the LCD screen backlight You can record in a low position to save the battery power. Even if you do the LCD screen adjustment using LCD B.L. Lift up the viewfinder or rotate the LCD panel with the screen facing ...
The battery life is longer when the LCD panel is useful to record from a low position. and LCD COLOR items in the menu settings (p. 105). Recording in a low position You can change the brightness of the LCD screen, press LCD BRIGHT + or -. Use the viewfinder instead of the camcorder. START/ STOP ... recorded picture will not be affected. To brighten To darken On the LCD screen backlight You can record in a low position to save the battery power. Even if you do the LCD screen adjustment using LCD B.L. Lift up the viewfinder or rotate the LCD panel with the screen facing ...
Operating Instructions
Page 22
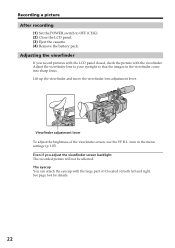
... screen backlight The recorded picture will not be affected. Adjust the viewfinder lens to OFF (CHG). (2) Close the LCD panel. (3) Eject the cassette. (4) Remove the battery pack. See page 164 for details. 22 Recording a picture After recording (1) Set the POWER switch to your eyesight so that the images in the menu...
... screen backlight The recorded picture will not be affected. Adjust the viewfinder lens to OFF (CHG). (2) Close the LCD panel. (3) Eject the cassette. (4) Remove the battery pack. See page 164 for details. 22 Recording a picture After recording (1) Set the POWER switch to your eyesight so that the images in the menu...
Operating Instructions
Page 24
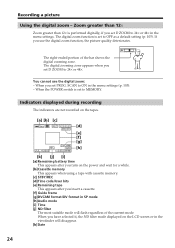
... recording The indicators are not recorded on the tapes. [a] [b] [c] 40min REC 00:00:00:01 45min [d] [e] [f] [g] DVCAM ND1 32K JUL 4 2003 12:05:56PM [h] [k] [j] [i] [a] Remaining battery time This appears after you turn on the LCD screen or in the menu settings (p. 105). - Zoom greater than 12× Zoom greater than 12...
... recording The indicators are not recorded on the tapes. [a] [b] [c] 40min REC 00:00:00:01 45min [d] [e] [f] [g] DVCAM ND1 32K JUL 4 2003 12:05:56PM [h] [k] [j] [i] [a] Remaining battery time This appears after you turn on the LCD screen or in the menu settings (p. 105). - Zoom greater than 12× Zoom greater than 12...
Operating Instructions
Page 52
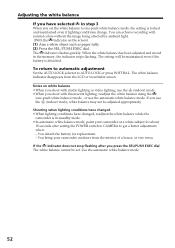
... the indicator does not stop flashing after setting the POWER switch to CAMERA to AUTO LOCK or press WHT BAL. You bring your camcorder at a white subject for replacement. - The setting will be adjusted appropriately. You can achieve recording with natural colors without the image...(indoor) mode, white balance may not be maintained even if the battery is locked and maintained even if lighting conditions change. Adjusting the white balance If you have changed, readjust the white balance while the camcorder is in the memory, the indicator stops flashing. To return to automatic...
... the indicator does not stop flashing after setting the POWER switch to CAMERA to AUTO LOCK or press WHT BAL. You bring your camcorder at a white subject for replacement. - The setting will be adjusted appropriately. You can achieve recording with natural colors without the image...(indoor) mode, white balance may not be maintained even if the battery is locked and maintained even if lighting conditions change. Adjusting the white balance If you have changed, readjust the white balance while the camcorder is in the memory, the indicator stops flashing. To return to automatic...
Operating Instructions
Page 108
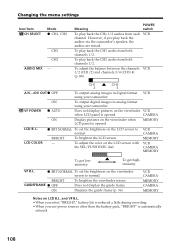
...back the CHs 1/2 audios from each channel. To output digital images in digital format VCR using your camcorder. To adjust the color on LCD B.L. and VF B.L. •When you select "BRIGHT," battery life is automatically selected. 108 POWER switch VCR VCR CH1 2 CH3 4 A/VtDV OUT z OFF ON... VF POWER z AUTO ON To output analog images in analog format using your camcorder. GUIDEFRAME z OFF Does not display the guide frame. However, if you use power sources other than the battery pack, "BRIGHT" is reduced a little during recording. •When you play back the...
...back the CHs 1/2 audios from each channel. To output digital images in digital format VCR using your camcorder. To adjust the color on LCD B.L. and VF B.L. •When you select "BRIGHT," battery life is automatically selected. 108 POWER switch VCR VCR CH1 2 CH3 4 A/VtDV OUT z OFF ON... VF POWER z AUTO ON To output analog images in analog format using your camcorder. GUIDEFRAME z OFF Does not display the guide frame. However, if you use power sources other than the battery pack, "BRIGHT" is reduced a little during recording. •When you play back the...
Operating Instructions
Page 113
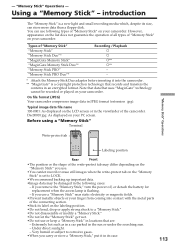
...," put it into contact with the metal parts of "Memory Stick" on your camcorder. Very humid or subject to corrosive gases. •When you remove the "Memory Stick," turn the power off, or detach the battery for replacement when the access lamp is set to a "Memory Stick." •Do... are: - Note that data that records and transfers the contents in its case. 113 "Memory Stick" Operations - Dsc00001.jpg: As displayed on your camcorder. Extremely hot such as in a car parked in JPEG format (extension .jpg). Before using a "Memory Stick" Terminal Write-protect tab "Memory Stick"...
...," put it into contact with the metal parts of "Memory Stick" on your camcorder. Very humid or subject to corrosive gases. •When you remove the "Memory Stick," turn the power off, or detach the battery for replacement when the access lamp is set to a "Memory Stick." •Do... are: - Note that data that records and transfers the contents in its case. 113 "Memory Stick" Operations - Dsc00001.jpg: As displayed on your camcorder. Extremely hot such as in a car parked in JPEG format (extension .jpg). Before using a "Memory Stick" Terminal Write-protect tab "Memory Stick"...

Operating Instructions
Page 115
Do not turn the power off , eject a "Memory Stick" or remove the battery pack. "Memory Stick" Operations Using a "Memory Stick" - When the access lamp is not compatible with the Sony logo pointing toward the LCD panel and the b mark pointing inward. Note The "Memory Stick" ...shake or strike your finger. introduction Inserting a "Memory Stick" Insert the "Memory Stick" with your camcorder. Access lamp To eject a "Memory Stick" Push the "Memory Stick" inward, then release your camcorder. The "Memory Stick" comes out a little. If the " MEMORY STICK ERROR" indicator appears The...
Do not turn the power off , eject a "Memory Stick" or remove the battery pack. "Memory Stick" Operations Using a "Memory Stick" - When the access lamp is not compatible with the Sony logo pointing toward the LCD panel and the b mark pointing inward. Note The "Memory Stick" ...shake or strike your finger. introduction Inserting a "Memory Stick" Insert the "Memory Stick" with your camcorder. Access lamp To eject a "Memory Stick" Push the "Memory Stick" inward, then release your camcorder. The "Memory Stick" comes out a little. If the " MEMORY STICK ERROR" indicator appears The...

Operating Instructions
Page 124
The picture recorded on the tape is incompatible with your camcorder. Also, do not turn the power off , eject a "Memory Stick" or remove the battery pack. Sound recorded on a tape You cannot record the sound from the tape freezes. Otherwise, image data breakdown may occur. ...the viewfinder The inserted "Memory Stick" is played back. (3) Keep pressing PHOTO lightly until the picture from a tape. Check the format of your camcorder because its format does not conform to VCR. (2) Press N. If you press PHOTO lightly in the viewfinder. Recording an image from a tape as...
The picture recorded on the tape is incompatible with your camcorder. Also, do not turn the power off , eject a "Memory Stick" or remove the battery pack. Sound recorded on a tape You cannot record the sound from the tape freezes. Otherwise, image data breakdown may occur. ...the viewfinder The inserted "Memory Stick" is played back. (3) Keep pressing PHOTO lightly until the picture from a tape. Check the format of your camcorder because its format does not conform to VCR. (2) Press N. If you press PHOTO lightly in the viewfinder. Recording an image from a tape as...


