Operating Instructions
Page 4
... which can radiate radio frequency energy and, if not installed and used with the equipment in this manual could void your authority to operate this equipment. [ Note: This equipment has been tested...help. For Customers in a particular installation. Operation is no guarantee that to the following measures: - Telephone No.: 858-942-2230 This device complies with Part 15 of Conformity Trade Name: SONY Model No.: DSC-W190 Responsible Party: Sony Electronics Inc. If this product, you may apply, See www.dtsc.ca.gov/hazardouswaste/perchlorate Perchlorate Material: Lithium battery...
... which can radiate radio frequency energy and, if not installed and used with the equipment in this manual could void your authority to operate this equipment. [ Note: This equipment has been tested...help. For Customers in a particular installation. Operation is no guarantee that to the following measures: - Telephone No.: 858-942-2230 This device complies with Part 15 of Conformity Trade Name: SONY Model No.: DSC-W190 Responsible Party: Sony Electronics Inc. If this product, you may apply, See www.dtsc.ca.gov/hazardouswaste/perchlorate Perchlorate Material: Lithium battery...
Operating Instructions
Page 5
... to the applicable collection point for using connection cables shorter than 3 meters (9.8 feet). [ Attention The electromagnetic fields at the specific frequencies may influence the picture and sound of this product is Sony Deutschland GmbH, Hedelfinger Strasse 61, 70327 Stuttgart, Germany. Instead it shall be handed over to the addresses given in separate service or guarantee documents. By ensuring...
... to the applicable collection point for using connection cables shorter than 3 meters (9.8 feet). [ Attention The electromagnetic fields at the specific frequencies may influence the picture and sound of this product is Sony Deutschland GmbH, Hedelfinger Strasse 61, 70327 Stuttgart, Germany. Instead it shall be handed over to the addresses given in separate service or guarantee documents. By ensuring...
Operating Instructions
Page 7
... 10 Identifying parts 11 Charging the battery pack 12 Inserting the battery pack/a "Memory Stick Duo" media (sold separately 14 Setting the clock 16 Shooting/viewing images 18 Shooting images 18 Viewing images 19 Using shooting functions 20 Detecting smiles and shooting automatically (Smile Shutter 20 Focusing on the face of the subject (Face Detection 21 Shooting close-ups (Macro 22 Using the self-timer 22 Selecting a flash mode 23 Changing the screen display 23 Selecting the image size to match...
... 10 Identifying parts 11 Charging the battery pack 12 Inserting the battery pack/a "Memory Stick Duo" media (sold separately 14 Setting the clock 16 Shooting/viewing images 18 Shooting images 18 Viewing images 19 Using shooting functions 20 Detecting smiles and shooting automatically (Smile Shutter 20 Focusing on the face of the subject (Face Detection 21 Shooting close-ups (Macro 22 Using the self-timer 22 Selecting a flash mode 23 Changing the screen display 23 Selecting the image size to match...
Operating Instructions
Page 8
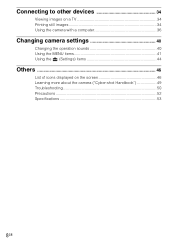
Connecting to other devices 34 Viewing images on a TV 34 Printing still images 34 Using the camera with a computer 36 Changing camera settings 40 Changing the operation sounds 40 Using the MENU items 41 Using the (Settings) items 44 Others 46 List of icons displayed on the screen 46 Learning more about the camera ("Cyber-shot Handbook 49 Troubleshooting 50 Precautions 52 Specifications 53 8GB
Connecting to other devices 34 Viewing images on a TV 34 Printing still images 34 Using the camera with a computer 36 Changing camera settings 40 Changing the operation sounds 40 Using the MENU items 41 Using the (Settings) items 44 Others 46 List of icons displayed on the screen 46 Learning more about the camera ("Cyber-shot Handbook 49 Troubleshooting 50 Precautions 52 Specifications 53 8GB
Operating Instructions
Page 9
... a malfunction and you start recording, make a trial recording to make a backup copy to the flash surface, resulting in sandy or dusty locations may not properly record or play back images. • Using the camera in insufficient light emission. The heat of the pixels are a normal result of the copyright laws. Notes on the LCD screen and lens • The LCD screen is lit. A message will play back images recorded or edited with...
... a malfunction and you start recording, make a trial recording to make a backup copy to the flash surface, resulting in sandy or dusty locations may not properly record or play back images. • Using the camera in insufficient light emission. The heat of the pixels are a normal result of the copyright laws. Notes on the LCD screen and lens • The LCD screen is lit. A message will play back images recorded or edited with...
Operating Instructions
Page 10
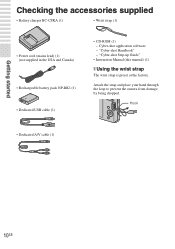
... • Battery charger BC-CSKA (1) • Wrist strap (1) • Power cord (mains lead) (1) (not supplied in the USA and Canada) • Rechargeable battery pack NP-BK1 (1) • Dedicated USB cable (1) • CD-ROM (1) - "Cyber-shot Handbook" - Attach the strap and place your hand through the loop to prevent the camera from damage by being dropped. "Cyber-shot Step-up Guide" • Instruction Manual (this manual) (1) x Using the wrist...
... • Battery charger BC-CSKA (1) • Wrist strap (1) • Power cord (mains lead) (1) (not supplied in the USA and Canada) • Rechargeable battery pack NP-BK1 (1) • Dedicated USB cable (1) • CD-ROM (1) - "Cyber-shot Handbook" - Attach the strap and place your hand through the loop to prevent the camera from damage by being dropped. "Cyber-shot Step-up Guide" • Instruction Manual (this manual) (1) x Using the wrist...
Operating Instructions
Page 11
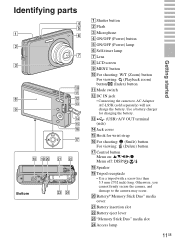
...Delete) button Q Control button Menu on: v/V/b/B/z Menu off: DISP/ / / R Speaker S Tripod receptacle • Use a tripod with a screw less than 5.5 mm (7/32 inch) long. Otherwise, you cannot firmly secure the camera, and damage to AC Adaptor AC-LS5K (sold separately) will not charge the battery. Identifying parts Bottom Getting started A Shutter button B Flash C Microphone D ON/OFF (Power) button E ON/OFF (Power) lamp F Self-timer lamp G Lens H LCD screen I MENU button J For shooting: W/T (Zoom) button For viewing: (Playback zoom) button/ (Index) button K Mode switch...
...Delete) button Q Control button Menu on: v/V/b/B/z Menu off: DISP/ / / R Speaker S Tripod receptacle • Use a tripod with a screw less than 5.5 mm (7/32 inch) long. Otherwise, you cannot firmly secure the camera, and damage to AC Adaptor AC-LS5K (sold separately) will not charge the battery. Identifying parts Bottom Getting started A Shutter button B Flash C Microphone D ON/OFF (Power) button E ON/OFF (Power) lamp F Self-timer lamp G Lens H LCD screen I MENU button J For shooting: W/T (Zoom) button For viewing: (Playback zoom) button/ (Index) button K Mode switch...
Operating Instructions
Page 13
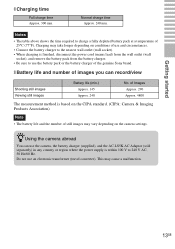
... started x Charging time Full charge time Approx. 300 min. Charging may take longer depending on conditions of use and circumstances. • Connect the battery charger to the nearest wall outlet (wall socket). • When charging is finished, disconnect the power cord (mains lead) from the wall outlet (wall socket), and remove the battery pack from the battery charger. • Be sure to use the battery pack or the battery charger of still images...
... started x Charging time Full charge time Approx. 300 min. Charging may take longer depending on conditions of use and circumstances. • Connect the battery charger to the nearest wall outlet (wall socket). • When charging is finished, disconnect the power cord (mains lead) from the wall outlet (wall socket), and remove the battery pack from the battery charger. • Be sure to use the battery pack or the battery charger of still images...
Operating Instructions
Page 15
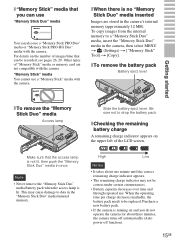
... camera turns off automatically (Auto power-off function). 15GB This may not be replaced. Other types of the LCD screen. "Memory Stick" media You cannot use a "Memory Stick" media with the camera. Make sure that can also use . When the operating time per charge decreases markedly, the battery pack needs to a "Memory Stick Duo" media, insert the "Memory Stick Duo" media in once. x To remove the battery pack Battery eject lever Getting started x To remove the "Memory...
... camera turns off automatically (Auto power-off function). 15GB This may not be replaced. Other types of the LCD screen. "Memory Stick" media You cannot use a "Memory Stick" media with the camera. Make sure that can also use . When the operating time per charge decreases markedly, the battery pack needs to a "Memory Stick Duo" media, insert the "Memory Stick Duo" media in once. x To remove the battery pack Battery eject lever Getting started x To remove the "Memory...
Operating Instructions
Page 35
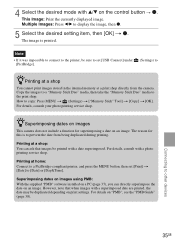
... images with a date superimposed. Multiple Images: Press b/B to the print shop. The reason for superimposing a date on "PMB", see the "PMB Guide" (page 38). Connecting to copy: Press MENU t (Settings) t ["Memory Stick" Tool] t [Copy] t [OK]. This Image: Print the currently displayed image. How to other devices 35GB zSuperimposing dates on images This camera does not include a function for this is printed. Superimposing dates on images using PMB: With the supplied "PMB" software installed on an image. Printing at a print shop directly...
... images with a date superimposed. Multiple Images: Press b/B to the print shop. The reason for superimposing a date on "PMB", see the "PMB Guide" (page 38). Connecting to copy: Press MENU t (Settings) t ["Memory Stick" Tool] t [Copy] t [OK]. This Image: Print the currently displayed image. How to other devices 35GB zSuperimposing dates on images This camera does not include a function for this is printed. Superimposing dates on images using PMB: With the supplied "PMB" software installed on an image. Printing at a print shop directly...
Operating Instructions
Page 37
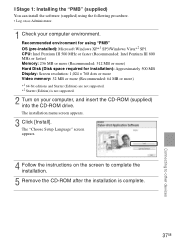
... 800 MHz or faster) Memory: 256 MB or more (Recommended: 512 MB or more ) *1 64-bit editions and Starter (Edition) are not supported. *2 Starter (Edition) is complete. 37GB Connecting to complete the installation. 5 Remove the CD-ROM after the installation is not supported. 2 Turn on your computer environment. The "Choose Setup Language" screen appears. 4 Follow the instructions on the screen to other devices
... 800 MHz or faster) Memory: 256 MB or more (Recommended: 512 MB or more ) *1 64-bit editions and Starter (Edition) are not supported. *2 Starter (Edition) is complete. 37GB Connecting to complete the installation. 5 Remove the CD-ROM after the installation is not supported. 2 Turn on your computer environment. The "Choose Setup Language" screen appears. 4 Follow the instructions on the screen to other devices

Operating Instructions
Page 40
On: Turns on the beep/shutter sound when you press the shutter button. Shutter: Turns on the shutter sound when you press the control/shutter button. Off: Turns off the beep/shutter sound. 40GB Changing camera settings Changing the operation sounds You can set the sound produced when you operate the camera. 1 Press the MENU button. 2 Select (Settings) with v/V on the control button t z. MENU button 3 Select [Main Settings] with v/V on the control button, then press [Beep] t z. 4 Select the desired mode with V on the control button, then press z.
On: Turns on the beep/shutter sound when you press the shutter button. Shutter: Turns on the shutter sound when you press the control/shutter button. Off: Turns off the beep/shutter sound. 40GB Changing camera settings Changing the operation sounds You can set the sound produced when you operate the camera. 1 Press the MENU button. 2 Select (Settings) with v/V on the control button t z. MENU button 3 Select [Main Settings] with v/V on the control button, then press [Beep] t z. 4 Select the desired mode with V on the control button, then press z.
Operating Instructions
Page 41
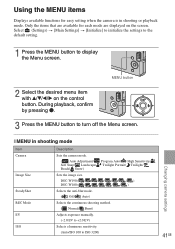
...shooting or playback mode. MENU button 2 Select the desired menu item with v/V/b/B on the screen. Using the MENU items Displays available functions for each mode are available for easy setting when the camera is in shooting mode Item Camera Image Size SteadyShot REC Mode EV ISO Description Sets the camera mode. ( Auto Adjustment/ Program Auto/ High Sensitivity/ Soft Snap/ Landscape/ Twilight Portrait/ Twilight/ Beach/ Snow) Sets the image size. Select (Settings) t [Main Settings] t [Initialize] to initialize the settings to the default setting. 1 Press the MENU button to turn...
...shooting or playback mode. MENU button 2 Select the desired menu item with v/V/b/B on the screen. Using the MENU items Displays available functions for each mode are available for easy setting when the camera is in shooting mode Item Camera Image Size SteadyShot REC Mode EV ISO Description Sets the camera mode. ( Auto Adjustment/ Program Auto/ High Sensitivity/ Soft Snap/ Landscape/ Twilight Portrait/ Twilight/ Beach/ Snow) Sets the image size. Select (Settings) t [Main Settings] t [Initialize] to initialize the settings to the default setting. 1 Press the MENU button to turn...
Operating Instructions
Page 44
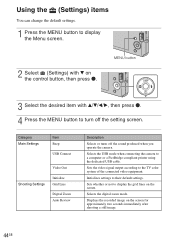
...-compliant printer using the dedicated USB cable. Selects the digital zoom mode. MENU button 3 Select the desired item with V on the screen for approximately two seconds immediately after shooting a still image. 44GB Category Main Settings Item Beep USB Connect Video Out Shooting Settings Initialize Grid Line Digital Zoom Auto Review Description Selects or turns off the setting screen. Selects the USB mode when connecting the camera to their default settings. Using the (Settings) items You can change the default settings. 1 Press the MENU button to display the Menu screen...
...-compliant printer using the dedicated USB cable. Selects the digital zoom mode. MENU button 3 Select the desired item with V on the screen for approximately two seconds immediately after shooting a still image. 44GB Category Main Settings Item Beep USB Connect Video Out Shooting Settings Initialize Grid Line Digital Zoom Auto Review Description Selects or turns off the setting screen. Selects the USB mode when connecting the camera to their default settings. Using the (Settings) items You can change the default settings. 1 Press the MENU button to display the Menu screen...

Operating Instructions
Page 45
Copies all images in the internal memory to be used for recording images. Changing camera settings 45GB Selects the language to "Memory Stick Duo" media. Formats the internal memory. Sets the date and time. Category Item "Memory Stick" Tool Format Create REC.Folder Change REC.Folder Copy Internal Memory Tool Clock Settings Language Setting Format Clock Settings Language Setting Description Formats the "Memory Stick Duo" media. Creates a folder in menu items, warnings and messages. Changes the folder currently used in "Memory Stick Duo" media for recording images...
Copies all images in the internal memory to be used for recording images. Changing camera settings 45GB Selects the language to "Memory Stick Duo" media. Formats the internal memory. Sets the date and time. Category Item "Memory Stick" Tool Format Create REC.Folder Change REC.Folder Copy Internal Memory Tool Clock Settings Language Setting Format Clock Settings Language Setting Description Formats the "Memory Stick Duo" media. Creates a folder in menu items, warnings and messages. Changes the folder currently used in "Memory Stick Duo" media for recording images...

Operating Instructions
Page 47
...-0012 Folder-file number 2009 1 1 9:30 AM Recorded date/time of the playback image z STOP z PLAY Function guide for playing image bB BACK/NEXT Selecting images V VOLUME Adjusting volume C Display 12 00:00:15 12/12 ISO 400 +2.0EV 500 F3.5 Indication Recording folder Number of recordable images Recording/Playback Media ("Memory Stick Duo" media, internal memory) Recordable time Red-eye reduction Flash mode Flash charging Playback folder Image number/Number of images recorded in selected folder Changing folder Metering mode White balance ISO number Exposure value Shutter speed Aperture...
...-0012 Folder-file number 2009 1 1 9:30 AM Recorded date/time of the playback image z STOP z PLAY Function guide for playing image bB BACK/NEXT Selecting images V VOLUME Adjusting volume C Display 12 00:00:15 12/12 ISO 400 +2.0EV 500 F3.5 Indication Recording folder Number of recordable images Recording/Playback Media ("Memory Stick Duo" media, internal memory) Recordable time Red-eye reduction Flash mode Flash charging Playback folder Image number/Number of images recorded in selected folder Changing folder Metering mode White balance ISO number Exposure value Shutter speed Aperture...
Operating Instructions
Page 50
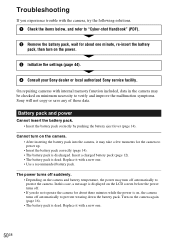
... "Cyber-shot Handbook" (PDF). 2 Remove the battery pack, wait for the camera to verify and improve the malfunction symptoms. Sony will not copy or save any of those data. Replace it with a new one . • Use a recommended battery pack. In this case, a message is displayed on the power. 3 Initialize the settings (page 44). 4 Consult your Sony dealer or local authorized Sony service facility. Replace it with a new one . 50GB On repairing cameras with internal memory function included, data...
... "Cyber-shot Handbook" (PDF). 2 Remove the battery pack, wait for the camera to verify and improve the malfunction symptoms. Sony will not copy or save any of those data. Replace it with a new one . • Use a recommended battery pack. In this case, a message is displayed on the power. 3 Initialize the settings (page 44). 4 Consult your Sony dealer or local authorized Sony service facility. Replace it with a new one . 50GB On repairing cameras with internal memory function included, data...
Operating Instructions
Page 51
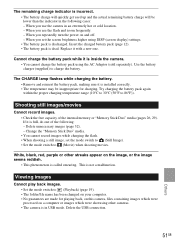
... images/movies Cannot record images. • Check the free capacity of the following cases: - Change the "Memory Stick Duo" media. • You cannot record images while charging the flash. • When shooting a still image, set the screen brightness higher using DISP (screen display) settings. • The battery pack is discharged. Delete the USB connection. 51GB Others Insert the charged battery pack (page 12). • The battery pack is not a malfunction. Cannot charge the battery pack while it is installed...
... images/movies Cannot record images. • Check the free capacity of the following cases: - Change the "Memory Stick Duo" media. • You cannot record images while charging the flash. • When shooting a still image, set the screen brightness higher using DISP (screen display) settings. • The battery pack is discharged. Delete the USB connection. 51GB Others Insert the charged battery pack (page 12). • The battery pack is not a malfunction. Cannot charge the battery pack while it is installed...

Operating Instructions
Page 52
... of the internal rechargeable backup battery Insert charged battery pack in the camera, and then leave the camera for a long time. Charging method of the camera. Shooting in extremely cold or hot places that if you do not use the camera at all for the moisture to a warm location, moisture may condense inside the lens, you can still use the camera, but the date and time will...
... of the internal rechargeable backup battery Insert charged battery pack in the camera, and then leave the camera for a long time. Charging method of the camera. Shooting in extremely cold or hot places that if you do not use the camera at all for the moisture to a warm location, moisture may condense inside the lens, you can still use the camera, but the date and time will...
Operating Instructions
Page 53
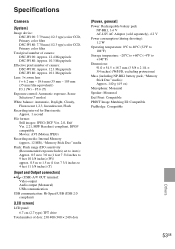
...: Video output Audio output (Monaural) USB communication USB communication: Hi-Speed USB (USB 2.0 compliant) [LCD screen] LCD panel: 6.7 cm (2.7 type) TFT drive Total number of camera: DSC-W190: Approx. 12.1 Megapixels DSC-W180: Approx. 10.1 Megapixels Lens: 3× zoom lens f = 6.2 mm - 18.6 mm (35 mm - 105 mm (35 mm film equivalent)) F3.1 (W) - F5.6 (T) Exposure control: Automatic exposure, Scene Selection (7 modes) White balance: Automatic, Daylight, Cloudy, Fluorescent 1,2,3, Incandescent, Flash Recording interval for Burst mode: Approx. 1 second File format: Still images: JPEG...
...: Video output Audio output (Monaural) USB communication USB communication: Hi-Speed USB (USB 2.0 compliant) [LCD screen] LCD panel: 6.7 cm (2.7 type) TFT drive Total number of camera: DSC-W190: Approx. 12.1 Megapixels DSC-W180: Approx. 10.1 Megapixels Lens: 3× zoom lens f = 6.2 mm - 18.6 mm (35 mm - 105 mm (35 mm film equivalent)) F3.1 (W) - F5.6 (T) Exposure control: Automatic exposure, Scene Selection (7 modes) White balance: Automatic, Daylight, Cloudy, Fluorescent 1,2,3, Incandescent, Flash Recording interval for Burst mode: Approx. 1 second File format: Still images: JPEG...


