Operating Instructions
Page 8
Connecting to other devices 34 Viewing images on a TV 34 Printing still images 34 Using the camera with a computer 36 Changing camera settings 40 Changing the operation sounds 40 Using the MENU items 41 Using the (Settings) items 44 Others 46 List of icons displayed on the screen 46 Learning more about the camera ("Cyber-shot Handbook 49 Troubleshooting 50 Precautions 52 Specifications 53 8GB
Connecting to other devices 34 Viewing images on a TV 34 Printing still images 34 Using the camera with a computer 36 Changing camera settings 40 Changing the operation sounds 40 Using the MENU items 41 Using the (Settings) items 44 Others 46 List of icons displayed on the screen 46 Learning more about the camera ("Cyber-shot Handbook 49 Troubleshooting 50 Precautions 52 Specifications 53 8GB
Operating Instructions
Page 9
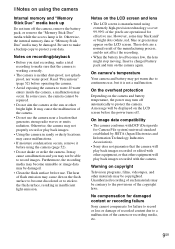
.... In some tiny black and/ or bright dots (white, red, blue or green) may appear on the LCD screen and lens • The LCD screen is neither dust-proof, nor splashproof, nor water-proof. On the overheat protection Depending on the camera and battery temperature, the power may cause the malfunction of flash emission may be damaged. On image data compatibility • The camera conforms with DCF (Design...
.... In some tiny black and/ or bright dots (white, red, blue or green) may appear on the LCD screen and lens • The LCD screen is neither dust-proof, nor splashproof, nor water-proof. On the overheat protection Depending on the camera and battery temperature, the power may cause the malfunction of flash emission may be damaged. On image data compatibility • The camera conforms with DCF (Design...
Operating Instructions
Page 41
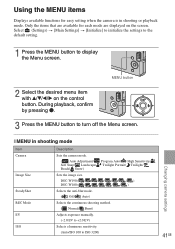
... or playback mode. DSC-W190 DSC-W180 Selects the anti-blur mode. ( Off/ Auto) Selects the continuous shooting method. ( Normal/ Burst) Adjusts exposure manually. (-2.0 EV to +2.0 EV) Selects a luminous sensitivity. (Auto/ISO 100 to display the Menu screen. MENU button 2 Select the desired menu item with v/V/b/B on the screen. Using the MENU items Displays available functions for each mode are displayed on the control button. Select (Settings) t [Main Settings] t [Initialize] to initialize the settings to the default setting. 1 Press the MENU button to ISO 3200) Changing camera...
... or playback mode. DSC-W190 DSC-W180 Selects the anti-blur mode. ( Off/ Auto) Selects the continuous shooting method. ( Normal/ Burst) Adjusts exposure manually. (-2.0 EV to +2.0 EV) Selects a luminous sensitivity. (Auto/ISO 100 to display the Menu screen. MENU button 2 Select the desired menu item with v/V/b/B on the screen. Using the MENU items Displays available functions for each mode are displayed on the control button. Select (Settings) t [Main Settings] t [Initialize] to initialize the settings to the default setting. 1 Press the MENU button to ISO 3200) Changing camera...

Operating Instructions
Page 47
...-0012 Folder-file number 2009 1 1 9:30 AM Recorded date/time of the playback image z STOP z PLAY Function guide for playing image bB BACK/NEXT Selecting images V VOLUME Adjusting volume C Display 12 00:00:15 12/12 ISO 400 +2.0EV 500 F3.5 Indication Recording folder Number of recordable images Recording/Playback Media ("Memory Stick Duo" media, internal memory) Recordable time Red-eye reduction Flash mode Flash charging Playback folder Image number/Number of images recorded in selected folder Changing folder Metering mode White balance ISO number Exposure value Shutter speed Aperture...
...-0012 Folder-file number 2009 1 1 9:30 AM Recorded date/time of the playback image z STOP z PLAY Function guide for playing image bB BACK/NEXT Selecting images V VOLUME Adjusting volume C Display 12 00:00:15 12/12 ISO 400 +2.0EV 500 F3.5 Indication Recording folder Number of recordable images Recording/Playback Media ("Memory Stick Duo" media, internal memory) Recordable time Red-eye reduction Flash mode Flash charging Playback folder Image number/Number of images recorded in selected folder Changing folder Metering mode White balance ISO number Exposure value Shutter speed Aperture...
Operating Instructions
Page 50
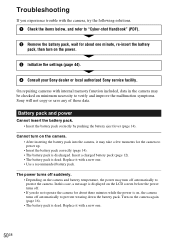
... discharged. Replace it may turn on the camera and battery temperature, the power may take a few moments for the camera to verify and improve the malfunction symptoms. Sony will not copy or save any of those data. On repairing cameras with the camera, try the following solutions. 1 Check the items below, and refer to prevent wearing down the battery pack. The power turns off automatically to "Cyber-shot Handbook" (PDF). 2 Remove the battery pack...
... discharged. Replace it may turn on the camera and battery temperature, the power may take a few moments for the camera to verify and improve the malfunction symptoms. Sony will not copy or save any of those data. On repairing cameras with the camera, try the following solutions. 1 Check the items below, and refer to prevent wearing down the battery pack. The power turns off automatically to "Cyber-shot Handbook" (PDF). 2 Remove the battery pack...
Operating Instructions
Page 51
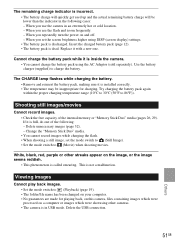
... battery pack, making sure it with a new one of the internal memory or "Memory Stick Duo" media (pages 26, 29). Change the "Memory Stick Duo" media. • You cannot record images while charging the flash. • When shooting a still image, set the screen brightness higher using DISP (screen display) settings. • The battery pack is discharged. Replace it is called smearing. When you set the mode switch to (Still Image). • Set the mode switch to (Playback) (page 19). • The folder/file...
... battery pack, making sure it with a new one of the internal memory or "Memory Stick Duo" media (pages 26, 29). Change the "Memory Stick Duo" media. • You cannot record images while charging the flash. • When shooting a still image, set the screen brightness higher using DISP (screen display) settings. • The battery pack is discharged. Replace it is called smearing. When you set the mode switch to (Still Image). • Set the mode switch to (Playback) (page 19). • The folder/file...
Cyber-shot® Handbook
Page 4
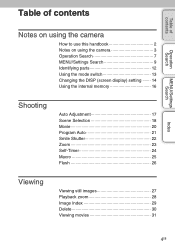
Table of contents Operation Search MENU/Settings Search Table of contents Notes on using the camera How to use this handbook 2 Notes on using the camera 3 Operation Search 7 MENU/Settings Search 9 Identifying parts 12 Using the mode switch 13 Changing the DISP (screen display) setting 14 Using the internal memory 16 Shooting Auto Adjustment 17 Scene Selection 18 Movie 20 Program Auto 21 Smile Shutter 22 Zoom 23 Self-Timer 24 Macro 25 Flash 26 Viewing Viewing still images 27 Playback zoom 28 Image Index 29 Delete 30 Viewing movies 31 Index 4GB
Table of contents Operation Search MENU/Settings Search Table of contents Notes on using the camera How to use this handbook 2 Notes on using the camera 3 Operation Search 7 MENU/Settings Search 9 Identifying parts 12 Using the mode switch 13 Changing the DISP (screen display) setting 14 Using the internal memory 16 Shooting Auto Adjustment 17 Scene Selection 18 Movie 20 Program Auto 21 Smile Shutter 22 Zoom 23 Self-Timer 24 Macro 25 Flash 26 Viewing Viewing still images 27 Playback zoom 28 Image Index 29 Delete 30 Viewing movies 31 Index 4GB
Cyber-shot® Handbook
Page 5
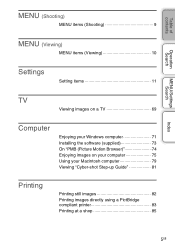
Table of contents Operation Search MENU/Settings Search MENU (Shooting) MENU items (Shooting 9 MENU (Viewing) MENU items (Viewing 10 Settings Setting items 11 TV Viewing images on a TV 69 Computer Enjoying your Windows computer 71 Installing the software (supplied 73 On "PMB (Picture Motion Browser 74 Enjoying images on your computer 75 Using your Macintosh computer 79 Viewing "Cyber-shot Step-up Guide 81 Printing Printing still images 82 Printing images directly using a PictBridge compliant printer 83 Printing at a shop 85 Index 5GB
Table of contents Operation Search MENU/Settings Search MENU (Shooting) MENU items (Shooting 9 MENU (Viewing) MENU items (Viewing 10 Settings Setting items 11 TV Viewing images on a TV 69 Computer Enjoying your Windows computer 71 Installing the software (supplied 73 On "PMB (Picture Motion Browser 74 Enjoying images on your computer 75 Using your Macintosh computer 79 Viewing "Cyber-shot Step-up Guide 81 Printing Printing still images 82 Printing images directly using a PictBridge compliant printer 83 Printing at a shop 85 Index 5GB
Cyber-shot® Handbook
Page 8
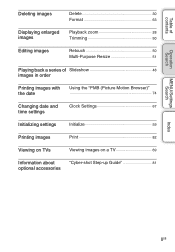
Table of contents Operation Search MENU/Settings Search Deleting images Delete 30 Format 63 Displaying enlarged images Editing images Playback zoom 28 Trimming 50 Retouch 50 Multi-Purpose Resize 51 Playing back a series of Slideshow 48 images in order Printing images with the date Using the "PMB (Picture Motion Browser)" 74 Changing date and time settings Clock Settings 67 Initializing settings Initialize 59 Printing images Print 82 Viewing on TVs Viewing images on a TV 69 Information about optional accessories "Cyber-shot Step-up Guide 81 Index 8GB
Table of contents Operation Search MENU/Settings Search Deleting images Delete 30 Format 63 Displaying enlarged images Editing images Playback zoom 28 Trimming 50 Retouch 50 Multi-Purpose Resize 51 Playing back a series of Slideshow 48 images in order Printing images with the date Using the "PMB (Picture Motion Browser)" 74 Changing date and time settings Clock Settings 67 Initializing settings Initialize 59 Printing images Print 82 Viewing on TVs Viewing images on a TV 69 Information about optional accessories "Cyber-shot Step-up Guide 81 Index 8GB
Cyber-shot® Handbook
Page 9
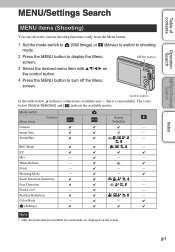
The icons below , indicates a function is unavailable. Red Eye Reduction Color Mode - (Settings) - - - - - - - - - - - - Table of contents Operation Search MENU/Settings Search MENU/Settings Search MENU items (Shooting) You can select the various shooting functions easily from the Menu button. 1 Set the mode switch to (Still Image) or (Movie) to switch to shooting mode. 2 Press the MENU button to turn off the Menu screen. White Balance - MENU button 3 Select the desired menu item with v/V/b/B on the screen. Mode switch Menu items Camera Image Size ...
The icons below , indicates a function is unavailable. Red Eye Reduction Color Mode - (Settings) - - - - - - - - - - - - Table of contents Operation Search MENU/Settings Search MENU/Settings Search MENU items (Shooting) You can select the various shooting functions easily from the Menu button. 1 Set the mode switch to (Still Image) or (Movie) to switch to shooting mode. 2 Press the MENU button to turn off the Menu screen. White Balance - MENU button 3 Select the desired menu item with v/V/b/B on the screen. Mode switch Menu items Camera Image Size ...

Cyber-shot® Handbook
Page 11
... the MENU button to display the Menu screen. 2 Select (Settings) with V on the control button, then press z on the center of the control button to display the setup screen. 3 Select each item with v/V/b/B, then press z. 4 Press the MENU button to turn off the Menu screen. MENU button Control button Categories Main Settings Shooting Settings Internal Memory Tool "Memory Stick" Tool Clock Settings Language Setting Items Beep USB Connect Video Out Initialize Grid Line Digital Zoom Auto Review Format Format Create REC.Folder Change REC.Folder Copy Clock Settings Language Setting Note •...
... the MENU button to display the Menu screen. 2 Select (Settings) with V on the control button, then press z on the center of the control button to display the setup screen. 3 Select each item with v/V/b/B, then press z. 4 Press the MENU button to turn off the Menu screen. MENU button Control button Categories Main Settings Shooting Settings Internal Memory Tool "Memory Stick" Tool Clock Settings Language Setting Items Beep USB Connect Video Out Initialize Grid Line Digital Zoom Auto Review Format Format Create REC.Folder Change REC.Folder Copy Clock Settings Language Setting Note •...
Cyber-shot® Handbook
Page 12
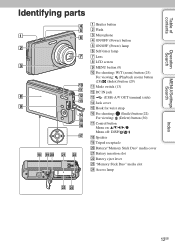
...contents Operation Search MENU/Settings Search Index Identifying parts A Shutter button B Flash C Microphone D ON/OFF (Power) button E ON/OFF (Power) lamp F Self-timer lamp G Lens H LCD screen I MENU button (9) J For shooting: W/T (zoom) button (23) For viewing: (Playback zoom) button (28)/ (Index) button (29) K Mode switch (13) L DC IN jack M (USB)·A/V OUT terminal (side) N Jack cover O Hook for wrist strap P For shooting: (Smile) button (22) For viewing: (Delete) button (30) Q Control button Menu on: v/V/b/B/z Menu off: DISP/ / / R Speaker S Tripod receptacle T Battery/"Memory Stick...
...contents Operation Search MENU/Settings Search Index Identifying parts A Shutter button B Flash C Microphone D ON/OFF (Power) button E ON/OFF (Power) lamp F Self-timer lamp G Lens H LCD screen I MENU button (9) J For shooting: W/T (zoom) button (23) For viewing: (Playback zoom) button (28)/ (Index) button (29) K Mode switch (13) L DC IN jack M (USB)·A/V OUT terminal (side) N Jack cover O Hook for wrist strap P For shooting: (Smile) button (22) For viewing: (Delete) button (30) Q Control button Menu on: v/V/b/B/z Menu off: DISP/ / / R Speaker S Tripod receptacle T Battery/"Memory Stick...
Cyber-shot® Handbook
Page 61
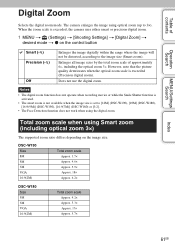
... digital zoom mode. Total zoom scale when using optical zoom (up to 3×). When the zoom scale is exceeded, the camera uses either smart or precision digital zoom. 1 MENU t (Settings) t [Shooting Settings] t [Digital Zoom] t desired mode t z on the image size. Does not use the digital zoom. Notes • The digital zoom function does not operate when recording movies or while the Smile Shutter function is activated. • The smart zoom is not available when the image size is exceeded (Precision digital zoom). However, note that the picture...
... digital zoom mode. Total zoom scale when using optical zoom (up to 3×). When the zoom scale is exceeded, the camera uses either smart or precision digital zoom. 1 MENU t (Settings) t [Shooting Settings] t [Digital Zoom] t desired mode t z on the image size. Does not use the digital zoom. Notes • The digital zoom function does not operate when recording movies or while the Smile Shutter function is activated. • The smart zoom is not available when the image size is exceeded (Precision digital zoom). However, note that the picture...
Cyber-shot® Handbook
Page 74
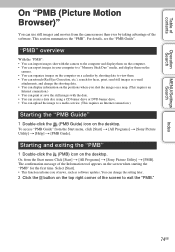
...". You can change the shooting date. • You can display information on the positions where you of the Information tool appears on the screen when starting the "PMB" for faces, print, send still images as software updates. Table of contents Operation Search MENU/Settings Search Index On "PMB (Picture Motion Browser)" You can use still images and movies from the camera more than ever by shooting date to view them on the camera. •...
...". You can change the shooting date. • You can display information on the positions where you of the Information tool appears on the screen when starting the "PMB" for faces, print, send still images as software updates. Table of contents Operation Search MENU/Settings Search Index On "PMB (Picture Motion Browser)" You can use still images and movies from the camera more than ever by shooting date to view them on the camera. •...
Cyber-shot® Handbook
Page 80
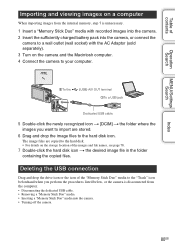
... Operation Search MENU/Settings Search Importing and viewing images on a computer When importing images from the computer. • Disconnecting the dedicated USB cable. • Removing a "Memory Stick Duo" media. • Inserting a "Memory Stick Duo" media into the camera, or connect the camera to the hard disk icon. The image files are stored. 6 Drag and drop the image files to a wall outlet (wall socket) with recorded images into the camera. 2 Insert the sufficiently charged battery pack into the camera...
... Operation Search MENU/Settings Search Importing and viewing images on a computer When importing images from the computer. • Disconnecting the dedicated USB cable. • Removing a "Memory Stick Duo" media. • Inserting a "Memory Stick Duo" media into the camera, or connect the camera to the hard disk icon. The image files are stored. 6 Drag and drop the image files to a wall outlet (wall socket) with recorded images into the camera. 2 Insert the sufficiently charged battery pack into the camera...
Cyber-shot® Handbook
Page 87
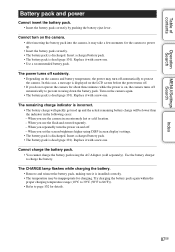
... remaining battery charge will quickly get used up . • Insert the battery pack correctly. • The battery pack is displayed on the LCD screen before the power turns off automatically to page 102 for charging. Table of contents Operation Search MENU/Settings Search Index Battery pack and power Cannot insert the battery pack. • Insert the battery pack correctly by pushing the battery eject lever. When you use the flash and zoom frequently...
... remaining battery charge will quickly get used up . • Insert the battery pack correctly. • The battery pack is displayed on the LCD screen before the power turns off automatically to page 102 for charging. Table of contents Operation Search MENU/Settings Search Index Battery pack and power Cannot insert the battery pack. • Insert the battery pack correctly by pushing the battery eject lever. When you use the flash and zoom frequently...

Cyber-shot® Handbook
Page 93
... connected using other cameras, or images modified with the printer. • If you still cannot print your images, disconnect the dedicated USB cable, turn the printer off and then on, then connect the dedicated USB cable again. • Movies cannot be inserted. For details, refer to whether the printer can be printed. is turned on the date-inserted part of the printer. Cannot operate the camera after connecting the printer to a printer that you use paper of a different size...
... connected using other cameras, or images modified with the printer. • If you still cannot print your images, disconnect the dedicated USB cable, turn the printer off and then on, then connect the dedicated USB cable again. • Movies cannot be inserted. For details, refer to whether the printer can be printed. is turned on the date-inserted part of the printer. Cannot operate the camera after connecting the printer to a printer that you use paper of a different size...

Cyber-shot® Handbook
Page 95
... section of remaining battery time left. Error formatting internal memory Error formatting "Memory Stick" • Format the media again (page 63). No memory space on "Memory Stick" No memory space on again. "Memory Stick" locked • You are still 5 to the LOCK position. For use or the type of contents Warning messages If the following messages appear, follow the instructions. Set the switch to cool • The camera temperature has risen. Operation Search MENU/Settings Search Index...
... section of remaining battery time left. Error formatting internal memory Error formatting "Memory Stick" • Format the media again (page 63). No memory space on "Memory Stick" No memory space on again. "Memory Stick" locked • You are still 5 to the LOCK position. For use or the type of contents Warning messages If the following messages appear, follow the instructions. Set the switch to cool • The camera temperature has risen. Operation Search MENU/Settings Search Index...
Marketing Specifications (Red Model)
Page 1
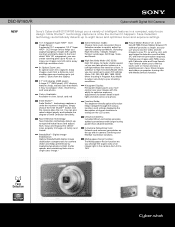
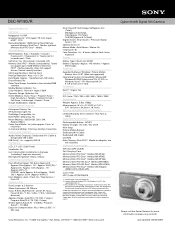
... adjusts flash, focus and exposure to deliver crisp, properly lit images of Smile Detection Sensitivity. Finding your images with PMB is easy with Media Services function. In addition to High Sensitivity Mode (ISO), you to filter by capturing two photos at high shutter speeds and combining them into a single clear image.³ Scene Selection modes: Choose from seven convenient Scene Selection modes to quickly adjust for a flash. DSC-W180/R Cyber-shot® Digital Still Camera NEW Sony's Cyber-shot® DSC-W180...
... adjusts flash, focus and exposure to deliver crisp, properly lit images of Smile Detection Sensitivity. Finding your images with PMB is easy with Media Services function. In addition to High Sensitivity Mode (ISO), you to filter by capturing two photos at high shutter speeds and combining them into a single clear image.³ Scene Selection modes: Choose from seven convenient Scene Selection modes to quickly adjust for a flash. DSC-W180/R Cyber-shot® Digital Still Camera NEW Sony's Cyber-shot® DSC-W180...
Marketing Specifications (Red Model)
Page 2
...) Power Save Mode: Yes (after approx. 3 min. Viewable area, measured diagonally. 2. Automatically fixed to "Off" during movie shooting mode. Sony, Cyber-shot, SteadyShot, Smile Shutter, and Super HAD are trademarks of inactivity) In-Camera Editing: Trimming, Red Eye Correction Inputs and Outputs Audio/Video Output(s): Dedicated A/V Cable & Designated USB Cable USB Port(s): Yes -supports USB 2.0 Hardware LCD: 2.7" LCD1 (230K Pixels) Viewfinder: No Lens Construction: 6 elements in part without written permission is prohibited. NP-BK1 Battery Charger...
...) Power Save Mode: Yes (after approx. 3 min. Viewable area, measured diagonally. 2. Automatically fixed to "Off" during movie shooting mode. Sony, Cyber-shot, SteadyShot, Smile Shutter, and Super HAD are trademarks of inactivity) In-Camera Editing: Trimming, Red Eye Correction Inputs and Outputs Audio/Video Output(s): Dedicated A/V Cable & Designated USB Cable USB Port(s): Yes -supports USB 2.0 Hardware LCD: 2.7" LCD1 (230K Pixels) Viewfinder: No Lens Construction: 6 elements in part without written permission is prohibited. NP-BK1 Battery Charger...


