Instruction Manual
Page 3
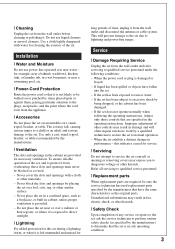
... use power-line operated sets near water - The set may result in fire, electric shock, or other similar surface. - Never cover the slots and openings with water for long periods of any service or repairs to the set, ask the service technician to perform routine safety checks (as the original parts. Do not place the set near a swimming pool, etc. [ Power-Cord Protection Route the power cord...
... use power-line operated sets near water - The set may result in fire, electric shock, or other similar surface. - Never cover the slots and openings with water for long periods of any service or repairs to the set, ask the service technician to perform routine safety checks (as the original parts. Do not place the set near a swimming pool, etc. [ Power-Cord Protection Route the power cord...

Instruction Manual
Page 5
... of the following measures: - The supplied interface cable must be used in a residential installation. [ Note: This equipment has been tested and found compliant with the limits set out in the EMC Directive for using connection cables shorter than 3 meters (9.8 feet). [ Attention The electromagnetic fields at the specific frequencies may influence the picture and sound of this product shall not be treated...
... of the following measures: - The supplied interface cable must be used in a residential installation. [ Note: This equipment has been tested and found compliant with the limits set out in the EMC Directive for using connection cables shorter than 3 meters (9.8 feet). [ Attention The electromagnetic fields at the specific frequencies may influence the picture and sound of this product shall not be treated...
Instruction Manual
Page 7
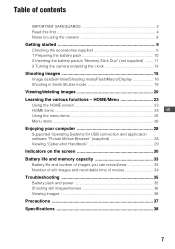
... computer 28 Supported Operating Systems for USB connection and application software "Picture Motion Browser" (supplied 28 Viewing "Cyber-shot Handbook 29 Indicators on /setting the clock 13 Shooting images 15 Image size/Self-timer/Shooting mode/Flash/Macro/Display 16 Shooting in Smile Shutter mode 19 Viewing/deleting images 20 Learning the various functions - Table of contents IMPORTANT SAFEGUARDS 2 Read this first 4 Notes on using the camera 8 Getting started 9 Checking the accessories supplied 9 1 Preparing the battery pack 10 2 Inserting the battery pack/a "Memory Stick Duo...
... computer 28 Supported Operating Systems for USB connection and application software "Picture Motion Browser" (supplied 28 Viewing "Cyber-shot Handbook 29 Indicators on /setting the clock 13 Shooting images 15 Image size/Self-timer/Shooting mode/Flash/Macro/Display 16 Shooting in Smile Shutter mode 19 Viewing/deleting images 20 Learning the various functions - Table of contents IMPORTANT SAFEGUARDS 2 Read this first 4 Notes on using the camera 8 Getting started 9 Checking the accessories supplied 9 1 Preparing the battery pack 10 2 Inserting the battery pack/a "Memory Stick Duo...

Instruction Manual
Page 8
... are operational for effective use . In some tiny black and/or bright dots (white, red, blue or green) may be repaired. • Do not aim the camera at the sun or other materials may be copyrighted. Leaving liquids on the LCD screen surface can harm the quality and cause a malfunction. [ On image data compatibility • The camera conforms with DCF (Design rule for Camera File system...
... are operational for effective use . In some tiny black and/or bright dots (white, red, blue or green) may be repaired. • Do not aim the camera at the sun or other materials may be copyrighted. Leaving liquids on the LCD screen surface can harm the quality and cause a malfunction. [ On image data compatibility • The camera conforms with DCF (Design rule for Camera File system...

Instruction Manual
Page 12
... charge indicator may cause damage to turn on the LCD screen. This may not be correct under certain circumstances. • The Clock Set screen appears when you turn on and check the remaining battery charge on the camera for the first time (page 13). [ To remove the battery pack/"Memory Stick Duo" Open the battery/"Memory Stick Duo" cover. Change the battery with this camera. 12 [ To check the remaining battery charge Press POWER button...
... charge indicator may cause damage to turn on the LCD screen. This may not be correct under certain circumstances. • The Clock Set screen appears when you turn on and check the remaining battery charge on the camera for the first time (page 13). [ To remove the battery pack/"Memory Stick Duo" Open the battery/"Memory Stick Duo" cover. Change the battery with this camera. 12 [ To check the remaining battery charge Press POWER button...
Instruction Manual
Page 16
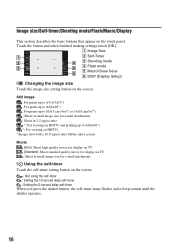
... screen. A Image Size B Self-Timer C Shooting mode D Flash mode E Macro/Close focus F DISP (Display Setup) [ Changing the image size Touch the image size setting button on the touch panel. Still image : For prints up to A3+(13×19") : For prints up to A4(8×10") : For prints up to A4(8×10") *: For viewing on the screen. : Not using the self-timer : Setting the 10-second delay self-timer : Setting the 2-second delay self-timer When you press the shutter button, the self-timer lamp flashes and a beep sounds until the shutter operates...
... screen. A Image Size B Self-Timer C Shooting mode D Flash mode E Macro/Close focus F DISP (Display Setup) [ Changing the image size Touch the image size setting button on the touch panel. Still image : For prints up to A3+(13×19") : For prints up to A4(8×10") : For prints up to A4(8×10") *: For viewing on the screen. : Not using the self-timer : Setting the 10-second delay self-timer : Setting the 2-second delay self-timer When you press the shutter button, the self-timer lamp flashes and a beep sounds until the shutter operates...

Instruction Manual
Page 18
.../32 to 7 7/8 inches) [ Changing the screen display Touch [DISP] on the screen to change to close-up. [ Flash (Selecting a flash mode for still images) Touch the flash mode setting button on the screen. : Flash Auto Flashes when there is insufficient light or backlight (default setting) : Flash forced on : Slow synchro (Flash forced on) The shutter speed is out of flash light. : Flash forced off [ Macro/Close focus enabled (Shooting close-up) Touch the Macro/Close focus mode setting button on the screen. : Auto The camera adjusts the focus automatically from [Normal...
.../32 to 7 7/8 inches) [ Changing the screen display Touch [DISP] on the screen to change to close-up. [ Flash (Selecting a flash mode for still images) Touch the flash mode setting button on the screen. : Flash Auto Flashes when there is insufficient light or backlight (default setting) : Flash forced on : Slow synchro (Flash forced on) The shutter speed is out of flash light. : Flash forced off [ Macro/Close focus enabled (Shooting close-up) Touch the Macro/Close focus mode setting button on the screen. : Auto The camera adjusts the focus automatically from [Normal...

Instruction Manual
Page 20
... playback zoom. • You can also enlarge the image by sliding the zoom (W/T) lever to select an image. Touch [Exit] to normal playback.) Volume control: Touch during movie playback, then adjust the volume with / . v/V/b/B: Adjusts the position. : Changes the zoom scale. : Turns v/V/b/B on the screen to the T side. To switch to the shooting mode, press (Playback) again. 2Touch (previous) / (next) on /off the volume control screen. Touch [HOME], then select [ Folder View] from (View Images) to play back some images shot using...
... playback zoom. • You can also enlarge the image by sliding the zoom (W/T) lever to select an image. Touch [Exit] to normal playback.) Volume control: Touch during movie playback, then adjust the volume with / . v/V/b/B: Adjusts the position. : Changes the zoom scale. : Turns v/V/b/B on the screen to the T side. To switch to the shooting mode, press (Playback) again. 2Touch (previous) / (next) on /off the volume control screen. Touch [HOME], then select [ Folder View] from (View Images) to play back some images shot using...
Instruction Manual
Page 36
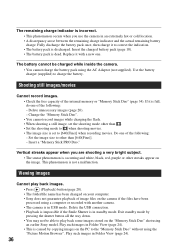
... charge indicator and the actual remaining battery charge. Set the image size to charge the battery. Delete the USB connection. • Playback is impossible if the Smile Shutter is not a malfunction. Play such images in Folder View (page 24). • This is caused by pressing the shutter button all the way down. • You may not be charged while inside the camera. • You cannot charge the battery pack using an earlier Sony model. Replace it to the "Memory...
... charge indicator and the actual remaining battery charge. Set the image size to charge the battery. Delete the USB connection. • Playback is impossible if the Smile Shutter is not a malfunction. Play such images in Folder View (page 24). • This is caused by pressing the shutter button all the way down. • You may not be charged while inside the camera. • You cannot charge the battery pack using an earlier Sony model. Replace it to the "Memory...

Cyber-shot® Handbook (Large File - 13.9 MB)
Page 28
...; Setting the zoom all the way to clearly shoot the background that is recommended. Shooting images (Auto Adjustment mode) Flash (Selecting a flash mode for still images) Touch the flash mode setting button on the screen. Normally, put the camera in a dark place to the W side is out of flash light. : Flash forced off the power or switch the mode to shoot at even closer distances than Macro recording. • The Auto Focus speed becomes slower when you shoot images in the Macro or Close focus mode. Macro...
...; Setting the zoom all the way to clearly shoot the background that is recommended. Shooting images (Auto Adjustment mode) Flash (Selecting a flash mode for still images) Touch the flash mode setting button on the screen. Normally, put the camera in a dark place to the W side is out of flash light. : Flash forced off the power or switch the mode to shoot at even closer distances than Macro recording. • The Auto Focus speed becomes slower when you shoot images in the Macro or Close focus mode. Macro...

Cyber-shot® Handbook (Large File - 13.9 MB)
Page 102
Starting the "PMB Guide" Double-click the (PMB Guide) icon on this camera. • You can retouch (Red Eye Correction, etc.), print, and send still images as software updates. Or, from the Start menu: Click [Start] t [All Programs] (in Windows 2000, [Programs]) t [Sony Picture Utility] t [Help] t [PMB Guide]. This function informs you of the software. "Picture Motion Browser" overview With the "Picture Motion Browser": • You can import images shot with the date. • You can create a data disc using a CD...
Starting the "PMB Guide" Double-click the (PMB Guide) icon on this camera. • You can retouch (Red Eye Correction, etc.), print, and send still images as software updates. Or, from the Start menu: Click [Start] t [All Programs] (in Windows 2000, [Programs]) t [Sony Picture Utility] t [Help] t [PMB Guide]. This function informs you of the software. "Picture Motion Browser" overview With the "Picture Motion Browser": • You can import images shot with the date. • You can create a data disc using a CD...

Cyber-shot® Handbook (Large File - 13.9 MB)
Page 109
... still images to be able to play back some images depending on the image size. • Sony does not guarantee playback of image files on the camera if the files have been processed using a computer or recorded with another camera. 1 Connect the camera to your computer 109 To export images to the camera without using the "Picture Motion Browser" • Images copied by the procedure below cannot be played back using Date View, Filter by exporting (copying) the image file...
... still images to be able to play back some images depending on the image size. • Sony does not guarantee playback of image files on the camera if the files have been processed using a computer or recorded with another camera. 1 Connect the camera to your computer 109 To export images to the camera without using the "Picture Motion Browser" • Images copied by the procedure below cannot be played back using Date View, Filter by exporting (copying) the image file...

Cyber-shot® Handbook (Large File - 13.9 MB)
Page 112
... files. To delete the USB connection Drag and drop the drive icon or the icon of your Macintosh computer, and insert the CD-ROM (supplied) into the camera after copying images from the internal memory. • Turning off the camera. To add/change the Music files that image file. http://www.sony.net/ 112 The installation of the images and file names, see page 106. 4 View images on this product and answers to open...
... files. To delete the USB connection Drag and drop the drive icon or the icon of your Macintosh computer, and insert the CD-ROM (supplied) into the camera after copying images from the internal memory. • Turning off the camera. To add/change the Music files that image file. http://www.sony.net/ 112 The installation of the images and file names, see page 106. 4 View images on this product and answers to open...

Cyber-shot® Handbook (Large File - 13.9 MB)
Page 126
... manufacturers other than Sony should contact those manufacturers. • If "Memory Stick PRO Duo" is not supported, connect the camera to play back movies during HD(1080i) output. The buttons and icons will momentarily disappear. Troubleshooting The buttons and icons no longer appear. • If you touch the top right of the screen during shooting, the buttons and icons will reappear when you take your TV (page...
... manufacturers other than Sony should contact those manufacturers. • If "Memory Stick PRO Duo" is not supported, connect the camera to play back movies during HD(1080i) output. The buttons and icons will momentarily disappear. Troubleshooting The buttons and icons no longer appear. • If you touch the top right of the screen during shooting, the buttons and icons will reappear when you take your TV (page...

Cyber-shot® Handbook (Large File - 13.9 MB)
Page 128
... the Date View. Copy to the operation manual of the printer. You have formatted a "Memory Stick Duo" by mistake. • All the data on the "Memory Stick Duo" is a "Memory Stick Duo" inserted in the internal memory to a "Memory Stick Duo". • The "Memory Stick Duo" is not available. 128 View these images using the "Picture Motion Browser" are not displayed in the correct direction. Internal memory Cannot playback or record images using the internal memory. • There is deleted...
... the Date View. Copy to the operation manual of the printer. You have formatted a "Memory Stick Duo" by mistake. • All the data on the "Memory Stick Duo" is a "Memory Stick Duo" inserted in the internal memory to a "Memory Stick Duo". • The "Memory Stick Duo" is not available. 128 View these images using the "Picture Motion Browser" are not displayed in the correct direction. Internal memory Cannot playback or record images using the internal memory. • There is deleted...
Cyber-shot® Handbook (Large File - 13.9 MB)
Page 131
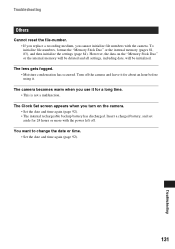
.... However, the data on the camera. • Set the date and time again (page 92). • The internal rechargeable backup battery has discharged. The camera becomes warm when you turn on the "Memory Stick Duo" or the internal memory will be deleted and all settings, including date, will be initialized. The Clock Set screen appears when you use it . To initialize file numbers, format the "Memory Stick Duo" or the internal memory (pages 81...
.... However, the data on the camera. • Set the date and time again (page 92). • The internal rechargeable backup battery has discharged. The camera becomes warm when you turn on the "Memory Stick Duo" or the internal memory will be deleted and all settings, including date, will be initialized. The Clock Set screen appears when you use it . To initialize file numbers, format the "Memory Stick Duo" or the internal memory (pages 81...

Cyber-shot® Handbook (Large File - 13.9 MB)
Page 132
... corrective actions a few times, the camera may flash even though there are still 5 to 10 minutes of remaining battery time left. For use or the type of battery pack, the indicator may need repair. Warning indicators and messages Self-diagnosis display If a code starting with a letter of the alphabet appears, the self-diagnosis function on the camera is low. Initialize the camera (page 84), then turn the power on the "Memory Stick Duo". Depending...
... corrective actions a few times, the camera may flash even though there are still 5 to 10 minutes of remaining battery time left. For use or the type of battery pack, the indicator may need repair. Warning indicators and messages Self-diagnosis display If a code starting with a letter of the alphabet appears, the self-diagnosis function on the camera is low. Initialize the camera (page 84), then turn the power on the "Memory Stick Duo". Depending...
Cyber-shot® Handbook (Large File - 13.9 MB)
Page 145
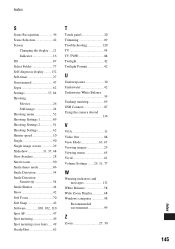
Index S Scene Recognition 56 Scene Selection 42 Screen Changing the display .....21 Indicator 16 SD 87 Select Folder 77 Self-diagnosis display.........132 Self-timer 27 Semi manual 47 Sepia 62 Settings 37, 84 Shooting Movies 26 Still image 24 Shooting menu 52 Shooting Settings 1 89 Shooting Settings 2 91 Shooting Settings 62 Shutter speed 10 Single 90 Single image screen 29 Slideshow 31, 37, 68 Slow Synchro 28 Smart zoom 90 Smile demo mode 86 Smile Detection 54 Smile Detection...
Index S Scene Recognition 56 Scene Selection 42 Screen Changing the display .....21 Indicator 16 SD 87 Select Folder 77 Self-diagnosis display.........132 Self-timer 27 Semi manual 47 Sepia 62 Settings 37, 84 Shooting Movies 26 Still image 24 Shooting menu 52 Shooting Settings 1 89 Shooting Settings 2 91 Shooting Settings 62 Shutter speed 10 Single 90 Single image screen 29 Slideshow 31, 37, 68 Slow Synchro 28 Smart zoom 90 Smile demo mode 86 Smile Detection 54 Smile Detection...
Marketing Specifications (Red Model)
Page 1
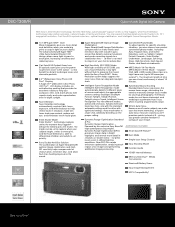
... your image. The Macro mode has not been eliminated, and enabling it accelerates Auto Focus when shooting at 9 precision points instead of time you greater creative freedom to 30 frames per second7 ). giving you can choose from several convenient photo modes, including Auto, Program Auto, and Scene Selections such as they happen6 without flash to a stabilization lens - DSC-T300/R Cyber-shot® Digital Still Camera With Sony's Smile Shutter technology, the DSC-T300 helps automatically6...
... your image. The Macro mode has not been eliminated, and enabling it accelerates Auto Focus when shooting at 9 precision points instead of time you greater creative freedom to 30 frames per second7 ). giving you can choose from several convenient photo modes, including Auto, Program Auto, and Scene Selections such as they happen6 without flash to a stabilization lens - DSC-T300/R Cyber-shot® Digital Still Camera With Sony's Smile Shutter technology, the DSC-T300 helps automatically6...
Marketing Specifications (Red Model)
Page 2
... Mutli-Use Connector USB Port(s): Yes (Supports USB 2.08 ) HD Output: Yes (1080i) with optional accessory Hardware LCD: 3.5"1 Widescreen (230K Pixels) Clear Photo LCD™ Plus screen Viewfinder: N/A Lens Construction: 12 Elements in Smile Shutter mode. 7. Available storage capacity may vary and a portion of up to five minutes long. DSC-T300/R Cyber-shot® Digital Still Camera Specifications General Megapixel: 10.1 MP Imaging Device: 1/2.3" Super HAD™ CCD Recording Media: 15MB internal Flash Memory, optional Memory...
... Mutli-Use Connector USB Port(s): Yes (Supports USB 2.08 ) HD Output: Yes (1080i) with optional accessory Hardware LCD: 3.5"1 Widescreen (230K Pixels) Clear Photo LCD™ Plus screen Viewfinder: N/A Lens Construction: 12 Elements in Smile Shutter mode. 7. Available storage capacity may vary and a portion of up to five minutes long. DSC-T300/R Cyber-shot® Digital Still Camera Specifications General Megapixel: 10.1 MP Imaging Device: 1/2.3" Super HAD™ CCD Recording Media: 15MB internal Flash Memory, optional Memory...


