Operating Instructions
Page 1
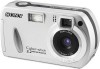
... the bottom. Model No. DSC-P32/P52/P72 Serial No. Record the serial number in the space provided below. Refer to these numbers whenever you call upon your computer ______ Troubleshooting Additional information Index Digital Still Camera Operating Instructions Before operating the ...unit, please read this product. Owner's Record The model and serial numbers are located on your Sony dealer regarding this manual thoroughly, and retain it ...
... the bottom. Model No. DSC-P32/P52/P72 Serial No. Record the serial number in the space provided below. Refer to these numbers whenever you call upon your computer ______ Troubleshooting Additional information Index Digital Still Camera Operating Instructions Before operating the ...unit, please read this product. Owner's Record The model and serial numbers are located on your Sony dealer regarding this manual thoroughly, and retain it ...

Operating Instructions
Page 3
...be used rechargeable batteries to the collection and recycling location nearest you should lose the fuse cover, please contact your authority to operate this digital camera. Notice on , the user is encouraged to try to correct the interference by ASTA or BSI to BS 1362, (i.e., marked with ...or television reception, which the receiver is no guarantee that any changes or modifications not expressly approved in this manual could void your nearest Sony service station. If you . If this equipment for the customers in the United Kingdom A moulded plug complying with or mark) must ...
...be used rechargeable batteries to the collection and recycling location nearest you should lose the fuse cover, please contact your authority to operate this digital camera. Notice on , the user is encouraged to try to correct the interference by ASTA or BSI to BS 1362, (i.e., marked with ...or television reception, which the receiver is no guarantee that any changes or modifications not expressly approved in this manual could void your nearest Sony service station. If you . If this equipment for the customers in the United Kingdom A moulded plug complying with or mark) must ...

Operating Instructions
Page 4
and Canada THIS CLASS B DIGITAL DEVICE COMPLIES WITH PART 15 OF THE FCC RULES AND THE CANADIAN ... a LCD finder) and lens • The LCD screen and the LCD finder are operational for the DSCP72 only) This camera is not a malfunction. The power zoom lens (for effective use. Please consult with other equipment on copyright Television programs, ...films, video tapes, and other equipment and playback of images recorded or edited with your camera on other materials may be compensated for long periods may cause malfunctions. • Do not press the LCD ...
and Canada THIS CLASS B DIGITAL DEVICE COMPLIES WITH PART 15 OF THE FCC RULES AND THE CANADIAN ... a LCD finder) and lens • The LCD screen and the LCD finder are operational for the DSCP72 only) This camera is not a malfunction. The power zoom lens (for effective use. Please consult with other equipment on copyright Television programs, ...films, video tapes, and other equipment and playback of images recorded or edited with your camera on other materials may be compensated for long periods may cause malfunctions. • Do not press the LCD ...
Operating Instructions
Page 5
... "MagicGate Memory Stick" are trademarks of Sony Corporation. • "Memory Stick Duo" and are trademarks of Sony Corporation. • "Memory Stick PRO" and are trademarks of Sony Corporation. • "MagicGate" and are trademarks of Sony Corporation. • Microsoft and Windows are of the DSC-P72 unless noted otherwise. The camera may cause irrecoverable damage to record...
... "MagicGate Memory Stick" are trademarks of Sony Corporation. • "Memory Stick Duo" and are trademarks of Sony Corporation. • "Memory Stick PRO" and are trademarks of Sony Corporation. • "MagicGate" and are trademarks of Sony Corporation. • Microsoft and Windows are of the DSC-P72 unless noted otherwise. The camera may cause irrecoverable damage to record...

Operating Instructions
Page 6
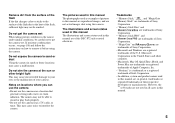
... Getting started Preparing batteries 14 Charging the batteries 14 Inserting the batteries 16 Using an external power source 19 Using your camera abroad 19 Turning your camera on a TV screen 38 Deleting still images Deleting images 40 Formatting a "Memory Stick 44 Before advanced operations How to...Stick 23 Setting the still image size 24 Image size and quality 25 Basic still image shooting - Clip Motion 54 Shooting in succession - Macro (DSC-P72 only 30 Using the self-timer 31 Selecting a flash mode 32 Shooting with audio files - Burst 2 56 Shooting still images for e-...
... Getting started Preparing batteries 14 Charging the batteries 14 Inserting the batteries 16 Using an external power source 19 Using your camera abroad 19 Turning your camera on a TV screen 38 Deleting still images Deleting images 40 Formatting a "Memory Stick 44 Before advanced operations How to...Stick 23 Setting the still image size 24 Image size and quality 25 Basic still image shooting - Clip Motion 54 Shooting in succession - Macro (DSC-P72 only 30 Using the self-timer 31 Selecting a flash mode 32 Shooting with audio files - Burst 2 56 Shooting still images for e-...
Operating Instructions
Page 7
... images - Trimming 63 Playing back successive images - For Windows users 78 Installing the USB driver 79 Installing "Image Transfer 80 Installing "ImageMixer 81 Connecting the camera to your computer 82 Copying images using "Image Transfer" 83 Changing "Image Transfer" settings .. 84 Copying images without using "Image Transfer 84 Viewing the images...
... images - Trimming 63 Playing back successive images - For Windows users 78 Installing the USB driver 79 Installing "Image Transfer 80 Installing "ImageMixer 81 Connecting the camera to your computer 82 Copying images using "Image Transfer" 83 Changing "Image Transfer" settings .. 84 Copying images without using "Image Transfer 84 Viewing the images...

Operating Instructions
Page 8
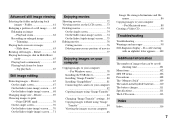
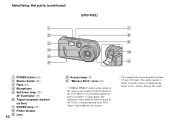
..., the maximum number of pixels recorded is a recommendation of the JCIA (Japan Camera Industry Association). • Use a tripod with a screw length of the CCD. Identifying the parts (DSC-P72) 1 7 2 8 3 9 4 q; 5 qa 6 A POWER button (20) B Shutter button (26) C Flash (32) D Microphone E Self-timer lamp (31)/ AF illuminator (33) F Tripod receptacle (bottom surface) G POWER lamp...
..., the maximum number of pixels recorded is a recommendation of the JCIA (Japan Camera Industry Association). • Use a tripod with a screw length of the CCD. Identifying the parts (DSC-P72) 1 7 2 8 3 9 4 q; 5 qa 6 A POWER button (20) B Shutter button (26) C Flash (32) D Microphone E Self-timer lamp (31)/ AF illuminator (33) F Tripod receptacle (bottom surface) G POWER lamp...
Operating Instructions
Page 10
You will be unable to firmly secure the camera to tripods having longer screws, and may damage the camera. Identifying the parts (continued) (DSC-P52) 1 7 2 8 3 9 4 q; 5 6 qa A POWER button (20) B Shutter button (26) C Flash (32) D Microphone E Self-timer lamp (31)/ AF illuminator (33) F Tripod receptacle (bottom surface) G POWER lamp (20) H ...
You will be unable to firmly secure the camera to tripods having longer screws, and may damage the camera. Identifying the parts (continued) (DSC-P52) 1 7 2 8 3 9 4 q; 5 6 qa A POWER button (20) B Shutter button (26) C Flash (32) D Microphone E Self-timer lamp (31)/ AF illuminator (33) F Tripod receptacle (bottom surface) G POWER lamp (20) H ...

Operating Instructions
Page 12
You will be unable to firmly secure the camera to tripods having longer screws, and may damage the camera. Identifying the parts (continued) (DSC-P32) 1 7 2 8 3 9 4 5 q; 6 qa A POWER button (20) B Shutter button (26) C Flash (32) D Finder window E Lens F Tripod receptacle (bottom surface) G POWER lamp (20) H Microphone I Self-timer lamp (31)/ 12 ...
You will be unable to firmly secure the camera to tripods having longer screws, and may damage the camera. Identifying the parts (continued) (DSC-P32) 1 7 2 8 3 9 4 5 q; 6 qa A POWER button (20) B Shutter button (26) C Flash (32) D Finder window E Lens F Tripod receptacle (bottom surface) G POWER lamp (20) H Microphone I Self-timer lamp (31)/ 12 ...
Operating Instructions
Page 14
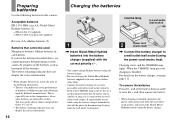
... are used Manganese batteries, lithium batteries, nicad batteries If you use the batteries described above, we cannot guarantee full performance of the camera by disconnecting the plug from the AC power source (mains) as long as brownout of the battery down in order to shoot in this...8722;. • You cannot charge alkaline batteries using the battery charger. • Be sure to charge the Nickel-Metal Hydride batteries supplied with your camera before using them. • Connect the battery charger to an easily accessible wall outlet (wall socket) close by. • Even if the CHARGE ...
... are used Manganese batteries, lithium batteries, nicad batteries If you use the batteries described above, we cannot guarantee full performance of the camera by disconnecting the plug from the AC power source (mains) as long as brownout of the battery down in order to shoot in this...8722;. • You cannot charge alkaline batteries using the battery charger. • Be sure to charge the Nickel-Metal Hydride batteries supplied with your camera before using them. • Connect the battery charger to an easily accessible wall outlet (wall socket) close by. • Even if the CHARGE ...
Operating Instructions
Page 15
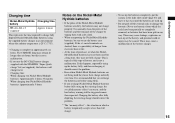
..., repeatedly using up the battery fully, and then recharging it that have been split in any way. Never use up the batteries completely, put the camera in the slide show mode (page 63) and leave it , should correct the problem. * The "memory effect" - This is typical of this is not a malfunction...
..., repeatedly using up the battery fully, and then recharging it that have been split in any way. Never use up the batteries completely, put the camera in the slide show mode (page 63) and leave it , should correct the problem. * The "memory effect" - This is typical of this is not a malfunction...
Operating Instructions
Page 16
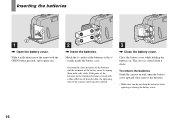
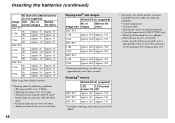
... batteries in the direction of the battery cover by wiping them with a film of dirt or oil from the skin, the operating time of the camera can be greatly reduced. 1 3 , Close the battery cover. Inserting the batteries 2 1 2 1 , Open the battery cover. Slide it clicks. To remove the ...batteries Stand the camera on end, open the battery cover upward, then remove the batteries. • Make sure you do not drop the batteries when opening or closing the ...
... batteries in the direction of the battery cover by wiping them with a film of dirt or oil from the skin, the operating time of the camera can be greatly reduced. 1 3 , Close the battery cover. Inserting the batteries 2 1 2 1 , Open the battery cover. Slide it clicks. To remove the ...batteries Stand the camera on end, open the battery cover upward, then remove the batteries. • Make sure you do not drop the batteries when opening or closing the ...
Operating Instructions
Page 17
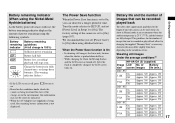
...used , the remaining battery information is 25°C (77°F), and the batteries are fully charged. Change the batteries for the length of time the camera can be correctly indicated. • When the AC Adaptor (not supplied) is being used when you can be recorded or played back allow for a longer... Approx. 250 VGA On Off Approx. 300 Approx. 150 Approx. 500 Approx. 250 DSC-P52 3.1M On Off Approx. 320 Approx. 160 Approx. 540 Approx. 270 VGA On Off Approx. 320 Approx. 160 Approx. 540 Approx. 270 DSC-P32 3.1M On Off Approx. 320 Approx. 160 Approx. 540 Approx. 270 VGA On ...
...used , the remaining battery information is 25°C (77°F), and the batteries are fully charged. Change the batteries for the length of time the camera can be correctly indicated. • When the AC Adaptor (not supplied) is being used when you can be recorded or played back allow for a longer... Approx. 250 VGA On Off Approx. 300 Approx. 150 Approx. 500 Approx. 250 DSC-P52 3.1M On Off Approx. 320 Approx. 160 Approx. 540 Approx. 270 VGA On Off Approx. 320 Approx. 160 Approx. 540 Approx. 270 DSC-P32 3.1M On Off Approx. 320 Approx. 160 Approx. 540 Approx. 270 VGA On ...
Operating Instructions
Page 18
...VGA Approx. 5400 Approx. 270 DSC-P52 3.1M Approx. 6000 Approx. 300 VGA Approx. 6000 Approx. 300 DSC-P32 3.1M Approx. 6000 Approx. 300 VGA Approx. 6000 Approx. 300 2) Showing single images in order, one image every 30 seconds. - Turning the camera on and off frequently. - ...not supplied) Image LCD No. At low temperatures. - Using the zoom heavily (DSC-P72/P52 only) - After using Sony alkaline batteries 1) Shooting under the following conditions: - of Battery size screen images life (min.) DSC-P72 3.1M On Off Approx. 70 Approx. 35 Approx. 130 Approx. 65...
...VGA Approx. 5400 Approx. 270 DSC-P52 3.1M Approx. 6000 Approx. 300 VGA Approx. 6000 Approx. 300 DSC-P32 3.1M Approx. 6000 Approx. 300 VGA Approx. 6000 Approx. 300 2) Showing single images in order, one image every 30 seconds. - Turning the camera on and off frequently. - ...not supplied) Image LCD No. At low temperatures. - Using the zoom heavily (DSC-P72/P52 only) - After using Sony alkaline batteries 1) Shooting under the following conditions: - of Battery size screen images life (min.) DSC-P72 3.1M On Off Approx. 70 Approx. 35 Approx. 130 Approx. 65...

Operating Instructions
Page 19
... have finished using the adaptor, immediately shut off . Connect the plug with the v mark facing toward the LCD screen. • Be sure to use your camera in any country or area with this may cause a malfunction. 19 Other AC adaptors cannot be used with the supplied battery charger or AC Adaptor... the jack cover, then connect the AC-LS5 AC Adaptor (not supplied) to the DC IN jack of the wall outlet (wall socket) [b]. Using your camera abroad Power sources You can use the AC-LS5 AC Adaptor. BC-CS2A/CS2B • Do not use an electrical transformer (travel converter), as it...
... have finished using the adaptor, immediately shut off . Connect the plug with the v mark facing toward the LCD screen. • Be sure to use your camera in any country or area with this may cause a malfunction. 19 Other AC adaptors cannot be used with the supplied battery charger or AC Adaptor... the jack cover, then connect the AC-LS5 AC Adaptor (not supplied) to the DC IN jack of the wall outlet (wall socket) [b]. Using your camera abroad Power sources You can use the AC-LS5 AC Adaptor. BC-CS2A/CS2B • Do not use an electrical transformer (travel converter), as it...

Operating Instructions
Page 20
...set to or , the lens begins to make the changes. This may cause a malfunction (DSC-P72 only). • When you turn on with the lens portion pulled out. However, in green and the power is on the camera. For each item, press v/V/b/B to select the desired value, then press z or b/B to... move (DSC-P72 only). Turning your camera on/off POWER lamp POWER POWER , Press POWER to turn on . The POWER lamp lights...
...set to or , the lens begins to make the changes. This may cause a malfunction (DSC-P72 only). • When you turn on with the lens portion pulled out. However, in green and the power is on the camera. For each item, press v/V/b/B to select the desired value, then press z or b/B to... move (DSC-P72 only). Turning your camera on/off POWER lamp POWER POWER , Press POWER to turn on . The POWER lamp lights...
Operating Instructions
Page 21
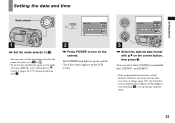
Clock Set Y/M/D M/D/Y D/M/Y 2003 / OK 1/ 1 12 : 00 OK AM Cancel 3 , Select the desired date format with v/V on the camera. You can carry out this happens, start from [Y/M/D] (year/month/ day), [M/D/Y], and [D/M/Y]. • If the rechargeable button battery, which provides the power for saving the ...
Clock Set Y/M/D M/D/Y D/M/Y 2003 / OK 1/ 1 12 : 00 OK AM Cancel 3 , Select the desired date format with v/V on the camera. You can carry out this happens, start from [Y/M/D] (year/month/ day), [M/D/Y], and [D/M/Y]. • If the rechargeable button battery, which provides the power for saving the ...

Operating Instructions
Page 23
... the "Memory Stick." Slide the cover in the illustration. • Whenever you do not insert it out. • Whenever the access lamp is lit, the camera is recording or reading out an image.
... the "Memory Stick." Slide the cover in the illustration. • Whenever you do not insert it out. • Whenever the access lamp is lit, the camera is recording or reading out an image.

Operating Instructions
Page 24
The Image Size setup item appears. • For more information about the image size, see page 25. 3 , Select the desired image size with v/V on the camera, then press (Image Size). After the setting is set. The image size is completed, press (Image Size). Setting the still image size Mode selector 1 , Set ... on the control button. The Image Size setup item disappears from the screen. • The image size value selected here is preserved even when the camera is turned off. 24
The Image Size setup item appears. • For more information about the image size, see page 25. 3 , Select the desired image size with v/V on the camera, then press (Image Size). After the setting is set. The image size is completed, press (Image Size). Setting the still image size Mode selector 1 , Set ... on the control button. The Image Size setup item disappears from the screen. • The image size value selected here is preserved even when the camera is turned off. 24

Operating Instructions
Page 25
...can be saved in a "Memory Stick"2) The number of images that can be saved in other Sony devices are played back, the image size indication may be saved in Fine (Standard)3) mode are viewed on ...the LCD screen of the camera, they all look the same size. • Number of shooting images can differ from among the five... about the image quality mode, see page 46. • "3.2MEGA PIXELS" shown on the surface of the camera is the number of effective pixels of the CCD. When you want to preserve your home page 1) This option...
...can be saved in a "Memory Stick"2) The number of images that can be saved in other Sony devices are played back, the image size indication may be saved in Fine (Standard)3) mode are viewed on ...the LCD screen of the camera, they all look the same size. • Number of shooting images can differ from among the five... about the image quality mode, see page 46. • "3.2MEGA PIXELS" shown on the surface of the camera is the number of effective pixels of the CCD. When you want to preserve your home page 1) This option...


