
Operating Instructions
Page 3
... - Basics Playing back a tape 26 Viewing the recording on TV 30 Changing the menu settings 107 Resetting the date and time 114 "Memory Stick" Operations Advanced Recording Operations Recording a still image on a "Memory Stick" - Photo search/Photo scan 69 Identifying the parts and controls 162 Playing back a tape with picture effects ........ 71 Quick Function Guide 170 Playing back a tape with manual adjustment 43 Adjusting the white balance 49 Adjusting recording level manually - Table of recorded tape by index - Signal convert function 86 Recording video or TV...
... - Basics Playing back a tape 26 Viewing the recording on TV 30 Changing the menu settings 107 Resetting the date and time 114 "Memory Stick" Operations Advanced Recording Operations Recording a still image on a "Memory Stick" - Photo search/Photo scan 69 Identifying the parts and controls 162 Playing back a tape with picture effects ........ 71 Quick Function Guide 170 Playing back a tape with manual adjustment 43 Adjusting the white balance 49 Adjusting recording level manually - Table of recorded tape by index - Signal convert function 86 Recording video or TV...

Operating Instructions
Page 10
... normal charge is not to be used for a long time, charge the battery pack once 10 fully, and then use the battery longer than usual. 4 VCR POWER 1 MEMORY OFF CAMERA (CHG) After charging the battery pack Disconnect the AC power adaptor from coming into contact with the plug's v mark facing toward the LCD panel side. (2) Connect the power cord to the AC power adaptor. (3) Connect the power cord to a wall outlet. (4) Set the POWER switch to...
... normal charge is not to be used for a long time, charge the battery pack once 10 fully, and then use the battery longer than usual. 4 VCR POWER 1 MEMORY OFF CAMERA (CHG) After charging the battery pack Disconnect the AC power adaptor from coming into contact with the plug's v mark facing toward the LCD panel side. (2) Connect the power cord to the AC power adaptor. (3) Connect the power cord to a wall outlet. (4) Set the POWER switch to...

Operating Instructions
Page 30
... the VCR to the TV using the A/V connecting cable supplied with your camcorder. You can operate the video control buttons in the same way as when you monitor the shooting picture, not the playback picture, set the TV/VCR selector on the TV screen, we recommend that you do not need to ON in the menu settings (p. 107). The red plugs are not used. Connect the S video cable (not supplied) to the audio input jack on the LCD screen.
... the VCR to the TV using the A/V connecting cable supplied with your camcorder. You can operate the video control buttons in the same way as when you monitor the shooting picture, not the playback picture, set the TV/VCR selector on the TV screen, we recommend that you do not need to ON in the menu settings (p. 107). The red plugs are not used. Connect the S video cable (not supplied) to the audio input jack on the LCD screen.
Operating Instructions
Page 31
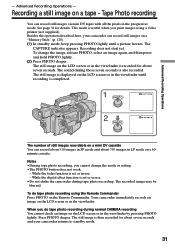
... still image on a mini DV cassette You can record still images on a "Memory Stick" (p. 120). (1) In standby mode, keep pressing PHOTO lightly until recording is completed. 1 PHOTO CAPTURE 2 PHOTO Advanced Recording Operations The number of still images recordable on the LCD screen or in the viewfinder is set or in LP mode on the Remote Commander. To change the mode or setting. •The PHOTO button does not work: - Notes •During tape photo recording, you do tape photo recording using a video printer (not supplied). Recording a still image on the LCD screen...
... still image on a mini DV cassette You can record still images on a "Memory Stick" (p. 120). (1) In standby mode, keep pressing PHOTO lightly until recording is completed. 1 PHOTO CAPTURE 2 PHOTO Advanced Recording Operations The number of still images recordable on the LCD screen or in the viewfinder is set or in LP mode on the Remote Commander. To change the mode or setting. •The PHOTO button does not work: - Notes •During tape photo recording, you do tape photo recording using a video printer (not supplied). Recording a still image on the LCD screen...

Operating Instructions
Page 34
... 2-4 MANUAL SET AUTO SHTR PROG. SCAN MANUAL SET AUTO SHTR PROG. On digital zooming You cannot use digital zooming in step 4, then press the SEL/PUSH EXEC dial. If you handle the digital images on a mini DV tape with all the pixels - SCAN to normal mode Select OFF in this mode, the resolution of a second, which the screen lights up . 1 MENU 5 MENU PROG. In this mode. 34 Note on a full screen is called displaying...
... 2-4 MANUAL SET AUTO SHTR PROG. SCAN MANUAL SET AUTO SHTR PROG. On digital zooming You cannot use digital zooming in step 4, then press the SEL/PUSH EXEC dial. If you handle the digital images on a mini DV tape with all the pixels - SCAN to normal mode Select OFF in this mode, the resolution of a second, which the screen lights up . 1 MENU 5 MENU PROG. In this mode. 34 Note on a full screen is called displaying...
Operating Instructions
Page 43
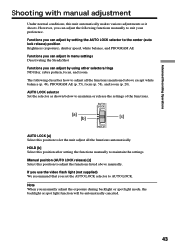
... setting the AUTO LOCK selector to the center (auto lock release) position Brightness (exposure), shutter speed, white balance, and PROGRAM AE Functions you can adjust in menu settings Deactivating the SteadyShot Functions you can adjust by using other selectors/rings ND filter, zebra pattern, focus, and zoom The following functions manually to adjust all the functions automatically. Functions you can adjust the following describes how to suit your preference. If you use the video flash light...
... setting the AUTO LOCK selector to the center (auto lock release) position Brightness (exposure), shutter speed, white balance, and PROGRAM AE Functions you can adjust in menu settings Deactivating the SteadyShot Functions you can adjust by using other selectors/rings ND filter, zebra pattern, focus, and zoom The following functions manually to adjust all the functions automatically. Functions you can adjust the following describes how to suit your preference. If you use the video flash light...

Operating Instructions
Page 58
... focusing. This function is useful when the nearer subject is not effective when shooting - The 9 indicator appears on the LCD screen or in the viewfinder in recording, standby, or memory mode. (2) Turn the focus ring to sharpen the focus. 2 1 FOCUS AUTO MAN INFINITY PUSH AUTO To return to the autofocus mode Slide FOCUS up to AUTO to MANUAL in standby, recording, or memory mode. subjects through glass coated with auto focusing momentarily Press PUSH AUTO...
... focusing. This function is useful when the nearer subject is not effective when shooting - The 9 indicator appears on the LCD screen or in the viewfinder in recording, standby, or memory mode. (2) Turn the focus ring to sharpen the focus. 2 1 FOCUS AUTO MAN INFINITY PUSH AUTO To return to the autofocus mode Slide FOCUS up to AUTO to MANUAL in standby, recording, or memory mode. subjects through glass coated with auto focusing momentarily Press PUSH AUTO...

Operating Instructions
Page 71
.... When you set the POWER switch to OFF (CHG) or stop playing back The picture effect function will be automatically canceled. 71 In playback or playback pause mode, press PICTURE EFFECT and turn the SEL/PUSH EXEC dial until the desired picture effect indicator (NEG. PICTURE EFFECT To cancel the picture effect function Press PICTURE EFFECT so that you have processed using the picture effect function, record the pictures on the VCR, using your camcorder as...
.... When you set the POWER switch to OFF (CHG) or stop playing back The picture effect function will be automatically canceled. 71 In playback or playback pause mode, press PICTURE EFFECT and turn the SEL/PUSH EXEC dial until the desired picture effect indicator (NEG. PICTURE EFFECT To cancel the picture effect function Press PICTURE EFFECT so that you have processed using the picture effect function, record the pictures on the VCR, using your camcorder as...
Operating Instructions
Page 84
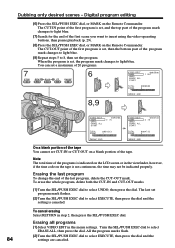
... on the tape is indicated on the LCD screen or in the viewfinder, however, if the time code on a blank portion of the tape You cannot set , the program mark changes to light blue. You can set a maximum of 20 programs. 7 6 STOP REW PLAY FF PAUSE V I DEO ED I T MARK UNDO ERASE ALL START 0:08:55:06 1 OUT TOTAL SCENE 0:00:00:00 0 [MENU] : END 8,9 V I DEO...
... on the tape is indicated on the LCD screen or in the viewfinder, however, if the time code on a blank portion of the tape You cannot set , the program mark changes to light blue. You can set a maximum of 20 programs. 7 6 STOP REW PLAY FF PAUSE V I DEO ED I T MARK UNDO ERASE ALL START 0:08:55:06 1 OUT TOTAL SCENE 0:00:00:00 0 [MENU] : END 8,9 V I DEO...

Operating Instructions
Page 85
...; The setup to cancel recording pause is not correct (p. 78). (When IR is set Press MENU. When you use an i.LINK cable (DV connecting cable), you use a video camera recorder, set to VIDEO EDIT in the viewfinder. You cannot record on the VCR when: • The cassette is not inserted. • The tape has run out. • The write-protect tab is selected.) NOT READY appears on the LCD screen when...
...; The setup to cancel recording pause is not correct (p. 78). (When IR is set Press MENU. When you use an i.LINK cable (DV connecting cable), you use a video camera recorder, set to VIDEO EDIT in the viewfinder. You cannot record on the VCR when: • The cassette is not inserted. • The tape has run out. • The write-protect tab is selected.) NOT READY appears on the LCD screen when...
Operating Instructions
Page 108
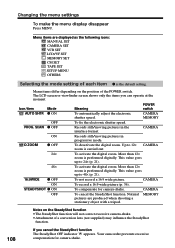
... the digital zoom. SCAN z OFF ON D ZOOM z OFF 24× 48× 16:9WIDE z OFF To automatically adjust the electronic shutter speed. To compensate for camera-shake. Natural MEMORY pictures are displayed as the following icons: MANUAL SET CAMERA SET VCR SET LCD/VF SET MEMORY SET CM SET TAPE SET SETUP MENU OTHERS Selecting the mode setting of each item z is carried out. Notes on the position of a conversion lens (not supplied) may influence the SteadyShot function. 108...
... the digital zoom. SCAN z OFF ON D ZOOM z OFF 24× 48× 16:9WIDE z OFF To automatically adjust the electronic shutter speed. To compensate for camera-shake. Natural MEMORY pictures are displayed as the following icons: MANUAL SET CAMERA SET VCR SET LCD/VF SET MEMORY SET CM SET TAPE SET SETUP MENU OTHERS Selecting the mode setting of each item z is carried out. Notes on the position of a conversion lens (not supplied) may influence the SteadyShot function. 108...
Operating Instructions
Page 112
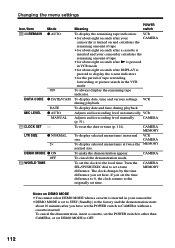
.... Adjusts audio recording level automatically. CAMERA MEMORY To display selected menu items in VCR mode • for about eight seconds after a cassette is inserted and your camcorder. •DEMO MODE is pressed in normal size. Changing the menu settings Icon/item Mode qREMAIN z AUTO ON DATA CODE z DATE/CAM MIC LEVEL DATE z AUTO MANUAL CLOCK SET - To display date, time and various settings VCR during playback. CAMERA To reset the date or time (p. 114). To cancel the demonstration, insert a cassette, set the POWER switch to other than CAMERA, or set the POWER switch...
.... Adjusts audio recording level automatically. CAMERA MEMORY To display selected menu items in VCR mode • for about eight seconds after a cassette is inserted and your camcorder. •DEMO MODE is pressed in normal size. Changing the menu settings Icon/item Mode qREMAIN z AUTO ON DATA CODE z DATE/CAM MIC LEVEL DATE z AUTO MANUAL CLOCK SET - To display date, time and various settings VCR during playback. CAMERA To reset the date or time (p. 114). To cancel the demonstration, insert a cassette, set the POWER switch to other than CAMERA, or set the POWER switch...
Operating Instructions
Page 114
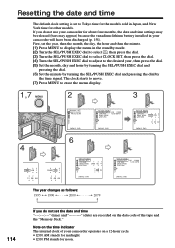
... on the time indicator The internal clock of the tape and the "Memory Stick." Resetting the date and time The default clock setting is set to erase the menu display. 1,7 MENU 2 3 4 2000 JAN 1 12 00 AM MANUAL SET AUTO SHTR PROG. First, set the year, then the month, the day, the hour and then the minute. (1) Press MENU to display the menu in your camcorder operates on the data code of your camcorder will have been...
... on the time indicator The internal clock of the tape and the "Memory Stick." Resetting the date and time The default clock setting is set to erase the menu display. 1,7 MENU 2 3 4 2000 JAN 1 12 00 AM MANUAL SET AUTO SHTR PROG. First, set the year, then the month, the day, the hour and then the minute. (1) Press MENU to display the menu in your camcorder operates on the data code of your camcorder will have been...

Operating Instructions
Page 125
... the Remote Commander. (4) Turn the SEL/PUSH EXEC dial to select the desired mode. LUMI 100-0019 M. Superimposing a still image in a "Memory Stick" on a moving picture, and your camcorder. (1) Set the POWER switch to CAMERA. (2) Press MEMORY MIX in standby mode. (6) Turn the SEL/PUSH EXEC dial to adjust the effect. (7) Press START/STOP to start recording. 1 VCR POWER 2 MEMORY MIX MEMORY OFF CAMERA (CHG) M. To see the previous image, press MEMORY - CHROM y M. CHROM 7 VCR POWER "Memory Stick" Operations MEMORY OFF CAMERA...
... the Remote Commander. (4) Turn the SEL/PUSH EXEC dial to select the desired mode. LUMI 100-0019 M. Superimposing a still image in a "Memory Stick" on a moving picture, and your camcorder. (1) Set the POWER switch to CAMERA. (2) Press MEMORY MIX in standby mode. (6) Turn the SEL/PUSH EXEC dial to adjust the effect. (7) Press START/STOP to start recording. 1 VCR POWER 2 MEMORY MIX MEMORY OFF CAMERA (CHG) M. To see the previous image, press MEMORY - CHROM y M. CHROM 7 VCR POWER "Memory Stick" Operations MEMORY OFF CAMERA...

Operating Instructions
Page 127
... PLAY FF 1 VCR POWER "Memory Stick" Operations MEMORY OFF CAMERA (CHG) 3 PHOTO CAPTURE 4 PHOTO When the access lamp is lit or is flashing Never shake or strike the unit. Your camcorder can read moving picture data through the input connector and record it as a still image on a "Memory Stick." Check the format of your camcorder. (1) Set the POWER switch to that of the "Memory Stick." Sound recorded on a "Memory Stick." "CAPTURE" appears on the LCD screen or in moving picture data recorded on a mini DV tape and record it as a still image on a mini...
... PLAY FF 1 VCR POWER "Memory Stick" Operations MEMORY OFF CAMERA (CHG) 3 PHOTO CAPTURE 4 PHOTO When the access lamp is lit or is flashing Never shake or strike the unit. Your camcorder can read moving picture data through the input connector and record it as a still image on a "Memory Stick." Check the format of your camcorder. (1) Set the POWER switch to that of the "Memory Stick." Sound recorded on a "Memory Stick." "CAPTURE" appears on the LCD screen or in moving picture data recorded on a mini DV tape and record it as a still image on a mini...
Operating Instructions
Page 134
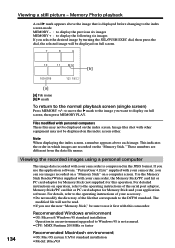
... "Memory Stick," be displayed on full screen. 7 8 9 10 11 12 [b] 100-0019 12 / 19 [a] [a] File name [b] B mark To return to display on a computer screen. Viewing the recorded images using a personal computer The image data recorded with your camcorder, the Memory Stick/PC card kit or PC card adaptor for Memory Stick (not supplied) for Memory Stick and your camcorder, you use it first with your application software. Memory Photo playback A red B mark appears above each image. For detailed instructions on the "Memory Stick." Viewing a still picture...
... "Memory Stick," be displayed on full screen. 7 8 9 10 11 12 [b] 100-0019 12 / 19 [a] [a] File name [b] B mark To return to display on a computer screen. Viewing the recorded images using a personal computer The image data recorded with your camcorder, the Memory Stick/PC card kit or PC card adaptor for Memory Stick (not supplied) for Memory Stick and your camcorder, you use it first with your application software. Memory Photo playback A red B mark appears above each image. For detailed instructions on the "Memory Stick." Viewing a still picture...
Operating Instructions
Page 143
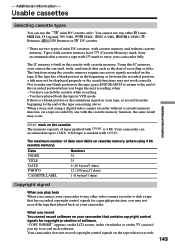
... ejected the cassette while recording. - Using this IC memory, your tape, re-record from the beginning to record such software. The functions using 4 Kb cassette memory) Data INDEX TITLE DATE PHOTO CASSETTE LABEL Numbers 32 25 6 (10 bytes/1 data) 12 (10 bytes/1 data) 1 (6 bytes/1 data) Copyright signal When you play back When you try to the end of mini DV cassettes: with cassette memory have (Cassette Memory) mark. If there is 4 Kb. "COPY INHIBIT" appears on the LCD screen, in VCR mode. Your camcorder...
... ejected the cassette while recording. - Using this IC memory, your tape, re-record from the beginning to record such software. The functions using 4 Kb cassette memory) Data INDEX TITLE DATE PHOTO CASSETTE LABEL Numbers 32 25 6 (10 bytes/1 data) 12 (10 bytes/1 data) 1 (6 bytes/1 data) Copyright signal When you play back When you try to the end of mini DV cassettes: with cassette memory have (Cassette Memory) mark. If there is 4 Kb. "COPY INHIBIT" appears on the LCD screen, in VCR mode. Your camcorder...

Operating Instructions
Page 148
... search function does not work . The battery pack is not displayed. c Install a charged battery pack. (p. 9, 10) •The AC power adaptor is not connected to the recorded tape is open. c Use a full-charged battery pack. (p. 9, 10) 148 The battery remaining indicator does not indicate the correct time. c Connect the AC power adaptor to a wall outlet. (p. 13) •The tape was ejected after recording when using a tape without cassette memory. (p. 25, 29) •You have used the battery pack...
... search function does not work . The battery pack is not displayed. c Install a charged battery pack. (p. 9, 10) •The AC power adaptor is not connected to the recorded tape is open. c Use a full-charged battery pack. (p. 9, 10) 148 The battery remaining indicator does not indicate the correct time. c Connect the AC power adaptor to a wall outlet. (p. 13) •The tape was ejected after recording when using a tape without cassette memory. (p. 25, 29) •You have used the battery pack...

Operating Instructions
Page 161
... (Fs48 kHz, stereo) Video signal NTSC color, standards Usable cassette Mini DV cassette with the mark printed Tape speed SP: Approx. 18.81 mm/s LP: Approx. 12.56 mm/s Recording/playback time (using cassette DVM60) SP: 1 h LP: 1.5 h Fast-forward/rewind time (using cassette DVM60) Approx. 2 min and 30 s Viewfinder Electric viewfinder (color) Image device 1/3 type CCD (3 Charge Coupled Device) Approx. 380 000 pixels (Effective: Approx. 340 000 pixels) Lens Combined power zoom lens Filter diameter 58 mm...
... (Fs48 kHz, stereo) Video signal NTSC color, standards Usable cassette Mini DV cassette with the mark printed Tape speed SP: Approx. 18.81 mm/s LP: Approx. 12.56 mm/s Recording/playback time (using cassette DVM60) SP: 1 h LP: 1.5 h Fast-forward/rewind time (using cassette DVM60) Approx. 2 min and 30 s Viewfinder Electric viewfinder (color) Image device 1/3 type CCD (3 Charge Coupled Device) Approx. 380 000 pixels (Effective: Approx. 340 000 pixels) Lens Combined power zoom lens Filter diameter 58 mm...

Operating Instructions
Page 171
... Adjusting shutter speed ...... 45 Adjusting viewfinder 19 AE SHIFT 53 Audio dubbing 93 AUDIO LEVEL 51 AUDIO MIX 109 Audio mode 111 AUTO SHTR 108 BACK LIGHT 22 Battery pack 9 BEEP 113 C, D Camera chromakey 124 Cassette memory 6, 143 Charging battery 10 Charging vanadium-lithium battery 158 Clock set 114 COLOR BAR 113 Connection (dubbing a tape 73 (viewing on TV 30 Continuous 121 Custom preset 53 Cut recording 61 Data code 28 Date search 67 Date/time indicator 28 DEMO 112 DIGITAL EFFECT 40 Digital...
... Adjusting shutter speed ...... 45 Adjusting viewfinder 19 AE SHIFT 53 Audio dubbing 93 AUDIO LEVEL 51 AUDIO MIX 109 Audio mode 111 AUTO SHTR 108 BACK LIGHT 22 Battery pack 9 BEEP 113 C, D Camera chromakey 124 Cassette memory 6, 143 Charging battery 10 Charging vanadium-lithium battery 158 Clock set 114 COLOR BAR 113 Connection (dubbing a tape 73 (viewing on TV 30 Continuous 121 Custom preset 53 Cut recording 61 Data code 28 Date search 67 Date/time indicator 28 DEMO 112 DIGITAL EFFECT 40 Digital...


