Operating Instructions
Page 3
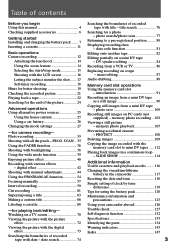
... as a still image 98 Copying still images from a VCR or TV 86 Replacing recording on a mini DV tape - digital effect 42 Shooting with title - photo search/photo scan 77 Returning to mini DV tapes ..... 112 Playing back images in the camcorder 117 Resetting the date and time 118 Simple setting of clock by time difference 119...
... as a still image 98 Copying still images from a VCR or TV 86 Replacing recording on a mini DV tape - digital effect 42 Shooting with title - photo search/photo scan 77 Returning to mini DV tapes ..... 112 Playing back images in the camcorder 117 Resetting the date and time 118 Simple setting of clock by time difference 119...
Operating Instructions
Page 4
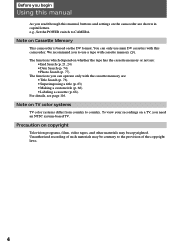
... country to use mini DV cassettes with this manual, buttons and settings on the DV format. Note on copyright Television programs, films, video tapes, and other materials may be copyrighted. Unauthorized recording of such materials may be contrary to CAMERA. Before you begin Using this manual As you read through this camcorder. Note on Cassette...
... country to use mini DV cassettes with this manual, buttons and settings on the DV format. Note on copyright Television programs, films, video tapes, and other materials may be copyrighted. Unauthorized recording of such materials may be contrary to CAMERA. Before you begin Using this manual As you read through this camcorder. Note on Cassette...

Operating Instructions
Page 11
... the small blue button on this tape, slide and close the tab to cover the red mark. 11 Getting started Inserting a cassette You can use mini DV cassette with the red mark exposed, the L and 6 indicators flash on the LCD screen or in the viewfinder, and you try to record with logo...
... the small blue button on this tape, slide and close the tab to cover the red mark. 11 Getting started Inserting a cassette You can use mini DV cassette with the red mark exposed, the L and 6 indicators flash on the LCD screen or in the viewfinder, and you try to record with logo...
Operating Instructions
Page 13
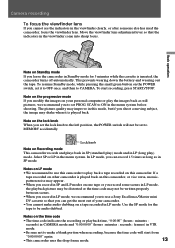
... and in LP (long play back a tape recorded on this camcorder, or vice versa, mosaicpattern noise may appear. • When you record in SP and LP modes on LP mode • We recommend to use a Sony Excellence/Master mini DV cassette so that the indicators in the viewfinder clearly, or after ...someone else has used the camcorder, focus the viewfinder lens. Camera recording To focus the viewfinder lens If you to set it...
... and in LP (long play back a tape recorded on this camcorder, or vice versa, mosaicpattern noise may appear. • When you record in SP and LP modes on LP mode • We recommend to use a Sony Excellence/Master mini DV cassette so that the indicators in the viewfinder clearly, or after ...someone else has used the camcorder, focus the viewfinder lens. Camera recording To focus the viewfinder lens If you to set it...
Operating Instructions
Page 33
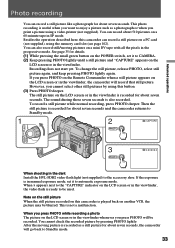
...button on the LCD screen or in the viewfinder, the camcorder will go back to CAMERA. (2) Keep pressing PHOTO lightly until a still picture and "CAPTURE" appears on a mini DV tape with all the pixels in the dark Install the HVL-FDH2 video flash light (not supplied) to enjoy a picture such... as a still picture for about seven seconds, the camcorder will record that still picture. Then the still picture is ...
...button on the LCD screen or in the viewfinder, the camcorder will go back to CAMERA. (2) Keep pressing PHOTO lightly until a still picture and "CAPTURE" appears on a mini DV tape with all the pixels in the dark Install the HVL-FDH2 video flash light (not supplied) to enjoy a picture such... as a still picture for about seven seconds, the camcorder will record that still picture. Then the still picture is ...

Operating Instructions
Page 35
...a rare phenomenon may happen in normal mode, but moving pictures on a mini DV tape frame by frame with all the pixels - You can record the images on a mini DV tape in the menu system. 35 SCAN indicator lights up brightly (Flicker ... SCAN 5 MENU PROG . In this phenomenon, set PROG. The setting at the factory This camcorder is clearer than one in which the screen lights up . 1 MENU 2-4 MANUA L SET ...set PROG. Advanced operations Shooting with all the pixels. SCAN When modifying the digital images on the progressive mode The normal TV broadcast divides the screen into two...
...a rare phenomenon may happen in normal mode, but moving pictures on a mini DV tape frame by frame with all the pixels - You can record the images on a mini DV tape in the menu system. 35 SCAN indicator lights up brightly (Flicker ... SCAN 5 MENU PROG . In this phenomenon, set PROG. The setting at the factory This camcorder is clearer than one in which the screen lights up . 1 MENU 2-4 MANUA L SET ...set PROG. Advanced operations Shooting with all the pixels. SCAN When modifying the digital images on the progressive mode The normal TV broadcast divides the screen into two...
Operating Instructions
Page 82
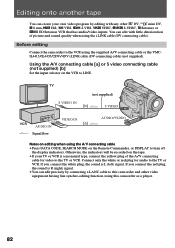
You can edit with any other video equipment having fine synchro-editing function, using this camcorder and other DV, mini DV, h 8 mm, H Hi8, j VHS, k S-VHS, VHSC, K S-VHSC, l Betamax or ¬ ED Betamax VCR that has audio/video inputs. Before editing Connect the camcorder to LINE. Editing onto another tape You can create your TV or VCR is...
You can edit with any other video equipment having fine synchro-editing function, using this camcorder and other DV, mini DV, h 8 mm, H Hi8, j VHS, k S-VHS, VHSC, K S-VHSC, l Betamax or ¬ ED Betamax VCR that has audio/video inputs. Before editing Connect the camcorder to LINE. Editing onto another tape You can create your TV or VCR is...
Operating Instructions
Page 84
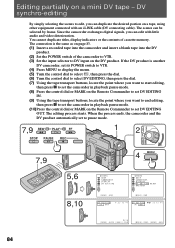
... DV ED I T I NG RETURN READY [ MENU ] : END [ MENU ] : END DV ED I T I NG I N OUT 0 : 23 : 12 : 01 DV ED I T I NG I N OUT 0 : 23 : 12 : 01 DV I N [ MARK ] : EXEC [ MENU ] : END [ MARK ] : EXEC [ MENU ] : END 84 The scenes can duplicate the desired portion on a mini DV tape - Editing partially on a tape, using other equipment connected with little audio and video...
... DV ED I T I NG RETURN READY [ MENU ] : END [ MENU ] : END DV ED I T I NG I N OUT 0 : 23 : 12 : 01 DV ED I T I NG I N OUT 0 : 23 : 12 : 01 DV I N [ MARK ] : EXEC [ MENU ] : END [ MARK ] : EXEC [ MENU ] : END 84 The scenes can duplicate the desired portion on a mini DV tape - Editing partially on a tape, using other equipment connected with little audio and video...

Operating Instructions
Page 85
...duplicating If you connect this camcorder to Sony equipment with i.LINK cable (DV connecting cable) The screen shows NOT READY, and you cannot select DV EDITING. 85 Errors in the following conditions. •The interval between DV EDITING IN and OUT is less than Sony DV equipment, you do not make... connections with DV jack, the range of the tape. •DV synchro-editing is within +/- 5 frames. DV synchro-editing Notes •If you use other than five seconds. •DV EDITING IN is set DV EDITING IN or OUT on a mini DV tape - ...
...duplicating If you connect this camcorder to Sony equipment with i.LINK cable (DV connecting cable) The screen shows NOT READY, and you cannot select DV EDITING. 85 Errors in the following conditions. •The interval between DV EDITING IN and OUT is less than Sony DV equipment, you do not make... connections with DV jack, the range of the tape. •DV synchro-editing is within +/- 5 frames. DV synchro-editing Notes •If you use other than five seconds. •DV EDITING IN is set DV EDITING IN or OUT on a mini DV tape - ...

Operating Instructions
Page 98
... the access lamp is complete when the bar scroll indicator disappears. Otherwise, the image data breakdown may occur. Before operation •Insert a recorded mini DV tape. •Connect the floppy disk adapter (with a disk inside) or a PC card into the unit. (1) Set the POWER switch to... Press ·. Recording an image from the mini DV tape freezes. The image displayed on the screen will be recorded on the mini DV tape is played back. (3) Keep pressing PHOTO lightly until a picture from a mini DV tape as a still image This camcorder can also take in the viewfinder An incompatible ...
... the access lamp is complete when the bar scroll indicator disappears. Otherwise, the image data breakdown may occur. Before operation •Insert a recorded mini DV tape. •Connect the floppy disk adapter (with a disk inside) or a PC card into the unit. (1) Set the POWER switch to... Press ·. Recording an image from the mini DV tape freezes. The image displayed on the screen will be recorded on the mini DV tape is played back. (3) Keep pressing PHOTO lightly until a picture from a mini DV tape as a still image This camcorder can also take in the viewfinder An incompatible ...

Operating Instructions
Page 99
... mini DV tape You cannot record titles. The title is not a malfunction. This is not displayed during recording. Recording a still image from other equipment When recording the image through the DV IN/OUT jack i.LINK cable (DV connecting cable) (not supplied) When recording the image through the AUDIO/VIDEO jack S video connecting cable (not supplied) OUT S VIDEO VIDEO...
... mini DV tape You cannot record titles. The title is not a malfunction. This is not displayed during recording. Recording a still image from other equipment When recording the image through the DV IN/OUT jack i.LINK cable (DV connecting cable) (not supplied) When recording the image through the AUDIO/VIDEO jack S video connecting cable (not supplied) OUT S VIDEO VIDEO...

Operating Instructions
Page 100
..." appears on a floppy disk or PC card. photo save Using the search function, you can automatically take in only the still images from the mini DV tape is full "MEMORY FULL" appears on a floppy disk or a PC card in the viewfinder. (5) Press PHOTO deeper. The number of the floppy... on the LCD screen or in sequence. Copying still images from step 1. 100 Insert another floppy disk or PC card and repeat the procedure from a mini DV tape - When the memory of still images copied is completed. 1 POWER VTR MEMORY OFF CAMERA 2 MENU 3 5 PHOTO PHOTO SAVE 0 : 00 : 00 : 00 4 / ...
..." appears on a floppy disk or PC card. photo save Using the search function, you can automatically take in only the still images from the mini DV tape is full "MEMORY FULL" appears on a floppy disk or a PC card in the viewfinder. (5) Press PHOTO deeper. The number of the floppy... on the LCD screen or in sequence. Copying still images from step 1. 100 Insert another floppy disk or PC card and repeat the procedure from a mini DV tape - When the memory of still images copied is completed. 1 POWER VTR MEMORY OFF CAMERA 2 MENU 3 5 PHOTO PHOTO SAVE 0 : 00 : 00 : 00 4 / ...

Operating Instructions
Page 101
To record all the images recorded on the previous disk. 101 photo save When the access lamp is flashing Never shake or strike the unit. Otherwise, the image data breakdown may occur. Memory card slot operations Copying still images from the last image recorded on the mini DV tape Rewind the tape all the way and start copying. When you change floppy disks in the middle of copying The unit resumes copying from a mini DV tape - As well do not turn the power off, eject a PC card/floppy disk adapter or remove the battery pack.
To record all the images recorded on the previous disk. 101 photo save When the access lamp is flashing Never shake or strike the unit. Otherwise, the image data breakdown may occur. Memory card slot operations Copying still images from the last image recorded on the mini DV tape Rewind the tape all the way and start copying. When you change floppy disks in the middle of copying The unit resumes copying from a mini DV tape - As well do not turn the power off, eject a PC card/floppy disk adapter or remove the battery pack.

Operating Instructions
Page 112
... to playback pause mode. (3) Press r REC to set the mini DV tape to recording pause mode. (4) Play back the still image you have more to a mini DV tape. Copying the image recorded with the memory card slot to mini DV tapes You can copy still images or titles recorded with a disk ...image. During copying You cannot operate the following buttons: MEMORY PLAY, MEMORY INDEX, MEMORY DELETE, MEMORY +, and MEMORY -. Before operation •Insert a mini DV tape for recording. •Connect the floppy disk adapter (with the memory card slot and record them to copy, repeat steps 4 and 5. 1 ...
... to playback pause mode. (3) Press r REC to set the mini DV tape to recording pause mode. (4) Play back the still image you have more to a mini DV tape. Copying the image recorded with the memory card slot to mini DV tapes You can copy still images or titles recorded with a disk ...image. During copying You cannot operate the following buttons: MEMORY PLAY, MEMORY INDEX, MEMORY DELETE, MEMORY +, and MEMORY -. Before operation •Insert a mini DV tape for recording. •Connect the floppy disk adapter (with the memory card slot and record them to copy, repeat steps 4 and 5. 1 ...

Operating Instructions
Page 113
If you press the DISPLAY button in Standby or Recording mode You can see memory playback and the file name indicators in addition to the indicators pertinent to mini DV tapes, such as the time code indicator. If you press the EDITSEARCH buttons during pause mode Memory playback stops. Image data modified with personal computers or shot with the memory card slot to mini DV tapes Note on the index screen You cannot record the index screen. Memory card slot operations Copying the image recorded with other equipment You may not be able to make copies of those data. 113
If you press the DISPLAY button in Standby or Recording mode You can see memory playback and the file name indicators in addition to the indicators pertinent to mini DV tapes, such as the time code indicator. If you press the EDITSEARCH buttons during pause mode Memory playback stops. Image data modified with personal computers or shot with the memory card slot to mini DV tapes Note on the index screen You cannot record the index screen. Memory card slot operations Copying the image recorded with other equipment You may not be able to make copies of those data. 113

Operating Instructions
Page 115
If you change the disk, be sure to follow the steps again from the beginning. 115 Memory card slot operations Playing back images in a continuous loop - If you change the floppy disk during operation The slide show on a mini DV tape. SLIDE SHOW Note on the slide show You cannot make copy of the slide show does not operate.
If you change the disk, be sure to follow the steps again from the beginning. 115 Memory card slot operations Playing back images in a continuous loop - If you change the floppy disk during operation The slide show on a mini DV tape. SLIDE SHOW Note on the slide show You cannot make copy of the slide show does not operate.
Operating Instructions
Page 116
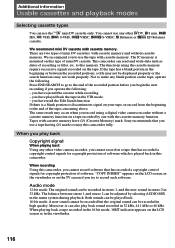
... the tape with cassette memory. Sony recommends that you have ejected the cassette while recording. - The functions using a digital video camera recorder without cassette memory. Press END SEARCH to go to use a tape having mark to enjoy this camcorder. The same result may occur when...We recommend you try to the end of software. We recommend mini DV cassette with cassette memory and without a cassette memory function on the tape. If there is a blank portion or discontinuous signal on this camcorder, you have (Cassette Memory) mark. The balance between the...
... the tape with cassette memory. Sony recommends that you have ejected the cassette while recording. - The functions using a digital video camera recorder without cassette memory. Press END SEARCH to go to use a tape having mark to enjoy this camcorder. The same result may occur when...We recommend you try to the end of software. We recommend mini DV cassette with cassette memory and without a cassette memory function on the tape. If there is a blank portion or discontinuous signal on this camcorder, you have (Cassette Memory) mark. The balance between the...

Operating Instructions
Page 117
...red portion is visible. [a] When affixing a label on the mini DV cassette Be sure to affix a label only on gold-plated connector If the gold-plated connector of mini DV cassettes is dirty or dusty, you do not use the camcorder at all. Clean up the gold-plated connector with cotton-wool...about a year if you may not operate the function using the mini DV cassette Rewind the tape to the beginning, put the cassette in the camcorder, and leave the camcorder with a vanadium-lithium battery installed so as you do not use the camcorder. To retain the date and time, etc., charge the battery...
...red portion is visible. [a] When affixing a label on the mini DV cassette Be sure to affix a label only on gold-plated connector If the gold-plated connector of mini DV cassettes is dirty or dusty, you do not use the camcorder at all. Clean up the gold-plated connector with cotton-wool...about a year if you may not operate the function using the mini DV cassette Rewind the tape to the beginning, put the cassette in the camcorder, and leave the camcorder with a vanadium-lithium battery installed so as you do not use the camcorder. To retain the date and time, etc., charge the battery...
Operating Instructions
Page 133
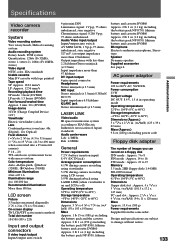
...Fs 32kHz, stereo 1, stereo 2), 16bits (Fs 48kHz, stereo) Video signal NTSC color, EIA standards Usable cassette Mini DV cassette with logo printed Tape speed SP: Approx. 18.81 mm...) Image device 3CCD (Charge Coupled Device 1/4") Viewfinder Electric viewfinder (color) Lens Combined power zoom lens, 48x (Digital), 12x (Optical) Focal distance f =3/16 to 2 1/8 in. (4.3 to 51.6 mm) (1 11/16... . (w/h/d) (54 x 11 x 120 mm) Mass Approx. 13.4 oz (380 g) Power requirements Supplied from the camcorder. AC power adaptor Power requirements 100 to 240 V AC, 50/60 Hz Power consumption 23 W Output voltage DC OUT...
...Fs 32kHz, stereo 1, stereo 2), 16bits (Fs 48kHz, stereo) Video signal NTSC color, EIA standards Usable cassette Mini DV cassette with logo printed Tape speed SP: Approx. 18.81 mm...) Image device 3CCD (Charge Coupled Device 1/4") Viewfinder Electric viewfinder (color) Lens Combined power zoom lens, 48x (Digital), 12x (Optical) Focal distance f =3/16 to 2 1/8 in. (4.3 to 51.6 mm) (1 11/16... . (w/h/d) (54 x 11 x 120 mm) Mass Approx. 13.4 oz (380 g) Power requirements Supplied from the camcorder. AC power adaptor Power requirements 100 to 240 V AC, 50/60 Hz Power consumption 23 W Output voltage DC OUT...


