Operating Instructions
Page 1
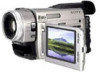
AC-L10A Serial No. Owner's Record The model and serial numbers are located on the bottom. Record the serial number in the space provided below. DCR-TRV900 Model No. 3-864-632-14 (2) Digital Video Camera Recorder Operating Instructions Before operating the unit, please read this product. DCR-TRV900 ©1998 by Sony Corporation Model No. Refer to these numbers whenever you call upon your Sony dealer regarding this manual thoroughly, and retain it for future reference. Serial No.
AC-L10A Serial No. Owner's Record The model and serial numbers are located on the bottom. Record the serial number in the space provided below. DCR-TRV900 Model No. 3-864-632-14 (2) Digital Video Camera Recorder Operating Instructions Before operating the unit, please read this product. DCR-TRV900 ©1998 by Sony Corporation Model No. Refer to these numbers whenever you call upon your Sony dealer regarding this manual thoroughly, and retain it for future reference. Serial No.
Operating Instructions
Page 3
...TV screen 70 Viewing the picture with the picture effect 72 Viewing the picture with the digital effect 73 Searching the boundaries of recorded tape with date - memory photo playback 105 Preventing... search/photo scan 77 Returning to mini DV tapes ..... 112 Playing back images in the camcorder 117 Resetting the date and time 118 Simple setting of clock by time difference 119 Tips... 61 Superimposing a title 63 Making a custom title 66 Labeling a cassette 68 -for camera recording- Photo recording 33 Shooting with various effects - date search 74 Searching the boundaries ...
...TV screen 70 Viewing the picture with the picture effect 72 Viewing the picture with the digital effect 73 Searching the boundaries of recorded tape with date - memory photo playback 105 Preventing... search/photo scan 77 Returning to mini DV tapes ..... 112 Playing back images in the camcorder 117 Resetting the date and time 118 Simple setting of clock by time difference 119 Tips... 61 Superimposing a title 63 Making a custom title 66 Labeling a cassette 68 -for camera recording- Photo recording 33 Shooting with various effects - date search 74 Searching the boundaries ...
Operating Instructions
Page 4
...;Date Search (p. 74) •Photo Search (p. 77). e.g., Set the POWER switch to use mini DV cassettes with this manual As you to CAMERA. The functions you need an NTSC system-based TV. We recommend you read through this manual, buttons and settings on a TV, you can only... use a tape with cassette memory . Before you begin Using this camcorder. Note on copyright Television programs, films, video tapes, and other materials may be copyrighted. Note on Cassette Memory This camcorder is based on whether the tape has the cassette memory or not are : •...
...;Date Search (p. 74) •Photo Search (p. 77). e.g., Set the POWER switch to use mini DV cassettes with this manual As you to CAMERA. The functions you need an NTSC system-based TV. We recommend you read through this manual, buttons and settings on a TV, you can only... use a tape with cassette memory . Before you begin Using this camcorder. Note on copyright Television programs, films, video tapes, and other materials may be copyrighted. Note on Cassette Memory This camcorder is based on whether the tape has the cassette memory or not are : •...

Operating Instructions
Page 8
POWER VTR MEMORY OFF CAMERA Installing and charging the battery pack Charging the battery pack Charge the battery pack on the display window. It may differ from the DC IN jack of the camcorder. Remaining battery time is indicated by the minutes on a flat surface without vibration. ...normal charge is completely charged. Notes •"- - - min" appears on the display window roughly indicates the recording time with the viewfinder. Before using the camcorder with the plug's 4 mark up. (2) Connect the power cord to the AC power adaptor. (3) Connect the power cord to a wall outlet. (4)...
POWER VTR MEMORY OFF CAMERA Installing and charging the battery pack Charging the battery pack Charge the battery pack on the display window. It may differ from the DC IN jack of the camcorder. Remaining battery time is indicated by the minutes on a flat surface without vibration. ...normal charge is completely charged. Notes •"- - - min" appears on the display window roughly indicates the recording time with the viewfinder. Before using the camcorder with the plug's 4 mark up. (2) Connect the power cord to the AC power adaptor. (3) Connect the power cord to a wall outlet. (4)...

Operating Instructions
Page 12
...pull the lens cap string to fix it to OFF. The camera recording lamp on the LCD screen or in the viewfinder (Standby mode). Then, eject the cassette and remove the battery pack. The camcorder starts recording. The camcorder is set it . (2) While pressing the small green button on.... "REC" appears on the POWER switch, set to the length of the camcorder also lights up. Basic operations Camera recording Make sure that the power source is installed and a cassette is inserted and that the camcorder is working correctly. The "STBY" indicator appears on the front of your time...
...pull the lens cap string to fix it to OFF. The camera recording lamp on the LCD screen or in the viewfinder (Standby mode). Then, eject the cassette and remove the battery pack. The camcorder starts recording. The camcorder is set it . (2) While pressing the small green button on.... "REC" appears on the POWER switch, set to the length of the camcorder also lights up. Basic operations Camera recording Make sure that the power source is installed and a cassette is inserted and that the camcorder is working correctly. The "STBY" indicator appears on the front of your time...
Operating Instructions
Page 13
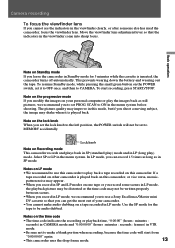
...not to make audio dubbing on LP mode • We recommend to use a Sony Excellence/Master mini DV cassette so that the indicators in the viewfinder clearly, or after someone else has used the camcorder, focus the viewfinder lens. To resume Standby mode, while pressing the small green ...SP or LP in the menu system before shooting. Use the SP mode for 5 minutes while the cassette is inserted, the camcorder turns off automatically. Camera recording To focus the viewfinder lens If you cannot see the indicators in the viewfinder come into sharp focus. Move the viewfinder lens...
...not to make audio dubbing on LP mode • We recommend to use a Sony Excellence/Master mini DV cassette so that the indicators in the viewfinder clearly, or after someone else has used the camcorder, focus the viewfinder lens. To resume Standby mode, while pressing the small green ...SP or LP in the menu system before shooting. Use the SP mode for 5 minutes while the cassette is inserted, the camcorder turns off automatically. Camera recording To focus the viewfinder lens If you cannot see the indicators in the viewfinder come into sharp focus. Move the viewfinder lens...

Operating Instructions
Page 14
... the focus is a recording technique that lets you shoot a subject using the lens hood. You can shoot a subject that is not recorded on the tape. Camera recording Note on the beep sound Note that the beep sound is at the time of recording, it still more professional-looking recordings, use the...
... the focus is a recording technique that lets you shoot a subject using the lens hood. You can shoot a subject that is not recorded on the tape. Camera recording Note on the beep sound Note that the beep sound is at the time of recording, it still more professional-looking recordings, use the...

Operating Instructions
Page 15
...modes enable you to take a series of quick shots resulting in a lively video. (1) While pressing OPEN, open the LCD panel. (2) Set START/STOP ... Press START/STOP again before all the dots disappear. Basic operations Camera recording Zooming of more than 12x - If you press START/STOP, the camcorder records for about 5 seconds from the moment you selected 5SEC,...START/STOP. If you press START/STOP. The dots disappear at the factory. • You cannot use the digital zoom when you can avoid recording unnecessary scenes. 5SEC : When you set PROG. Recording starts. SCAN to OFF...
...modes enable you to take a series of quick shots resulting in a lively video. (1) While pressing OPEN, open the LCD panel. (2) Set START/STOP ... Press START/STOP again before all the dots disappear. Basic operations Camera recording Zooming of more than 12x - If you press START/STOP, the camcorder records for about 5 seconds from the moment you selected 5SEC,...START/STOP. If you press START/STOP. The dots disappear at the factory. • You cannot use the digital zoom when you can avoid recording unnecessary scenes. 5SEC : When you set PROG. Recording starts. SCAN to OFF...

Operating Instructions
Page 16
.... (1) While pressing OPEN, open the LCD panel. (2) Adjust angle of the LCD screen, press LCD BRIGHT + or -. L. in mirror mode. Camera recording Shooting with the LCD screen You can select LCD B. The battery life is longer when the LCD panel is insufficiently illuminated even after adjusting... LCD BRIGHT, select LCD B. Use the viewfinder instead of the LCD screen to the other side. otherwise, the camcorder body may be damaged or the LCD panel may not close properly [b]. •Close the LCD panel completely when not in use. •...
.... (1) While pressing OPEN, open the LCD panel. (2) Adjust angle of the LCD screen, press LCD BRIGHT + or -. L. in mirror mode. Camera recording Shooting with the LCD screen You can select LCD B. The battery life is longer when the LCD panel is insufficiently illuminated even after adjusting... LCD BRIGHT, select LCD B. Use the viewfinder instead of the LCD screen to the other side. otherwise, the camcorder body may be damaged or the LCD panel may not close properly [b]. •Close the LCD panel completely when not in use. •...

Operating Instructions
Page 17
Basic operations Camera recording Letting the subject monitor the shot You can turn the LCD panel over ...like a mirror-image while recording in mirror mode, you turn the LCD panel about 135 degrees to 180 degrees, the camcorder enters mirror mode. • Using the mirror mode, you can also use the Remote Commander. The STBY indicator appears ... degrees, the indicator appears on the Remote Commander. 17 To cancel mirror mode Turn the LCD panel down toward the camcorder body. Turn the LCD panel up vertically. Other indicators appear as r. You can let the subject monitor the shot while...
Basic operations Camera recording Letting the subject monitor the shot You can turn the LCD panel over ...like a mirror-image while recording in mirror mode, you turn the LCD panel about 135 degrees to 180 degrees, the camcorder enters mirror mode. • Using the mirror mode, you can also use the Remote Commander. The STBY indicator appears ... degrees, the indicator appears on the Remote Commander. 17 To cancel mirror mode Turn the LCD panel down toward the camcorder body. Turn the LCD panel up vertically. Other indicators appear as r. You can let the subject monitor the shot while...

Operating Instructions
Page 18
...Commander for convenience. Self-timer recording mode is canceled when •Self-timer recording is finished. •The POWER switch is in step 2. Camera recording Self-timer recording You can make a recording with a beep sound. To cancel self-timer recording Press so that the indicator disappears from... the LCD or viewfinder screen while the camcorder is set . Note The display may become darker right after pressing the button. Self-timer starts counting down to OFF or VTR. To ...
...Commander for convenience. Self-timer recording mode is canceled when •Self-timer recording is finished. •The POWER switch is in step 2. Camera recording Self-timer recording You can make a recording with a beep sound. To cancel self-timer recording Press so that the indicator disappears from... the LCD or viewfinder screen while the camcorder is set . Note The display may become darker right after pressing the button. Self-timer starts counting down to OFF or VTR. To ...

Operating Instructions
Page 20
... viewfinder or the LCD panel may damage the camcorder. When attaching a non-Sony tripod, make sure that the length of suitable height. If you have a tripod for better shooting Place the camcorder on a flat surface or use it with the camcorder. Be careful when placing the camcorder under sunlight or by the viewfinder or the... the LCD panel and on a table top or any other flat surface of the tripod screw is less than 9/32 inch (6.5 mm). Hints for a still camera, you can also use a tripod Try placing the camcorder on the viewfinder •Do not pick up the...
... viewfinder or the LCD panel may damage the camcorder. When attaching a non-Sony tripod, make sure that the length of suitable height. If you have a tripod for better shooting Place the camcorder on a flat surface or use it with the camcorder. Be careful when placing the camcorder under sunlight or by the viewfinder or the... the LCD panel and on a table top or any other flat surface of the tripod screw is less than 9/32 inch (6.5 mm). Hints for a still camera, you can also use a tripod Try placing the camcorder on the viewfinder •Do not pick up the...

Operating Instructions
Page 21
side of EDITSEARCH until the camcorder goes back to the scene you eject the cassette after recording. END... the last scene you recorded and the next scene you released EDITSEARCH. POWER VTR EDITSEARCH 2 1 MEMORY OFF CAMERA EDITSEARCH EDITSEARCH To stop playback Release EDITSEARCH. To begin re-recording Press START/STOP. the last few seconds of... EDITSEARCH momentarily; Hold down the + side (Edit Search). To go back to CAMERA. (2) Press the - Πside of the recorded portion plays back (Rec Review). Re-recording begins from the...
side of EDITSEARCH until the camcorder goes back to the scene you eject the cassette after recording. END... the last scene you recorded and the next scene you released EDITSEARCH. POWER VTR EDITSEARCH 2 1 MEMORY OFF CAMERA EDITSEARCH EDITSEARCH To stop playback Release EDITSEARCH. To begin re-recording Press START/STOP. the last few seconds of... EDITSEARCH momentarily; Hold down the + side (Edit Search). To go back to CAMERA. (2) Press the - Πside of the recorded portion plays back (Rec Review). Re-recording begins from the...

Operating Instructions
Page 22
... the indicators, press again. Using the Remote Commander You can also monitor the picture on a TV screen, after connecting the camcorder to a TV or VCR. 4 REW PLAY FF 5 REW PLAY FF 1 POWER VTR LCD BRIGHT 3 MEMORY OFF CAMERA 2 VOLUME DISPLAY To stop playback, press π. You can control playback using LCD BRIGHT +/-.
... the indicators, press again. Using the Remote Commander You can also monitor the picture on a TV screen, after connecting the camcorder to a TV or VCR. 4 REW PLAY FF 5 REW PLAY FF 1 POWER VTR LCD BRIGHT 3 MEMORY OFF CAMERA 2 VOLUME DISPLAY To stop playback, press π. You can control playback using LCD BRIGHT +/-.

Operating Instructions
Page 24
... or fast-forwarding and the last about 5 seconds of the recorded picture (End Search). Searching for the end of the picture You can go to CAMERA or VTR. Then the tape stops at the end of the recorded portion plays back. When you play back a tape which has a blank portion in...
... or fast-forwarding and the last about 5 seconds of the recorded picture (End Search). Searching for the end of the picture You can go to CAMERA or VTR. Then the tape stops at the end of the recorded portion plays back. When you play back a tape which has a blank portion in...

Operating Instructions
Page 27
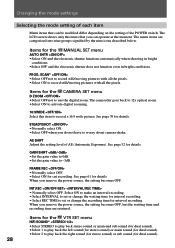
...make selections in mirror mode, you cannot operate the menu system. 27 If you want to erase the menu display. 1 MENU CAMERA MANUA L SET AUTO SHTR PROG . Just turn the control dial to select the desired mode, then press the dial. SCAN ...change some of the mode settings programed at the factory to further enjoy the features and functions of the POWER switch to VTR, CAMERA or MEMORY. •While recording in the following order: the menu display n icons n items n mode settings. (1) Press ...Turn the control dial to select the menu items displayed on the setting of the camcorder.
...make selections in mirror mode, you cannot operate the menu system. 27 If you want to erase the menu display. 1 MENU CAMERA MANUA L SET AUTO SHTR PROG . Just turn the control dial to select the desired mode, then press the dial. SCAN ...change some of the mode settings programed at the factory to further enjoy the features and functions of the POWER switch to VTR, CAMERA or MEMORY. •While recording in the following order: the menu display n icons n items n mode settings. (1) Press ...Turn the control dial to select the menu items displayed on the setting of the camcorder.
Operating Instructions
Page 28
... you do not have to record still/moving pictures with all the pixels. •Select ON to worry about camera-shake. The camcorder goes back to 12x optical zoom. •Select ON to activate digital zooming. 16:9WIDE Select this item to play back the right sound (for stereo sound) or sub sound... interval recording. • Select INTERVAL to set or change the waiting time for interval recording. See page 39 for the CAMERA SET menu D ZOOM •Select OFF not to use the digital zoom. GAIN SHIFT •Set the gain value to 0dB. •Set the gain value to set or change the...
... you do not have to record still/moving pictures with all the pixels. •Select ON to worry about camera-shake. The camcorder goes back to 12x optical zoom. •Select ON to activate digital zooming. 16:9WIDE Select this item to play back the right sound (for stereo sound) or sub sound... interval recording. • Select INTERVAL to set or change the waiting time for interval recording. See page 39 for the CAMERA SET menu D ZOOM •Select OFF not to use the digital zoom. GAIN SHIFT •Set the gain value to 0dB. •Set the gain value to set or change the...
Operating Instructions
Page 31
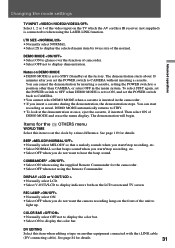
...OFF not to display demonstration. See page 119 for details. 31 Changing the mode settings Advanced operations TV INPUT Select 1, 2 or 3 of the video input on DEMO MODE • DEMO MODE is set to STBY (Standby) at once, eject the cassette, if inserted. You can start /stop ...to display the selected menu item by inserting a cassette, setting the POWER switch to a position other than CAMERA, or select OFF in the camcorder. • If you set the POWER switch to CAMERA without inserting a cassette. LTR SIZE • Normally select NORMAL. • Select 2X to display the color...
...OFF not to display demonstration. See page 119 for details. 31 Changing the mode settings Advanced operations TV INPUT Select 1, 2 or 3 of the video input on DEMO MODE • DEMO MODE is set to STBY (Standby) at once, eject the cassette, if inserted. You can start /stop ...to display the selected menu item by inserting a cassette, setting the POWER switch to a position other than CAMERA, or select OFF in the camcorder. • If you set the POWER switch to CAMERA without inserting a cassette. LTR SIZE • Normally select NORMAL. • Select 2X to display the color...
Operating Instructions
Page 32
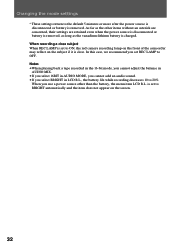
... LCD B.L., the battery life while recording decreases 10 to OFF. Changing the mode settings * These settings return to ON, the red camera recording lamp on the front of the camcorder may reflect on the subject if it is close subject When REC LAMP is set to BRIGHT automatically and the item does...
... LCD B.L., the battery life while recording decreases 10 to OFF. Changing the mode settings * These settings return to ON, the red camera recording lamp on the front of the camcorder may reflect on the subject if it is close subject When REC LAMP is set to BRIGHT automatically and the item does...
Operating Instructions
Page 33
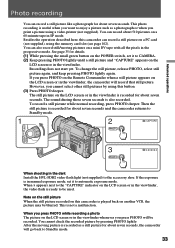
...picture such as a still picture for about seven seconds and the camcorder returns to Standby mode. 1 2 CAPTURE POWER VTR PHOTO MEMORY OFF CAMERA 3 PHOTO When shooting in the dark Install the HVL-FDH2 video flash light (not supplied) to Standby mode. 33 The still picture... PHOTO deeper. Besides the operation described here, this camcorder can record a still picture on a PC card (not supplied), using this camcorder is not a malfunction. You can record about seven seconds. If you print a picture using a video printer (not supplied). When you press PHOTO while ...
...picture such as a still picture for about seven seconds and the camcorder returns to Standby mode. 1 2 CAPTURE POWER VTR PHOTO MEMORY OFF CAMERA 3 PHOTO When shooting in the dark Install the HVL-FDH2 video flash light (not supplied) to Standby mode. 33 The still picture... PHOTO deeper. Besides the operation described here, this camcorder can record a still picture on a PC card (not supplied), using this camcorder is not a malfunction. You can record about seven seconds. If you print a picture using a video printer (not supplied). When you press PHOTO while ...


