Operating Instructions
Page 3
...68 -for using the battery pack 120 Maintenance information and precautions 123 Using your camcorder abroad 126 Trouble check 127 Self-diagnosis function 132 Specifications 133 Identifying the parts ...70 Viewing the picture with the picture effect 72 Viewing the picture with the digital effect 73 Searching the boundaries of recorded tape with the LCD screen 16 ...tape - Table of contents Before you begin Before you begin Using this manual 4 Checking supplied accessories 6 Getting started Installing and charging the battery pack ....... 7 Inserting a cassette 11 Basic operations ...
...68 -for using the battery pack 120 Maintenance information and precautions 123 Using your camcorder abroad 126 Trouble check 127 Self-diagnosis function 132 Specifications 133 Identifying the parts ...70 Viewing the picture with the picture effect 72 Viewing the picture with the digital effect 73 Searching the boundaries of recorded tape with the LCD screen 16 ...tape - Table of contents Before you begin Before you begin Using this manual 4 Checking supplied accessories 6 Getting started Installing and charging the battery pack ....... 7 Inserting a cassette 11 Basic operations ...

Operating Instructions
Page 6
Checking supplied accessories Check that the following accessories are supplied with your camcorder. 1 2 3 4 5 6 7 8 9 1 Wireless Remote Commander (1) (p. 139) 2 AC-L10A AC power adaptor (1), Power cord (1) (p. 8, 25) The shape of the plug varies from region to region. 3 NP-F330 battery ...) 8 Lens cap (1) (p. 12) 9 Lens hood (1) (p. 14) Contents of the recording cannot be compensated if recording or playback is not made due to a malfunction of the camcorder, video tape, etc. 6
Checking supplied accessories Check that the following accessories are supplied with your camcorder. 1 2 3 4 5 6 7 8 9 1 Wireless Remote Commander (1) (p. 139) 2 AC-L10A AC power adaptor (1), Power cord (1) (p. 8, 25) The shape of the plug varies from region to region. 3 NP-F330 battery ...) 8 Lens cap (1) (p. 12) 9 Lens hood (1) (p. 14) Contents of the recording cannot be compensated if recording or playback is not made due to a malfunction of the camcorder, video tape, etc. 6
Operating Instructions
Page 25
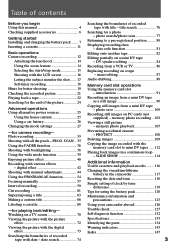
...as long as it is disturbed. 25 If this happens, restore the power supply again immediately. Place Indoors Outdoors In the car Power source Accessory to the power cord, even if the set itself has been turned off. Advanced operations Advanced operations Using alternative power sources You can choose any...-F330 (supplied), NP-F530, NP-F550, NPF730, NP-F730H*, NP-F750, NP-F930, NP-F950 12 V or 24 V car battery Sony DC adaptor/charger DC-V700 * NP-F730H is sold only in the U.S.A. Using the house current To use your camcorder: battery pack, house current, and 12/24 V car battery.
...as long as it is disturbed. 25 If this happens, restore the power supply again immediately. Place Indoors Outdoors In the car Power source Accessory to the power cord, even if the set itself has been turned off. Advanced operations Advanced operations Using alternative power sources You can choose any...-F330 (supplied), NP-F530, NP-F550, NPF730, NP-F730H*, NP-F750, NP-F930, NP-F950 12 V or 24 V car battery Sony DC adaptor/charger DC-V700 * NP-F730H is sold only in the U.S.A. Using the house current To use your camcorder: battery pack, house current, and 12/24 V car battery.

Operating Instructions
Page 26
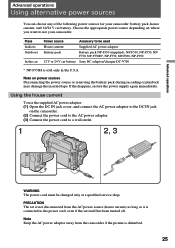
Using alternative power sources Using a car battery Use a DC adaptor/charger such as Sony DC-V700 (not supplied). This mark indicates that you purchase accessories with DC-V700) connecting cord. Connect the DC adaptor/charger and the camcorder using the DK-415 (supplied with this product is a genuine accessory for Sony video product. Connect the car battery cord to the cigarette lighter socket of a car (12 V or 24 V). When purchasing Sony video products, Sony recommends that this "GENUINE VIDEO ACCESSORIES" mark. 26
Using alternative power sources Using a car battery Use a DC adaptor/charger such as Sony DC-V700 (not supplied). This mark indicates that you purchase accessories with DC-V700) connecting cord. Connect the DC adaptor/charger and the camcorder using the DK-415 (supplied with this product is a genuine accessory for Sony video product. Connect the car battery cord to the cigarette lighter socket of a car (12 V or 24 V). When purchasing Sony video products, Sony recommends that this "GENUINE VIDEO ACCESSORIES" mark. 26
Operating Instructions
Page 33
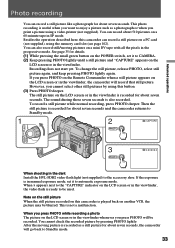
...like a photograph for details. (1) While pressing the small green button on the POWER switch, set it to the accessory shoe. You cannot check the recorded picture by using a video printer (not supplied). Recording does not start yet. After the moving pictures on a mini DV tape with all the... is useful when you want to be blurred. Note on the still picture When the still picture recorded on this camcorder can record about seven seconds and the camcorder returns to Standby mode. 1 2 CAPTURE POWER VTR PHOTO MEMORY OFF CAMERA 3 PHOTO When shooting in the dark ...
...like a photograph for details. (1) While pressing the small green button on the POWER switch, set it to the accessory shoe. You cannot check the recorded picture by using a video printer (not supplied). Recording does not start yet. After the moving pictures on a mini DV tape with all the... is useful when you want to be blurred. Note on the still picture When the still picture recorded on this camcorder can record about seven seconds and the camcorder returns to Standby mode. 1 2 CAPTURE POWER VTR PHOTO MEMORY OFF CAMERA 3 PHOTO When shooting in the dark ...

Operating Instructions
Page 88
... starting and ending points. The recorded sound is not output from a speaker. The original sound will not be erased. Connecting the microphone with the intelligent accessory shoe Microphone (not supplied) 88 Connecting the microphone with the MIC jack MIC (PLUG IN POWER) Ç : Signal flow Microphone (not supplied) Note You can... the original sound on a tape by connecting audio equipment or a microphone. Audio dubbing You can check the recorded picture and sound by connecting the AUDIO/VIDEO jack to a TV. Check the sound by using the TV or headphones.
... starting and ending points. The recorded sound is not output from a speaker. The original sound will not be erased. Connecting the microphone with the intelligent accessory shoe Microphone (not supplied) 88 Connecting the microphone with the MIC jack MIC (PLUG IN POWER) Ç : Signal flow Microphone (not supplied) Note You can... the original sound on a tape by connecting audio equipment or a microphone. Audio dubbing You can check the recorded picture and sound by connecting the AUDIO/VIDEO jack to a TV. Check the sound by using the TV or headphones.

Operating Instructions
Page 90
... Remote Commander at the point where you disconnect or connect a cable to the camcorder during recording The recording may become worse. •You cannot add audio with another camcorder (including DCR- The factory setting is not connected, the recording will be made... the power source or remove the battery pack, the setting of the camcorder. •A new sound cannot be recorded will take precedence over others in the following order. •MIC (PLUG IN POWER) jack •Intelligent accessory shoe •AUDIO/VIDEO jack •Built-in the menu system. VTR SET H i F i SOUND AUD I O...
... Remote Commander at the point where you disconnect or connect a cable to the camcorder during recording The recording may become worse. •You cannot add audio with another camcorder (including DCR- The factory setting is not connected, the recording will be made... the power source or remove the battery pack, the setting of the camcorder. •A new sound cannot be recorded will take precedence over others in the following order. •MIC (PLUG IN POWER) jack •Intelligent accessory shoe •AUDIO/VIDEO jack •Built-in the menu system. VTR SET H i F i SOUND AUD I O...

Operating Instructions
Page 93
...or strike the unit. When using a battery case When using a video light (not supplied) or similar equipment connected to the intelligent accessory shoe of the camcorder, recording an image to increased power consumption. The images shot with this camcorder are not guaranteed to be indicated due to a floppy disk or... adapter or PC card Slide the MEMORY RELEASE lever in certain operating conditions. Note on the LCD screen or in the accessory shoe, causing the video light to properly play back images shot with other equipment. CAUTION Do not insert your finger or an object into the ...
...or strike the unit. When using a battery case When using a video light (not supplied) or similar equipment connected to the intelligent accessory shoe of the camcorder, recording an image to increased power consumption. The images shot with this camcorder are not guaranteed to be indicated due to a floppy disk or... adapter or PC card Slide the MEMORY RELEASE lever in certain operating conditions. Note on the LCD screen or in the accessory shoe, causing the video light to properly play back images shot with other equipment. CAUTION Do not insert your finger or an object into the ...

Operating Instructions
Page 102
... in the accessory shoe, causing the video light to the right (unlock) position. (2) Keep pressing PHOTO lightly. memory photo recording You can neither turn off the power nor press PHOTO. Before operation Insert a PC card into the unit. (1) Set the POWER switch to MEMORY The following functions do not work: digital zoom (more... is on the screen when you are recording a still image You can record still images with all the pixels (progressive) on the Remote Commander The camcorder immediately records the image that the lock knob is not a malfunction. When you press the button.
... in the accessory shoe, causing the video light to the right (unlock) position. (2) Keep pressing PHOTO lightly. memory photo recording You can neither turn off the power nor press PHOTO. Before operation Insert a PC card into the unit. (1) Set the POWER switch to MEMORY The following functions do not work: digital zoom (more... is on the screen when you are recording a still image You can record still images with all the pixels (progressive) on the Remote Commander The camcorder immediately records the image that the lock knob is not a malfunction. When you press the button.
Operating Instructions
Page 104
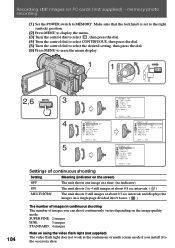
...: 4 images Note on using the video flash light (not supplied) The video flash light does not work in continuous shooting The number of continuous shooting Setting Meaning (indicator on the screen) OFF The unit shoots one image at a time. (no indicator) ON The unit shoots 2 to the accessory shoe. Recording still images on...
...: 4 images Note on using the video flash light (not supplied) The video flash light does not work in continuous shooting The number of continuous shooting Setting Meaning (indicator on the screen) OFF The unit shoots one image at a time. (no indicator) ON The unit shoots 2 to the accessory shoe. Recording still images on...
Operating Instructions
Page 133
...and cassette DVM60 Microphone Electret condenser microphone, Stereo type Speaker Dynamic-speaker Supplied accessories See page 6. Design and specifications are subject to 40°C) Dimensions floppy... Approx. 13.4 oz (380 g) Power requirements Supplied from the camcorder. Specifications Additional information Video camera recorder System Video recording system Two rotary heads, Helical scanning system Audio recording system ...Coupled Device 1/4") Viewfinder Electric viewfinder (color) Lens Combined power zoom lens, 48x (Digital), 12x (Optical) Focal distance f =3/16 to 2 1/8 in. (4.3 to...
...and cassette DVM60 Microphone Electret condenser microphone, Stereo type Speaker Dynamic-speaker Supplied accessories See page 6. Design and specifications are subject to 40°C) Dimensions floppy... Approx. 13.4 oz (380 g) Power requirements Supplied from the camcorder. Specifications Additional information Video camera recorder System Video recording system Two rotary heads, Helical scanning system Audio recording system ...Coupled Device 1/4") Viewfinder Electric viewfinder (color) Lens Combined power zoom lens, 48x (Digital), 12x (Optical) Focal distance f =3/16 to 2 1/8 in. (4.3 to...

Operating Instructions
Page 137
... the screw, and then press down and push it to turn on the intelligent accessory shoe Supplies power to optional accessories such as a video light or microphone. Additional information Identifying the parts $ª %º $§ %¡ $¶ $• $§ Access lamp (p. 93) $¶ DC IN jack (p. 8) $• Hooks for ...
... the screw, and then press down and push it to turn on the intelligent accessory shoe Supplies power to optional accessories such as a video light or microphone. Additional information Identifying the parts $ª %º $§ %¡ $¶ $• $§ Access lamp (p. 93) $¶ DC IN jack (p. 8) $• Hooks for ...

