Operating Instructions
Page 15
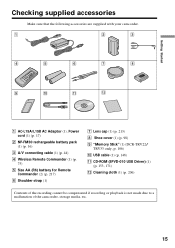
... cap (1) (p. 213) 8 Shoe cover (1) (p. 98) 9 "Memory Stick" (1) (DCR-TRV22/ TRV33 only, p. 106) 0 USB cable (1) (p. 148) qa CD-ROM (SPVD-010 USB Driver) (1) (p. 153, 171) qs Cleaning cloth (1) (p. 206) Contents of the recording cannot be compensated if recording or playback is not made due to a malfunction of the camcorder, storage media, etc. 15 Getting Started Checking...
... cap (1) (p. 213) 8 Shoe cover (1) (p. 98) 9 "Memory Stick" (1) (DCR-TRV22/ TRV33 only, p. 106) 0 USB cable (1) (p. 148) qa CD-ROM (SPVD-010 USB Driver) (1) (p. 153, 171) qs Cleaning cloth (1) (p. 206) Contents of the recording cannot be compensated if recording or playback is not made due to a malfunction of the camcorder, storage media, etc. 15 Getting Started Checking...

Operating Instructions
Page 148
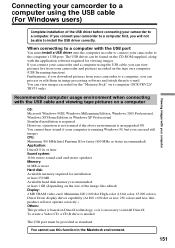
..." (DCR-TRV22/TRV33 only) or recorded on the tape on the tape When connecting to a computer with the USB port, complete installation of connecting your camcorder to a computer with the USB port See page 151 for details. Introduction There are following ways of the USB driver before connecting your camcorder to a computer in order to install the USB driver...
..." (DCR-TRV22/TRV33 only) or recorded on the tape on the tape When connecting to a computer with the USB port, complete installation of connecting your camcorder to a computer with the USB port See page 151 for details. Introduction There are following ways of the USB driver before connecting your camcorder to a computer in order to install the USB driver...
Operating Instructions
Page 151
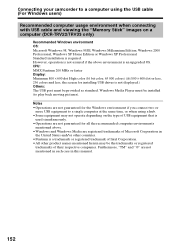
... memory recommended: at least 1 GB (depending on the size of the USB driver before connecting your camcorder to the computer's USB port. However, operation is not assured if the above environment is required. If you connect your camcorder to install DirectX. You can read still images. CPU: Minimum 500 MHz...USB port You must be provided as standard. To create a Video CD, a CD-R drive is needed. You cannot use this product will not operate correctly.) Others: This product is based on DirectX technology, so it is running Windows 98, but you will not be found on a computer (DCR...
... memory recommended: at least 1 GB (depending on the size of the USB driver before connecting your camcorder to the computer's USB port. However, operation is not assured if the above environment is required. If you connect your camcorder to install DirectX. You can read still images. CPU: Minimum 500 MHz...USB port You must be provided as standard. To create a Video CD, a CD-R drive is needed. You cannot use this product will not operate correctly.) Others: This product is based on DirectX technology, so it is running Windows 98, but you will not be found on a computer (DCR...
Operating Instructions
Page 152
...States and/or other product names mentioned herein may not operate depending on a computer (DCR-TRV22/TRV33 only) Recommended Windows environment OS: Microsoft Windows 98, Windows 98SE, Windows ...XP Home Edition or Windows XP Professional Standard installation is required. Connecting your camcorder to a computer using a hub. •Some equipment may be installed (to a single computer... USB cable and viewing the "Memory Stick" images on the type of USB equipment that is used simultaneously. •Operations are not guaranteed for installing USB driver is not displayed.) Others: The USB ...
...States and/or other product names mentioned herein may not operate depending on a computer (DCR-TRV22/TRV33 only) Recommended Windows environment OS: Microsoft Windows 98, Windows 98SE, Windows ...XP Home Edition or Windows XP Professional Standard installation is required. Connecting your camcorder to a computer using a hub. •Some equipment may be installed (to a single computer... USB cable and viewing the "Memory Stick" images on the type of USB equipment that is used simultaneously. •Operations are not guaranteed for installing USB driver is not displayed.) Others: The USB ...
Operating Instructions
Page 154
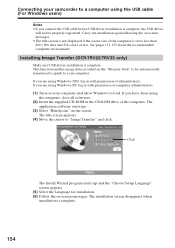
... Windows to load. See pages 151, 152 about the recommended computer environment. Connecting your camcorder to a computer using the USB cable (For Windows users) Notes •If you connect the USB cable before USB driver installation is set to less than 800 × 600 dots and 256 colors or less.... Installing Image Transfer (DCR-TRV22/TRV33 only) Make sure USB driver installation is complete. 154 The installation screen disappears when installation is complete. This function enables image data recorded on -screen messages...
... Windows to load. See pages 151, 152 about the recommended computer environment. Connecting your camcorder to a computer using the USB cable (For Windows users) Notes •If you connect the USB cable before USB driver installation is set to less than 800 × 600 dots and 256 colors or less.... Installing Image Transfer (DCR-TRV22/TRV33 only) Make sure USB driver installation is complete. 154 The installation screen disappears when installation is complete. This function enables image data recorded on -screen messages...
Operating Instructions
Page 155
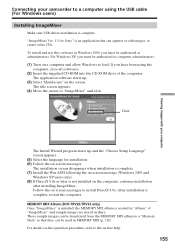
MEMORY MIX Album (DCR-TRV22/TRV33 only) ... starts up and the "Choose Setup Language" screen appears. (5) Select the language for Sony" is not installed on the screen. The installation screen disappears when installation is complete. ... be used in there. Follow the on -screen messages. Viewing images with your computer Connecting your camcorder to install DirectX 8.0a. "ImageMixer Ver. 1.5 for installation. (6) Follow the on -screen messages... been using the USB cable (For Windows users) Installing ImageMixer Make sure USB driver installation is complete, restart the computer.
MEMORY MIX Album (DCR-TRV22/TRV33 only) ... starts up and the "Choose Setup Language" screen appears. (5) Select the language for Sony" is not installed on the screen. The installation screen disappears when installation is complete. ... be used in there. Follow the on -screen messages. Viewing images with your computer Connecting your camcorder to install DirectX 8.0a. "ImageMixer Ver. 1.5 for installation. (6) Follow the on -screen messages... been using the USB cable (For Windows users) Installing ImageMixer Make sure USB driver installation is complete, restart the computer.
Operating Instructions
Page 157
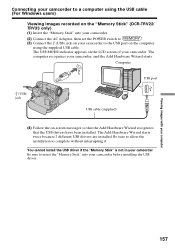
... set the POWER switch to . (3) Connect the (USB) jack on your camcorder to the USB port on the computer using the USB cable (For Windows users) Viewing images recorded on the "Memory Stick" (DCR-TRV22/ TRV33 only) (1) Insert the "Memory Stick" into your camcorder before installing the USB driver. The USB MODE indicator appears on -screen messages so that...
... set the POWER switch to . (3) Connect the (USB) jack on your camcorder to the USB port on the computer using the USB cable (For Windows users) Viewing images recorded on the "Memory Stick" (DCR-TRV22/ TRV33 only) (1) Insert the "Memory Stick" into your camcorder before installing the USB driver. The USB MODE indicator appears on -screen messages so that...
Operating Instructions
Page 160
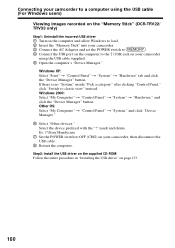
... in "Installing the USB driver" on your camcorder to a computer using the USB cable supplied. 5 Open the computer's "Device Manager." Ex: (?)Sony Handycam 7 Set the POWER switch to the (USB) jack on your camcorder using the USB cable (For Windows users) Viewing images recorded on the "Memory Stick" (DCR-TRV22/ TRV33 only) Step1: Uninstall the incorrect USB driver 1 Turn on the...
... in "Installing the USB driver" on your camcorder to a computer using the USB cable supplied. 5 Open the computer's "Device Manager." Ex: (?)Sony Handycam 7 Set the POWER switch to the (USB) jack on your camcorder using the USB cable (For Windows users) Viewing images recorded on the "Memory Stick" (DCR-TRV22/ TRV33 only) Step1: Uninstall the incorrect USB driver 1 Turn on the...
Operating Instructions
Page 167
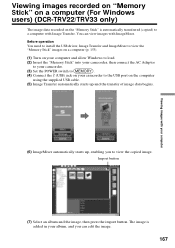
...computer (For Windows users) (DCR-TRV22/TRV33 only) The image data recorded on the computer using the supplied USB cable. (5) Image Transfer automatically starts up , enabling you can view images with ImageMixer. Before operation You need to install the USB driver, Image Transfer and ImageMixer to ...view the "Memory Stick" images on a computer (p. 153). (1) Turn on your computer and allow Windows to load. (2) Insert the "Memory Stick" into your camcorder, then connect the AC Adaptor to your camcorder. (3) Set the POWER...
...computer (For Windows users) (DCR-TRV22/TRV33 only) The image data recorded on the computer using the supplied USB cable. (5) Image Transfer automatically starts up , enabling you can view images with ImageMixer. Before operation You need to install the USB driver, Image Transfer and ImageMixer to ...view the "Memory Stick" images on a computer (p. 153). (1) Turn on your computer and allow Windows to load. (2) Insert the "Memory Stick" into your camcorder, then connect the AC Adaptor to your camcorder. (3) Set the POWER...
Operating Instructions
Page 168
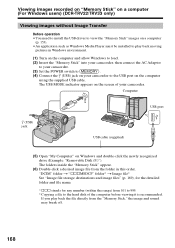
...stands for any number (within the range) from 101 to 999. 2) Copying a file to the hard disk of your camcorder to . (4) Connect the (USB) jack on your camcorder. The folders inside the "Memory Stick" appear. (6) Double-click a desired image file from the "Memory Stick," the ...Removable Disk (F:)"). Viewing images recorded on "Memory Stick" on a computer (For Windows users) (DCR-TRV22/TRV33 only) Viewing images without Image Transfer Before operation •You need to install the USB driver to view the "Memory Stick" images on a computer (p. 153). •An application such as...
...stands for any number (within the range) from 101 to 999. 2) Copying a file to the hard disk of your camcorder to . (4) Connect the (USB) jack on your camcorder. The folders inside the "Memory Stick" appear. (6) Double-click a desired image file from the "Memory Stick," the ...Removable Disk (F:)"). Viewing images recorded on "Memory Stick" on a computer (For Windows users) (DCR-TRV22/TRV33 only) Viewing images without Image Transfer Before operation •You need to install the USB driver to view the "Memory Stick" images on a computer (p. 153). •An application such as...
Operating Instructions
Page 170
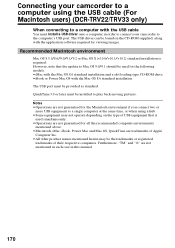
..."®" are not guaranteed for the Macintosh environment if you connect two or more USB equipment to a single computer at the same time, or when using the USB cable (For Macintosh users) (DCR-TRV22/TRV33 only) When connecting to a computer with the Mac OS 8.6 standard ...Notes •Operations are not mentioned in each case in order to connect your camcorder to a computer using a hub. •Some equipment may be provided as standard. QuickTime 3.0 or later must install a USB driver onto a computer in this manual. 170 Recommended Macintosh environment Mac OS 8.5.1/8.6/9.0/9.1/9.2 or...
..."®" are not guaranteed for the Macintosh environment if you connect two or more USB equipment to a single computer at the same time, or when using the USB cable (For Macintosh users) (DCR-TRV22/TRV33 only) When connecting to a computer with the Mac OS 8.6 standard ...Notes •Operations are not mentioned in each case in order to connect your camcorder to a computer using a hub. •Some equipment may be provided as standard. QuickTime 3.0 or later must install a USB driver onto a computer in this manual. 170 Recommended Macintosh environment Mac OS 8.5.1/8.6/9.0/9.1/9.2 or...
Operating Instructions
Page 171
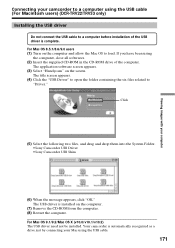
...into the System Folder. •Sony Camcorder USB Driver •Sony Camcorder USB Shim (6) When the message appears, click "OK." Your camcorder is complete. The application software ...screen appears. (3) Select "Handycam" on the computer. (7) Remove the CD-ROM from the computer. (8) Restart the computer. Viewing images with your computer Connecting your camcorder to a computer using the USB cable (For Macintosh users) (DCR-TRV22/TRV33 only) Installing the USB driver...
...into the System Folder. •Sony Camcorder USB Driver •Sony Camcorder USB Shim (6) When the message appears, click "OK." Your camcorder is complete. The application software ...screen appears. (3) Select "Handycam" on the computer. (7) Remove the CD-ROM from the computer. (8) Restart the computer. Viewing images with your computer Connecting your camcorder to a computer using the USB cable (For Macintosh users) (DCR-TRV22/TRV33 only) Installing the USB driver...

Operating Instructions
Page 172
... access lamp of the computer before viewing it , then select "Eject disk" from 101 to 999. 2) Copying a file to the hard disk of your camcorder is recommended. "DCIM" folder t "sssMSDCF" folder1) t Image file2) 1) sss stands for any number (within the range) from the "Special" menu ... POWER switch to OFF (CHG). Viewing images recorded on "Memory Stick" on a computer (For Macintosh users) (DCR-TRV22/TRV33 only) Viewing images Before operation •You need to install the USB driver to view the "Memory Stick" images on a computer (p. 171). •QuickTime 3.0 or later must be installed...
... access lamp of the computer before viewing it , then select "Eject disk" from 101 to 999. 2) Copying a file to the hard disk of your camcorder is recommended. "DCIM" folder t "sssMSDCF" folder1) t Image file2) 1) sss stands for any number (within the range) from the "Special" menu ... POWER switch to OFF (CHG). Viewing images recorded on "Memory Stick" on a computer (For Macintosh users) (DCR-TRV22/TRV33 only) Viewing images Before operation •You need to install the USB driver to view the "Memory Stick" images on a computer (p. 171). •QuickTime 3.0 or later must be installed...
Operating Instructions
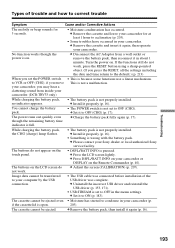
Page 193
... switch is not set to ON (p. 183). The buttons on the LCD screen do not work . c Set it again (p. 16). c Remove the battery pack, then install it to OFF in your camcorder. (DCR-TRV33 only) • This is on . c Remove the cassette and...camcorder or DISPLAY on the touch panel. • DSPL/BATT INFO is set to OFF (CHG) (p. 17). The buttons do not appear on the Remote Commander (p. 40). c Uninstall the incorrect USB driver and reinstall the USB driver (p. 153, 171). • USB STREAM is pressed. c Press DSPL/BATT INFO on your Sony dealer or local authorized Sony...
... switch is not set to ON (p. 183). The buttons on the LCD screen do not work . c Set it again (p. 16). c Remove the battery pack, then install it to OFF in your camcorder. (DCR-TRV33 only) • This is on . c Remove the cassette and...camcorder or DISPLAY on the touch panel. • DSPL/BATT INFO is set to OFF (CHG) (p. 17). The buttons do not appear on the Remote Commander (p. 40). c Uninstall the incorrect USB driver and reinstall the USB driver (p. 153, 171). • USB STREAM is pressed. c Press DSPL/BATT INFO on your Sony dealer or local authorized Sony...


