Operating Instructions
Page 1
Model No. Refer to these numbers whenever you call upon your Sony dealer regarding this manual thoroughly, and retain it for future reference. Owner's Record The model and serial numbers are located on the bottom. AC Serial No Serial No DCR-TRV33 DCR-TRV19/TRV22/TRV33 ©2003 Sony Corporation DCR-TRV Model No. 3-080-369-12(1) Digital Video Camera Recorder Operating Instructions Before operating the unit, please read this product. Record the serial number in the space provided below.
Model No. Refer to these numbers whenever you call upon your Sony dealer regarding this manual thoroughly, and retain it for future reference. Owner's Record The model and serial numbers are located on the bottom. AC Serial No Serial No DCR-TRV33 DCR-TRV19/TRV22/TRV33 ©2003 Sony Corporation DCR-TRV Model No. 3-080-369-12(1) Digital Video Camera Recorder Operating Instructions Before operating the unit, please read this product. Record the serial number in the space provided below.

Operating Instructions
Page 2
... recycling of important operating and maintenance (servicing) instructions in the U.S.A. Operation is intended to alert the user to use. "Memory Stick" (DCR-TRV22/ TRV33 only) This device complies with Canadian ICES-003. 2 Welcome! You will soon be of sufficient magnitude to constitute a risk of...uninsulated "dangerous voltage" within the product's enclosure that may be producing home video that may not cause harmful interference, and (2) this Sony Handycam. With your used rechargeable batteries to rain or moisture. WARNING To prevent fire or shock hazard, do not expose the unit ...
... recycling of important operating and maintenance (servicing) instructions in the U.S.A. Operation is intended to alert the user to use. "Memory Stick" (DCR-TRV22/ TRV33 only) This device complies with Canadian ICES-003. 2 Welcome! You will soon be of sufficient magnitude to constitute a risk of...uninsulated "dangerous voltage" within the product's enclosure that may be producing home video that may not cause harmful interference, and (2) this Sony Handycam. With your used rechargeable batteries to rain or moisture. WARNING To prevent fire or shock hazard, do not expose the unit ...
Operating Instructions
Page 3
... operate this manual could void your local authority. 3 This equipment generates, uses, and can be used with Part 15 of Conformity Trade Name: SONY Model No.: DCR-TRV33 Responsible Party: Sony Electronics Inc. Reorient or relocate the receiving antenna. - Operation is subject to the following two conditions: (1) This device may not cause harmful...
... operate this manual could void your local authority. 3 This equipment generates, uses, and can be used with Part 15 of Conformity Trade Name: SONY Model No.: DCR-TRV33 Responsible Party: Sony Electronics Inc. Reorient or relocate the receiving antenna. - Operation is subject to the following two conditions: (1) This device may not cause harmful...
Operating Instructions
Page 4
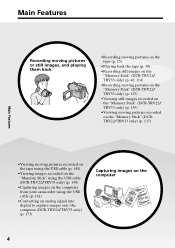
...(p. 39) •Recording still images on the "Memory Stick" (DCR-TRV22/ TRV33 only) (p. 46, 114) •Recording moving pictures on the "Memory Stick" (DCR-TRV22/ TRV33 only) (p. 125) •Viewing still images recorded on the "Memory Stick" (DCR-TRV22/ TRV33 only) (p. 135) •Viewing moving pictures recorded...USB cable (p. 148) •Viewing images recorded on the "Memory Stick" using the USB cable (DCR-TRV22/TRV33 only) (p. 149) •Capturing images on the computer from your camcorder using the USB cable (p. 161) •Converting an analog signal into digital to capture images onto ...
...(p. 39) •Recording still images on the "Memory Stick" (DCR-TRV22/ TRV33 only) (p. 46, 114) •Recording moving pictures on the "Memory Stick" (DCR-TRV22/ TRV33 only) (p. 125) •Viewing still images recorded on the "Memory Stick" (DCR-TRV22/ TRV33 only) (p. 135) •Viewing moving pictures recorded...USB cable (p. 148) •Viewing images recorded on the "Memory Stick" using the USB cable (DCR-TRV22/TRV33 only) (p. 149) •Capturing images on the computer from your camcorder using the USB cable (p. 161) •Converting an analog signal into digital to capture images onto ...
Operating Instructions
Page 5
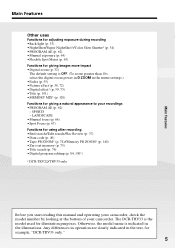
...•Zero set memory (p. 75) •Title search (p. 76) •Digital program editing (p. 84, 130*) * DCR-TRV22/TRV33 only Before you start reading this manual and operating your camcorder, check the model number by looking at the bottom of your recordings •PROGRAM AE (p. 62) - Otherwise, the model... name is the model used for illustration purposes. The DCR-TRV33 is indicated in the illustrations. Getting ...
...•Zero set memory (p. 75) •Title search (p. 76) •Digital program editing (p. 84, 130*) * DCR-TRV22/TRV33 only Before you start reading this manual and operating your camcorder, check the model number by looking at the bottom of your recordings •PROGRAM AE (p. 62) - Otherwise, the model... name is the model used for illustration purposes. The DCR-TRV33 is indicated in the illustrations. Getting ...

Operating Instructions
Page 6
... function 40 Viewing a recording on TV 44 Advanced Recording Operations Recording still images on "Memory Stick" during tape recording standby or tape recording (DCR-TRV22/TRV33 only 46 Recording a still image on tape 84 Recording video or TV programs ....... 93 Inserting a scene from a VCR - Picture... Spot Focus 67 Interval Recording 68 Frame by date - Title search 76 Searching a recording by frame recording - Tape Photo recording (DCR-TRV19 only 48 Self-timer recording 50 Adjusting the white balance manually 52 Using the wide mode 53 Using the fader function 55 Using...
... function 40 Viewing a recording on TV 44 Advanced Recording Operations Recording still images on "Memory Stick" during tape recording standby or tape recording (DCR-TRV22/TRV33 only 46 Recording a still image on tape 84 Recording video or TV programs ....... 93 Inserting a scene from a VCR - Picture... Spot Focus 67 Interval Recording 68 Frame by date - Title search 76 Searching a recording by frame recording - Tape Photo recording (DCR-TRV19 only 48 Self-timer recording 50 Adjusting the white balance manually 52 Using the wide mode 53 Using the fader function 55 Using...

Operating Instructions
Page 7
... picture from tape as a moving picture - Signal convert function (DCR-TRV22/ TRV33 only 173 Customizing Your Camcorder Changing the menu settings 175 Troubleshooting Types of contents Getting Started "Memory Stick" Operations (DCR-TRV22/TRV33 only) Using "Memory Stick 106 Inserting/Ejecting the ...USB Streaming (For Windows users 161 Viewing images recorded on "Memory Stick" on a computer (For Windows users) (DCR-TRV22/TRV33 only) ......... 167 Connecting your camcorder to a computer using the USB cable (For Windows users 151 7 Memory Photo recording 114 Recording an image from ...
... picture from tape as a moving picture - Signal convert function (DCR-TRV22/ TRV33 only 173 Customizing Your Camcorder Changing the menu settings 175 Troubleshooting Types of contents Getting Started "Memory Stick" Operations (DCR-TRV22/TRV33 only) Using "Memory Stick 106 Inserting/Ejecting the ...USB Streaming (For Windows users 161 Viewing images recorded on "Memory Stick" on a computer (For Windows users) (DCR-TRV22/TRV33 only) ......... 167 Connecting your camcorder to a computer using the USB cable (For Windows users 151 7 Memory Photo recording 114 Recording an image from ...
Operating Instructions
Page 10
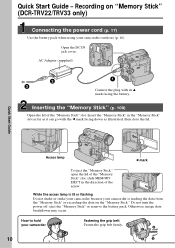
... with the b mark facing down as illustrated, then close the lid. While the access lamp is lit or flashing Do not shake or strike your camcorder because your camcorder Fastening the grip belt Fasten the grip belt firmly. 2 1 10 43 Quick Start Guide - How to hold your... reading the data from the "Memory Stick" or recording the data on "Memory Stick" (DCR-TRV22/TRV33 only) Connecting the power cord (p. 17) Use the battery pack when using your camcorder outdoors (p. 16). Insert the "Memory Stick" in the direction of the "Memory Stick" slot. Open the DC IN jack cover. Quick...
... with the b mark facing down as illustrated, then close the lid. While the access lamp is lit or flashing Do not shake or strike your camcorder because your camcorder Fastening the grip belt Fasten the grip belt firmly. 2 1 10 43 Quick Start Guide - How to hold your... reading the data from the "Memory Stick" or recording the data on "Memory Stick" (DCR-TRV22/TRV33 only) Connecting the power cord (p. 17) Use the battery pack when using your camcorder outdoors (p. 16). Insert the "Memory Stick" in the direction of the "Memory Stick" slot. Open the DC IN jack cover. Quick...
Operating Instructions
Page 12
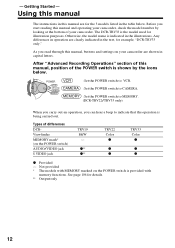
The DCR-TRV33 is the model used for details. ** Output only 12 Types of this manual, buttons and settings on your camcorder. See page 106 for illustration purposes. Not provided * The models with MEMORY marked on the POWER switch) AUDIO/VIDEO jack S VIDEO jack TRV19 B&W ...When you carry out an operation, you start reading this manual are for example, "DCR-TRV33 only." Any differences in operation are shown in the illustrations. - As you read through this manual, position of your camcorder are clearly indicated in the text, for the 3 models listed in this manual and ...
The DCR-TRV33 is the model used for details. ** Output only 12 Types of this manual, buttons and settings on your camcorder. See page 106 for illustration purposes. Not provided * The models with MEMORY marked on the POWER switch) AUDIO/VIDEO jack S VIDEO jack TRV19 B&W ...When you carry out an operation, you start reading this manual are for example, "DCR-TRV33 only." Any differences in operation are shown in the illustrations. - As you read through this manual, position of your camcorder are clearly indicated in the text, for the 3 models listed in this manual and ...
Operating Instructions
Page 15
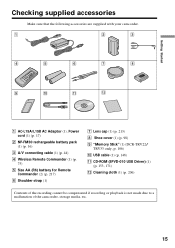
... (1) (p. 75) 5 Size AA (R6) battery for Remote Commander (2) (p. 217) 6 Shoulder strap (1) 7 Lens cap (1) (p. 213) 8 Shoe cover (1) (p. 98) 9 "Memory Stick" (1) (DCR-TRV22/ TRV33 only, p. 106) 0 USB cable (1) (p. 148) qa CD-ROM (SPVD-010 USB Driver) (1) (p. 153, 171) qs Cleaning cloth (1) (p. 206) Contents of the recording cannot... be compensated if recording or playback is not made due to a malfunction of the camcorder, storage media, etc. 15 Getting Started Checking supplied accessories Make sure that the following accessories are supplied with your...
... (1) (p. 75) 5 Size AA (R6) battery for Remote Commander (2) (p. 217) 6 Shoulder strap (1) 7 Lens cap (1) (p. 213) 8 Shoe cover (1) (p. 98) 9 "Memory Stick" (1) (DCR-TRV22/ TRV33 only, p. 106) 0 USB cable (1) (p. 148) qa CD-ROM (SPVD-010 USB Driver) (1) (p. 153, 171) qs Cleaning cloth (1) (p. 206) Contents of the recording cannot... be compensated if recording or playback is not made due to a malfunction of the camcorder, storage media, etc. 15 Getting Started Checking supplied accessories Make sure that the following accessories are supplied with your...
Operating Instructions
Page 19
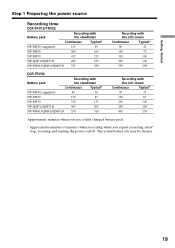
...105 NP-FM70 415 215 NP-QM71/QM71D 485 255 NP-FM91/QM91/QM91D 725 380 Recording with the LCD screen Continuous Typical* 90 45 150 75 310 160 365 190 550 290 DCR-TRV33 Battery pack Recording with the viewfinder Continuous Typical* NP-FM30 (supplied) 90 50 NP-FM50 150 85... NP-FM70 310 175 NP-QM71/QM71D 365 205 NP-FM91/QM91/QM91D 550 310 Recording with the LCD screen Continuous Typical* 70 35 120 65...
...105 NP-FM70 415 215 NP-QM71/QM71D 485 255 NP-FM91/QM91/QM91D 725 380 Recording with the LCD screen Continuous Typical* 90 45 150 75 310 160 365 190 550 290 DCR-TRV33 Battery pack Recording with the viewfinder Continuous Typical* NP-FM30 (supplied) 90 50 NP-FM50 150 85... NP-FM70 310 175 NP-QM71/QM71D 365 205 NP-FM91/QM91/QM91D 550 310 Recording with the LCD screen Continuous Typical* 70 35 120 65...
Operating Instructions
Page 20
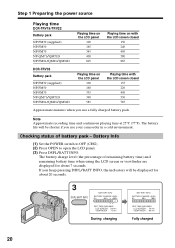
... (supplied) NP-FM50 NP-FM70 NP-QM71/QM71D NP-FM91/QM91/QM91D Playing time on the LCD panel 100 165 345 400 605 Playing time on with the LCD screen closed 150 240 495 580 865 DCR-TRV33 Battery pack NP-FM30 (supplied) NP-FM50 NP-FM70 NP-QM71/QM71D NP-FM91/QM91.../QM91D Playing time on the LCD panel 100 160 335 390 585 Playing time with the LCD screen closed 135 220 450 530 785 Approximate minutes when you use your camcorder in a cold environment...
... (supplied) NP-FM50 NP-FM70 NP-QM71/QM71D NP-FM91/QM91/QM91D Playing time on the LCD panel 100 165 345 400 605 Playing time on with the LCD screen closed 150 240 495 580 865 DCR-TRV33 Battery pack NP-FM30 (supplied) NP-FM50 NP-FM70 NP-QM71/QM71D NP-FM91/QM91.../QM91D Playing time on the LCD panel 100 160 335 390 585 Playing time with the LCD screen closed 135 220 450 530 785 Approximate minutes when you use your camcorder in a cold environment...
Operating Instructions
Page 22
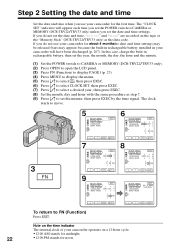
...for noon. The "CLOCK SET" indicator will have been discharged (p. 207). Note on the time indicator The internal clock of your camcorder operates on the tape or the "Memory Stick" (DCR-TRV22/TRV33 only) as step 7. (9) Press r/R to set the minute, then press EXEC by the time signal. In this ..., then set the year, the month, the day, the hour and the minute. (1) Set the POWER switch to CAMERA or MEMORY (DCR-TRV22/TRV33 only). (2) Press OPEN to open the LCD panel. (3) Press FN (Function) to display PAGE1 (p. 23). (4) Press MENU to display the menu. (5) Press r/R to select , then press ...
...for noon. The "CLOCK SET" indicator will have been discharged (p. 207). Note on the time indicator The internal clock of your camcorder operates on the tape or the "Memory Stick" (DCR-TRV22/TRV33 only) as step 7. (9) Press r/R to set the minute, then press EXEC by the time signal. In this ..., then set the year, the month, the day, the hour and the minute. (1) Set the POWER switch to CAMERA or MEMORY (DCR-TRV22/TRV33 only). (2) Press OPEN to open the LCD panel. (3) Press FN (Function) to display PAGE1 (p. 23). (4) Press MENU to display the menu. (5) Press r/R to select , then press ...
Operating Instructions
Page 23
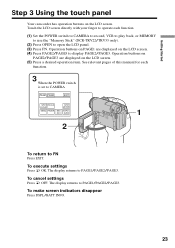
... or MEMORY to use the "Memory Stick" (DCR-TRV22/TRV33 only). (2) Press OPEN to display PAGE2/PAGE3. The display returns to FN Press EXIT. Getting Started Step 3 Using the touch panel Your camcorder has operation buttons on the LCD screen. (5) Press a desired operation item. Operation... buttons on PAGE2/PAGE3 are displayed on the LCD screen. (4) Press PAGE2/PAGE3 to open the LCD panel. (3) Press FN. To execute settings Press ...
... or MEMORY to use the "Memory Stick" (DCR-TRV22/TRV33 only). (2) Press OPEN to display PAGE2/PAGE3. The display returns to FN Press EXIT. Getting Started Step 3 Using the touch panel Your camcorder has operation buttons on the LCD screen. (5) Press a desired operation item. Operation... buttons on PAGE2/PAGE3 are displayed on the LCD screen. (4) Press PAGE2/PAGE3 to open the LCD panel. (3) Press FN. To execute settings Press ...

Operating Instructions
Page 24
... Operation buttons on each item The green bar appears above the item. When using the touch panel, press operation buttons lightly with your camcorder. If the items are not available The color of it. •Do not press the LCD screen with sharp objects such as a pen. •Do not press the..., PLAY, VOL During memory playback PAGE1 PAGE2 PAGE3 MENU, CAM, PB FOLDR, DEL PB ZOOM, CAM, RESIZE*, DATA CODE LCD BRT, CAM, VOL * DCR-TRV33 only Notes •When using the viewfinder You can control the display with the touch panel (p. 70). 24 You can also operate with DSPL/...
... Operation buttons on each item The green bar appears above the item. When using the touch panel, press operation buttons lightly with your camcorder. If the items are not available The color of it. •Do not press the LCD screen with sharp objects such as a pen. •Do not press the..., PLAY, VOL During memory playback PAGE1 PAGE2 PAGE3 MENU, CAM, PB FOLDR, DEL PB ZOOM, CAM, RESIZE*, DATA CODE LCD BRT, CAM, VOL * DCR-TRV33 only Notes •When using the viewfinder You can control the display with the touch panel (p. 70). 24 You can also operate with DSPL/...
Operating Instructions
Page 26
... details. 26 See page 50 for 5 minutes while the cassette is inserted Your camcorder automatically turns off automatically while the cassette is to save battery power and to prevent battery pack and tape wear. Note on the LOCK switch (DCR-TRV22/TRV33 only) When you can record 1.5 times as long as in... the LP mode on your camcorder, we recommend playing back the tape on the tape with the self-timer. When you leave...
... details. 26 See page 50 for 5 minutes while the cassette is inserted Your camcorder automatically turns off automatically while the cassette is to save battery power and to prevent battery pack and tape wear. Note on the LOCK switch (DCR-TRV22/TRV33 only) When you can record 1.5 times as long as in... the LP mode on your camcorder, we recommend playing back the tape on the tape with the self-timer. When you leave...
Operating Instructions
Page 30
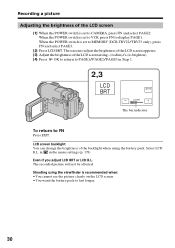
...return to FN Press EXIT. Even if you adjust LCD BRT or LCD B.L. The screen to adjust the brightness of the LCD screen appears. (3) Adjust the brightness of the LCD screen using - (to dim)/+ (to brighten).... (4) Press OK to return to PAGE1/PAGE2/PAGE3 in the menu settings (p. 178). Select LCD B.L. Shooting...When the POWER switch is recommended when: •You cannot see the picture clearly on the LCD screen. •You want the battery pack to last longer. 30 When the POWER switch ...
...return to FN Press EXIT. Even if you adjust LCD BRT or LCD B.L. The screen to adjust the brightness of the LCD screen appears. (3) Adjust the brightness of the LCD screen using - (to dim)/+ (to brighten).... (4) Press OK to return to PAGE1/PAGE2/PAGE3 in the menu settings (p. 178). Select LCD B.L. Shooting...When the POWER switch is recommended when: •You cannot see the picture clearly on the LCD screen. •You want the battery pack to last longer. 30 When the POWER switch ...
Operating Instructions
Page 31
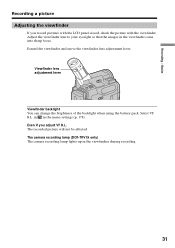
... will not be affected. Adjust the viewfinder lens to your eyesight so that the images in the viewfindrer during recording. 31 The camera recording lamp (DCR-TRV19 only) The camera recording lamp lights up in the viewfinder come into sharp focus. in in the menu settings (p. 178). Select VF B.L. Even if...
... will not be affected. Adjust the viewfinder lens to your eyesight so that the images in the viewfindrer during recording. 31 The camera recording lamp (DCR-TRV19 only) The camera recording lamp lights up in the viewfinder come into sharp focus. in in the menu settings (p. 178). Select VF B.L. Even if...

Operating Instructions
Page 32
.... Because the picture is performed digitally. When the POWER switch is set to 20× or 120×. The digital zoom is set to MEMORY (DCR-TRV22/TRV33 only) You cannot use zoom greater than 10× Zoom greater than 10× is processed digitally, the picture quality deteriorates. Recording a picture...
.... Because the picture is performed digitally. When the POWER switch is set to 20× or 120×. The digital zoom is set to MEMORY (DCR-TRV22/TRV33 only) You cannot use zoom greater than 10× Zoom greater than 10× is processed digitally, the picture quality deteriorates. Recording a picture...

Operating Instructions
Page 33
indicator appears on the screen. Recording - Back light function When you press MANUAL of EXPOSURE (p. 64) or SPOT METER (p. 65), the back light function will be canceled. 33 The . BACK LIGHT To cancel the back light function Press BACK LIGHT again. When shooting backlit subjects If you shoot a subject with the light source behind the subject or a subject with a light background, use the back light function. (1) Set the POWER switch to CAMERA or MEMORY (DCR-TRV22/TRV33 only). (2) Press BACK LIGHT. Basics Recording a picture Shooting backlit subjects -
indicator appears on the screen. Recording - Back light function When you press MANUAL of EXPOSURE (p. 64) or SPOT METER (p. 65), the back light function will be canceled. 33 The . BACK LIGHT To cancel the back light function Press BACK LIGHT again. When shooting backlit subjects If you shoot a subject with the light source behind the subject or a subject with a light background, use the back light function. (1) Set the POWER switch to CAMERA or MEMORY (DCR-TRV22/TRV33 only). (2) Press BACK LIGHT. Basics Recording a picture Shooting backlit subjects -


