
Operating Instructions
Page 7
...Connecting your computer Viewing images with a computer - USB Streaming (For Windows users 161 Viewing images recorded on "Memory Stick" on a computer (For Windows users) (DCR-TRV22/TRV33 only) ......... 167 Connecting your camcorder to correct trouble 186 Self-diagnosis display 194 Warning...Maintenance information and precautions 205 Specifications 211 Quick Reference Identifying parts and controls 213 Index 219 Viewing images with your camcorder to a computer using the USB cable (For Macintosh users) (DCR-TRV22/TRV33 only) ......... 170 Viewing images recorded on "Memory Stick" on...
...Connecting your computer Viewing images with a computer - USB Streaming (For Windows users 161 Viewing images recorded on "Memory Stick" on a computer (For Windows users) (DCR-TRV22/TRV33 only) ......... 167 Connecting your camcorder to correct trouble 186 Self-diagnosis display 194 Warning...Maintenance information and precautions 205 Specifications 211 Quick Reference Identifying parts and controls 213 Index 219 Viewing images with your camcorder to a computer using the USB cable (For Macintosh users) (DCR-TRV22/TRV33 only) ......... 170 Viewing images recorded on "Memory Stick" on...
Operating Instructions
Page 22
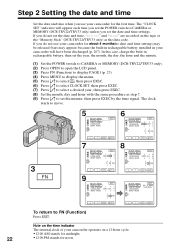
... month, the day, the hour and the minute. (1) Set the POWER switch to CAMERA or MEMORY (DCR-TRV22/TRV33 only). (2) Press OPEN to open the LCD panel. (3) Press FN (Function) to display PAGE1 (p. 23). (4) Press MENU to display the menu. (5) Press r/R to select , then press EXEC. (6) Press r/R to ... the POWER switch to CAMERA or MEMORY (DCR-TRV22/TRV33 only) unless you do not use your camcorder operates on the time indicator The internal clock of your camcorder for noon. SETUP MENU CLOCK SET USB STREAM LANGUAGE DEMO MODE EXIT JUL 4 2003 5:30:00PM EXEC RET. Note on a 12-hour cycle. &#...
... month, the day, the hour and the minute. (1) Set the POWER switch to CAMERA or MEMORY (DCR-TRV22/TRV33 only). (2) Press OPEN to open the LCD panel. (3) Press FN (Function) to display PAGE1 (p. 23). (4) Press MENU to display the menu. (5) Press r/R to select , then press EXEC. (6) Press r/R to ... the POWER switch to CAMERA or MEMORY (DCR-TRV22/TRV33 only) unless you do not use your camcorder operates on the time indicator The internal clock of your camcorder for noon. SETUP MENU CLOCK SET USB STREAM LANGUAGE DEMO MODE EXIT JUL 4 2003 5:30:00PM EXEC RET. Note on a 12-hour cycle. &#...
Operating Instructions
Page 151
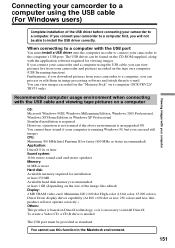
... × 600 dot or less, 256 colors and less, this function in order to connect your camcorder to a computer. Furthermore, if you download pictures from your camcorder and pictures recorded on the tape on a computer (USB Streaming function). You cannot hear sound if your computer is needed. Recommended computer usage environment when connecting with...
... × 600 dot or less, 256 colors and less, this function in order to connect your camcorder to a computer. Furthermore, if you download pictures from your camcorder and pictures recorded on the tape on a computer (USB Streaming function). You cannot hear sound if your computer is needed. Recommended computer usage environment when connecting with...

Operating Instructions
Page 156
.... Viewing pictures recorded on the tape (1) Connect the AC Adaptor to your camcorder. (2) Set the POWER switch to . (3) Press FN to display PAGE1. (4) Press MENU to display the menu. (5) Select USB STREAM in with permission of computer administrators. Computer USB port (USB) jack USB cable (supplied) (8) Follow the on the computer using Windows XP, log in...
.... Viewing pictures recorded on the tape (1) Connect the AC Adaptor to your camcorder. (2) Set the POWER switch to . (3) Press FN to display PAGE1. (4) Press MENU to display the menu. (5) Select USB STREAM in with permission of computer administrators. Computer USB port (USB) jack USB cable (supplied) (8) Follow the on the computer using Windows XP, log in...
Operating Instructions
Page 161
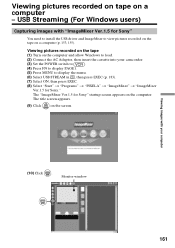
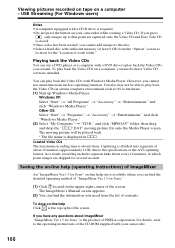
...insert the cassette into your computer (10) Click . Viewing images with "ImageMixer Ver.1.5 for Sony" You need to install the USB driver and ImageMixer to display the menu. (6) Select USB STREAM in , then press EXEC (p. 183). (7) Select ON, then press EXEC. (8) Select "..."PIXELA" t "ImageMixer" t "ImageMixer Ver.1.5 for Sony" startup screen appears on a computer (p. 153, 155). The "ImageMixer Ver.1.5 for Sony." The title screen appears. (9) Click on a computer - USB Streaming (For Windows users) Capturing images with your camcorder. (3) Set the POWER switch to . (4) Press...
...insert the cassette into your computer (10) Click . Viewing images with "ImageMixer Ver.1.5 for Sony" You need to install the USB driver and ImageMixer to display the menu. (6) Select USB STREAM in , then press EXEC (p. 183). (7) Select ON, then press EXEC. (8) Select "..."PIXELA" t "ImageMixer" t "ImageMixer Ver.1.5 for Sony" startup screen appears on a computer (p. 153, 155). The "ImageMixer Ver.1.5 for Sony." The title screen appears. (9) Click on a computer - USB Streaming (For Windows users) Capturing images with your camcorder. (3) Set the POWER switch to . (4) Press...

Operating Instructions
Page 162
... the computer. 162 Computer USB port (USB) jack USB cable (supplied) (12) Click to the USB port on the screen. The picture from your camcorder appears on the monitor window on pages 161, 162. Viewing pictures recorded on tape on the computer. USB Streaming (For Windows users) (11) Connect the (USB) jack on your camcorder to start playback. You...
... the computer. 162 Computer USB port (USB) jack USB cable (supplied) (12) Click to the USB port on the screen. The picture from your camcorder appears on the monitor window on pages 161, 162. Viewing pictures recorded on tape on the computer. USB Streaming (For Windows users) (11) Connect the (USB) jack on your camcorder to start playback. You...

Operating Instructions
Page 163
... . (2) Click the album you want to capture. (3) Click to start playback. (4) Looking at the monitor window, click want to capture. changes to point you 163 USB Streaming (For Windows users) Capturing still images Monitor window Thumbnail list window Viewing images with your computer (1) Click . (2) Looking at the first scene of the movie...
... . (2) Click the album you want to capture. (3) Click to start playback. (4) Looking at the monitor window, click want to capture. changes to point you 163 USB Streaming (For Windows users) Capturing still images Monitor window Thumbnail list window Viewing images with your computer (1) Click . (2) Looking at the first scene of the movie...

Operating Instructions
Page 164
...all running applications, then restart the computer. Carry out the following the procedure on your camcorder before installation of the screen. Disconnect the USB cable. - Reinstall the USB driver following operations after five minutes. •We recommend setting DEMO MODE to the other ...are not displayed correctly due to that of your camcorder are not displayed correctly. •When your camcorder is captured. USB Streaming (For Windows users) (5) Looking at the monitor window, click at the top right of the USB driver was complete. The moving picture, the preview...
...all running applications, then restart the computer. Carry out the following the procedure on your camcorder before installation of the screen. Disconnect the USB cable. - Reinstall the USB driver following operations after five minutes. •We recommend setting DEMO MODE to the other ...are not displayed correctly due to that of your camcorder are not displayed correctly. •When your camcorder is captured. USB Streaming (For Windows users) (5) Looking at the monitor window, click at the top right of the USB driver was complete. The moving picture, the preview...
Operating Instructions
Page 165
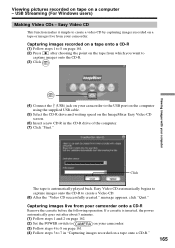
... choosing the point on the tape from which you want to capture images onto the CD-R. (3) Click . (4) Connect the (USB) jack on your camcorder onto a CD-R Remove the cassette before the following operation. USB Streaming (For Windows users) Making Video CDs - Capturing images recorded on a tape onto a CD-R (1) Follow steps 1 to 8 on page 161...
... choosing the point on the tape from which you want to capture images onto the CD-R. (3) Click . (4) Connect the (USB) jack on your camcorder onto a CD-R Remove the cassette before the following operation. USB Streaming (For Windows users) Making Video CDs - Capturing images recorded on a tape onto a CD-R (1) Follow steps 1 to 8 on page 161...
Operating Instructions
Page 166
USB Streaming (For Windows users) Notes •A computer equipped with sufficient memory (at least 6 GB) from the list of work folder." To play back the Video CDs with Windows Media Player. However, you cannot use a DVD player or a computer with your camcorder while creating a Video CD. Windows XP: Select "Start" t "All ...Playing back the Video CDs You can use menu functions such as OS or hardware. (1) Start up to that point are skipped for Sony." (1) Click located in sss. Created Video CDs The maximum recording time is about 10 minutes (approximately 4 GB) due to the...
USB Streaming (For Windows users) Notes •A computer equipped with sufficient memory (at least 6 GB) from the list of work folder." To play back the Video CDs with Windows Media Player. However, you cannot use a DVD player or a computer with your camcorder while creating a Video CD. Windows XP: Select "Start" t "All ...Playing back the Video CDs You can use menu functions such as OS or hardware. (1) Start up to that point are skipped for Sony." (1) Click located in sss. Created Video CDs The maximum recording time is about 10 minutes (approximately 4 GB) due to the...

Operating Instructions
Page 183
... To set DEMO MODE to other than CAMERA, or set the date or time (p. 22) USB STREAM LANGUAGE DEMO MODE z OFF To deactivate the USB Streaming function ON To activate the USB Streaming function z ENGLISH To display the information indicators in English FRANÇAIS To display the information ...the demonstration appear OFF To cancel the demonstration mode POWER switch * * * DCR-TRV22/TRV33 only Notes on the following page) Customizing Your Camcorder 183 Changing the menu settings Icon/item SETUP MENU CLOCK SET Mode -- To set to STBY (Standby) again, leave the DEMO MODE ...
... To set DEMO MODE to other than CAMERA, or set the date or time (p. 22) USB STREAM LANGUAGE DEMO MODE z OFF To deactivate the USB Streaming function ON To activate the USB Streaming function z ENGLISH To display the information indicators in English FRANÇAIS To display the information ...the demonstration appear OFF To cancel the demonstration mode POWER switch * * * DCR-TRV22/TRV33 only Notes on the following page) Customizing Your Camcorder 183 Changing the menu settings Icon/item SETUP MENU CLOCK SET Mode -- To set to STBY (Standby) again, leave the DEMO MODE ...
Operating Instructions
Page 193
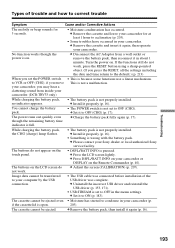
c Disconnect the AC Adaptor from inside your Sony dealer or local authorized Sony service facility. This is full. c Install it again (p. 16). The power runs out quickly, even though the remaining battery time indicator is not a ... pack, then install it properly (p. 16). c Press the LCD screen lightly. Image data cannot be ejected. c Set it to your camcorder. c Set it to OFF in about 1 minute. c Uninstall the incorrect USB driver and reinstall the USB driver (p. 153, 171). • USB STREAM is not set to correct trouble Symptom Cause and/or Corrective...
c Disconnect the AC Adaptor from inside your Sony dealer or local authorized Sony service facility. This is full. c Install it again (p. 16). The power runs out quickly, even though the remaining battery time indicator is not a ... pack, then install it properly (p. 16). c Press the LCD screen lightly. Image data cannot be ejected. c Set it to your camcorder. c Set it to OFF in about 1 minute. c Uninstall the incorrect USB driver and reinstall the USB driver (p. 153, 171). • USB STREAM is not set to correct trouble Symptom Cause and/or Corrective...

Operating Instructions
Page 196
...be created.1) • USB STREAMING ON GOING3) USB streaming is inserted.1) • AUDIO ERROR3) You are dirty (p. 206). FULL3) You have reached the maximum number of the tape.1) • Q NO TAPE Insert a cassette.1) • DELETING3) You press PHOTO on your camcorder while deleting data in the...ONLY Use an "InfoLITHIUM" battery pack (p. 17). • CLEANING CASSETTE The video heads are trying to record an image with your camcorder while formatting the "Memory Stick."1) • NOW CHARGING Charging an external flash (optional) does not work correctly.1) • FOLDER NO...
...be created.1) • USB STREAMING ON GOING3) USB streaming is inserted.1) • AUDIO ERROR3) You are dirty (p. 206). FULL3) You have reached the maximum number of the tape.1) • Q NO TAPE Insert a cassette.1) • DELETING3) You press PHOTO on your camcorder while deleting data in the...ONLY Use an "InfoLITHIUM" battery pack (p. 17). • CLEANING CASSETTE The video heads are trying to record an image with your camcorder while formatting the "Memory Stick."1) • NOW CHARGING Charging an external flash (optional) does not work correctly.1) • FOLDER NO...
Operating Instructions
Page 219
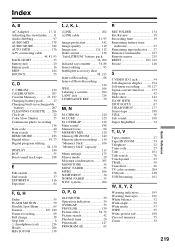
... PB ZOOM 74 Telephoto 32 Time code 27 Title 101 Title search 76 Touch panel 23 TRAIL 59 Transition 26 TV color systems 204 USB jack 148 USB Streaming 161 W, X, Y, Z Warning indicators 195 Warning messages 196 White balance 52 Wide-angle 32 Wide mode 53 WIPE 55 Write-protect tab 198 Zero set...
... PB ZOOM 74 Telephoto 32 Time code 27 Title 101 Title search 76 Touch panel 23 TRAIL 59 Transition 26 TV color systems 204 USB jack 148 USB Streaming 161 W, X, Y, Z Warning indicators 195 Warning messages 196 White balance 52 Wide-angle 32 Wide mode 53 WIPE 55 Write-protect tab 198 Zero set...


