
Operating Instructions
Page 148
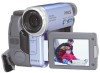
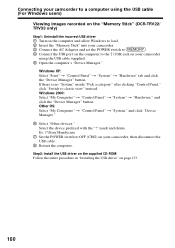
... Introduction There are following ways of the USB driver before connecting your camcorder to the computer first, you will not be able to a computer with your camcorder "Memory Stick" image (DCRTRV22/TRV33 only) Camcorder connection jack USB jack DV Interface USB jack ...Connection cable USB cable (supplied) Computer environment requirements USB port, editing software Reference pages For For Windows Macintosh Users Users 151 - 160 ...
... Introduction There are following ways of the USB driver before connecting your camcorder to the computer first, you will not be able to a computer with your camcorder "Memory Stick" image (DCRTRV22/TRV33 only) Camcorder connection jack USB jack DV Interface USB jack ...Connection cable USB cable (supplied) Computer environment requirements USB port, editing software Reference pages For For Windows Macintosh Users Users 151 - 160 ...
Operating Instructions
Page 151
... the computer's USB port. The USB port must install a USB driver onto the computer in order to connect your camcorder and a computer using the USB cable (For Windows users) Complete installation of the image files edited) Display: 4 MB VRAM video card, Minimum ... The USB driver can view images recorded on the "Memory Stick" on a computer OS: Microsoft Windows 98SE, Windows Millennium Edition, Windows 2000 Professional, Windows XP Home Edition or Windows XP Professional Standard installation is an upgraded OS. Viewing images with your computer Connecting your camcorder to a computer...
... the computer's USB port. The USB port must install a USB driver onto the computer in order to connect your camcorder and a computer using the USB cable (For Windows users) Complete installation of the image files edited) Display: 4 MB VRAM video card, Minimum ... The USB driver can view images recorded on the "Memory Stick" on a computer OS: Microsoft Windows 98SE, Windows Millennium Edition, Windows 2000 Professional, Windows XP Home Edition or Windows XP Professional Standard installation is an upgraded OS. Viewing images with your computer Connecting your camcorder to a computer...
Operating Instructions
Page 152
...the "Memory Stick" images on the type of USB equipment that is used simultaneously. •Operations are not guaranteed for installing USB driver is a trademark or registered trademark of Intel Corporation. •All other countries. •Pentium is not displayed.) Others: The USB... port must be the trademarks or registered trademarks of Microsoft Corporation in this manual. 152 Windows Media Player must be provided as standard. Connecting your camcorder to a computer using a hub. •Some equipment may be installed (to play back moving pictures). ...
...the "Memory Stick" images on the type of USB equipment that is used simultaneously. •Operations are not guaranteed for installing USB driver is a trademark or registered trademark of Intel Corporation. •All other countries. •Pentium is not displayed.) Others: The USB... port must be the trademarks or registered trademarks of Microsoft Corporation in this manual. 152 Windows Media Player must be provided as standard. Connecting your camcorder to a computer using a hub. •Some equipment may be installed (to play back moving pictures). ...

Operating Instructions
Page 153
..." (CD-ROM Drive). (3) Select "Handycam" on a computer and allow Windows to "USB Driver" and click. Viewing images with your computer Connecting your camcorder" on -screen messages. 153 This starts USB driver installation. If you are using the USB cable (For Windows users) Installing the USB driver Start the following operation without connecting the USB cable to...
..." (CD-ROM Drive). (3) Select "Handycam" on a computer and allow Windows to "USB Driver" and click. Viewing images with your computer Connecting your camcorder" on -screen messages. 153 This starts USB driver installation. If you are using the USB cable (For Windows users) Installing the USB driver Start the following operation without connecting the USB cable to...
Operating Instructions
Page 154
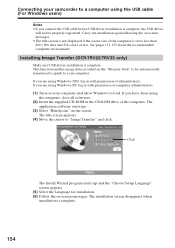
...screen disappears when installation is complete, the USB driver will not be automatically transferred (copied) to your computer and allow Windows to "Image Transfer" and click. Connecting your camcorder to a computer using the USB cable (For Windows users) Notes •If you connect the USB... cable before USB driver installation is complete. 154 This function enables image...
...screen disappears when installation is complete, the USB driver will not be automatically transferred (copied) to your computer and allow Windows to "Image Transfer" and click. Connecting your camcorder to a computer using the USB cable (For Windows users) Notes •If you connect the USB... cable before USB driver installation is complete. 154 This function enables image...
Operating Instructions
Page 155
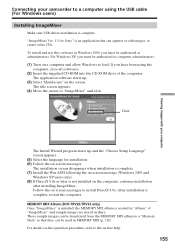
...you have been using the USB cable (For Windows users) Installing ImageMixer Make sure USB driver installation is complete, restart the computer. The application software starts up and the "Choose Setup Language" screen appears. (5) Select the language for Sony" is not installed on the screen. Follow the...procedure, refer to the on -screen messages to install DirectX 8.0a. After installation is complete. Viewing images with your computer Connecting your camcorder to a computer using the computer, close all softwares. (2) Insert the supplied CD-ROM into the CD-ROM drive of "ImageMixer" ...
...you have been using the USB cable (For Windows users) Installing ImageMixer Make sure USB driver installation is complete, restart the computer. The application software starts up and the "Choose Setup Language" screen appears. (5) Select the language for Sony" is not installed on the screen. Follow the...procedure, refer to the on -screen messages to install DirectX 8.0a. After installation is complete. Viewing images with your computer Connecting your camcorder to a computer using the computer, close all softwares. (2) Insert the supplied CD-ROM into the CD-ROM drive of "ImageMixer" ...

Operating Instructions
Page 156
... menu. (5) Select USB STREAM in , then press EXEC (p. 183). (6) Select ON, then press EXEC. (7) Connect the (USB) jack on your camcorder, and the Windows Add Hardware Wizard starts. If that the USB drivers have been installed. Computer USB port (USB) jack USB cable (supplied) (8) Follow the on the computer using the supplied USB...
... menu. (5) Select USB STREAM in , then press EXEC (p. 183). (6) Select ON, then press EXEC. (7) Connect the (USB) jack on your camcorder, and the Windows Add Hardware Wizard starts. If that the USB drivers have been installed. Computer USB port (USB) jack USB cable (supplied) (8) Follow the on the computer using the supplied USB...
Operating Instructions
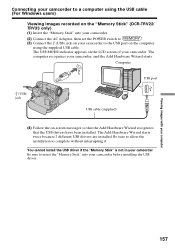
Page 157
... appears on the LCD screen of your computer 157 Computer USB port (USB) jack USB cable (supplied) (4) Follow the on-screen messages so that the Add Hardware Wizard recognizes that the USB drivers have been installed. The computer recognizes your camcorder before installing the USB driver. Be sure to... driver if the "Memory Stick" is not in your camcorder Be sure to insert the "Memory Stick" into your camcorder. (2) Connect the AC Adaptor, then set the POWER switch to . (3) Connect the (USB) jack on your camcorder to the USB port on the computer using the USB cable (For Windows ...
... appears on the LCD screen of your computer 157 Computer USB port (USB) jack USB cable (supplied) (4) Follow the on-screen messages so that the Add Hardware Wizard recognizes that the USB drivers have been installed. The computer recognizes your camcorder before installing the USB driver. Be sure to... driver if the "Memory Stick" is not in your camcorder Be sure to insert the "Memory Stick" into your camcorder. (2) Connect the AC Adaptor, then set the POWER switch to . (3) Connect the (USB) jack on your camcorder to the USB port on the computer using the USB cable (For Windows ...
Operating Instructions
Page 158
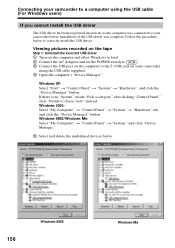
... on the computer to the (USB) jack on your camcorder before installation of the USB driver was connected to your camcorder using the USB cable (For Windows users) If you cannot install the USB driver The USB driver has been registered incorrectly as the computer was complete. Windows 2000: Select "My Computer" t "Control Panel" t "System" t "Hardware" tab...
... on the computer to the (USB) jack on your camcorder before installation of the USB driver was connected to your camcorder using the USB cable (For Windows users) If you cannot install the USB driver The USB driver has been registered incorrectly as the computer was complete. Windows 2000: Select "My Computer" t "Control Panel" t "System" t "Hardware" tab...
Operating Instructions
Page 159
Step 2: Install the USB driver on the supplied CD-ROM Follow the entire procedure in "Installing the USB driver" on your camcorder, then disconnect the USB cable. 7 Restart the computer. Connecting your camcorder to a computer using the USB cable (For Windows users) Viewing images with your computer Windows 2000 Windows XP 6 Set the POWER switch to OFF (CHG) on page 153. 159
Step 2: Install the USB driver on the supplied CD-ROM Follow the entire procedure in "Installing the USB driver" on your camcorder, then disconnect the USB cable. 7 Restart the computer. Connecting your camcorder to a computer using the USB cable (For Windows users) Viewing images with your computer Windows 2000 Windows XP 6 Set the POWER switch to OFF (CHG) on page 153. 159
Operating Instructions
Page 160
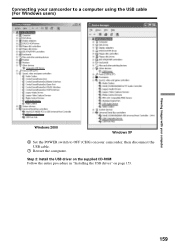
... the supplied CD-ROM Follow the entire procedure in "Installing the USB driver" on your camcorder using the USB cable supplied. 5 Open the computer's "Device Manager." Ex: (?)Sony Handycam 7 Set the POWER switch to classic view" instead. Windows 2000: Select "My Computer" t "Control Panel" t "System" t "Hardware," and click the "Device Manager" button. Other OS...
... the supplied CD-ROM Follow the entire procedure in "Installing the USB driver" on your camcorder using the USB cable supplied. 5 Open the computer's "Device Manager." Ex: (?)Sony Handycam 7 Set the POWER switch to classic view" instead. Windows 2000: Select "My Computer" t "Control Panel" t "System" t "Hardware," and click the "Device Manager" button. Other OS...
Operating Instructions
Page 161
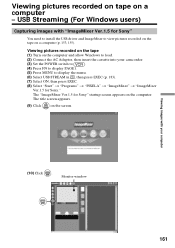
..."ImageMixer Ver.1.5 for Sony" You need to install the USB driver and ImageMixer to display the menu. (6) Select USB STREAM in , then press EXEC (p. 183). (7) Select ON, then press EXEC. (8) Select "Start" t "Programs" t "PIXELA" t "ImageMixer" t "ImageMixer Ver.1.5 for Sony" startup screen appears ... Viewing pictures recorded on the tape (1) Turn on a computer (p. 153, 155). The "ImageMixer Ver.1.5 for Sony." USB Streaming (For Windows users) Capturing images with your camcorder. (3) Set the POWER switch to . (4) Press FN to display PAGE1. (5) Press MENU to view pictures ...
..."ImageMixer Ver.1.5 for Sony" You need to install the USB driver and ImageMixer to display the menu. (6) Select USB STREAM in , then press EXEC (p. 183). (7) Select ON, then press EXEC. (8) Select "Start" t "Programs" t "PIXELA" t "ImageMixer" t "ImageMixer Ver.1.5 for Sony" startup screen appears ... Viewing pictures recorded on the tape (1) Turn on a computer (p. 153, 155). The "ImageMixer Ver.1.5 for Sony." USB Streaming (For Windows users) Capturing images with your camcorder. (3) Set the POWER switch to . (4) Press FN to display PAGE1. (5) Press MENU to view pictures ...

Operating Instructions
Page 164
... cassette is inserted. •Indicators on the screen of your camcorder. 164 Reinstall the USB driver following may occur. This is captured. Disconnect the USB cable. - USB Streaming (For Windows users) (5) Looking at the monitor window, click at the top right of the USB driver was complete. Images of different color systems to noise, etc...
... cassette is inserted. •Indicators on the screen of your camcorder. 164 Reinstall the USB driver following may occur. This is captured. Disconnect the USB cable. - USB Streaming (For Windows users) (5) Looking at the monitor window, click at the top right of the USB driver was complete. Images of different color systems to noise, etc...
Operating Instructions
Page 167
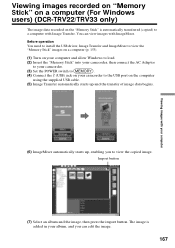
... button (7) Select an album and the image, then press the import button. Viewing images with your camcorder to view the copied image. Before operation You need to install the USB driver, Image Transfer and ImageMixer to view the "Memory Stick" images on a computer (p. 153). (1) ...Turn on your computer and allow Windows to load. (2) Insert the "Memory Stick" into your camcorder, then connect the AC Adaptor to your camcorder. (3) Set the POWER switch to...
... button (7) Select an album and the image, then press the import button. Viewing images with your camcorder to view the copied image. Before operation You need to install the USB driver, Image Transfer and ImageMixer to view the "Memory Stick" images on a computer (p. 153). (1) ...Turn on your computer and allow Windows to load. (2) Insert the "Memory Stick" into your camcorder, then connect the AC Adaptor to your camcorder. (3) Set the POWER switch to...
Operating Instructions
Page 168
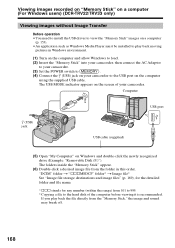
...folder in Windows environment. (1) Turn on the computer and allow Windows to load. (2) Insert the "Memory Stick" into your camcorder, then connect the AC Adaptor to your camcorder. (3) Set the POWER switch to . (4) Connect the (USB) jack on your camcorder to the hard disk of your camcorder. Computer ...only) Viewing images without Image Transfer Before operation •You need to install the USB driver to view the "Memory Stick" images on a computer (p. 153). •An application such as Windows Media Player must be installed to play back the file directly from 101 to 999. 2)...
...folder in Windows environment. (1) Turn on the computer and allow Windows to load. (2) Insert the "Memory Stick" into your camcorder, then connect the AC Adaptor to your camcorder. (3) Set the POWER switch to . (4) Connect the (USB) jack on your camcorder to the hard disk of your camcorder. Computer ...only) Viewing images without Image Transfer Before operation •You need to install the USB driver to view the "Memory Stick" images on a computer (p. 153). •An application such as Windows Media Player must be installed to play back the file directly from 101 to 999. 2)...


