Operating Guide
Page 11
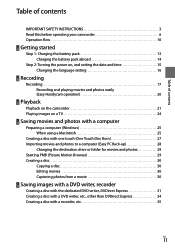
... 13 Charging the battery pack abroad 14 Step 2: Turning the power on, and setting the date and time 15 Changing the language setting 16 Recording Recording 17 Recording and playing movies and photos easily (Easy Handycam operation 20 Playback Playback on the camcorder 21 Playing images on a TV 24 Saving movies and photos with a computer Preparing...
... 13 Charging the battery pack abroad 14 Step 2: Turning the power on, and setting the date and time 15 Changing the language setting 16 Recording Recording 17 Recording and playing movies and photos easily (Easy Handycam operation 20 Playback Playback on the camcorder 21 Playing images on a TV 24 Saving movies and photos with a computer Preparing...
Operating Guide
Page 15
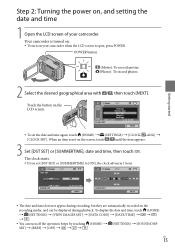
... during playback. To display the date and time, touch (HOME) (SETTINGS) [VIEW IMAGES SET] [DATA CODE] [DATE/TIME You can be displayed during recording, but they are automatically recorded on the recording media, and can turn on , and setting the date and time 1 Open the LCD screen of your camcorder when the LCD screen is...
... during playback. To display the date and time, touch (HOME) (SETTINGS) [VIEW IMAGES SET] [DATA CODE] [DATE/TIME You can be displayed during recording, but they are automatically recorded on the recording media, and can turn on , and setting the date and time 1 Open the LCD screen of your camcorder when the LCD screen is...

Operating Guide
Page 21
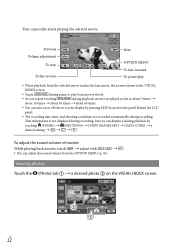
...can continue playback from the previous time. ( appears on the photo recorded on the LCD screen as well. Touch the (Movie) tab a desired movie . Playback Playback on the camcorder In the default setting, movies and photos on your camcorder. To the index screen of scenes...face scenes (Face Index) To the list of your camcorder when the LCD screen is turned on. To turn on the internal hard disk are played (p. 38). Playing movies Open the LCD screen of recording dates Next To return to recording mode ...
...can continue playback from the previous time. ( appears on the photo recorded on the LCD screen as well. Touch the (Movie) tab a desired movie . Playback Playback on the camcorder In the default setting, movies and photos on your camcorder. To the index screen of scenes...face scenes (Face Index) To the list of your camcorder when the LCD screen is turned on. To turn on the internal hard disk are played (p. 38). Playing movies Open the LCD screen of recording dates Next To return to recording mode ...
Operating Guide
Page 22
... As you can turn on or off the on-screen display by touching (HOME) (SETTINGS) [VIEW IMAGES SET] [DATA CODE] a desired setting To adjust the sound volume of movies While playing back movies, touch adjust with / ....; on the panel behind the LCD panel. The recording date, time, and shooting conditions are played as fast as about 5 times about 10 times about 30 times about 60 times. You can display it during recording. Your camcorder starts playing the selected movie. US 22
... As you can turn on or off the on-screen display by touching (HOME) (SETTINGS) [VIEW IMAGES SET] [DATA CODE] a desired setting To adjust the sound volume of movies While playing back movies, touch adjust with / ....; on the panel behind the LCD panel. The recording date, time, and shooting conditions are played as fast as about 5 times about 10 times about 30 times about 60 times. You can display it during recording. Your camcorder starts playing the selected movie. US 22
Operating Guide
Page 36
... your camcorder. Since dubbing is performed via analog data transfer, the image quality may deteriorate. To hide the screen indicators (such as a counter, etc.) on the screen of the monitor device connected, touch (HOME) (SETTINGS) [OUTPUT SETTINGS] [DISP OUTPUT] [LCD PANEL] (the default setting To record the date/time...
... your camcorder. Since dubbing is performed via analog data transfer, the image quality may deteriorate. To hide the screen indicators (such as a counter, etc.) on the screen of the monitor device connected, touch (HOME) (SETTINGS) [OUTPUT SETTINGS] [DISP OUTPUT] [LCD PANEL] (the default setting To record the date/time...

Operating Guide
Page 42
... DUB p. 40 PHOTO COPY COPY by select p. 40 COPY by date Adds movies recorded on the recording media, such as free space. 42 PROTECT Sets the protection to a playlist. USB CONNECT.......... ADD by date p. 40 EDIT DELETE p. 37 DELETE p. 37 PROTECT Sets the protection to avoid deleting movies. ERASE Erases a movie from ... hard disk via USB. USB CONNECT USB CONNECT........... DISC BURN p. 27 BATTERY INFO Displays the battery information. (MANAGE MEDIA) category MOVIE MEDIA SET p. 38 PHOTO MEDIA SET p. 39 US MEDIA INFO Displays information on the same day at one...
... DUB p. 40 PHOTO COPY COPY by select p. 40 COPY by date Adds movies recorded on the recording media, such as free space. 42 PROTECT Sets the protection to a playlist. USB CONNECT.......... ADD by date p. 40 EDIT DELETE p. 37 DELETE p. 37 PROTECT Sets the protection to avoid deleting movies. ERASE Erases a movie from ... hard disk via USB. USB CONNECT USB CONNECT........... DISC BURN p. 27 BATTERY INFO Displays the battery information. (MANAGE MEDIA) category MOVIE MEDIA SET p. 38 PHOTO MEDIA SET p. 39 US MEDIA INFO Displays information on the same day at one...
Operating Guide
Page 50
... PRO Duo" media or format the "Memory Stick PRO Duo" media on your camcorder to retain the date, time, and other settings even when the camcorder is recommended that you may not delete data from the "Handycam Handbook" " on a computer. Procedures Connect your camcorder or a computer, you perform [ EMPTY] (See "Getting detailed information from the "Memory Stick...
... PRO Duo" media or format the "Memory Stick PRO Duo" media on your camcorder to retain the date, time, and other settings even when the camcorder is recommended that you may not delete data from the "Handycam Handbook" " on a computer. Procedures Connect your camcorder or a computer, you perform [ EMPTY] (See "Getting detailed information from the "Memory Stick...
Operating Guide
Page 58
... 25 Copy 40 Copying a disc 30 Creating a disc 30 D DATE/TIME 15 Delete 37 Destination drive or folder........29 Disc recorder 35 DST SET 15 Dubbing 40 DVDirect Express 31 DVD writer 31 E Easy Handycam operation.........20 Easy PC Back-up 28 Editing movies 30 F Format...Picture Motion Browser)....25, 29 PMB Guide 29 R Recording 17 Recording and playback time....52 Recording media 38 Repair 46 RESET 57 S Screen indicators 55 Self-diagnosis display 47 Setting the date and time...........15 Software 25 Specifications 51 Supplied items 8 T Tripod 38 Troubleshooting 46 Turning ...
... 25 Copy 40 Copying a disc 30 Creating a disc 30 D DATE/TIME 15 Delete 37 Destination drive or folder........29 Disc recorder 35 DST SET 15 Dubbing 40 DVDirect Express 31 DVD writer 31 E Easy Handycam operation.........20 Easy PC Back-up 28 Editing movies 30 F Format...Picture Motion Browser)....25, 29 PMB Guide 29 R Recording 17 Recording and playback time....52 Recording media 38 Repair 46 RESET 57 S Screen indicators 55 Self-diagnosis display 47 Setting the date and time...........15 Software 25 Specifications 51 Supplied items 8 T Tripod 38 Troubleshooting 46 Turning ...


