
Operating Guide
Page 7
... the operating system of the camcorder. Do not apply shock or vibration to "Handycam Handbook" (PDF). 7 Note on using your camcorder. When you transfer the camcorder, it is recommended that you perform [ EMPTY]* to protect the camcorder may be recorded. Unauthorized recording of the camcorder using a VCR, or a...computer • Do not try to format the hard disk of such materials may also be contrary to the camcorder. About language setting • The on DCR-SR300. • The screenshots are used for the contents of recordings cannot be copyrighted. On the drop sensor ...
... the operating system of the camcorder. Do not apply shock or vibration to "Handycam Handbook" (PDF). 7 Note on using your camcorder. When you transfer the camcorder, it is recommended that you perform [ EMPTY]* to protect the camcorder may be recorded. Unauthorized recording of the camcorder using a VCR, or a...computer • Do not try to format the hard disk of such materials may also be contrary to the camcorder. About language setting • The on DCR-SR300. • The screenshots are used for the contents of recordings cannot be copyrighted. On the drop sensor ...

Operating Guide
Page 9
...) (DCR-SR42/SR62/ SR82) NP-FH60 (1) (p.11) (DCR-SR200/SR300) Handycam Station (1) (p.11) A/V connecting cable (1) (p.25) USB cable (1) (p.27) CD-ROM "Handycam Application Software" (1) (p.26) - Getting Started Step 1: Checking supplied items Make sure that item supplied. The number in the parentheses indicates the number of that you have the following items supplied with your camcorder. AC...
...) (DCR-SR42/SR62/ SR82) NP-FH60 (1) (p.11) (DCR-SR200/SR300) Handycam Station (1) (p.11) A/V connecting cable (1) (p.25) USB cable (1) (p.27) CD-ROM "Handycam Application Software" (1) (p.26) - Getting Started Step 1: Checking supplied items Make sure that item supplied. The number in the parentheses indicates the number of that you have the following items supplied with your camcorder. AC...
Operating Guide
Page 11
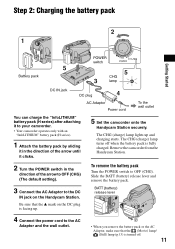
... AC Adaptor Power cord To the wall outlet You can charge the "InfoLITHIUM" battery pack (H series) after attaching it to your camcorder. • Your camcorder operates only with an "InfoLITHIUM" battery pack (H series). 1 Attach the battery pack by sliding it in the direction of the ...arrow until it clicks. 5 Set the camcorder onto the Handycam Station securely. Remove the camcorder from the Handycam Station. 2 Turn the POWER switch in the direction of the arrow to OFF (CHG) (The default setting). 3 Connect...
... AC Adaptor Power cord To the wall outlet You can charge the "InfoLITHIUM" battery pack (H series) after attaching it to your camcorder. • Your camcorder operates only with an "InfoLITHIUM" battery pack (H series). 1 Attach the battery pack by sliding it in the direction of the ...arrow until it clicks. 5 Set the camcorder onto the Handycam Station securely. Remove the camcorder from the Handycam Station. 2 Turn the POWER switch in the direction of the arrow to OFF (CHG) (The default setting). 3 Connect...

Operating Guide
Page 12
... Adaptor. NP-FH40: (Unit:min.) DCR-SR42 Charging time 125 Recording time*1 Continuous 105 recording time Typical recording time*4 50 Playback time 120 DCR-SR62/ SR82 125 90*2 100*3 45*2 50*3 110*2 12 NP-FH60: (Unit:min.) DCR-SR200 DCR-SR300 Charging time 135 135 Recording time*1...which you fully charge a completely exhausted battery pack. On the charging/recording/playback time • Times measured when using your camcorder or the Handycam Station, even when the power cord is recommended). • The available recording and playback time will not be supplied from the...
... Adaptor. NP-FH40: (Unit:min.) DCR-SR42 Charging time 125 Recording time*1 Continuous 105 recording time Typical recording time*4 50 Playback time 120 DCR-SR62/ SR82 125 90*2 100*3 45*2 50*3 110*2 12 NP-FH60: (Unit:min.) DCR-SR200 DCR-SR300 Charging time 135 135 Recording time*1...which you fully charge a completely exhausted battery pack. On the charging/recording/playback time • Times measured when using your camcorder or the Handycam Station, even when the power cord is recommended). • The available recording and playback time will not be supplied from the...

Operating Guide
Page 16
... ( )); Do not shake or knock your camcorder is reading/writing data. To cancel Easy Handycam operation, press EASY again. • You cannot use only a "Memory Stick Duo" marked with recording mode [SP]); DCR-SR42/SR62: approx. 10 hours and 50 minutes DCR-SR82: approx. 21 hours and 40 minutes DCR-SR200/SR300: approx. 14 hours and... the LCD panel, lightly push the "Memory Stick Duo" in which you can perform recording or playing back operation without detailed settings. For details, see "Handycam Handbook" (PDF). Your camcorder returns to 3 still images by Sony Corporation.
... ( )); Do not shake or knock your camcorder is reading/writing data. To cancel Easy Handycam operation, press EASY again. • You cannot use only a "Memory Stick Duo" marked with recording mode [SP]); DCR-SR42/SR62: approx. 10 hours and 50 minutes DCR-SR82: approx. 21 hours and 40 minutes DCR-SR200/SR300: approx. 14 hours and... the LCD panel, lightly push the "Memory Stick Duo" in which you can perform recording or playing back operation without detailed settings. For details, see "Handycam Handbook" (PDF). Your camcorder returns to 3 still images by Sony Corporation.
Operating Guide
Page 19
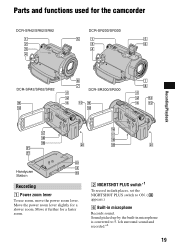
Parts and functions used for a faster zoom. 2 NIGHTSHOT PLUS switch*1 To record in microphone Records sound. Move it further for the camcorder DCR-SR42/SR62/SR82 DCR-SR200/SR300 DCR-SR42/SR62/SR82 DCR-SR200/SR300 Recording/Playback Handycam Station Recording 1 Power zoom lever To use zoom, move the power zoom lever. Move the power zoom lever slightly for a slower zoom. Sound picked up by the built-in microphone is converted to ON. ( appears.) 6 Built-in dark places, set the NIGHTSHOT PLUS switch to 5.1ch surround sound and recorded.*2 19
Parts and functions used for a faster zoom. 2 NIGHTSHOT PLUS switch*1 To record in microphone Records sound. Move it further for the camcorder DCR-SR42/SR62/SR82 DCR-SR200/SR300 DCR-SR42/SR62/SR82 DCR-SR200/SR300 Recording/Playback Handycam Station Recording 1 Power zoom lever To use zoom, move the power zoom lever. Move the power zoom lever slightly for a slower zoom. Sound picked up by the built-in microphone is converted to ON. ( appears.) 6 Built-in dark places, set the NIGHTSHOT PLUS switch to 5.1ch surround sound and recorded.*2 19
Operating Guide
Page 21
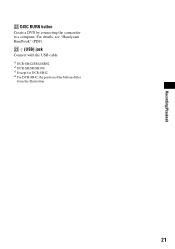
For details, see "Handycam Handbook" (PDF). wd (USB) jack Connect with the USB cable. *1 DCR-SR42/SR62/SR82 *2 DCR-SR200/SR300 *3 Except for DCR-SR42 *4 For DCR-SR42, the position of the buttons differ from the illustration. 21 Recording/Playback ws DISC BURN button Create a DVD by connecting the camcorder to a computer.
For details, see "Handycam Handbook" (PDF). wd (USB) jack Connect with the USB cable. *1 DCR-SR42/SR62/SR82 *2 DCR-SR200/SR300 *3 Except for DCR-SR42 *4 For DCR-SR42, the position of the buttons differ from the illustration. 21 Recording/Playback ws DISC BURN button Create a DVD by connecting the camcorder to a computer.

Operating Guide
Page 24
Saving images on a computer You can save the images recorded on a DVD or the hard disk of a computer. Saving images by connecting your camcorder. For details, see "Handycam Handbook" (PDF). To delete the still images in step 2, touch [ DELETE ALL] t [YES] t [YES] t . 24 Saving images ... Touch [ DELETE], then touch the still image to some type of your camcorder to other devices You can also edit those images. You can save the image data to be deleted. For details, see "Handycam Handbook" (PDF). Deleting the images on the internal hard disk of external ...
Saving images on a computer You can save the images recorded on a DVD or the hard disk of a computer. Saving images by connecting your camcorder. For details, see "Handycam Handbook" (PDF). To delete the still images in step 2, touch [ DELETE ALL] t [YES] t [YES] t . 24 Saving images ... Touch [ DELETE], then touch the still image to some type of your camcorder to other devices You can also edit those images. You can save the image data to be deleted. For details, see "Handycam Handbook" (PDF). Deleting the images on the internal hard disk of external ...
Operating Guide
Page 25
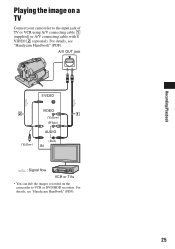
For details, see "Handycam Handbook" (PDF). A/V OUT jack S VIDEO VIDEO (Yellow) (White) AUDIO (Yellow) (Red) IN : Signal flow VCR or TVs • You can dub the images recorded on a TV Connect your camcorder to VCR or DVD/HDD recorders. Recording/Playback Playing the image on the camcorder to the input jack of TV or VCR using A/V connecting cable 1 (supplied) or A/V connecting cable with S VIDEO 2 (optional). For details, see "Handycam Handbook" (PDF). 25
For details, see "Handycam Handbook" (PDF). A/V OUT jack S VIDEO VIDEO (Yellow) (White) AUDIO (Yellow) (Red) IN : Signal flow VCR or TVs • You can dub the images recorded on a TV Connect your camcorder to VCR or DVD/HDD recorders. Recording/Playback Playing the image on the camcorder to the input jack of TV or VCR using A/V connecting cable 1 (supplied) or A/V connecting cable with S VIDEO 2 (optional). For details, see "Handycam Handbook" (PDF). 25
Operating Guide
Page 26
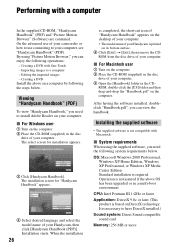
..."Picture Motion Browser" (Software) are contained. The select screen for "Handycam Handbook" appears. 4 Select desired language and select the model name of your computer. x For Macintosh user 1 Turn on your camcorder or how to use connecting to a computer - ROM, double-click the...drive of your computer. 3 Open the [Handbook] folder in a multi-boot environment. Performing with One Touch - Viewing "Handycam Handbook" (PDF) To view "Handycam Handbook," you can enjoy the following system requirements below . x For Windows user 1 Turn on DirectX technology. After having...
..."Picture Motion Browser" (Software) are contained. The select screen for "Handycam Handbook" appears. 4 Select desired language and select the model name of your computer. x For Macintosh user 1 Turn on your camcorder or how to use connecting to a computer - ROM, double-click the...drive of your computer. 3 Open the [Handbook] folder in a multi-boot environment. Performing with One Touch - Viewing "Handycam Handbook" (PDF) To view "Handycam Handbook," you can enjoy the following system requirements below . x For Windows user 1 Turn on DirectX technology. After having...

Operating Guide
Page 27
...guaranteed, frames may be dropped from movies, resulting in 2ch sound. • If you agree, then click [Next]. 8 Set the camcorder onto the Handycam Station, then turn the POWER switch to turn on the connection confirmation screen. If the screen does not appear 1Click [Start], then ... to restart it to your selected country/region. 7 Read [License Agreement], select [I accept the terms of the computer. Provide the camcorder and the Handycam Station, and a USB cable beforehand. Contents to be installed and procedures may differ depending on a DVD created subsequently will not work ...
...guaranteed, frames may be dropped from movies, resulting in 2ch sound. • If you agree, then click [Next]. 8 Set the camcorder onto the Handycam Station, then turn the POWER switch to turn on the connection confirmation screen. If the screen does not appear 1Click [Start], then ... to restart it to your selected country/region. 7 Read [License Agreement], select [I accept the terms of the computer. Provide the camcorder and the Handycam Station, and a USB cable beforehand. Contents to be installed and procedures may differ depending on a DVD created subsequently will not work ...

Operating Guide
Page 28
... USB cable, see the explanation of the function of each item on -screen instructions to change the recording functions and the operating settings for your camcorder, then press (HOME) A (or B). 2 Touch the desired setup item. 3 Follow the guide on the screen for the customers registration website ..., such as [ ] (Picture Motion Browser), appear on the computer, you register on the screen, touch v/V to install the software. To see "Handycam Handbook" (PDF). http://www.sony.net/registration/di/ • For the information about Picture Motion Browser, visit the following URL: http://www...
... USB cable, see the explanation of the function of each item on -screen instructions to change the recording functions and the operating settings for your camcorder, then press (HOME) A (or B). 2 Touch the desired setup item. 3 Follow the guide on the screen for the customers registration website ..., such as [ ] (Picture Motion Browser), appear on the computer, you register on the screen, touch v/V to install the software. To see "Handycam Handbook" (PDF). http://www.sony.net/registration/di/ • For the information about Picture Motion Browser, visit the following URL: http://www...
Operating Guide
Page 29
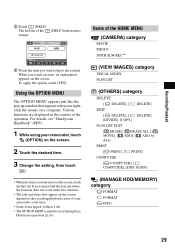
To apply the option, touch [YES]. For details, see "Handycam Handbook" (PDF). 1 While using your camcorder at the time. • Some items appear without a tab. • The OPTION MENU cannot be used during Easy Handycam operation (p.16). When you want to know the content. If you cannot find the item ... OPTION MENU appears just like the pop-up window that appear on the screen depend on a computer. The bottom of the operation. Items of your camcorder, touch (OPTION) on the screen. 2 Touch the desired item. 3 Change the setting, then touch . • When the item you touch an ...
To apply the option, touch [YES]. For details, see "Handycam Handbook" (PDF). 1 While using your camcorder at the time. • Some items appear without a tab. • The OPTION MENU cannot be used during Easy Handycam operation (p.16). When you want to know the content. If you cannot find the item ... OPTION MENU appears just like the pop-up window that appear on the screen depend on a computer. The bottom of the operation. Items of your camcorder, touch (OPTION) on the screen. 2 Touch the desired item. 3 Change the setting, then touch . • When the item you touch an ...

Operating Guide
Page 31
... persists, disconnect the power source and contact your camcorder for a while, then turn on the hard disk. However, your Sony dealer will be required to shoot after about 1 minute. The power does not turn on the problem. Cancel Easy Handycam operation. For details on for a long time....OFF). Be sure to save the data on the internal hard disk (see "Handycam Handbook" (PDF)) on other media (backup) before sending your Sony dealer. Buttons do not work , press the RESET button (p.20) using your camcorder, use the AC Adaptor. • Charge the battery pack (p.11). The...
... persists, disconnect the power source and contact your camcorder for a while, then turn on the hard disk. However, your Sony dealer will be required to shoot after about 1 minute. The power does not turn on the problem. Cancel Easy Handycam operation. For details on for a long time....OFF). Be sure to save the data on the internal hard disk (see "Handycam Handbook" (PDF)) on other media (backup) before sending your Sony dealer. Buttons do not work , press the RESET button (p.20) using your camcorder, use the AC Adaptor. • Charge the battery pack (p.11). The...

Operating Guide
Page 32
... "Handycam Handbook" (PDF). If the problem persists even after you have tried a couple of times, contact your camcorder again. Reconnect it and operate your camcorder again. • Turn on the screen. Contact your camcorder while the lens cover is closed (DCR-SR42/ ...SR62/SR82). • When you can fix by yourself. Self-diagnosis display/Warning indicators If indicators appear on your Sony dealer or local authorized Sony...
... "Handycam Handbook" (PDF). If the problem persists even after you have tried a couple of times, contact your camcorder again. Reconnect it and operate your camcorder again. • Turn on the screen. Contact your camcorder while the lens cover is closed (DCR-SR42/ ...SR62/SR82). • When you can fix by yourself. Self-diagnosis display/Warning indicators If indicators appear on your Sony dealer or local authorized Sony...


