
Operating Guide
Page 2
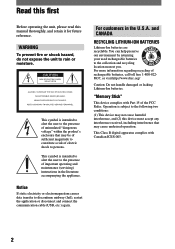
... or moisture. This symbol is subject to persons. For customers in the literature accompanying the appliance. and CANADA RECYCLING LITHIUM-ION BATTERIES Lithium-Ion batteries are recyclable. For more information regarding recycling of the FCC Rules. This Class B digital apparatus complies with Part 15 of rechargeable... toll free 1-800-8228837, or visit http://www.rbrc.org/ Caution: Do not handle damaged or leaking Lithium-Ion batteries. Operation is intended to alert the user to the presence of uninsulated "dangerous voltage" within the product's enclosure that may be ...
... or moisture. This symbol is subject to persons. For customers in the literature accompanying the appliance. and CANADA RECYCLING LITHIUM-ION BATTERIES Lithium-Ion batteries are recyclable. For more information regarding recycling of the FCC Rules. This Class B digital apparatus complies with Part 15 of rechargeable... toll free 1-800-8228837, or visit http://www.rbrc.org/ Caution: Do not handle damaged or leaking Lithium-Ion batteries. Operation is intended to alert the user to the presence of uninsulated "dangerous voltage" within the product's enclosure that may be ...
Operating Guide
Page 4
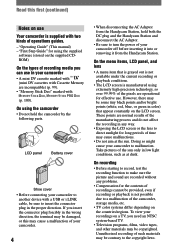
... dusk. Read this may cause a malfunction of your camcorder. 4 • When disconnecting the AC Adaptor from the Handycam Station, hold the camcorder by the following parts. "First Step Guide" for the contents of operations guides. - LCD panel Battery cover Shoe cover • Before connecting your camcorder to malfunction. If you insert the connector plug forcibly...
... dusk. Read this may cause a malfunction of your camcorder. 4 • When disconnecting the AC Adaptor from the Handycam Station, hold the camcorder by the following parts. "First Step Guide" for the contents of operations guides. - LCD panel Battery cover Shoe cover • Before connecting your camcorder to malfunction. If you insert the connector plug forcibly...
Operating Guide
Page 6
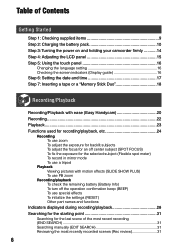
Table of Contents Getting Started Step 1: Checking supplied items 9 Step 2: Charging the battery pack 10 Step 3: Turning the power on and holding your camcorder firmly ...........14 Step 4: Adjusting the LCD panel 15 Step 5: Using the touch panel ...16 Changing the language setting 16 Checking the screen indicators (Display guide 16 Step 6: Setting the date and time 17 Step 7: Inserting a tape or a "Memory Stick Duo 18 Recording/Playback Recording/Playback with ease (Easy Handycam...
Table of Contents Getting Started Step 1: Checking supplied items 9 Step 2: Charging the battery pack 10 Step 3: Turning the power on and holding your camcorder firmly ...........14 Step 4: Adjusting the LCD panel 15 Step 5: Using the touch panel ...16 Changing the language setting 16 Checking the screen indicators (Display guide 16 Step 6: Setting the date and time 17 Step 7: Inserting a tape or a "Memory Stick Duo 18 Recording/Playback Recording/Playback with ease (Easy Handycam...
Operating Guide
Page 8
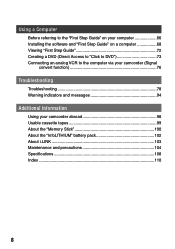
... 73 Connecting an analog VCR to the computer via your camcorder (Signal convert function 76 Troubleshooting Troubleshooting 78 Warning indicators and messages 94 Additional Information Using your camcorder abroad 98 Usable cassette tapes 99 About the "Memory Stick 100 About the "InfoLITHIUM" battery pack 102 About i.LINK 103 Maintenance and precautions 104 Speci...
... 73 Connecting an analog VCR to the computer via your camcorder (Signal convert function 76 Troubleshooting Troubleshooting 78 Warning indicators and messages 94 Additional Information Using your camcorder abroad 98 Usable cassette tapes 99 About the "Memory Stick 100 About the "InfoLITHIUM" battery pack 102 About i.LINK 103 Maintenance and precautions 104 Speci...
Operating Guide
Page 9
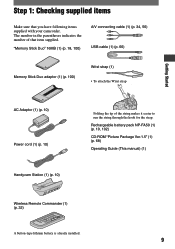
... (1) (p. 100) Wrist strap (1) • To attach the Wrist strap Getting Started AC Adaptor (1) (p. 10) Power cord (1) (p. 10) Handycam Station (1) (p. 10) Folding the tip of that you have following items supplied with your camcorder. Rechargeable battery pack NP-FA50 (1) (p. 10, 102) CD-ROM "Picture Package Ver.1.5" (1) (p. 68) Operating Guide (This manual) (1) Wireless Remote Commander...
... (1) (p. 100) Wrist strap (1) • To attach the Wrist strap Getting Started AC Adaptor (1) (p. 10) Power cord (1) (p. 10) Handycam Station (1) (p. 10) Folding the tip of that you have following items supplied with your camcorder. Rechargeable battery pack NP-FA50 (1) (p. 10, 102) CD-ROM "Picture Package Ver.1.5" (1) (p. 68) Operating Guide (This manual) (1) Wireless Remote Commander...
Operating Guide
Page 10
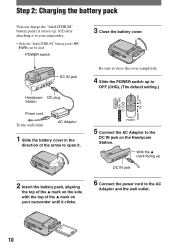
...Connect the AC Adaptor to the DC IN jack on your camcorder. • Only the "InfoLITHIUM" battery pack (NPFA50) can be used. Be sure to close the cover completely. 4 Slide the POWER switch up DC IN jack 2 Insert the battery pack, aligning the top of the mark on the...AC Adaptor and the wall outlet. 10 POWER switch 3 Close the battery cover. Step 2: Charging the battery pack You can charge the "InfoLITHIUM" battery pack (A series) (p. 102) after attaching it to your camcorder until it . DC IN jack Handycam DC plug Station Power cord To the wall outlet AC Adaptor 1 ...
...Connect the AC Adaptor to the DC IN jack on your camcorder. • Only the "InfoLITHIUM" battery pack (NPFA50) can be used. Be sure to close the cover completely. 4 Slide the POWER switch up DC IN jack 2 Insert the battery pack, aligning the top of the mark on the...AC Adaptor and the wall outlet. 10 POWER switch 3 Close the battery cover. Step 2: Charging the battery pack You can charge the "InfoLITHIUM" battery pack (A series) (p. 102) after attaching it to your camcorder until it . DC IN jack Handycam DC plug Station Power cord To the wall outlet AC Adaptor 1 ...
Operating Guide
Page 11
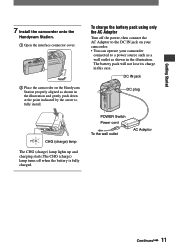
...The battery pack will not lose its charge in the illustration. CHG (charge) lamp The CHG (charge) lamp lights up and charging starts.The CHG (charge) lamp turns off the power, then connect the AC Adaptor to fully install. Getting Started 7 Install the camcorder onto the Handycam ...Station. Open the interface connector cover. Place the camcorder on your camcorder. • You can operate your camcorder connected to a power source such as a wall outlet as shown in the...
...The battery pack will not lose its charge in the illustration. CHG (charge) lamp The CHG (charge) lamp lights up and charging starts.The CHG (charge) lamp turns off the power, then connect the AC Adaptor to fully install. Getting Started 7 Install the camcorder onto the Handycam ...Station. Open the interface connector cover. Place the camcorder on your camcorder. • You can operate your camcorder connected to a power source such as a wall outlet as shown in the...
Operating Guide
Page 12
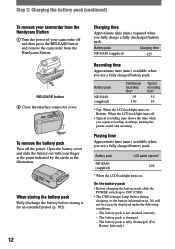
... turns off and zooming. To remove the battery pack Turn off and then press the RELEASE button and remove the camcorder from the Handycam Station. Playing time Approximate time (min.) available when you use a fully charged battery pack. Battery pack LCD panel opened* NP-FA50 (supplied...) 105 * When the LCD backlight turns on . Step 2: Charging the battery pack (continued) To remove your camcorder from the Handycam Station Turn the power of your fi...
... turns off and zooming. To remove the battery pack Turn off and then press the RELEASE button and remove the camcorder from the Handycam Station. Playing time Approximate time (min.) available when you use a fully charged battery pack. Battery pack LCD panel opened* NP-FA50 (supplied...) 105 * When the LCD backlight turns on . Step 2: Charging the battery pack (continued) To remove your camcorder from the Handycam Station Turn the power of your fi...
Operating Guide
Page 13
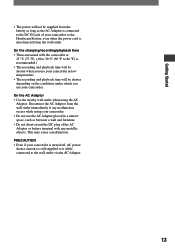
... a wall and furniture. • Do not short-circuit the DC plug of the AC Adaptor or battery terminal with the camcorder at 25 °C (77 °F). (10 to 30 °C (50 °F to 86... °F) is recommended.) • The recording and playback time will be shorter when you use your camcorder in low temperatures. • The recording and playback time will not be shorter depending on the conditions under ... space, such as the AC Adaptor is connected to the DC IN jack of your camcorder or the Handycam Station, even when the power cord is still supplied to it while connected to the wall ...
... a wall and furniture. • Do not short-circuit the DC plug of the AC Adaptor or battery terminal with the camcorder at 25 °C (77 °F). (10 to 30 °C (50 °F to 86... °F) is recommended.) • The recording and playback time will be shorter when you use your camcorder in low temperatures. • The recording and playback time will not be shorter depending on the conditions under ... space, such as the AC Adaptor is connected to the DC IN jack of your camcorder or the Handycam Station, even when the power cord is still supplied to it while connected to the wall ...
Operating Guide
Page 14
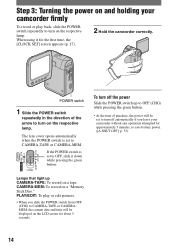
...CAMERA-MEM: To record on a tape. POWER switch 1 Slide the POWER switch repeatedly in the direction of purchase, the power will be set to save battery power. ([A.SHUT OFF], p. 53). To turn off automatically if you slide the POWER switch from OFF (CHG) to turn on the respective lamp. The...OFF, slide it for the first time, the [CLOCK SET] screen appears (p. 17). 2 Hold the camcorder correctly. PLAY/EDIT: To play or edit pictures. • When you leave your camcorder firmly To record or play back, slide the POWER switch repeatedly to CAMERA-TAPE or CAMERAMEM, the current...
...CAMERA-MEM: To record on a tape. POWER switch 1 Slide the POWER switch repeatedly in the direction of purchase, the power will be set to save battery power. ([A.SHUT OFF], p. 53). To turn off automatically if you slide the POWER switch from OFF (CHG) to turn on the respective lamp. The...OFF, slide it for the first time, the [CLOCK SET] screen appears (p. 17). 2 Hold the camcorder correctly. PLAY/EDIT: To play or edit pictures. • When you leave your camcorder firmly To record or play back, slide the POWER switch repeatedly to CAMERA-TAPE or CAMERAMEM, the current...

Operating Guide
Page 15
...to the best angle to record or play (). 180 degrees (max.) 90 degrees (max.) 2 Getting Started 1 DISP/BATT INFO 90 Degrees to the camcorder • Do not press the buttons on the LCD backlight, press and hold DISP/BATT INFO for a few seconds until disappears. • See [LCD ...BRIGHT] (p. 50) to save battery power. This setting is convenient during playback operations. To turn on the LCD frame accidentally when you open or adjust the LCD panel. • If...
...to the best angle to record or play (). 180 degrees (max.) 90 degrees (max.) 2 Getting Started 1 DISP/BATT INFO 90 Degrees to the camcorder • Do not press the buttons on the LCD backlight, press and hold DISP/BATT INFO for a few seconds until disappears. • See [LCD ...BRIGHT] (p. 50) to save battery power. This setting is convenient during playback operations. To turn on the LCD frame accidentally when you open or adjust the LCD panel. • If...
Operating Guide
Page 17
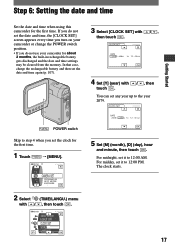
...date and time again (p. 107). The clock starts. 17 Step 6: Setting the date and time Getting Started Set the date and time when using this camcorder for the first time. 1 Touch [MENU]. 60min -:--:-- CAMERA SET PROGRAM AE SPOT METER EXPOSURE OK 2 Select (TIME/LANGU.) ...menu with / , then touch . 60min -:--:-- CLOCK SET -:--:-- If you do not use your camcorder for about 2 months, the built-in rechargeable battery gets discharged and the date and time settings may be cleared from the memory. In that case, charge the rechargeable...
...date and time again (p. 107). The clock starts. 17 Step 6: Setting the date and time Getting Started Set the date and time when using this camcorder for the first time. 1 Touch [MENU]. 60min -:--:-- CAMERA SET PROGRAM AE SPOT METER EXPOSURE OK 2 Select (TIME/LANGU.) ...menu with / , then touch . 60min -:--:-- CLOCK SET -:--:-- If you do not use your camcorder for about 2 months, the built-in rechargeable battery gets discharged and the date and time settings may be cleared from the memory. In that case, charge the rechargeable...

Operating Guide
Page 19
Otherwise, image data may be damaged. 19 Do not shake or knock your camcorder is lit or flashing, your camcorder, turn the power off, eject the "Memory Stick Duo," or remove the battery pack. Getting Started To eject a "Memory Stick Duo" Lightly push the "Memory Stick Duo" in once. • When the access lamp is reading/writing data.
Otherwise, image data may be damaged. 19 Do not shake or knock your camcorder is lit or flashing, your camcorder, turn the power off, eject the "Memory Stick Duo," or remove the battery pack. Getting Started To eject a "Memory Stick Duo" Lightly push the "Memory Stick Duo" in once. • When the access lamp is reading/writing data.

Operating Guide
Page 26
qa qs Recording/playback To check the remaining battery (Battery Info Set the POWER switch up in red during recording (p. 52). Remote sensor Point the Remote Commander (p. 32) towards the remote sensor to operate your camcorder. Internal stereo microphone When an external microphone is connected, the audio input from the speaker. •...
qa qs Recording/playback To check the remaining battery (Battery Info Set the POWER switch up in red during recording (p. 52). Remote sensor Point the Remote Commander (p. 32) towards the remote sensor to operate your camcorder. Internal stereo microphone When an external microphone is connected, the audio input from the speaker. •...
Operating Guide
Page 28
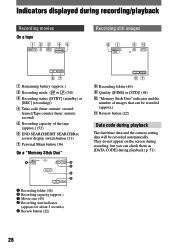
Indicators displayed during recording/playback Recording movies On a tape 123 45 Recording still images 81 60min 101 90 FINE 30 67 Remaining battery (approx.) Recording mode ( or ) (50) Recording status ([STBY] (standby) or [REC] (recording)) Time code (hour: minute: second: frame)/...
Indicators displayed during recording/playback Recording movies On a tape 123 45 Recording still images 81 60min 101 90 FINE 30 67 Remaining battery (approx.) Recording mode ( or ) (50) Recording status ([STBY] (standby) or [REC] (recording)) Time code (hour: minute: second: frame)/...
Operating Guide
Page 32
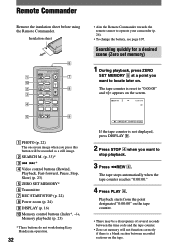
...button will not function correctly if there is not displayed, press DISPLAY . 2 Press STOP when you want to operate your camcorder (p. 26). • To change the battery, see page 107. Insulation sheet 6 1 7 q; 2 8 3 4 5 9 PHOTO (p. 22) The on the tape...; DISPLAY (p. 16) Memory control buttons (Index*, -/+, Memory playback) (p. 23) * These buttons do not work during Easy Handycam operation. 32 • Aim the Remote Commander towards the remote sensor to locate later on. Remote Commander Remove the insulation sheet before using the...
...button will not function correctly if there is not displayed, press DISPLAY . 2 Press STOP when you want to operate your camcorder (p. 26). • To change the battery, see page 107. Insulation sheet 6 1 7 q; 2 8 3 4 5 9 PHOTO (p. 22) The on the tape...; DISPLAY (p. 16) Memory control buttons (Index*, -/+, Memory playback) (p. 23) * These buttons do not work during Easy Handycam operation. 32 • Aim the Remote Commander towards the remote sensor to locate later on. Remote Commander Remove the insulation sheet before using the...
Operating Guide
Page 41
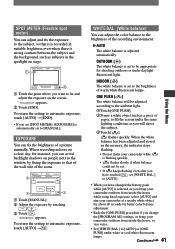
... by fixing the exposure to that it is recorded in the memory, the indicator stops flashing. • Do not shake your camcorder while is flashing quickly. • flashes slowly if white balance could not be appropriate for better color balance adjustment. • Redo... have touched , set to [MANUAL]. OUTDOOR ( ) The white balance is automatically set [WHITE BAL.] to [AUTO]. • When you have changed the battery pack while [AUTO] is selected, or you want to fix and adjust the exposure on people next to the window by touching /. Touch ....
... by fixing the exposure to that it is recorded in the memory, the indicator stops flashing. • Do not shake your camcorder while is flashing quickly. • flashes slowly if white balance could not be appropriate for better color balance adjustment. • Redo... have touched , set to [MANUAL]. OUTDOOR ( ) The white balance is automatically set [WHITE BAL.] to [AUTO]. • When you have changed the battery pack while [AUTO] is selected, or you want to fix and adjust the exposure on people next to the window by touching /. Touch ....
Operating Guide
Page 51
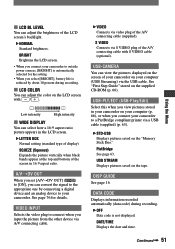
... camcorder to a PictBridge compliant printer via a USB cable (supplied) (p. 63). STD-USB Displays pictures saved on the "Memory Stick Duo." S VIDEO Connects via S VIDEO plug of the A/V connecting cable with / . USB-PLY/EDT (USB-Play/Edit) Select this when you select [BRIGHT], battery ... Displays information recorded automatically (data code) during recording. LCD COLOR You can view the pictures displayed on the screen of your camcorder on the LCD screen with S VIDEO cable (optional). See "First Step Guide" stored on the tape. DATE/TIME Displays the date...
... camcorder to a PictBridge compliant printer via a USB cable (supplied) (p. 63). STD-USB Displays pictures saved on the "Memory Stick Duo." S VIDEO Connects via S VIDEO plug of the A/V connecting cable with / . USB-PLY/EDT (USB-Play/Edit) Select this when you select [BRIGHT], battery ... Displays information recorded automatically (data code) during recording. LCD COLOR You can view the pictures displayed on the screen of your camcorder on the LCD screen with S VIDEO cable (optional). See "First Step Guide" stored on the tape. DATE/TIME Displays the date...
Operating Guide
Page 61
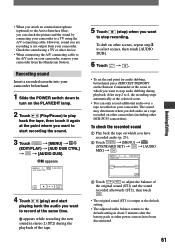
... sound (ST1) and the sound recorded afterwards (ST2), then touch . • The original sound (ST1) is not output from the Handycam Station. Check the sound using the A/V connecting cable. The sound may deteriorate when you dub audio on a tape recorded on the Remote...5 Touch (stop) when you want to stop recording. Recording sound Insert a recorded cassette into your camcorder. appears while recording the new sound in about 5 minutes after the battery pack or other DCR-PC55 camcorders). After step 2 to 4, the recording stops automatically at the default setting. • The adjusted...
... sound (ST1) and the sound recorded afterwards (ST2), then touch . • The original sound (ST1) is not output from the Handycam Station. Check the sound using the A/V connecting cable. The sound may deteriorate when you dub audio on a tape recorded on the Remote...5 Touch (stop) when you want to stop recording. Recording sound Insert a recorded cassette into your camcorder. appears while recording the new sound in about 5 minutes after the battery pack or other DCR-PC55 camcorders). After step 2 to 4, the recording stops automatically at the default setting. • The adjusted...

Operating Guide
Page 78
...is discharged, running low, or not attached to the camcorder. • Attach a charged battery pack to the camcorder (p. 10). • Use the AC Adaptor to connect to a wall outlet (p. 10). • Insert your Sony dealer. Troubleshooting If you press the RESET button, all ...settings, including the clock setting, are reset, except the Personal Menu items.) Buttons do not work . • During Easy Handycam...
...is discharged, running low, or not attached to the camcorder. • Attach a charged battery pack to the camcorder (p. 10). • Use the AC Adaptor to connect to a wall outlet (p. 10). • Insert your Sony dealer. Troubleshooting If you press the RESET button, all ...settings, including the clock setting, are reset, except the Personal Menu items.) Buttons do not work . • During Easy Handycam...


