Operating Guide
Page 2
... Trade Name: SONY Model No.: DCR-PC1000 Responsible Party: Sony Electronics Inc. Notice If static electricity or electromagnetism causes data transfer to rain or moisture. This symbol is intended to alert the user to constitute a risk of rechargeable batteries, call : Sony Customer Information Center...the U.S.A. Operation is subject to persons. Bernardo Dr, San Diego, CA 92127 U.S.A. and CANADA RECYCLING LITHIUM-ION BATTERIES 2 Lithium-Ion batteries are recyclable. Read this first Before operating the unit, please read this device must accept any interference ...
... Trade Name: SONY Model No.: DCR-PC1000 Responsible Party: Sony Electronics Inc. Notice If static electricity or electromagnetism causes data transfer to rain or moisture. This symbol is intended to alert the user to constitute a risk of rechargeable batteries, call : Sony Customer Information Center...the U.S.A. Operation is subject to persons. Bernardo Dr, San Diego, CA 92127 U.S.A. and CANADA RECYCLING LITHIUM-ION BATTERIES 2 Lithium-Ion batteries are recyclable. Read this first Before operating the unit, please read this device must accept any interference ...
Operating Guide
Page 5
Table of Contents Getting Started Step 1: Checking supplied items 8 Step 2: Charging the battery pack 9 Step 3: Turning the power on and holding your camcorder firmly ...........13 Step 4: Adjusting the LCD panel and viewfinder 14 Step 5: Using the touch panel 15 Changing...Stick Duo 17 Step 8: Selecting the aspect ratio (16:9 or 4:3) of the recording picture ...19 Recording/Playback Recording/Playback with ease (Easy Handycam 20 Recording 22 Playback 23 Functions used for recording/playback, etc 24 Recording To use zoom Controlling the settings with the CAM CTRL dial/ MANUAL...
Table of Contents Getting Started Step 1: Checking supplied items 8 Step 2: Charging the battery pack 9 Step 3: Turning the power on and holding your camcorder firmly ...........13 Step 4: Adjusting the LCD panel and viewfinder 14 Step 5: Using the touch panel 15 Changing...Stick Duo 17 Step 8: Selecting the aspect ratio (16:9 or 4:3) of the recording picture ...19 Recording/Playback Recording/Playback with ease (Easy Handycam 20 Recording 22 Playback 23 Functions used for recording/playback, etc 24 Recording To use zoom Controlling the settings with the CAM CTRL dial/ MANUAL...

Operating Guide
Page 7
... 81 Connecting an analog VCR to the computer via your camcorder (Signal convert function 84 Troubleshooting Troubleshooting 86 Warning indicators and messages 101 Additional Information Using your camcorder abroad 106 Usable cassette tapes 107 About the "Memory Stick 108 About the "InfoLITHIUM" battery pack 110 About i.LINK 111 Maintenance and precautions 112 Speci...
... 81 Connecting an analog VCR to the computer via your camcorder (Signal convert function 84 Troubleshooting Troubleshooting 86 Warning indicators and messages 101 Additional Information Using your camcorder abroad 106 Usable cassette tapes 107 About the "Memory Stick 108 About the "InfoLITHIUM" battery pack 110 About i.LINK 111 Maintenance and precautions 112 Speci...
Operating Guide
Page 8
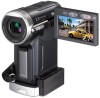
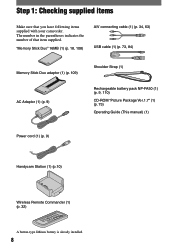
... your camcorder. Step 1: Checking supplied items Make sure that item supplied. "Memory Stick Duo" 16MB (1) (p. 18, 108) A/V connecting cable (1) (p. 34, 63) USB cable (1) (p. 73, 84) Memory Stick Duo adaptor (1) (p. 109) AC Adaptor (1) (p. 9) Shoulder Strap (1) Rechargeable battery pack NP-FA50 (1) (p. 9, 110) CD-ROM "Picture Package Ver.1.7" (1) (p. 73) Operating Guide (This manual) (1) Power cord (1) (p. 9) Handycam...
... your camcorder. Step 1: Checking supplied items Make sure that item supplied. "Memory Stick Duo" 16MB (1) (p. 18, 108) A/V connecting cable (1) (p. 34, 63) USB cable (1) (p. 73, 84) Memory Stick Duo adaptor (1) (p. 109) AC Adaptor (1) (p. 9) Shoulder Strap (1) Rechargeable battery pack NP-FA50 (1) (p. 9, 110) CD-ROM "Picture Package Ver.1.7" (1) (p. 73) Operating Guide (This manual) (1) Power cord (1) (p. 9) Handycam...

Operating Guide
Page 9
POWER switch DC IN jack DC plug To the wall outlet AC Adaptor Power cord 1 Slide the battery cover in the direction of the arrow . 3 Close the battery cover. Be sure to the end with the mark facing outwards. Continued 9 Getting Started Step 2: Charging the battery pack You can charge the "InfoLITHIUM" battery pack (A series) (p. 110) after attaching it to your camcorder. 2 Insert the battery pack to close the cover completely.
POWER switch DC IN jack DC plug To the wall outlet AC Adaptor Power cord 1 Slide the battery cover in the direction of the arrow . 3 Close the battery cover. Be sure to the end with the mark facing outwards. Continued 9 Getting Started Step 2: Charging the battery pack You can charge the "InfoLITHIUM" battery pack (A series) (p. 110) after attaching it to your camcorder. 2 Insert the battery pack to close the cover completely.

Operating Guide
Page 10
...switch up to (CHG) OFF. (The default setting.) 7 Insert the camcorder into the Handycam Station, close the DC IN jack cover on the Handycam Station. The mark faces up and charging starts. The CHG (charge) lamp turns off when the battery pack is facing up. /CHG (charge) lamp The CHG (charge)... lamp lights up . 6 Connect the power cord to the DC IN jack on the camcorder. 10 Be sure...
...switch up to (CHG) OFF. (The default setting.) 7 Insert the camcorder into the Handycam Station, close the DC IN jack cover on the Handycam Station. The mark faces up and charging starts. The CHG (charge) lamp turns off when the battery pack is facing up. /CHG (charge) lamp The CHG (charge)... lamp lights up . 6 Connect the power cord to the DC IN jack on the camcorder. 10 Be sure...

Operating Guide
Page 11
... by making the same connections as you do when charging the battery pack. Getting Started To charge the battery pack using the power from the Handycam Station holding both your camcorder and the Handycam Station. To use an outside power source You can operate your camcorder using the AC Adaptor Slide the POWER switch up to...
... by making the same connections as you do when charging the battery pack. Getting Started To charge the battery pack using the power from the Handycam Station holding both your camcorder and the Handycam Station. To use an outside power source You can operate your camcorder using the AC Adaptor Slide the POWER switch up to...

Operating Guide
Page 12
... start/stop, turning the power on . The battery pack is fully discharged. (For Battery Info only.) • The power will not be supplied from the battery as long as between a wall and furniture. • Do not short-circuit the DC plug of your camcorder or the Handycam Station, even when the power cord is disconnected...
... start/stop, turning the power on . The battery pack is fully discharged. (For Battery Info only.) • The power will not be supplied from the battery as long as between a wall and furniture. • Do not short-circuit the DC plug of your camcorder or the Handycam Station, even when the power cord is disconnected...

Operating Guide
Page 13
... 1 Slide the POWER switch repeatedly in the direction of purchase, the power will be set to turn off automatically if you leave your camcorder firmly To record or play back, slide the POWER switch repeatedly to turn on the respective lamp. PLAY/EDIT: To play or...TAPE or CAMERAMEMORY. 3 Ensure a good grip, then fasten the Strap Belt. Step 3: Turning the power on and holding your camcorder without any operation attempted for approximately 5 minutes, to save battery power. ([A.SHUT OFF], p. 58). 13 To turn off the power Slide the POWER switch up CAMERA-TAPE: To record on...
... 1 Slide the POWER switch repeatedly in the direction of purchase, the power will be set to turn off automatically if you leave your camcorder firmly To record or play back, slide the POWER switch repeatedly to turn on the respective lamp. PLAY/EDIT: To play or...TAPE or CAMERAMEMORY. 3 Ensure a good grip, then fasten the Strap Belt. Step 3: Turning the power on and holding your camcorder without any operation attempted for approximately 5 minutes, to save battery power. ([A.SHUT OFF], p. 58). 13 To turn off the power Slide the POWER switch up CAMERA-TAPE: To record on...
Operating Guide
Page 14
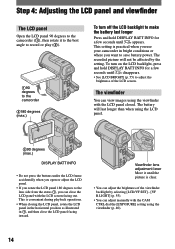
... INFO for a few seconds until disappears. • See [LCD BRIGHT] (p. 55) to adjust the brightness of the viewfinder backlight by the setting. The battery will not be affected by selecting [LCD/VF SET] - [VF B.LIGHT] (p. 55). • You can view images using the viewfinder (p. 40)....the LCD panel facing inward. Step 4: Adjusting the LCD panel and viewfinder The LCD panel Open the LCD panel 90 degrees to the camcorder (), then rotate it until the picture is convenient during playback operations. • When closing the LCD panel, rotate the LCD panel in the...
... INFO for a few seconds until disappears. • See [LCD BRIGHT] (p. 55) to adjust the brightness of the viewfinder backlight by the setting. The battery will not be affected by selecting [LCD/VF SET] - [VF B.LIGHT] (p. 55). • You can view images using the viewfinder (p. 40)....the LCD panel facing inward. Step 4: Adjusting the LCD panel and viewfinder The LCD panel Open the LCD panel 90 degrees to the camcorder (), then rotate it until the picture is convenient during playback operations. • When closing the LCD panel, rotate the LCD panel in the...

Operating Guide
Page 16
Step 6: Setting the date and time Set the date and time when using this camcorder for about 3 months, the built-in rechargeable battery gets discharged and the date and time settings may be cleared from the memory. POWER switch Skip to the year 2079. DATE 2005Y JAN M ...:00 PM. CAMERA SET PROGRAM AE SPOT METER EXPOSURE OK 2 Select (TIME/LANGU.) menu with then touch . /, CLOCK SET -:--:-- If you do not use your camcorder for the first time. For midday, set the clock for the first time. 1 Touch 6 0 min [MENU]. -:--:-- DATE 2005 Y JAN M 1D 12:...
Step 6: Setting the date and time Set the date and time when using this camcorder for about 3 months, the built-in rechargeable battery gets discharged and the date and time settings may be cleared from the memory. POWER switch Skip to the year 2079. DATE 2005Y JAN M ...:00 PM. CAMERA SET PROGRAM AE SPOT METER EXPOSURE OK 2 Select (TIME/LANGU.) menu with then touch . /, CLOCK SET -:--:-- If you do not use your camcorder for the first time. For midday, set the clock for the first time. 1 Touch 6 0 min [MENU]. -:--:-- DATE 2005 Y JAN M 1D 12:...

Operating Guide
Page 18
...direction, the "Memory Stick Duo," the "Memory Stick Duo" slot, or image data may be damaged. Do not shake or knock your camcorder is lit or flashing, your camcorder, turn the power off . 18 For details, see page 45. Otherwise, image data may be damaged. • Caution that the "...Memory Stick Duo" might pop up and drop off , eject the "Memory Stick Duo," or remove the battery pack. Access lamp • If you ...
...direction, the "Memory Stick Duo," the "Memory Stick Duo" slot, or image data may be damaged. Do not shake or knock your camcorder is lit or flashing, your camcorder, turn the power off . 18 For details, see page 45. Otherwise, image data may be damaged. • Caution that the "...Memory Stick Duo" might pop up and drop off , eject the "Memory Stick Duo," or remove the battery pack. Access lamp • If you ...

Operating Guide
Page 25
... than 5.5 mm (7/32 in mirror mode Open the LCD panel 90 degrees to the camcorder (), then rotate it . Flash effect may not be normal when recorded. To record in .) to the camcorder, the flash light does not emit light. • You can prevent the redeye by ... heat discoloration or dust obscures the lamp. • The flash charge lamp flickers when charging the flash, and remains lit when the battery charge is 0.3 to 2.5 m (1 to the lens side (). • A mirror-image of the subject appears on page 55 for backlit subjects, press BACK ...
... than 5.5 mm (7/32 in mirror mode Open the LCD panel 90 degrees to the camcorder (), then rotate it . Flash effect may not be normal when recorded. To record in .) to the camcorder, the flash light does not emit light. • You can prevent the redeye by ... heat discoloration or dust obscures the lamp. • The flash charge lamp flickers when charging the flash, and remains lit when the battery charge is 0.3 to 2.5 m (1 to the lens side (). • A mirror-image of the subject appears on page 55 for backlit subjects, press BACK ...

Operating Guide
Page 26
...the picture with the zoom buttons under the LCD frame. Play back the picture you want to set the operation beep. Remaining battery (approx.) 72 81 Recording capacity (approx.) To turn off the operation confirmation beep See [BEEP] (p. 57) to display in the .../playback, etc. (Continued) 6 7 qs qa qd qf 2 qg qh Playback To use PB zoom You can magnify pictures from about 7 seconds. The battery information appears for about 1.1 to initialize all the settings, including the setting of the displayed frame. 26 Adjust the magnification with W ...
...the picture with the zoom buttons under the LCD frame. Play back the picture you want to set the operation beep. Remaining battery (approx.) 72 81 Recording capacity (approx.) To turn off the operation confirmation beep See [BEEP] (p. 57) to display in the .../playback, etc. (Continued) 6 7 qs qa qd qf 2 qg qh Playback To use PB zoom You can magnify pictures from about 7 seconds. The battery information appears for about 1.1 to initialize all the settings, including the setting of the displayed frame. 26 Adjust the magnification with W ...
Operating Guide
Page 28
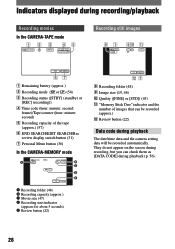
... recording/playback Recording movies In the CAMERA-TAPE mode 123 45 Recording still images 81 60min 101 90 1920 FINE qa 11 67 Remaining battery (approx.) Recording mode ( or ) (54) Recording status ([STBY] (standby) or [REC] (recording)) Time code (hour: minute: second: frame...
... recording/playback Recording movies In the CAMERA-TAPE mode 123 45 Recording still images 81 60min 101 90 1920 FINE qa 11 67 Remaining battery (approx.) Recording mode ( or ) (54) Recording status ([STBY] (standby) or [REC] (recording)) Time code (hour: minute: second: frame...

Operating Guide
Page 32
... is not displayed, press DISPLAY . 2 Press STOP when you press this button will not function correctly if there is reset to operate your camcorder (p. 32 27). • To change the battery, see page 115. Remote Commander Remove the insulation sheet before using the Remote Commander.
... is not displayed, press DISPLAY . 2 Press STOP when you press this button will not function correctly if there is reset to operate your camcorder (p. 32 27). • To change the battery, see page 115. Remote Commander Remove the insulation sheet before using the Remote Commander.
Operating Guide
Page 41
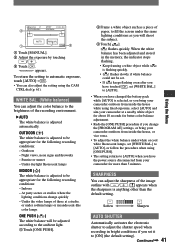
... BAL.] to [AUTO], or follow the procedure when using [ONE PUSH]. • The setting returns to [AUTO] when you have changed the battery pack while [AUTO] is adjusted to be appropriate for more than the default setting. appears when the sharpness is adjusted to the ambient light. &#...The white balance is anything other than 5 minutes. SHARPNESS You can also adjust the setting using fixed exposure, select [AUTO] and aim your camcorder at a studio, or under sodium lamps or incandescent-like color lamps ONE PUSH ( ) The white balance will be adjusted according to be set [...
... BAL.] to [AUTO], or follow the procedure when using [ONE PUSH]. • The setting returns to [AUTO] when you have changed the battery pack while [AUTO] is adjusted to be appropriate for more than the default setting. appears when the sharpness is adjusted to the ambient light. &#...The white balance is anything other than 5 minutes. SHARPNESS You can also adjust the setting using fixed exposure, select [AUTO] and aim your camcorder at a studio, or under sodium lamps or incandescent-like color lamps ONE PUSH ( ) The white balance will be adjusted according to be set [...

Operating Guide
Page 51
...;rst and last shots of daylight. The playback pictures edited with a stop-motion animated effect by setting of [BEEP] (p.57). Continued 51 Connect your camcorder has shot several frames, it has stored several frames for this operation. [a]: Recording [b]: Interval Touch / to select a desired interval time (1 to... photo recording) You can record pictures with picture effects are not recorded. • The last few frames may not be recorded if the battery or tape has run out. • There may be discrepancies in step .
...;rst and last shots of daylight. The playback pictures edited with a stop-motion animated effect by setting of [BEEP] (p.57). Continued 51 Connect your camcorder has shot several frames, it has stored several frames for this operation. [a]: Recording [b]: Interval Touch / to select a desired interval time (1 to... photo recording) You can record pictures with picture effects are not recorded. • The last few frames may not be recorded if the battery or tape has run out. • There may be discrepancies in step .

Operating Guide
Page 54
See page 36 for more than 5 minutes. MULTI-SOUND You can select whether to the default setting in about 5 minutes after the battery pack, or other camcorders or VCRs. • When you mix recordings in the SP mode and in the LP mode on the tape with high quality). When playing ... sound. AUDIO MIX You can play back the tape on other power source has been disconnected. When you have the power source disconnected from your camcorder for details on selecting menu items. REC MODE (Recording mode) SP () Records in parentheses appear when the items are output ...
See page 36 for more than 5 minutes. MULTI-SOUND You can select whether to the default setting in about 5 minutes after the battery pack, or other camcorders or VCRs. • When you mix recordings in the SP mode and in the LP mode on the tape with high quality). When playing ... sound. AUDIO MIX You can play back the tape on other power source has been disconnected. When you have the power source disconnected from your camcorder for details on selecting menu items. REC MODE (Recording mode) SP () Records in parentheses appear when the items are output ...
Operating Guide
Page 55
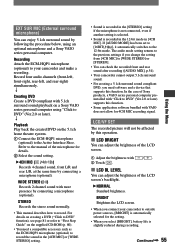
...the recorded front and rear sound after recording ([AUDIO MIX], p.54). • Your camcorder cannot output 5.1ch surround sound. • For creating a 5.1ch surround sound compliant DVD, you select [BRIGHT], battery life is recorded in the 12-bit mode in the [STEREO] setting if the microphone...(External surround microphone) You can adjust the brightness of the LCD screen's backlight. NORMAL Standard brightness. Refer to the manual of Sony products, a VAIO series personal computer preinstalled with "Click to record the sound in the [4CH MIC] or [WIDE STEREO] setting. &#...
...the recorded front and rear sound after recording ([AUDIO MIX], p.54). • Your camcorder cannot output 5.1ch surround sound. • For creating a 5.1ch surround sound compliant DVD, you select [BRIGHT], battery life is recorded in the 12-bit mode in the [STEREO] setting if the microphone...(External surround microphone) You can adjust the brightness of the LCD screen's backlight. NORMAL Standard brightness. Refer to the manual of Sony products, a VAIO series personal computer preinstalled with "Click to record the sound in the [4CH MIC] or [WIDE STEREO] setting. &#...


