
Operating Guide
Page 9
.../Editing Dubbing to VCR or DVD/HDD recorders 44 Recording pictures from a VCR, etc 46 Using a Computer What you can do with Windows computer (DCR-HC54 48 Installing the "First Step Guide" and software (DCR-HC54 49 Viewing "First Step Guide" (DCRHC54 51 Troubleshooting ...language setting 16 Step 4: Making setting adjustments before recording 17 Step 5: Inserting a Cassette ......... 18 Recording/Playback Easy Recording/Playback (Easy Handycam 19 Recording 21 Zooming 22 Recording in dark places (NightShot plus 22 Adjusting the exposure for backlit subjects 23 Recording in mirror mode ...
.../Editing Dubbing to VCR or DVD/HDD recorders 44 Recording pictures from a VCR, etc 46 Using a Computer What you can do with Windows computer (DCR-HC54 48 Installing the "First Step Guide" and software (DCR-HC54 49 Viewing "First Step Guide" (DCRHC54 51 Troubleshooting ...language setting 16 Step 4: Making setting adjustments before recording 17 Step 5: Inserting a Cassette ......... 18 Recording/Playback Easy Recording/Playback (Easy Handycam 19 Recording 21 Zooming 22 Recording in dark places (NightShot plus 22 Adjusting the exposure for backlit subjects 23 Recording in mirror mode ...
Operating Guide
Page 18
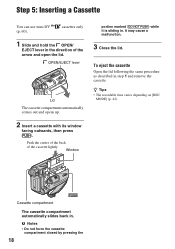
...z Tips • The recordable time varies depending on [REC MODE] (p. 42). cassettes only 1 Slide and hold the OPEN/ EJECT lever in . Window portion marked {DO NOT PUSH} while it is sliding in the direction of the cassette lightly. b Notes • Do not force the cassette compartment closed...step 1 and remove the cassette. OPEN/EJECT lever Lid The cassette compartment automatically comes out and opens up. 2 Insert a cassette with its window facing outwards, then press . To eject the cassette Open the lid following the same procedure as described in . Step 5: Inserting a Cassette...
...z Tips • The recordable time varies depending on [REC MODE] (p. 42). cassettes only 1 Slide and hold the OPEN/ EJECT lever in . Window portion marked {DO NOT PUSH} while it is sliding in the direction of the cassette lightly. b Notes • Do not force the cassette compartment closed...step 1 and remove the cassette. OPEN/EJECT lever Lid The cassette compartment automatically comes out and opens up. 2 Insert a cassette with its window facing outwards, then press . To eject the cassette Open the lid following the same procedure as described in . Step 5: Inserting a Cassette...

Operating Guide
Page 31
function. This setting also prevents your camcorder from appearing excessively white when subjects are lit by strong light. SCENE SEL. SPOTLIGHT** ( ) Select to prevent people's faces from focusing on the screen. Continued , ... Guide)* See page 73. B AUTO Select to [AUTO]. SUNRSSUNST* (Sunrise & Sunset) () Select to fix and adjust the exposure on glass or metal mesh in windows between the camcorder and the subject. MENU See page 37. To return the setting to automatic exposure, touch [AUTO] or set to shoot distant subjects clearly. SPOT...
function. This setting also prevents your camcorder from appearing excessively white when subjects are lit by strong light. SCENE SEL. SPOTLIGHT** ( ) Select to prevent people's faces from focusing on the screen. Continued , ... Guide)* See page 73. B AUTO Select to [AUTO]. SUNRSSUNST* (Sunrise & Sunset) () Select to fix and adjust the exposure on glass or metal mesh in windows between the camcorder and the subject. MENU See page 37. To return the setting to automatic exposure, touch [AUTO] or set to shoot distant subjects clearly. SPOT...
Operating Guide
Page 48
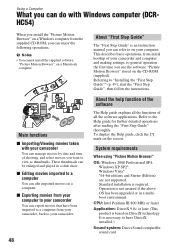
... to a computer from the supplied CD-ROM, you can enjoy the following operations. Operation is based on a Windows computer from your camcorder, back to your camcorder. 48 About "First Step Guide" The "First Step Guide" is required. Main functions x Importing/Viewing movies taken with... computer. System requirements When using "Picture Motion Browser" OS: Windows 2000 Professional SP4, Windows XP SP2*, Windows Vista* *64-bit editions and Starter (Edition) are not supported. Using a Computer What you can do with your camcorder You can manage movies by date and time of shooting, and...
... to a computer from the supplied CD-ROM, you can enjoy the following operations. Operation is based on a Windows computer from your camcorder, back to your camcorder. 48 About "First Step Guide" The "First Step Guide" is required. Main functions x Importing/Viewing movies taken with... computer. System requirements When using "Picture Motion Browser" OS: Windows 2000 Professional SP4, Windows XP SP2*, Windows Vista* *64-bit editions and Starter (Edition) are not supported. Using a Computer What you can do with your camcorder You can manage movies by date and time of shooting, and...
Operating Guide
Page 49
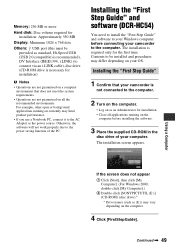
...Contents to be provided as the power source. Using a Computer If the screen does not appear 1 Click [Start], then click [My Computer]. (For Windows 2000, double-click [My Computer].) 2 Double-click [SONYPICTUTIL (E:)] (CD-ROM) (disc drive).* * Drive names (such as (E:)) may limit product performance...on the computer before connecting your camcorder to connect via an i.LINK cable), disc drive (CD-ROM drive is recommended), DV Interface (IEEE1394, i.LINK) (to the computer. Otherwise, the software will not work properly due to your Windows computer before installing the software. 3...
...Contents to be provided as the power source. Using a Computer If the screen does not appear 1 Click [Start], then click [My Computer]. (For Windows 2000, double-click [My Computer].) 2 Double-click [SONYPICTUTIL (E:)] (CD-ROM) (disc drive).* * Drive names (such as (E:)) may limit product performance...on the computer before connecting your camcorder to connect via an i.LINK cable), disc drive (CD-ROM drive is recommended), DV Interface (IEEE1394, i.LINK) (to the computer. Otherwise, the software will not work properly due to your Windows computer before installing the software. 3...
Operating Guide
Page 51
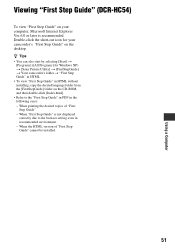
When printing the desired topics of "First Step Guide" cannot be installed. 51 Double-click the short-cut icon for Windows XP) t [Sony Picture Utility] t [FirstStepGuide] t Your camcorder's folder t "First Step Guide" in HTML. • To view "First Step Guide" in HTML without installing, copy the...When "First Step Guide" is recommended. z Tips • You can also start by selecting [Start] t [Programs] ([All Programs] for your camcorder's "First Step Guide" on your computer, Microsoft Internet Explorer Ver.6.0 or later is not displayed correctly due to the "First Step Guide" in ...
When printing the desired topics of "First Step Guide" cannot be installed. 51 Double-click the short-cut icon for Windows XP) t [Sony Picture Utility] t [FirstStepGuide] t Your camcorder's folder t "First Step Guide" in HTML. • To view "First Step Guide" in HTML without installing, copy the...When "First Step Guide" is recommended. z Tips • You can also start by selecting [Start] t [Programs] ([All Programs] for your camcorder's "First Step Guide" on your computer, Microsoft Internet Explorer Ver.6.0 or later is not displayed correctly due to the "First Step Guide" in ...

Operating Guide
Page 56
...Picture Motion Browser," on a Macintosh computer. • You can install "Picture Motion Browser" only on the functions, you may not recognize your camcorder. • Install the "Picture Motion Browser" (p. 49). • The computer may not be able to the input jack of functions that ...cannot be used together Depending on a Windows computer. Functions that cannot be used at the same time. Troubleshooting (Continued) You cannot dub correctly using the A/V connecting cable. • The...
...Picture Motion Browser," on a Macintosh computer. • You can install "Picture Motion Browser" only on the functions, you may not recognize your camcorder. • Install the "Picture Motion Browser" (p. 49). • The computer may not be able to the input jack of functions that ...cannot be used together Depending on a Windows computer. Functions that cannot be used at the same time. Troubleshooting (Continued) You cannot dub correctly using the A/V connecting cable. • The...
Operating Guide
Page 63
...required i.LINK cable Use the Sony i.LINK 4-pin-to-4-pin cable (during DV dubbing). Sometimes this state, the tape may stick to the head drum and be damaged or your camcorder may not operate correctly. On using your camcorder. • Do not wrap your camcorder with the cassette lid open..... Sometimes this malfunction cannot be repaired. • If any solid object or liquid gets inside the casing, unplug your camcorder and have contacted your skin - Near windows or outdoors, where the LCD screen, the viewfinder, or the lens may be able to record properly. - If your...
...required i.LINK cable Use the Sony i.LINK 4-pin-to-4-pin cable (during DV dubbing). Sometimes this state, the tape may stick to the head drum and be damaged or your camcorder may not operate correctly. On using your camcorder. • Do not wrap your camcorder with the cassette lid open..... Sometimes this malfunction cannot be repaired. • If any solid object or liquid gets inside the casing, unplug your camcorder and have contacted your skin - Near windows or outdoors, where the LCD screen, the viewfinder, or the lens may be able to record properly. - If your...
Operating Guide
Page 68
..., and Adobe Acrobat are registered trademarks of Apple Inc. On trademarks • "Handycam" and are registered trademarks of Sony Corporation. • "InfoLITHIUM" is a trademark of Sony Corporation. • i.LINK and are trademarks of Sony Corporation. • is a trademark. • Microsoft, Windows, Windows Media, Windows Vista, and DirectX are either registered trademarks or trademarks of their respective companies.
..., and Adobe Acrobat are registered trademarks of Apple Inc. On trademarks • "Handycam" and are registered trademarks of Sony Corporation. • "InfoLITHIUM" is a trademark of Sony Corporation. • i.LINK and are trademarks of Sony Corporation. • is a trademark. • Microsoft, Windows, Windows Media, Windows Vista, and DirectX are either registered trademarks or trademarks of their respective companies.


