Operating Guide
Page 2
...;re or shock hazard, do not expose the unit to discontinue midway (fail), restart the application or disconnect and connect the communication cable (USB, etc.) again. Notice If static electricity or electromagnetism causes data transfer to rain or moisture. and CANADA RECYCLING LITHIUM-ION BATTERIES...Bernardo Dr, San Diego, CA 92127 U.S.A. This Class B digital apparatus complies with Part 15 of rechargeable batteries, call : Sony Customer Information Center 1-800-222SONY (7669). For customers in the U.S.A. Battery pack This device complies with Part 15 of Conformity Trade Name...
...;re or shock hazard, do not expose the unit to discontinue midway (fail), restart the application or disconnect and connect the communication cable (USB, etc.) again. Notice If static electricity or electromagnetism causes data transfer to rain or moisture. and CANADA RECYCLING LITHIUM-ION BATTERIES...Bernardo Dr, San Diego, CA 92127 U.S.A. This Class B digital apparatus complies with Part 15 of rechargeable batteries, call : Sony Customer Information Center 1-800-222SONY (7669). For customers in the U.S.A. Battery pack This device complies with Part 15 of Conformity Trade Name...
Operating Guide
Page 3
... interference to radio communications. Connect the equipment into an outlet on , the user is no guarantee that interference will not occur in your Sony dealer regarding this equipment. AC- Serial No. "Operating Guide" (This manual) - Continued 3 These limits are designed to.... - Increase the separation between the equipment and receiver. - The supplied interface cable must be used in the proper direction. CAUTION You are cautioned that to which can use Your camcorder is connected. - Note This equipment has been tested and found to comply with...
... interference to radio communications. Connect the equipment into an outlet on , the user is no guarantee that interference will not occur in your Sony dealer regarding this equipment. AC- Serial No. "Operating Guide" (This manual) - Continued 3 These limits are designed to.... - Increase the separation between the equipment and receiver. - The supplied interface cable must be used in the proper direction. CAUTION You are cautioned that to which can use Your camcorder is connected. - Note This equipment has been tested and found to comply with...
Operating Guide
Page 9
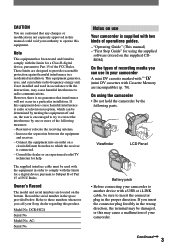
A/V connecting cable (1) (p. 30, 48) USB cable (1) (p. 53) Shoulder Strap (1) (p. 85) Rechargeable battery pack NP-FP30 (1) (p. 10, 79) CD-ROM "Picture Package Ver.1.5" (1) (p. 53) 9 Step 1: Checking supplied items Make sure that item ... (1) (p. 28) A button-type lithium battery is already installed. The number in the parentheses indicates the number of that you have following items supplied with your camcorder. AC Adaptor (1) (p. 10) Shoe cover (1) Attached to the...
A/V connecting cable (1) (p. 30, 48) USB cable (1) (p. 53) Shoulder Strap (1) (p. 85) Rechargeable battery pack NP-FP30 (1) (p. 10, 79) CD-ROM "Picture Package Ver.1.5" (1) (p. 53) 9 Step 1: Checking supplied items Make sure that item ... (1) (p. 28) A button-type lithium battery is already installed. The number in the parentheses indicates the number of that you have following items supplied with your camcorder. AC Adaptor (1) (p. 10) Shoe cover (1) Attached to the...
Operating Guide
Page 30
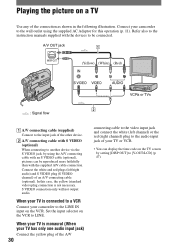
...the supplied AC Adaptor for this case, the yellow (standard video) plug connection is connected to a VCR Connect your camcorder to the wall outlet using the A/V connecting cable with an S VIDEO cable (optional), pictures can display the time code on a TV Use any of the connection as shown in the following ...output audio. When your TV is monaural (When your TV has only one audio input jack) Connect the yellow plug of the A/V 30 connecting cable to the video input jack and connect the white (left /right audio) and S VIDEO plug (S VIDEO channel) of the other device. A/V...
...the supplied AC Adaptor for this case, the yellow (standard video) plug connection is connected to a VCR Connect your camcorder to the wall outlet using the A/V connecting cable with an S VIDEO cable (optional), pictures can display the time code on a TV Use any of the connection as shown in the following ...output audio. When your TV is monaural (When your TV has only one audio input jack) Connect the yellow plug of the A/V 30 connecting cable to the video input jack and connect the white (left /right audio) and S VIDEO plug (S VIDEO channel) of the other device. A/V...
Operating Guide
Page 45
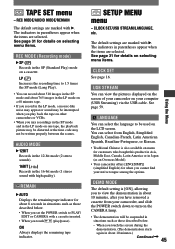
...When you touch the screen during the demonstration. (The demonstration starts again in about 8 seconds in Japan (as an Overseas Model). • Your camcorder offers [ENG[SIMP]] (simplified English) for details on menu for customers who bought this product in Asia, Middle East, Canada, Latin ...demonstration will be written properly between the scenes. See page 31 for when you cannot find your computer (USB Streaming) via the USB cable. The indicators in the SP (Standard Play) mode on selecting menu items. CLOCK SET See page 16. See page 59. REMAIN ...
...When you touch the screen during the demonstration. (The demonstration starts again in about 8 seconds in Japan (as an Overseas Model). • Your camcorder offers [ENG[SIMP]] (simplified English) for details on menu for customers who bought this product in Asia, Middle East, Canada, Latin ...demonstration will be written properly between the scenes. See page 31 for when you cannot find your computer (USB Streaming) via the USB cable. The indicators in the SP (Standard Play) mode on selecting menu items. CLOCK SET See page 16. See page 59. REMAIN ...
Operating Guide
Page 48
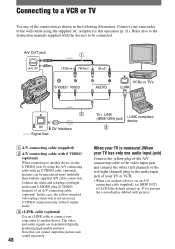
...When your TV has only one audio input jack) Connect the yellow plug of the A/V connecting cable to the wall outlet using the A/V connecting cable with pictures. Connect your camcorder to another device via an A/V connecting cable (supplied), set [DISP OUT] to [LCD] (the default setting) (p. 47) to ... pictures can be connected. In this operation (p. 11). S VIDEO connection only will not output audio. i.LINK cable (optional) Use an i.LINK cable to connect your camcorder to the video input jack and connect the white (left /right audio) and S VIDEO plug (S VIDEO channel) of...
...When your TV has only one audio input jack) Connect the yellow plug of the A/V connecting cable to the wall outlet using the A/V connecting cable with pictures. Connect your camcorder to another device via an A/V connecting cable (supplied), set [DISP OUT] to [LCD] (the default setting) (p. 47) to ... pictures can be connected. In this operation (p. 11). S VIDEO connection only will not output audio. i.LINK cable (optional) Use an i.LINK cable to connect your camcorder to the video input jack and connect the white (left /right audio) and S VIDEO plug (S VIDEO channel) of...

Operating Guide
Page 49
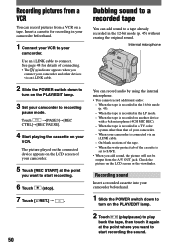
... 5 When the dubbing is paused on your camcorder and the VCR. Titles that are recorded on other camcorder. - Indicators - [P EFFECT] • When connected using an i.LINK cable, the recorded picture becomes rough when a picture is finished, stop your camcorder while recording to a VCR. • When... the date/time and camera settings data by using an A/V connecting cable, connect to the input jack of the other device. 2 Prepare your camcorder, and record it to the input mode. 3 Prepare your camcorder as a recording device. Dubbing/Editing Dubbing to other recording devices You...
... 5 When the dubbing is paused on your camcorder and the VCR. Titles that are recorded on other camcorder. - Indicators - [P EFFECT] • When connected using an i.LINK cable, the recorded picture becomes rough when a picture is finished, stop your camcorder while recording to a VCR. • When... the date/time and camera settings data by using an A/V connecting cable, connect to the input jack of the other device. 2 Prepare your camcorder, and record it to the input mode. 3 Prepare your camcorder as a recording device. Dubbing/Editing Dubbing to other recording devices You...
Operating Guide
Page 50
... point you want to start recording the sound. Recording sound Insert a recorded cassette into your camcorder beforehand. 1 Slide the POWER switch down to recording pause mode. Use an i.LINK cable to a tape already recorded in the 12-bit mode (p. 45) without erasing the original ...using the internal microphone. • You cannot record additional audio: - When the tape is connected via an i.LINK cable. 2 Slide the POWER switch down to turn on the LCD screen of your camcorder. 5 Touch [REC START] at the point where you want to start recording. 6 Touch (stop). 7 Touch ...
... point you want to start recording the sound. Recording sound Insert a recorded cassette into your camcorder beforehand. 1 Slide the POWER switch down to recording pause mode. Use an i.LINK cable to a tape already recorded in the 12-bit mode (p. 45) without erasing the original ...using the internal microphone. • You cannot record additional audio: - When the tape is connected via an i.LINK cable. 2 Slide the POWER switch down to turn on the LCD screen of your camcorder. 5 Touch [REC START] at the point where you want to start recording. 6 Touch (stop). 7 Touch ...
Operating Guide
Page 53
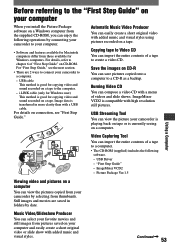
... import the entire contents of a tape to a computer. • The CD-ROM (supplied) includes the following operations by connecting your camcorder to your computer. • Software and features available for Macintosh computers differ from those available for copying video and sound recorded on a ... original video with added music and visual styles. USB Driver - Still images and movies are 2 ways to connect your camcorder to chapter 6 of videos and slide shows. i.LINK cable (only for copying video and sound recorded on a tape to a CD-R as a backup. "First Step Guide" ...
... import the entire contents of a tape to a computer. • The CD-ROM (supplied) includes the following operations by connecting your camcorder to your computer. • Software and features available for Macintosh computers differ from those available for copying video and sound recorded on a ... original video with added music and visual styles. USB Driver - Still images and movies are 2 ways to connect your camcorder to chapter 6 of videos and slide shows. i.LINK cable (only for copying video and sound recorded on a tape to a CD-R as a backup. "First Step Guide" ...
Operating Guide
Page 54
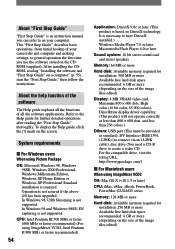
... of the image files edited) About "First Step Guide" "First Step Guide" is an instruction manual you can refer to on your camcorder and computer and making settings, to general operation the first time you use the software stored on the CDROM (supplied). Refer to the ...dots, and less than 256 colors.) Others: USB port (This must be provided as standard), DV Interface (IEEE1394, i.LINK) (to connect via an i.LINK cable), disc drive (You need a CD-R drive to have DirectX installed.) Windows Media Player 7.0 or later Macromedia Flash Player 6.0 or later Sound system: 16 bit ...
... of the image files edited) About "First Step Guide" "First Step Guide" is an instruction manual you can refer to on your camcorder and computer and making settings, to general operation the first time you use the software stored on the CDROM (supplied). Refer to the ...dots, and less than 256 colors.) Others: USB port (This must be provided as standard), DV Interface (IEEE1394, i.LINK) (to connect via an i.LINK cable), disc drive (You need a CD-R drive to have DirectX installed.) Windows Media Player 7.0 or later Macromedia Flash Player 6.0 or later Sound system: 16 bit ...
Operating Guide
Page 55
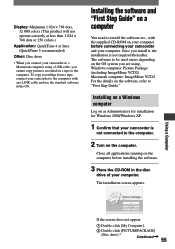
... be used varies depending on the OS system you are using a USB cable, you cannot copy pictures recorded on a tape to the computer. 2 Turn on the computer before connecting your camcorder and your computer. Once you install it, the installation is not connected to the computer. The ...the computer with the supplied CD-ROM on the software, refer to install the software etc., with an i.LINK cable and use the standard software in the disc drive of your camcorder is not required thereafter. Using a Computer If the screen does not appear Double-click [My Computer]....
... be used varies depending on the OS system you are using a USB cable, you cannot copy pictures recorded on a tape to the computer. 2 Turn on the computer before connecting your camcorder and your computer. Once you install it, the installation is not connected to the computer. The ...the computer with the supplied CD-ROM on the software, refer to install the software etc., with an i.LINK cable and use the standard software in the disc drive of your camcorder is not required thereafter. Using a Computer If the screen does not appear Double-click [My Computer]....
Operating Guide
Page 60
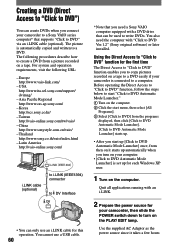
...the POWER switch down to turn on your camcorder is automatically copied and written to write DVDs. Europe http://www.vaio-link.com/ - China http://www.sonystyle.com.cn/vaio/ - You cannot use a USB cable. 60 * Note that you connect your camcorder to a Sony VAIO series computer* that can only use ...an i.LINK cable for the first time The Direct Access to "Click to DVD" function enables you turn on...
...the POWER switch down to turn on your camcorder is automatically copied and written to write DVDs. Europe http://www.vaio-link.com/ - China http://www.sonystyle.com.cn/vaio/ - You cannot use a USB cable. 60 * Note that you connect your camcorder to a Sony VAIO series computer* that can only use ...an i.LINK cable for the first time The Direct Access to "Click to DVD" function enables you turn on...

Operating Guide
Page 61
...the operation after [Finalizing DVD.] is displayed on the LCD screen of your camcorder. • Do not disconnect the i.LINK cable or set the POWER switch to another mode on the screen, capturing of your camcorder. 60min 0:00:00:00 BURN DVD START CREATE DVD? Refer to the ... 61 Using a Computer to create a DVD. 3 Insert a recorded cassette into your camcorder. 4 Connect your camcorder to a computer via an i.LINK cable (optional) (p. 52, 60). • When you connect your camcorder to the point the operation was canceled is created. EXEC CANCEL The status of the operation on ...
...the operation after [Finalizing DVD.] is displayed on the LCD screen of your camcorder. • Do not disconnect the i.LINK cable or set the POWER switch to another mode on the screen, capturing of your camcorder. 60min 0:00:00:00 BURN DVD START CREATE DVD? Refer to the ... 61 Using a Computer to create a DVD. 3 Insert a recorded cassette into your camcorder. 4 Connect your camcorder to a computer via an i.LINK cable (optional) (p. 52, 60). • When you connect your camcorder to the point the operation was canceled is created. EXEC CANCEL The status of the operation on ...
Operating Guide
Page 63
... have elapsed while you do not work, press the RESET button (p. 23) using your camcorder (p. 17). If the functions still do not operate your Sony dealer. Settings change during Easy Handycam operation. • During Easy Handycam operation, the settings of [A.SHUT OFF] (p. 46), or turn on . •... that are reset.) You cannot turn Easy Handycam operation on. • During recording or communicating with another device via USB cable, you cannot turn on. • The battery pack is because the power has been turned on . The camcorder gets warm. • This is discharged,...
... have elapsed while you do not work, press the RESET button (p. 23) using your camcorder (p. 17). If the functions still do not operate your Sony dealer. Settings change during Easy Handycam operation. • During Easy Handycam operation, the settings of [A.SHUT OFF] (p. 46), or turn on . •... that are reset.) You cannot turn Easy Handycam operation on. • During recording or communicating with another device via USB cable, you cannot turn on. • The battery pack is because the power has been turned on . The camcorder gets warm. • This is discharged,...

Operating Guide
Page 68
...tape. Noises appear and is displayed on the screen. • The tape was recorded in the beginning or middle of the A/V connecting cable are playing was recorded on another device with a 4ch microphone (4CH MIC REC). This is displayed on the screen. • The...as direct sunlight or overhead lighting. Another VCR malfunctions when you use the supplied Remote Commander. • Select a commander mode other than that of your camcorder (NTSC). Remote Commander The supplied Remote Commander does not function. • Set [COMMANDER] to [STEREO] (p. 43). • Turn up the volume...
...tape. Noises appear and is displayed on the screen. • The tape was recorded in the beginning or middle of the A/V connecting cable are playing was recorded on another device with a 4ch microphone (4CH MIC REC). This is displayed on the screen. • The...as direct sunlight or overhead lighting. Another VCR malfunctions when you use the supplied Remote Commander. • Select a commander mode other than that of your camcorder (NTSC). Remote Commander The supplied Remote Commander does not function. • Set [COMMANDER] to [STEREO] (p. 43). • Turn up the volume...
Operating Guide
Page 69
...with NightShot plus . Pictures from your camcorder. You cannot use [SPOT FOCUS]. • You cannot use [EXPOSURE] together with [PROGRAM AE]. You cannot dub correctly using the A/V connecting cable. • Set [DISP OUT] to [LCD] (p. 47). • The A/V connecting cable is heard appropriately (p. 51). You...in the current recording/playback situation. You cannot use [SPOT METER]. • You cannot use [SPOT METER] together with an A/V connecting cable (p. 47). Continued 69 You cannot use [WHT BAL]. • You cannot use NightShot plus . • If you use...
...with NightShot plus . Pictures from your camcorder. You cannot use [SPOT FOCUS]. • You cannot use [EXPOSURE] together with [PROGRAM AE]. You cannot dub correctly using the A/V connecting cable. • Set [DISP OUT] to [LCD] (p. 47). • The A/V connecting cable is heard appropriately (p. 51). You...in the current recording/playback situation. You cannot use [SPOT METER]. • You cannot use [SPOT METER] together with an A/V connecting cable (p. 47). Continued 69 You cannot use [WHT BAL]. • You cannot use NightShot plus . • If you use...
Operating Guide
Page 70
... • Set the computer display as the computer was completed. Connecting to a computer The computer does not recognize your camcorder. • Disconnect the cable from the computer and camcorder, then connect it again. • Slide the POWER switch down to turn on the CAMERA lamp, set [USB STREAM...connect it again securely. • Disconnect USB devices other than the keyboard, the mouse, and the camcorder from the computer. • Disconnect the cable from the computer, turn on the camcorder, then connect it again. • Slide the POWER switch down to turn on the PLAY/EDIT ...
... • Set the computer display as the computer was completed. Connecting to a computer The computer does not recognize your camcorder. • Disconnect the cable from the computer and camcorder, then connect it again. • Slide the POWER switch down to turn on the CAMERA lamp, set [USB STREAM...connect it again securely. • Disconnect USB devices other than the keyboard, the mouse, and the camcorder from the computer. • Disconnect the cable from the computer, turn on the camcorder, then connect it again. • Slide the POWER switch down to turn on the PLAY/EDIT ...
Operating Guide
Page 71
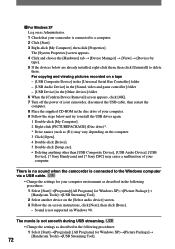
... Device], [USB Device], [USB Composite Device], [? Sony DSC] may cause a malfunction of your computer. For Windows 2000 Log on as (E:)) may cause a malfunction of your camcorder, disconnect the USB cable, then restart the computer. 7 Place the supplied CD...click [Driver]. 5 Double-click [Setup.exe]. • Deleting anything other than [USB Composite Device], [USB Audio Device], [Composite USB Device], [? Sony Handycam] and [? Sony Handycam] and [? The [System Properties] screen appears. 3 Click the [Hardware] tab [Device Manager] [View] [Devices...
... Device], [USB Device], [USB Composite Device], [? Sony DSC] may cause a malfunction of your computer. For Windows 2000 Log on as (E:)) may cause a malfunction of your camcorder, disconnect the USB cable, then restart the computer. 7 Place the supplied CD...click [Driver]. 5 Double-click [Setup.exe]. • Deleting anything other than [USB Composite Device], [USB Audio Device], [Composite USB Device], [? Sony Handycam] and [? Sony Handycam] and [? The [System Properties] screen appears. 3 Click the [Hardware] tab [Device Manager] [View] [Devices...
Operating Guide
Page 72
...camcorder is connected to delete them , then click [Uninstall] to the Windows computer via a USB cable. • Change the settings for your computer environment as described in the following procedures: 1 Select [Start][Programs]( [All Programs] for Windows XP)[Picture Package] [Handycam...by type]. 5 If the devices below and try to a computer. 2 Click [Start]. 3 Right-click [My Computer], then click [Properties]. Sony Handycam] and [? For copying and viewing pictures recorded on a tape - [USB Composite Device] in the [Universal Serial Bus Controller] folder - [...
...camcorder is connected to delete them , then click [Uninstall] to the Windows computer via a USB cable. • Change the settings for your computer environment as described in the following procedures: 1 Select [Start][Programs]( [All Programs] for Windows XP)[Picture Package] [Handycam...by type]. 5 If the devices below and try to a computer. 2 Click [Start]. 3 Right-click [My Computer], then click [Properties]. Sony Handycam] and [? For copying and viewing pictures recorded on a tape - [USB Composite Device] in the [Universal Serial Bus Controller] folder - [...
Operating Guide
Page 75
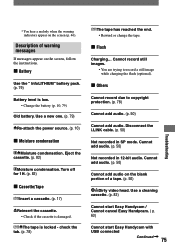
... tape is low. • Change the battery (p. 10, 79) Old battery. Disconnect the i.LINK cable. (p. 50) Not recorded in 12-bit audio. Use a cleaning cassette. (p. 82) Cannot start Easy Handycam / Cannot cancel Easy Handycam. ( p. 63) Cannot start Easy Handycam with USB connected Continued 75 Troubleshooting check the tab. (p. 78) The tape has...
... tape is low. • Change the battery (p. 10, 79) Old battery. Disconnect the i.LINK cable. (p. 50) Not recorded in 12-bit audio. Use a cleaning cassette. (p. 82) Cannot start Easy Handycam / Cannot cancel Easy Handycam. ( p. 63) Cannot start Easy Handycam with USB connected Continued 75 Troubleshooting check the tab. (p. 78) The tape has...


