Operating Guide
Page 3
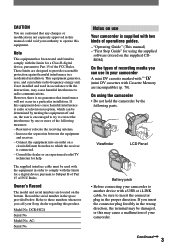
...provided below. Notes on the bottom. Viewfinder LCD Panel Battery pack • Before connecting your Sony dealer regarding this product. This equipment generates, uses, and can use Your camcorder is connected. - Reorient or relocate the receiving antenna. - Serial No. "Operating Guide" (This ...number in a residential installation. Refer to these numbers whenever you insert the connector plug forcibly in this manual could void your camcorder. The supplied interface cable must be determined by turning the equipment off and on the supplied CDROM) On the types of...
...provided below. Notes on the bottom. Viewfinder LCD Panel Battery pack • Before connecting your Sony dealer regarding this product. This equipment generates, uses, and can use Your camcorder is connected. - Reorient or relocate the receiving antenna. - Serial No. "Operating Guide" (This ...number in a residential installation. Refer to these numbers whenever you insert the connector plug forcibly in this manual could void your camcorder. The supplied interface cable must be determined by turning the equipment off and on the supplied CDROM) On the types of...
Operating Guide
Page 4
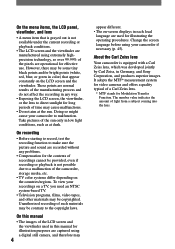
...technology, so over 99.99% of the pixels are normal results of the manufacturing process and do not affect the recording in Germany, and Sony Corporation, and produces superior images. Change the screen language before using a digital still camera, and therefore may 4 appear different. •... be contrary to malfunction. It adopts the MTF* measurement system for Modulation Transfer Function. On this manual • The images of the camcorder, storage media, etc. • TV color systems differ depending on -screen displays in each local language are used in low light conditions...
...technology, so over 99.99% of the pixels are normal results of the manufacturing process and do not affect the recording in Germany, and Sony Corporation, and produces superior images. Change the screen language before using a digital still camera, and therefore may 4 appear different. •... be contrary to malfunction. It adopts the MTF* measurement system for Modulation Transfer Function. On this manual • The images of the camcorder, storage media, etc. • TV color systems differ depending on -screen displays in each local language are used in low light conditions...
Operating Guide
Page 6
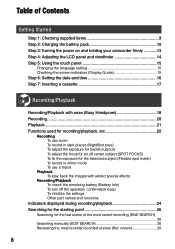
... Contents Getting Started Step 1: Checking supplied items 9 Step 2: Charging the battery pack 10 Step 3: Turning the power on and holding your camcorder firmly ...........13 Step 4: Adjusting the LCD panel and viewfinder 14 Step 5: Using the touch panel 15 Changing the language... (Display Guide 15 Step 6: Setting the date and time 16 Step 7: Inserting a cassette 17 Recording/Playback Recording/Playback with ease (Easy Handycam 18 Recording 20 Playback 21 Functions used for recording/playback, etc 22 Recording To use zoom To record in dark places (NightShot plus) To...
... Contents Getting Started Step 1: Checking supplied items 9 Step 2: Charging the battery pack 10 Step 3: Turning the power on and holding your camcorder firmly ...........13 Step 4: Adjusting the LCD panel and viewfinder 14 Step 5: Using the touch panel 15 Changing the language... (Display Guide 15 Step 6: Setting the date and time 16 Step 7: Inserting a cassette 17 Recording/Playback Recording/Playback with ease (Easy Handycam 18 Recording 20 Playback 21 Functions used for recording/playback, etc 22 Recording To use zoom To record in dark places (NightShot plus) To...

Operating Guide
Page 8
Creating a DVD (Direct Access to "Click to DVD 60 Troubleshooting Troubleshooting 63 Warning indicators and messages 74 Additional Information Using your camcorder abroad 77 Usable cassette tapes 78 About the "InfoLITHIUM" battery pack 79 About i.LINK 80 Maintenance and precautions 81 Using the Strap Belt as a wrist strap 84 Attaching the Shoulder Strap 85 Specifications 85 Index...87 8
Creating a DVD (Direct Access to "Click to DVD 60 Troubleshooting Troubleshooting 63 Warning indicators and messages 74 Additional Information Using your camcorder abroad 77 Usable cassette tapes 78 About the "InfoLITHIUM" battery pack 79 About i.LINK 80 Maintenance and precautions 81 Using the Strap Belt as a wrist strap 84 Attaching the Shoulder Strap 85 Specifications 85 Index...87 8
Operating Guide
Page 9
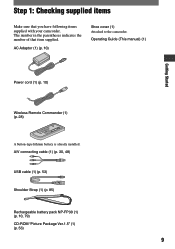
AC Adaptor (1) (p. 10) Shoe cover (1) Attached to the camcorder. A/V connecting cable (1) (p. 30, 48) USB cable (1) (p. 53) Shoulder Strap (1) (p. 85) Rechargeable battery pack NP-FP30 (1) (p. 10, 79) CD-ROM "Picture Package Ver.1.5" (1) (p. 53) 9 Step 1: Checking ... (1) (p. 28) A button-type lithium battery is already installed. The number in the parentheses indicates the number of that you have following items supplied with your camcorder.
AC Adaptor (1) (p. 10) Shoe cover (1) Attached to the camcorder. A/V connecting cable (1) (p. 30, 48) USB cable (1) (p. 53) Shoulder Strap (1) (p. 85) Rechargeable battery pack NP-FP30 (1) (p. 10, 79) CD-ROM "Picture Package Ver.1.5" (1) (p. 53) 9 Step 1: Checking ... (1) (p. 28) A button-type lithium battery is already installed. The number in the parentheses indicates the number of that you have following items supplied with your camcorder.

Operating Guide
Page 10
Step 2: Charging the battery pack You can charge the "InfoLITHIUM" battery pack (P series) (p. 79) after attaching it clicks. 2 Slide the POWER switch up to your camcorder. 10 To remove the battery pack Turn off when the battery is fully charged. CHG (charge) lamp To the wall outlet AC Adaptor 1 Attach the ... DC IN jack DC plug DC IN jack With the mark facing down 4 Connect the power cord to the DC IN jack on your camcorder.
Step 2: Charging the battery pack You can charge the "InfoLITHIUM" battery pack (P series) (p. 79) after attaching it clicks. 2 Slide the POWER switch up to your camcorder. 10 To remove the battery pack Turn off when the battery is fully charged. CHG (charge) lamp To the wall outlet AC Adaptor 1 Attach the ... DC IN jack DC plug DC IN jack With the mark facing down 4 Connect the power cord to the DC IN jack on your camcorder.
Operating Guide
Page 11
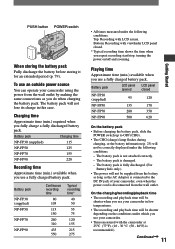
... time NP-FP30 (supplied) 115 NP-FP50 125 NP-FP70 155 NP-FP90 220 Recording time Approximate time (min.) available when you use your camcorder, even when the power cord is disconnected from the wall outlet. Bottom: Recording with LCD screen. Battery pack LCD panel LCD panel opened closed ...500 620 On the battery pack • Before changing the battery pack, slide the POWER switch up to the DC IN jack of your camcorder in this case. On the charging/recording/playback time • The recording and playback time will be correctly displayed under the following conditions. -...
... time NP-FP30 (supplied) 115 NP-FP50 125 NP-FP70 155 NP-FP90 220 Recording time Approximate time (min.) available when you use your camcorder, even when the power cord is disconnected from the wall outlet. Bottom: Recording with LCD screen. Battery pack LCD panel LCD panel opened closed ...500 620 On the battery pack • Before changing the battery pack, slide the POWER switch up to the DC IN jack of your camcorder in this case. On the charging/recording/playback time • The recording and playback time will be correctly displayed under the following conditions. -...
Operating Guide
Page 12
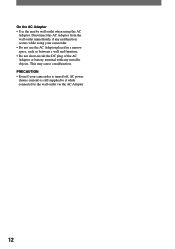
Disconnect the AC Adaptor from the wall outlet immediately if any metallic objects. PRECAUTION • Even if your camcorder. • Do not use the AC Adaptor placed in a narrow space, such as between a wall and furniture. • Do not short-circuit the DC plug ... any malfunction occurs while using the AC Adaptor. This may cause a malfunction. On the AC Adaptor • Use the nearby wall outlet when using your camcorder is turned off, AC power (house current) is still supplied to it while connected to the wall outlet via the AC Adaptor. 12
Disconnect the AC Adaptor from the wall outlet immediately if any metallic objects. PRECAUTION • Even if your camcorder. • Do not use the AC Adaptor placed in a narrow space, such as between a wall and furniture. • Do not short-circuit the DC plug ... any malfunction occurs while using the AC Adaptor. This may cause a malfunction. On the AC Adaptor • Use the nearby wall outlet when using your camcorder is turned off, AC power (house current) is still supplied to it while connected to the wall outlet via the AC Adaptor. 12
Operating Guide
Page 13
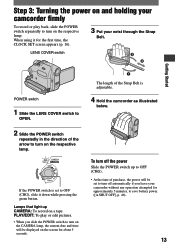
...OFF (CHG), slide it for about 5 seconds. Step 3: Turning the power on and holding your camcorder firmly To record or play or edit pictures. • When you leave your camcorder without any operation attempted for approximately 5 minutes, to turn on the screen for the first ...3 Put your wrist through the Strap Belt. When using it down while pressing the green button. If the POWER switch is adjustable. 4 Hold the camcorder as illustrated below. PLAY/EDIT: To play back, slide the POWER switch repeatedly to save battery power. ([A.SHUT OFF], p. 46). 13 To turn...
...OFF (CHG), slide it for about 5 seconds. Step 3: Turning the power on and holding your camcorder firmly To record or play or edit pictures. • When you leave your camcorder without any operation attempted for approximately 5 minutes, to turn on the screen for the first ...3 Put your wrist through the Strap Belt. When using it down while pressing the green button. If the POWER switch is adjustable. 4 Hold the camcorder as illustrated below. PLAY/EDIT: To play back, slide the POWER switch repeatedly to save battery power. ([A.SHUT OFF], p. 46). 13 To turn...
Operating Guide
Page 14
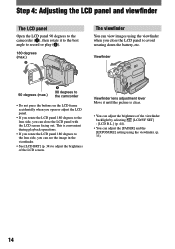
... brightness of the LCD screen. Step 4: Adjusting the LCD panel and viewfinder The LCD panel Open the LCD panel 90 degrees to the camcorder (), then rotate it until the picture is convenient during playback operations. • If you rotate the LCD panel 180 degrees to the lens side... viewfinder when you close the LCD panel with the LCD screen facing out. Viewfinder 90 degrees (max.) 1 90 degrees to the camcorder • Do not press the buttons on the LCD frame accidentally when you open or adjust the LCD panel. • If you rotate the LCD...
... brightness of the LCD screen. Step 4: Adjusting the LCD panel and viewfinder The LCD panel Open the LCD panel 90 degrees to the camcorder (), then rotate it until the picture is convenient during playback operations. • If you rotate the LCD panel 180 degrees to the lens side... viewfinder when you close the LCD panel with the LCD screen facing out. Viewfinder 90 degrees (max.) 1 90 degrees to the camcorder • Do not press the buttons on the LCD frame accidentally when you open or adjust the LCD panel. • If you rotate the LCD...

Operating Guide
Page 16
Step 6: Setting the date and time Set the date and time when using this camcorder for about 3 months, the built-in rechargeable battery gets discharged and the date ...4 when you do not set the date and time, the CLOCK SET screen appears every time you turn on your camcorder for the first time. For midday, set the date and time again (p. 83). POWER switch Skip to the... year 2079. EXEC RET. 16 If you do not use your camcorder. • If you set it to 12:00 AM. In that case, charge the rechargeable battery and then set it...
Step 6: Setting the date and time Set the date and time when using this camcorder for about 3 months, the built-in rechargeable battery gets discharged and the date ...4 when you do not set the date and time, the CLOCK SET screen appears every time you turn on your camcorder for the first time. For midday, set the date and time again (p. 83). POWER switch Skip to the... year 2079. EXEC RET. 16 If you do not use your camcorder. • If you set it to 12:00 AM. In that case, charge the rechargeable battery and then set it...
Operating Guide
Page 22
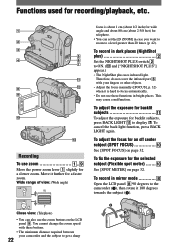
... telephoto. • You can also use the zoom buttons on the LCD panel . To record in case you want to zoom to the camcorder (), then rotate it further for a faster zoom. To adjust the exposure for backlit subjects To adjust the exposure for a slower zoom. To... (Telephoto) • You can set the [D ZOOM] in dark places (NightShot plus uses infrared light. You cannot change the zoom speed with your camcorder and the subject to focus automatically. • Do not use zoom Move the power zoom lever slightly for backlit subjects, press BACK LIGHT ...
... telephoto. • You can also use the zoom buttons on the LCD panel . To record in case you want to zoom to the camcorder (), then rotate it further for a faster zoom. To adjust the exposure for backlit subjects To adjust the exposure for a slower zoom. To... (Telephoto) • You can set the [D ZOOM] in dark places (NightShot plus uses infrared light. You cannot change the zoom speed with your camcorder and the subject to focus automatically. • Do not use zoom Move the power zoom lever slightly for backlit subjects, press BACK LIGHT ...
Operating Guide
Page 23
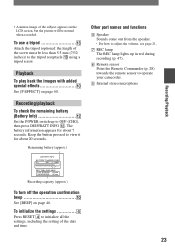
... date and time. Playback To play back the images with added special effects See [P EFFECT] on page 46. Keep the button pressed to operate your camcorder. Internal stereo microphone 23 Recording/playback To check the remaining battery (Battery Info Set the POWER switch up in red during recording (p. 47). ...
... date and time. Playback To play back the images with added special effects See [P EFFECT] on page 46. Keep the button pressed to operate your camcorder. Internal stereo microphone 23 Recording/playback To check the remaining battery (Battery Info Set the POWER switch up in red during recording (p. 47). ...
Operating Guide
Page 26
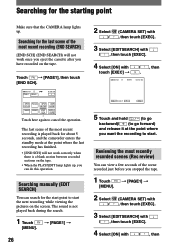
... point where the last recording has finished. • [END SCH] will not work correctly when there is played back for about 5 seconds, and the camcorder enters the standby mode at the point where you want the recording to start . Searching for the last scene of the most recently recorded scenes...
... point where the last recording has finished. • [END SCH] will not work correctly when there is played back for about 5 seconds, and the camcorder enters the standby mode at the point where you want the recording to start . Searching for the last scene of the most recently recorded scenes...

Operating Guide
Page 27
Then, your camcorder is set to the standby. touch [EXEC] . 5 Touch . 60min STBY 0:00:00 EDIT FN The last few seconds of the most recently recorded scene are played back. Recording/Playback 27
Then, your camcorder is set to the standby. touch [EXEC] . 5 Touch . 60min STBY 0:00:00 EDIT FN The last few seconds of the most recently recorded scene are played back. Recording/Playback 27
Operating Guide
Page 28
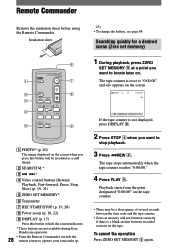
... screen when you press this button to hide the screen indicators. * These buttons are not available during Easy Handycam operation. • Point the Remote Commander towards the 28 remote sensor to operate your camcorder (p. 1 During playback, press ZERO SET MEMORY at a point you want to stop playback. 3 Press REW ...
... screen when you press this button to hide the screen indicators. * These buttons are not available during Easy Handycam operation. • Point the Remote Commander towards the 28 remote sensor to operate your camcorder (p. 1 During playback, press ZERO SET MEMORY at a point you want to stop playback. 3 Press REW ...

Operating Guide
Page 29
... if there is a blank section between recorded sections on the tape. 29 Recording/Playback Each time you press or , your camcorder searches for the still image before or after another and display each image for 5 seconds automatically. 1 Slide the POWER switch down repeatedly to ...search will not function correctly if there is a blank section between recorded sections on the tape. Searching for a still image (Photo search) Your camcorder can locate still images one after the current point on the tape. Searching for a scene by date of the recording date. 1 Slide the ...
... if there is a blank section between recorded sections on the tape. 29 Recording/Playback Each time you press or , your camcorder searches for the still image before or after another and display each image for 5 seconds automatically. 1 Slide the POWER switch down repeatedly to ...search will not function correctly if there is a blank section between recorded sections on the tape. Searching for a still image (Photo search) Your camcorder can locate still images one after the current point on the tape. Searching for a scene by date of the recording date. 1 Slide the ...
Operating Guide
Page 30
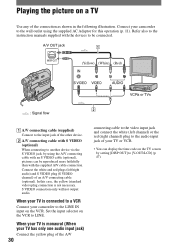
... code on the TV screen by using the supplied AC Adaptor for this case, the yellow (standard video) plug connection is not necessary. Connect your camcorder to the audio input jack of an A/V connecting cable (optional). When your TV is monaural (When your TV has only one audio input jack) Connect... plug of the A/V 30 connecting cable to the video input jack and connect the white (left /right audio) and S VIDEO plug (S VIDEO channel) of your camcorder to LINE. Set the input selector on the VCR to the LINE IN input on the VCR. Refer also to the instruction manuals supplied with...
... code on the TV screen by using the supplied AC Adaptor for this case, the yellow (standard video) plug connection is not necessary. Connect your camcorder to the audio input jack of an A/V connecting cable (optional). When your TV is monaural (When your TV has only one audio input jack) Connect... plug of the A/V 30 connecting cable to the video input jack and connect the white (left /right audio) and S VIDEO plug (S VIDEO channel) of your camcorder to LINE. Set the input selector on the VCR to the LINE IN input on the VCR. Refer also to the instruction manuals supplied with...
Operating Guide
Page 34
... When the white balance has been adjusted and stored in the memory, the indicator stops flashing. • Do not shake your camcorder while is selected, or you bring your camcorder outdoors from inside the house, or vice versa. • Set [WHT BAL] to [ AUTO] or [ONE PUSH] under white ...or cool white fluorescent lamps. • The setting returns to record still images. To cancel the count down during Easy Handycam operation. END SCH (END...
... When the white balance has been adjusted and stored in the memory, the indicator stops flashing. • Do not shake your camcorder while is selected, or you bring your camcorder outdoors from inside the house, or vice versa. • Set [WHT BAL] to [ AUTO] or [ONE PUSH] under white ...or cool white fluorescent lamps. • The setting returns to record still images. To cancel the count down during Easy Handycam operation. END SCH (END...
Operating Guide
Page 35
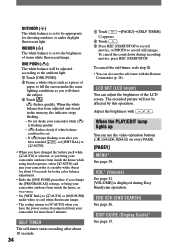
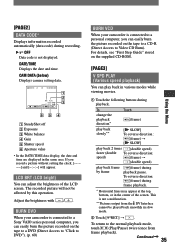
... burn the picture recorded on the tape to a DVD (Direct Access to "Click to DVD"). (p. 60) BURN VCD When your camcorder is connected to a Sony VAIO series personal computer, you can adjust the brightness of the screen. To reverse direction: (frame) during playback. Continued 35... Using the Menu If you can play back frame by this operation. BURN DVD When your camcorder is not a malfunction. **Pictures ...
... burn the picture recorded on the tape to a DVD (Direct Access to "Click to DVD"). (p. 60) BURN VCD When your camcorder is connected to a Sony VAIO series personal computer, you can adjust the brightness of the screen. To reverse direction: (frame) during playback. Continued 35... Using the Menu If you can play back frame by this operation. BURN DVD When your camcorder is not a malfunction. **Pictures ...


