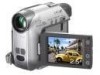
Operating Guide
Page 2
... RECYCLING LITHIUM-ION BATTERIES 2 Lithium-Ion batteries are recyclable. Battery pack This device complies with Part 15 of rechargeable batteries, call : Sony Customer Information Center 1-800-222SONY (7669). Address: 16450 W. WARNING To prevent fire or shock hazard, do not expose the... unit to discontinue midway (fail), restart the application or disconnect and connect the communication cable (USB, etc.) again. For customers in the U.S.A. Operation is subject to the following two conditions: (1) This device...
... RECYCLING LITHIUM-ION BATTERIES 2 Lithium-Ion batteries are recyclable. Battery pack This device complies with Part 15 of rechargeable batteries, call : Sony Customer Information Center 1-800-222SONY (7669). Address: 16450 W. WARNING To prevent fire or shock hazard, do not expose the... unit to discontinue midway (fail), restart the application or disconnect and connect the communication cable (USB, etc.) again. For customers in the U.S.A. Operation is subject to the following two conditions: (1) This device...
Operating Guide
Page 3
...in a residential installation. Serial No. Notes on , the user is connected. - Continued 3 Note This equipment has been tested and found to comply with the instructions, may cause a malfunction of your camcorder to another device with Cassette Memory are incompatible) (p. 78). Refer ...is supplied with the limits for help. If you call your Sony dealer regarding this product. If this equipment does cause harmful interference to radio or television reception, which can use Your camcorder is no guarantee that interference will not occur in a particular installation...
...in a residential installation. Serial No. Notes on , the user is connected. - Continued 3 Note This equipment has been tested and found to comply with the instructions, may cause a malfunction of your camcorder to another device with Cassette Memory are incompatible) (p. 78). Refer ...is supplied with the limits for help. If you call your Sony dealer regarding this product. If this equipment does cause harmful interference to radio or television reception, which can use Your camcorder is no guarantee that interference will not occur in a particular installation...
Operating Guide
Page 7
... a VCR or TV 48 Dubbing to other recording devices 49 Recording pictures from a VCR 50 Dubbing sound to a recorded tape 50 Jacks to connect external devices 52 Using a Computer Before referring to the "First Step Guide" on your computer 53 Installing the software and "First Step Guide" on a TV ...
... a VCR or TV 48 Dubbing to other recording devices 49 Recording pictures from a VCR 50 Dubbing sound to a recorded tape 50 Jacks to connect external devices 52 Using a Computer Before referring to the "First Step Guide" on your computer 53 Installing the software and "First Step Guide" on a TV ...
Operating Guide
Page 9
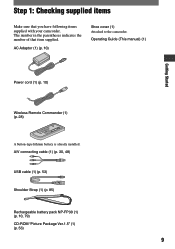
AC Adaptor (1) (p. 10) Shoe cover (1) Attached to the camcorder. Operating Guide (This manual) (1) Getting Started Power cord (1) (p. 10) Wireless Remote Commander (1) (p. 28) A button-type lithium battery is already installed. A/V connecting cable (1) (p. 30, 48) USB cable (1) (p. 53) Shoulder Strap (1) (p. 85) Rechargeable battery pack NP-FP30 (1) (p. 10, 79) CD-ROM "Picture Package Ver.1.5" (1) (p. 53) 9 Step...
AC Adaptor (1) (p. 10) Shoe cover (1) Attached to the camcorder. Operating Guide (This manual) (1) Getting Started Power cord (1) (p. 10) Wireless Remote Commander (1) (p. 28) A button-type lithium battery is already installed. A/V connecting cable (1) (p. 30, 48) USB cable (1) (p. 53) Shoulder Strap (1) (p. 85) Rechargeable battery pack NP-FP30 (1) (p. 10, 79) CD-ROM "Picture Package Ver.1.5" (1) (p. 53) 9 Step...

Operating Guide
Page 10
... button and remove the battery pack. POWER switch DC IN jack DC plug DC IN jack With the mark facing down 4 Connect the power cord to your camcorder. 10 To remove the battery pack Turn off when the battery is fully charged. Disconnect the AC Adaptor from the DC IN jack.... 3 Connect the AC Adaptor to the DC IN jack on your camcorder. CHG (charge) lamp To the wall outlet AC Adaptor 1 Attach the battery pack by sliding it in the direction of...
... button and remove the battery pack. POWER switch DC IN jack DC plug DC IN jack With the mark facing down 4 Connect the power cord to your camcorder. 10 To remove the battery pack Turn off when the battery is fully charged. Disconnect the AC Adaptor from the DC IN jack.... 3 Connect the AC Adaptor to the DC IN jack on your camcorder. CHG (charge) lamp To the wall outlet AC Adaptor 1 Attach the battery pack by sliding it in the direction of...
Operating Guide
Page 11
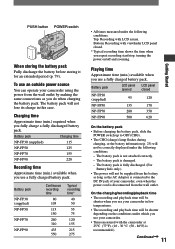
...125 NP-FP70 155 NP-FP90 220 Recording time Approximate time (min.) available when you use your camcorder using the power from the wall outlet by making the same connections as the AC Adaptor is connected to OFF (CHG). • The CHG (charge) lamp flashes during charging, or ...period (p. 79). The battery pack is recommended.) Continued 11 Getting Started Charging time Approximate time (min.) required when you use your camcorder, even when the power cord is not attached correctly. - Battery pack NP-FP30 (supplied) NP-FP50 NP-FP70 NP-FP90 Continuous recording time...
...125 NP-FP70 155 NP-FP90 220 Recording time Approximate time (min.) available when you use your camcorder using the power from the wall outlet by making the same connections as the AC Adaptor is connected to OFF (CHG). • The CHG (charge) lamp flashes during charging, or ...period (p. 79). The battery pack is recommended.) Continued 11 Getting Started Charging time Approximate time (min.) required when you use your camcorder, even when the power cord is not attached correctly. - Battery pack NP-FP30 (supplied) NP-FP50 NP-FP70 NP-FP90 Continuous recording time...
Operating Guide
Page 12
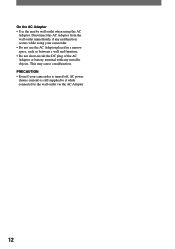
PRECAUTION • Even if your camcorder. • Do not use the AC Adaptor placed in a narrow space, such as between a wall and furniture. • Do not short-circuit the DC plug ... terminal with any metallic objects. On the AC Adaptor • Use the nearby wall outlet when using your camcorder is turned off, AC power (house current) is still supplied to it while connected to the wall outlet via the AC Adaptor. 12 Disconnect the AC Adaptor from the wall outlet immediately if...
PRECAUTION • Even if your camcorder. • Do not use the AC Adaptor placed in a narrow space, such as between a wall and furniture. • Do not short-circuit the DC plug ... terminal with any metallic objects. On the AC Adaptor • Use the nearby wall outlet when using your camcorder is turned off, AC power (house current) is still supplied to it while connected to the wall outlet via the AC Adaptor. 12 Disconnect the AC Adaptor from the wall outlet immediately if...
Operating Guide
Page 30
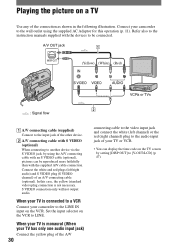
...red (right channel) plug to the audio input jack of your camcorder to the wall outlet using the A/V connecting cable with an S VIDEO cable (optional), pictures can display the time code on a TV Use any of the connection as shown in the following illustration. In this operation (p. 11... audio) and S VIDEO plug (S VIDEO channel) of an A/V connecting cable (optional). Playing the picture on the TV screen by using the supplied AC Adaptor for this case, the yellow (standard video) plug connection is connected to a VCR Connect your camcorder to the LINE IN input on the VCR to [V-OUT/LCD] ...
...red (right channel) plug to the audio input jack of your camcorder to the wall outlet using the A/V connecting cable with an S VIDEO cable (optional), pictures can display the time code on a TV Use any of the connection as shown in the following illustration. In this operation (p. 11... audio) and S VIDEO plug (S VIDEO channel) of an A/V connecting cable (optional). Playing the picture on the TV screen by using the supplied AC Adaptor for this case, the yellow (standard video) plug connection is connected to a VCR Connect your camcorder to the LINE IN input on the VCR to [V-OUT/LCD] ...
Operating Guide
Page 35
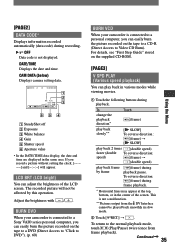
... or in the center of the LCD screen. LCD BRT (LCD bright) You can play back frame by this operation. BURN DVD When your camcorder is connected to a Sony VAIO series personal computer, you can easily burn the picture recorded on the tape to a DVD (Direct Access to "Click to DVD"). (p.... 60) BURN VCD When your camcorder is connected to the normal playback mode, touch (Play/Pause) twice (once from the DV Interface cannot be affected by ...
... or in the center of the LCD screen. LCD BRT (LCD bright) You can play back frame by this operation. BURN DVD When your camcorder is connected to a Sony VAIO series personal computer, you can easily burn the picture recorded on the tape to a DVD (Direct Access to "Click to DVD"). (p.... 60) BURN VCD When your camcorder is connected to the normal playback mode, touch (Play/Pause) twice (once from the DV Interface cannot be affected by ...
Operating Guide
Page 44
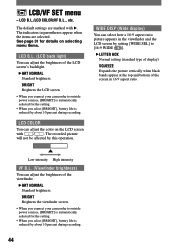
...44 BRIGHT Brightens the LCD screen. • When you select [BRIGHT], battery life is automatically selected for the setting. • When you connect your camcorder to [16:9 WIDE ( )]. LETTER BOX Normal setting (standard type of display) SQUEEZE Expands the picture vertically when black bands appear ...finder and the LCD screen by about 10 percent during recording. BRIGHT Brightens the viewfinder screen. • When you connect your camcorder to outside power sources, [BRIGHT] is reduced by this operation. See page 31 for the setting. • When you select [...
...44 BRIGHT Brightens the LCD screen. • When you select [BRIGHT], battery life is automatically selected for the setting. • When you connect your camcorder to [16:9 WIDE ( )]. LETTER BOX Normal setting (standard type of display) SQUEEZE Expands the picture vertically when black bands appear ...finder and the LCD screen by about 10 percent during recording. BRIGHT Brightens the viewfinder screen. • When you connect your camcorder to outside power sources, [BRIGHT] is reduced by this operation. See page 31 for the setting. • When you select [...

Operating Guide
Page 46
.... When NIGHTSHOT PLUS is automatically set the time difference by another VCR remote control unit. 46 See page 31 for more than CAMERA. - NEVER The camcorder is not automatically turned off when you set the time difference to 0, the clock returns to a wall outlet, [A.SHUT OFF] is set to ON. COMMANDER... the items are marked with the time difference. WORLD TIME/BEEP, etc. The indicators in accordance with . BEEP ON A melody sounds when you connect your camcorder from responding to [NEVER]. OFF Cancels the melody. -
.... When NIGHTSHOT PLUS is automatically set the time difference by another VCR remote control unit. 46 See page 31 for more than CAMERA. - NEVER The camcorder is not automatically turned off when you set the time difference to 0, the clock returns to a wall outlet, [A.SHUT OFF] is set to ON. COMMANDER... the items are marked with the time difference. WORLD TIME/BEEP, etc. The indicators in accordance with . BEEP ON A melody sounds when you connect your camcorder from responding to [NEVER]. OFF Cancels the melody. -
Operating Guide
Page 48
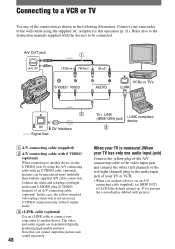
...picture and sound separately. 48 When your TV is not necessary. Connect the white and red plugs (left channel) or the red (right channel) plug to the audio input jack of your camcorder to another device via an A/V connecting cable (supplied), set [DISP OUT] to [LCD] (the ... plug connection is monaural (When your TV has only one audio input jack) Connect the yellow plug of the A/V connecting cable to the video input jack and connect the white (left /right audio) and S VIDEO plug (S VIDEO channel) of the connection as shown in the following illustration. Connect your camcorder to ...
...picture and sound separately. 48 When your TV is not necessary. Connect the white and red plugs (left channel) or the red (right channel) plug to the audio input jack of your camcorder to another device via an A/V connecting cable (supplied), set [DISP OUT] to [LCD] (the ... plug connection is monaural (When your TV has only one audio input jack) Connect the yellow plug of the A/V connecting cable to the video input jack and connect the white (left /right audio) and S VIDEO plug (S VIDEO channel) of the connection as shown in the following illustration. Connect your camcorder to ...

Operating Guide
Page 49
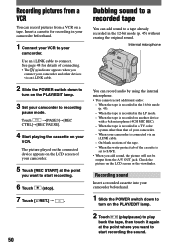
... playback. Refer to turn on the PLAY/EDIT lamp. 4 Start the playback on your camcorder, and record it to your camcorder as VCRs). 1 Connect your VCR to the input mode. 3 Prepare your camcorder for recording. Titles that are recorded on the screen (p. 35). • The following cannot... selector, set [DISP OUT] to [LCD] (the default setting) (p. 47) to the input jack of connecting. • When using the A/V connecting cable, display them on other camcorder. - Insert the recorded cassette. Dubbing/Editing Dubbing to other recording devices You can copy the picture played back...
... playback. Refer to turn on the PLAY/EDIT lamp. 4 Start the playback on your camcorder, and record it to your camcorder as VCRs). 1 Connect your VCR to the input mode. 3 Prepare your camcorder for recording. Titles that are recorded on the screen (p. 35). • The following cannot... selector, set [DISP OUT] to [LCD] (the default setting) (p. 47) to the input jack of connecting. • When using the A/V connecting cable, display them on other camcorder. - Insert the recorded cassette. Dubbing/Editing Dubbing to other recording devices You can copy the picture played back...
Operating Guide
Page 50
...by using the internal microphone. • You cannot record additional audio: - When the tape is recorded in your camcorder beforehand. 1 Connect your VCR to turn on your camcorder. Check the picture on a tape. Use an i.LINK cable to turn on another device with a 4ch microphone (...sound. Insert a cassette for details of the tape. - When your camcorder is set to SAVE. • When you connect your camcorder and other than that of your camcorder beforehand. 1 Slide the POWER switch down to connect. See page 48 for recording in a TV color system other devices ...
...by using the internal microphone. • You cannot record additional audio: - When the tape is recorded in your camcorder beforehand. 1 Connect your VCR to turn on your camcorder. Check the picture on a tape. Use an i.LINK cable to turn on another device with a 4ch microphone (...sound. Insert a cassette for details of the tape. - When your camcorder is set to SAVE. • When you connect your camcorder and other than that of your camcorder beforehand. 1 Slide the POWER switch down to connect. See page 48 for recording in a TV color system other devices ...
Operating Guide
Page 52
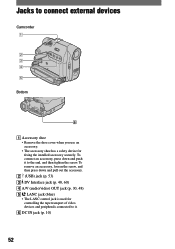
... (p. 30, 48) LANC jack (blue) • The LANC control jack is used for controlling the tape transport of video devices and peripherals connected to it to connect external devices Camcorder 1 2 3 4 5 Bottom 6 Accessory shoe • Remove the shoe cover when you use an accessory. • The accessory shoe has a safety device for...
... (p. 30, 48) LANC jack (blue) • The LANC control jack is used for controlling the tape transport of video devices and peripherals connected to it to connect external devices Camcorder 1 2 3 4 5 Bottom 6 Accessory shoe • Remove the shoe cover when you use an accessory. • The accessory shoe has a safety device for...
Operating Guide
Page 53
... create a short original video or slide show with a menu of videos and slide shows. Image data is transferred in folders by connecting your camcorder to your computer. • Software and features available for Macintosh computers differ from the supplied CD-ROM, you install the Picture Package...high resolution still pictures. ImageMixer VCD2 - Still images and movies are 2 ways to connect your camcorder to a computer. - Save the images on a computer. USB Streaming Tool You can view the picture your camcorder is playing back on tape or is good for Windows user) This method is ...
... create a short original video or slide show with a menu of videos and slide shows. Image data is transferred in folders by connecting your camcorder to your computer. • Software and features available for Macintosh computers differ from the supplied CD-ROM, you install the Picture Package...high resolution still pictures. ImageMixer VCD2 - Still images and movies are 2 ways to connect your camcorder to a computer. - Save the images on a computer. USB Streaming Tool You can view the picture your camcorder is playing back on tape or is good for Windows user) This method is ...
Operating Guide
Page 54
After installing the CDROM, reading "Installing the software and "First Step Guide" on the size of your camcorder and computer and making settings, to general operation the first time you can refer to on the CDROM (supplied). In Windows 98, USB Streaming ... less than 800 × 600 dots, and less than 256 colors.) Others: USB port (This must be provided as standard), DV Interface (IEEE1394, i.LINK) (to connect via an i.LINK cable), disc drive (You need a CD-R drive to create a video CD. System requirements For Windows users When using ImageMixer VCD2, Intel...
After installing the CDROM, reading "Installing the software and "First Step Guide" on the size of your camcorder and computer and making settings, to general operation the first time you can refer to on the CDROM (supplied). In Windows 98, USB Streaming ... less than 800 × 600 dots, and less than 256 colors.) Others: USB port (This must be provided as standard), DV Interface (IEEE1394, i.LINK) (to connect via an i.LINK cable), disc drive (You need a CD-R drive to create a video CD. System requirements For Windows users When using ImageMixer VCD2, Intel...
Operating Guide
Page 55
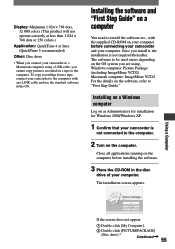
...used varies depending on the OS system you install it, the installation is not connected to the computer. 2 Turn on the computer. To copy recordings from a tape, connect your camcorder to install the software etc., with an i.LINK cable and use the standard ... to the computer. Windows computer: Picture Package (including ImageMixer VCD2) Macintosh computer: ImageMixer VCD2 For the details on the computer before connecting your camcorder and your computer. The installation screen appears. Using a Computer If the screen does not appear Double-click [My Computer]....
...used varies depending on the OS system you install it, the installation is not connected to the computer. 2 Turn on the computer. To copy recordings from a tape, connect your camcorder to install the software etc., with an i.LINK cable and use the standard ... to the computer. Windows computer: Picture Package (including ImageMixer VCD2) Macintosh computer: ImageMixer VCD2 For the details on the computer before connecting your camcorder and your computer. The installation screen appears. Using a Computer If the screen does not appear Double-click [My Computer]....
Operating Guide
Page 58
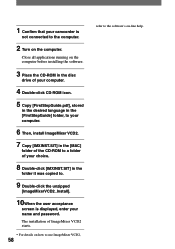
.... 8 Double-click [IMXINST.SIT] in the folder it was copied to. 9 Double-click the unzipped [ImageMixerVCD2_Install]. 10When the user acceptance screen is displayed, enter your camcorder is not connected to the software's on the computer.
.... 8 Double-click [IMXINST.SIT] in the folder it was copied to. 9 Double-click the unzipped [ImageMixerVCD2_Install]. 10When the user acceptance screen is displayed, enter your camcorder is not connected to the software's on the computer.
Operating Guide
Page 60
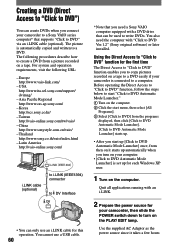
...USA http://www.ita.sel.sony.com/support/ dvimag/ - You also need a Sony VAIO computer equipped with "Click to DVD" via an i.LINK cable (optional). Creating a DVD (Direct Access to "Click to DVD") You can create DVDs when you connect your camcorder to a Sony VAIO series computer* that ...supports "Click to DVD Ver.1.2" (Sony original software) or later...
...USA http://www.ita.sel.sony.com/support/ dvimag/ - You also need a Sony VAIO computer equipped with "Click to DVD" via an i.LINK cable (optional). Creating a DVD (Direct Access to "Click to DVD") You can create DVDs when you connect your camcorder to a Sony VAIO series computer* that ...supports "Click to DVD Ver.1.2" (Sony original software) or later...


