
Operating Guide
Page 6
... Checking supplied items 9 Step 2: Charging the battery pack 10 Step 3: Turning the power on and holding your camcorder firmly ...........13 Step 4: Adjusting the LCD panel and viewfinder 14 Step 5: Using the touch ...6: Setting the date and time 16 Step 7: Inserting a cassette 17 Recording/Playback Recording/Playback with ease (Easy Handycam 18 Recording 20 Playback 21 Functions used for recording/playback, etc 22 Recording To use zoom To record in dark ... recent recording (END SEARCH) ...26 Searching manually (EDIT SEARCH 26 Reviewing the most recently recorded scenes (Rec...
... Checking supplied items 9 Step 2: Charging the battery pack 10 Step 3: Turning the power on and holding your camcorder firmly ...........13 Step 4: Adjusting the LCD panel and viewfinder 14 Step 5: Using the touch ...6: Setting the date and time 16 Step 7: Inserting a cassette 17 Recording/Playback Recording/Playback with ease (Easy Handycam 18 Recording 20 Playback 21 Functions used for recording/playback, etc 22 Recording To use zoom To record in dark ... recent recording (END SEARCH) ...26 Searching manually (EDIT SEARCH 26 Reviewing the most recently recorded scenes (Rec...
Operating Guide
Page 26
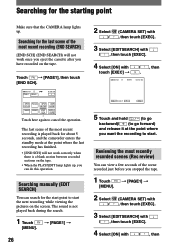
... END EXPO- The sound is a blank section between recorded sections on the tape. • When the PLAY/EDIT lamp lights up . Reviewing the most recently recorded scenes (Rec review) You can view a few seconds of the scene recorded just before you stopped the tape. 1 Touch [MENU]. [PAGE1] ...touch [EXEC]. 4 Select [ON] with / , then The last scene of the most recent recording is played back for about 5 seconds, and the camcorder enters the standby mode at the point where you want the recording to start the next recording while viewing the pictures on the tape. Searching...
... END EXPO- The sound is a blank section between recorded sections on the tape. • When the PLAY/EDIT lamp lights up . Reviewing the most recently recorded scenes (Rec review) You can view a few seconds of the scene recorded just before you stopped the tape. 1 Touch [MENU]. [PAGE1] ...touch [EXEC]. 4 Select [ON] with / , then The last scene of the most recent recording is played back for about 5 seconds, and the camcorder enters the standby mode at the point where you want the recording to start the next recording while viewing the pictures on the tape. Searching...

Operating Guide
Page 42
... case you can compensate for camerashake (the default setting is performed digitally. or + on the LCD screen, and enables the EDIT SEARCH function and Rec review (p. 26). N.S.LIGHT (NightShot Light) When using the digital zoom. When you select the zooming level. OFF Up to 20 × zoom is performed optically...
... case you can compensate for camerashake (the default setting is performed digitally. or + on the LCD screen, and enables the EDIT SEARCH function and Rec review (p. 26). N.S.LIGHT (NightShot Light) When using the digital zoom. When you select the zooming level. OFF Up to 20 × zoom is performed optically...
Operating Guide
Page 88
... Recording 20 Recording capacity......... 24, 45 Recording time 11 REC CTRL (Recording control 50 REC LAMP (Recording lamp 47 REC MODE (Recording mode 45 Rec review 26 REC START/STOP 20 REMAIN 45 Remaining battery.......... 24, 79 Remote Commander 28 Remote sensor 23 RESET button 23 Reversal Playback 35 S Searching for...
... Recording 20 Recording capacity......... 24, 45 Recording time 11 REC CTRL (Recording control 50 REC LAMP (Recording lamp 47 REC MODE (Recording mode 45 Rec review 26 REC START/STOP 20 REMAIN 45 Remaining battery.......... 24, 79 Remote Commander 28 Remote sensor 23 RESET button 23 Reversal Playback 35 S Searching for...


