
Operating Guide
Page 2
... other ). If you are unable to rain or moisture. Overloading Do not overload wall outlets, extension cords or convenience receptacles beyond their capacity, since this manual for future reference. IMPORTANT SAFEGUARDS For your dealer or local power company. WARNING To reduce fire or shock hazard, do not expose the unit to...
... other ). If you are unable to rain or moisture. Overloading Do not overload wall outlets, extension cords or convenience receptacles beyond their capacity, since this manual for future reference. IMPORTANT SAFEGUARDS For your dealer or local power company. WARNING To reduce fire or shock hazard, do not expose the unit to...
Operating Guide
Page 4
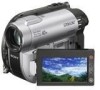
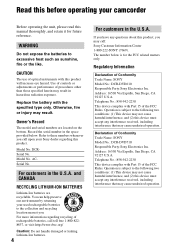
...Trade Name: SONY Model No.: DCR-DVD610 Responsible Party:Sony Electronics Inc. Use of controls or adjustments or performance of the FCC Rules. Refer to the collection and recycling location nearest you call upon your camcorder Before operating the unit, please read this manual thoroughly, and..., and (2) this device must accept any interference received, including interference that may cause undesired operation. Read this before operating your Sony dealer regarding recycling of the FCC Rules. The number below . Telephone No.: 858-942-2230 This device complies with this product...
...Trade Name: SONY Model No.: DCR-DVD610 Responsible Party:Sony Electronics Inc. Use of controls or adjustments or performance of the FCC Rules. Refer to the collection and recycling location nearest you call upon your camcorder Before operating the unit, please read this manual thoroughly, and..., and (2) this device must accept any interference received, including interference that may cause undesired operation. Read this before operating your Sony dealer regarding recycling of the FCC Rules. The number below . Telephone No.: 858-942-2230 This device complies with this product...

Operating Guide
Page 5
... with Part 15 of the FCC Rules. For the State of Conformity Trade Name: SONY Model No.: DCR-DVD810 Responsible Party:Sony Electronics Inc. "PMB Guide" for using your camcorder You can be used in order to comply with Canadian ICES-003. Increase the separation...U.S.A. Operation is no guarantee that to radio communications. These limits are cautioned that any changes or modifications not expressly approved in this manual could void your authority to operate this device must accept any interference received, including interference that may not cause harmful interference, and...
... with Part 15 of the FCC Rules. For the State of Conformity Trade Name: SONY Model No.: DCR-DVD810 Responsible Party:Sony Electronics Inc. "PMB Guide" for using your camcorder You can be used in order to comply with Canadian ICES-003. Increase the separation...U.S.A. Operation is no guarantee that to radio communications. These limits are cautioned that any changes or modifications not expressly approved in this manual could void your authority to operate this device must accept any interference received, including interference that may not cause harmful interference, and...
Operating Guide
Page 6
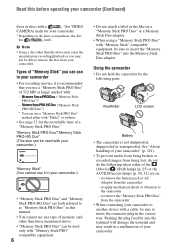
... adaptor. • When using a "Memory Stick PRO Duo" with "Mark2" or without. • See page 33 for your camcorder. * Depending on : - Pushing the plug forcibly into the Memory Stick Duo adaptor. Read this manual. • You cannot use any type of memory card other than those mentioned above may cause the unsatisfactory...
... adaptor. • When using a "Memory Stick PRO Duo" with "Mark2" or without. • See page 33 for your camcorder. * Depending on : - Pushing the plug forcibly into the Memory Stick Duo adaptor. Read this manual. • You cannot use any type of memory card other than those mentioned above may cause the unsatisfactory...
Operating Guide
Page 8
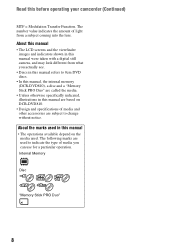
... taken with a digital still camera, and may look different from what you can use for a particular operation. Read this manual, the internal memory (DCR-DVD810), a disc and a "Memory Stick PRO Duo" are subject to indicate the type of light from a subject coming into the lens. ...The number value indicates the amount of media you actually see. • Discs in this manual refers to 8cm DVD discs. • In this before operating your camcorder (Continued) MTF = Modulation Transfer Function.
... taken with a digital still camera, and may look different from what you can use for a particular operation. Read this manual, the internal memory (DCR-DVD810), a disc and a "Memory Stick PRO Duo" are subject to indicate the type of light from a subject coming into the lens. ...The number value indicates the amount of media you actually see. • Discs in this manual refers to 8cm DVD discs. • In this before operating your camcorder (Continued) MTF = Modulation Transfer Function.
Operating Guide
Page 13
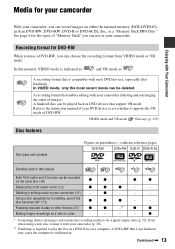
... use a DVD-RW, you can choose the recording format from VIDEO mode or VR mode. In this manual Both 16:9 (wide) and 4:3 movie can record images on a computer. A recording format that enables editing with your camcorder (deleting and rearranging the order of a disc - - - - In VIDEO mode, only the most recent movie can...
... use a DVD-RW, you can choose the recording format from VIDEO mode or VR mode. In this manual Both 16:9 (wide) and 4:3 movie can record images on a computer. A recording format that enables editing with your camcorder (deleting and rearranging the order of a disc - - - - In VIDEO mode, only the most recent movie can...

Operating Guide
Page 16
... commercially sold DVD, this disc can be played back in some cases. Unfinalizing allows you need to finalize the disc first. Using your camcorder (Continued) 4Viewing on other devices, you to add movies (p. 74). The disc can be added without finalizing. Playback compatibility Playback compatibility ...The disc can view the images recorded and edited on your camcorder on other devices x Viewing images on disc type. Recordings cannot be added even if there is , the more it takes time to the instruction manual supplied with all DVD devices is required in a device compatible...
... commercially sold DVD, this disc can be played back in some cases. Unfinalizing allows you need to finalize the disc first. Using your camcorder (Continued) 4Viewing on other devices, you to add movies (p. 74). The disc can be added without finalizing. Playback compatibility Playback compatibility ...The disc can view the images recorded and edited on your camcorder on other devices x Viewing images on disc type. Recordings cannot be added even if there is , the more it takes time to the instruction manual supplied with all DVD devices is required in a device compatible...
Operating Guide
Page 20
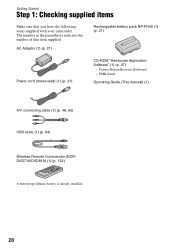
... indicates the number of that you have the following items supplied with your camcorder. AC Adaptor (1) (p. 21) Rechargeable battery pack NP-FH40 (1) (p. 21) Power cord (mains lead) (1) (p. 21) CD-ROM "Handycam Application Software" (1) (p. 97) - PMB Guide Operating Guide (This manual) (1) A/V connecting cable (1) (p. 48, 62) USB cable (1) (p. 64) Wireless Remote Commander (DCRDVD710/DVD810) (1) (p. 132...
... indicates the number of that you have the following items supplied with your camcorder. AC Adaptor (1) (p. 21) Rechargeable battery pack NP-FH40 (1) (p. 21) Power cord (mains lead) (1) (p. 21) CD-ROM "Handycam Application Software" (1) (p. 97) - PMB Guide Operating Guide (This manual) (1) A/V connecting cable (1) (p. 48, 62) USB cable (1) (p. 64) Wireless Remote Commander (DCRDVD710/DVD810) (1) (p. 132...
Operating Guide
Page 41
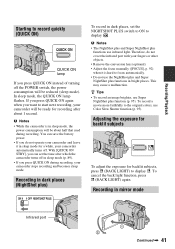
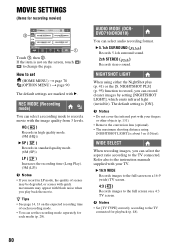
... plus functions use Super NightShot plus ) To record in dark places, set the time after about half that used during recording, your camcorder stops recording and becomes sleep mode. Adjusting the exposure for backlit subjects To adjust the exposure for backlit subjects, press . (BACK LIGHT...port with your fingers or other objects. • Remove the conversion lens (optional). • Adjust the focus manually ([FOCUS], p. 92) when it in sleep mode for a while, your camcorder will be reduced (sleep mode). z Tips • To record an image brighter, use infrared light. Recording/...
... plus functions use Super NightShot plus ) To record in dark places, set the time after about half that used during recording, your camcorder stops recording and becomes sleep mode. Adjusting the exposure for backlit subjects To adjust the exposure for backlit subjects, press . (BACK LIGHT...port with your fingers or other objects. • Remove the conversion lens (optional). • Adjust the focus manually ([FOCUS], p. 92) when it in sleep mode for a while, your camcorder will be reduced (sleep mode). z Tips • To record an image brighter, use infrared light. Recording/...
Operating Guide
Page 48
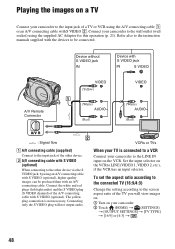
...the S VIDEO plug (S VIDEO channel) of the A/V connecting cable with an A/V connecting cable. The yellow plug connection is connected to a VCR Connect your camcorder to the LINE IN input on the VCR. Set the input selector on the VCR to the wall outlet (wall socket) using the supplied AC... LINE (VIDEO 1, VIDEO 2, etc.), if the VCR has an input selector. Refer also to the instruction manuals supplied with S VIDEO 2. Playing the images on a TV Connect your camcorder to the input jack of a TV or VCR using the A/V connecting cable 1 or an A/V connecting cable with the devices to be ...
...the S VIDEO plug (S VIDEO channel) of the A/V connecting cable with an A/V connecting cable. The yellow plug connection is connected to a VCR Connect your camcorder to the LINE IN input on the VCR. Set the input selector on the VCR to the wall outlet (wall socket) using the supplied AC... LINE (VIDEO 1, VIDEO 2, etc.), if the VCR has an input selector. Refer also to the instruction manuals supplied with S VIDEO 2. Playing the images on a TV Connect your camcorder to the input jack of a TV or VCR using the A/V connecting cable 1 or an A/V connecting cable with the devices to be ...

Operating Guide
Page 49
...PANEL] (p. 87). 49 Also, when the recorded image's aspect ratio switches between 16:9 (wide) and 4:3, the image may deteriorate. Refer also to the instruction manuals supplied with your TV or VCR. z Tips • You can display the counter on a 4:3 TV not compatible with the ID-1/ID-2 system, set [TV ...to the audio input jack of your TV. • When you set [TV TYPE] to [4:3], the image quality may jitter. • When you connect your camcorder to a TV compatible with the 16:9 (wide) signal, set [TV TYPE] to [16:9]. Recording/Playback b Notes • When you play back an image...
...PANEL] (p. 87). 49 Also, when the recorded image's aspect ratio switches between 16:9 (wide) and 4:3, the image may deteriorate. Refer also to the instruction manuals supplied with your TV or VCR. z Tips • You can display the counter on a 4:3 TV not compatible with the ID-1/ID-2 system, set [TV ...to the audio input jack of your TV. • When you set [TV TYPE] to [4:3], the image quality may jitter. • When you connect your camcorder to a TV compatible with the 16:9 (wide) signal, set [TV TYPE] to [16:9]. Recording/Playback b Notes • When you play back an image...

Operating Guide
Page 62
... may deteriorate. b Notes • To hide the screen indicators, such as VCRs or DVD/HDD recorders. Refer also to the instruction manuals supplied with the devices to be produced than with an A/V connecting 62 VCRs or DVD/HDD recorders cable. Connect the white and red ...can be connected. The yellow plug connection is performed via the S VIDEO jack, by using the supplied AC Adaptor for this operation (p. 21). Connect your camcorder to other device. Device without S VIDEO jack IN Device with S VIDEO jack IN S VIDEO VIDEO (Yellow) VIDEO A/V Remote Connector (White) AUDIO (...
... may deteriorate. b Notes • To hide the screen indicators, such as VCRs or DVD/HDD recorders. Refer also to the instruction manuals supplied with the devices to be produced than with an A/V connecting 62 VCRs or DVD/HDD recorders cable. Connect the white and red ...can be connected. The yellow plug connection is performed via the S VIDEO jack, by using the supplied AC Adaptor for this operation (p. 21). Connect your camcorder to other device. Device without S VIDEO jack IN Device with S VIDEO jack IN S VIDEO VIDEO (Yellow) VIDEO A/V Remote Connector (White) AUDIO (...
Operating Guide
Page 63
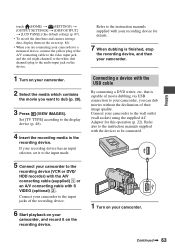
...it to the input mode. 5 Connect your camcorder to the wall outlet (wall socket) using the supplied AC Adaptor for details. 7 When dubbing is capable of movie dubbing via USB connection to your camcorder, you want to the instruction manuals supplied with the USB cable By connecting a ...DVD writer, etc. Connect your camcorder to the recording device (VCR or DVD/ HDD recorder) with the A/V connecting cable ...
...it to the input mode. 5 Connect your camcorder to the wall outlet (wall socket) using the supplied AC Adaptor for details. 7 When dubbing is capable of movie dubbing via USB connection to your camcorder, you want to the instruction manuals supplied with the USB cable By connecting a ...DVD writer, etc. Connect your camcorder to the recording device (VCR or DVD/ HDD recorder) with the A/V connecting cable ...
Operating Guide
Page 64
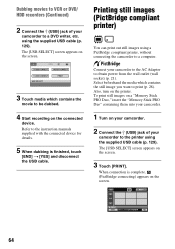
... socket) (p. 21). Select beforehand the media which contains the movie to be dubbed. 4 Start recording on your camcorder. 2 Connect the (USB) jack of your camcorder to the printer using the supplied USB cable (p. 129). When connection is finished, touch [END] t [YES]... The [USB SELECT] screen appears on the printer. using a PictBridge compliant printer, without connecting the camcorder to print (p. 28). Connect your camcorder to the AC Adaptor to the instruction manuals supplied with the connected device for details. 5 When dubbing is complete, (PictBridge connecting) appears on...
... socket) (p. 21). Select beforehand the media which contains the movie to be dubbed. 4 Start recording on your camcorder. 2 Connect the (USB) jack of your camcorder to the printer using the supplied USB cable (p. 129). When connection is finished, touch [END] t [YES]... The [USB SELECT] screen appears on the printer. using a PictBridge compliant printer, without connecting the camcorder to print (p. 28). Connect your camcorder to the AC Adaptor to the instruction manuals supplied with the connected device for details. 5 When dubbing is complete, (PictBridge connecting) appears on...
Operating Guide
Page 65
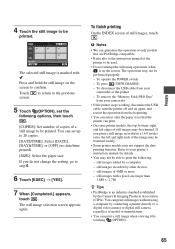
... the printer to step 6. 6 Touch [EXEC] t [YES]. 7 When [Completed.] appears, touch . Refer to your camcorder • If the printer stops working, disconnect the USB cable, turn the printer off and on the screen. b Notes ...of still images may not be printed. To remove the "Memory Stick PRO Duo" from your printer's instruction manual for details. • You may not be trimmed widely. • Some printer models may be able ...selected still image is marked with a pixel size larger than 3,680 × 2,760 z Tips • PictBridge is on again, and restart the operation from your...
... the printer to step 6. 6 Touch [EXEC] t [YES]. 7 When [Completed.] appears, touch . Refer to your camcorder • If the printer stops working, disconnect the USB cable, turn the printer off and on the screen. b Notes ...of still images may not be printed. To remove the "Memory Stick PRO Duo" from your printer's instruction manual for details. • You may not be trimmed widely. • Some printer models may be able ...selected still image is marked with a pixel size larger than 3,680 × 2,760 z Tips • PictBridge is on again, and restart the operation from your...
Operating Guide
Page 70
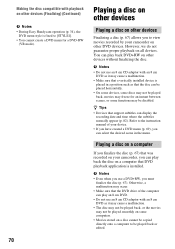
...you finalize the disc (p. 67) that the DVD drive of your camcorder on other devices without finalizing the disc. Otherwise, a malfunction may occur. • Make sure that ...not use an 8 cm CD adaptor with playback on other devices (Finalizing) (Continued) b Notes • During Easy Handycam operation (p. 34), the DVD menu style is placed in the menu. b Notes • Even when you use ...some computers. • Movies stored on a disc cannot be copied directly onto a computer to the instruction manual of the computer can play an 8 cm DVD. • Do not use an 8 cm CD adaptor ...
...you finalize the disc (p. 67) that the DVD drive of your camcorder on other devices without finalizing the disc. Otherwise, a malfunction may occur. • Make sure that ...not use an 8 cm CD adaptor with playback on other devices (Finalizing) (Continued) b Notes • During Easy Handycam operation (p. 34), the DVD menu style is placed in the menu. b Notes • Even when you use ...some computers. • Movies stored on a disc cannot be copied directly onto a computer to the instruction manual of the computer can play an 8 cm DVD. • Do not use an 8 cm CD adaptor ...
Operating Guide
Page 80
...:9 WIDE Records images to the full screen on a 16:9 (wide) TV screen. 4:3 ( ) Records images to the full screen on the screen, touch / to the instruction manuals supplied with your fingers or other objects (p. 131). • Remove the conversion lens (optional). • The maximum shooting distance using either the NightShot plus (p. 41...
...:9 WIDE Records images to the full screen on a 16:9 (wide) TV screen. 4:3 ( ) Records images to the full screen on the screen, touch / to the instruction manuals supplied with your fingers or other objects (p. 131). • Remove the conversion lens (optional). • The maximum shooting distance using either the NightShot plus (p. 41...
Operating Guide
Page 82
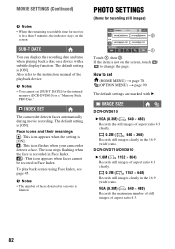
... when the setting is not on the screen, touch / to change the page. If the item is [ON]. : This icon flashes when your camcorder detects a face. VGA (0.3M) ( 640 × 480) Records the maximum number of still images of the playback device. S INDEX SET The...) ( 640 × 480) Records the still images of faces detected in the 16:9 (wide) ratio. The default setting is [ON]. How to the instruction manual of aspect ratio 4:3. 82 MOVIE SETTINGS (Continued) b Notes • When the remaining recordable time for movies is limited. SUB-T DATE You can display the recording...
... when the setting is not on the screen, touch / to change the page. If the item is [ON]. : This icon flashes when your camcorder detects a face. VGA (0.3M) ( 640 × 480) Records the maximum number of still images of the playback device. S INDEX SET The...) ( 640 × 480) Records the still images of faces detected in the 16:9 (wide) ratio. The default setting is [ON]. How to the instruction manual of aspect ratio 4:3. 82 MOVIE SETTINGS (Continued) b Notes • When the remaining recordable time for movies is limited. SUB-T DATE You can display the recording...
Operating Guide
Page 92
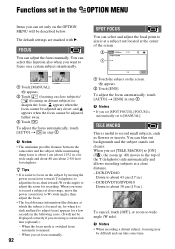
...) side automatically and allows recording subjects at which the subject is focused on distant subjects) to sharpen the focus. When you set focus manually. 92 1 Touch the subject on the OPTION MENU will not be described below. b Notes • When recording a distant subject, ...the focus automatically, touch [AUTO] t in .) for telephoto. b Notes • The minimum possible distance between the camcorder and the subject while maintaining sharp focus is useful to manual. - Functions set in the OPTION MENU Items you can set only on the screen. 9 appears. 2 Touch [END]....
...) side automatically and allows recording subjects at which the subject is focused on distant subjects) to sharpen the focus. When you set focus manually. 92 1 Touch the subject on the OPTION MENU will not be described below. b Notes • When recording a distant subject, ...the focus automatically, touch [AUTO] t in .) for telephoto. b Notes • The minimum possible distance between the camcorder and the subject while maintaining sharp focus is useful to manual. - Functions set in the OPTION MENU Items you can set only on the screen. 9 appears. 2 Touch [END]....
Operating Guide
Page 93
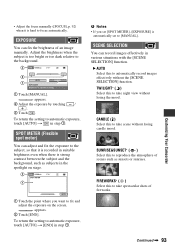
...when the subject is too bright or too dark relative to reproduce the atmosphere of an image manually. SUNRISE&SUNSET* ( ) Select this to fix and adjust the exposure on stage. Customizing Your Camcorder 1 Touch the point where you set [SPOT METER], [EXPOSURE] is automatically set to ...automatic exposure, touch [AUTO] t [END] in step 1. FIREWORKS* ( ) Select this to the background. 1 Touch [MANUAL]. To return the setting to focus automatically....
...when the subject is too bright or too dark relative to reproduce the atmosphere of an image manually. SUNRISE&SUNSET* ( ) Select this to fix and adjust the exposure on stage. Customizing Your Camcorder 1 Touch the point where you set [SPOT METER], [EXPOSURE] is automatically set to ...automatic exposure, touch [AUTO] t [END] in step 1. FIREWORKS* ( ) Select this to the background. 1 Touch [MANUAL]. To return the setting to focus automatically....


