Operating Instructions
Page 3
... digital effects ......... 73 Getting Started Editing Using this manual 6 Checking supplied accessories 8 Step 1 Preparing the power supply 9 Step 2 Setting the date and time 14 Step 3 Inserting a cassette 15 Recording - Memory Photo playback 133 Adjusting the white balance 50 Copying an ...END SEARCH / EDITSEARCH / Rec Review 26 Dubbing a tape 74 Dubbing only desired scenes - Insert editing 93 Audio dubbing 95 Superimposing a title 99 Making your camcorder abroad 157 Searching the boundaries of contents Quick Start Guide 4 Playing back a tape with manual adjustment 44 ...
... digital effects ......... 73 Getting Started Editing Using this manual 6 Checking supplied accessories 8 Step 1 Preparing the power supply 9 Step 2 Setting the date and time 14 Step 3 Inserting a cassette 15 Recording - Memory Photo playback 133 Adjusting the white balance 50 Copying an ...END SEARCH / EDITSEARCH / Rec Review 26 Dubbing a tape 74 Dubbing only desired scenes - Insert editing 93 Audio dubbing 95 Superimposing a title 99 Making your camcorder abroad 157 Searching the boundaries of contents Quick Start Guide 4 Playing back a tape with manual adjustment 44 ...
Operating Instructions
Page 16
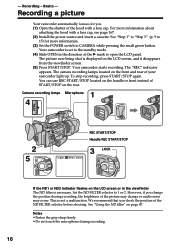
... recording. This is displayed on page 47. We recommend that you . (1) Open the shutter of the ND FILTER selector before shooting. Basics - Your camcorder is set to the standby mode. (4) Slide OPEN in the viewfinder The ND filter is necessary. You can use REC START/STOP located on the handle or ... OFF CAMERA (CHG) MEMORY OFF CAMERA (CHG) If the ND1 or ND2 indicator flashes on the front and rear of the picture may change or audio noise may occur. The picture now being shot is not a malfunction. To stop recording, press START/STOP again. See "Using the ND filter" on the...
... recording. This is displayed on page 47. We recommend that you . (1) Open the shutter of the ND FILTER selector before shooting. Basics - Your camcorder is set to the standby mode. (4) Slide OPEN in the viewfinder The ND filter is necessary. You can use REC START/STOP located on the handle or ... OFF CAMERA (CHG) MEMORY OFF CAMERA (CHG) If the ND1 or ND2 indicator flashes on the front and rear of the picture may change or audio noise may occur. The picture now being shot is not a malfunction. To stop recording, press START/STOP again. See "Using the ND filter" on the...

Operating Instructions
Page 31
... Adaptor (p. 13). Basics Viewing the recording on TV Connect your camcorder to the line input on the LCD screen. Playback - S VIDEO VIDEO AUDIO L/R : Signal flow (optional) AUDIO L/R White Yellow Red IN S VIDEO VIDEO AUDIO If your TV is displayed on the TV screen. Then, set COLOR BAR to watch the playback picture on the TV...
... Adaptor (p. 13). Basics Viewing the recording on TV Connect your camcorder to the line input on the LCD screen. Playback - S VIDEO VIDEO AUDIO L/R : Signal flow (optional) AUDIO L/R White Yellow Red IN S VIDEO VIDEO AUDIO If your TV is displayed on the TV screen. Then, set COLOR BAR to watch the playback picture on the TV...

Operating Instructions
Page 47
...such phenomenon, and you can record a picture clearly by adjusting light amounts, even if you shoot under too bright conditions. When ND 1 flashes, set the ND FILTER selector to 1 so that you check the position of light), you can attain a better shooting condition. We recommend that the ...ND filter (the ND filter 1 setting corresponds to 1/4 of the quantity of light and the ND filter 2 setting corresponds to another positions during recording, the picture may be blurred or audio noise may cause slight off set in the viewfinder. When ND 2 flashes, set the ND FILTER selector to 1/32...
...such phenomenon, and you can record a picture clearly by adjusting light amounts, even if you shoot under too bright conditions. When ND 1 flashes, set the ND FILTER selector to 1 so that you check the position of light), you can attain a better shooting condition. We recommend that the ...ND filter (the ND filter 1 setting corresponds to 1/4 of the quantity of light and the ND filter 2 setting corresponds to another positions during recording, the picture may be blurred or audio noise may cause slight off set in the viewfinder. When ND 2 flashes, set the ND FILTER selector to 1/32...

Operating Instructions
Page 52
... CAMERA (CHG) 2,6 MENU 3,4 TAPE SET REC MODE AUD I O MODE REMA I N M I C LEVEL TAPE SET REC MODE AUD I O MODE REMA I N [MENU] M: ERINECDTULERVNEL AUTO 8 7 AUDIO LEVEL [a] 30 20 12 0 dB [b][c] 5 TAPE SET REC MODE AUD I O MODE REMA I N M I C LEVEL RETURN AUTO MANUAL TAPE SET REC MODE AUD I O MODE REMA ... level meter [b] Decreases the recording level [c] Increases the recording level To clear the recording level adjustment display Press AUDIO LEVEL again. Setting up the menu (1) Set the POWER switch to CAMERA or VCR. (2) Press MENU to display the menu. (3) Turn the SEL/PUSH EXEC...
... CAMERA (CHG) 2,6 MENU 3,4 TAPE SET REC MODE AUD I O MODE REMA I N M I C LEVEL TAPE SET REC MODE AUD I O MODE REMA I N [MENU] M: ERINECDTULERVNEL AUTO 8 7 AUDIO LEVEL [a] 30 20 12 0 dB [b][c] 5 TAPE SET REC MODE AUD I O MODE REMA I N M I C LEVEL RETURN AUTO MANUAL TAPE SET REC MODE AUD I O MODE REMA ... level meter [b] Decreases the recording level [c] Increases the recording level To clear the recording level adjustment display Press AUDIO LEVEL again. Setting up the menu (1) Set the POWER switch to CAMERA or VCR. (2) Press MENU to display the menu. (3) Turn the SEL/PUSH EXEC...

Operating Instructions
Page 53
Advanced Recording Operations Adjusting recording level manually - When MIC LEVEL is set to AUTO You cannot adjust the recording level, however, the recording level adjustment display is retained for about five minutes after removing the battery. •The recording level indicator appears at the lower-right on the manual adjustment •The recording level setting is displayed. 53 The sound input through the AUDIO L/R jacks or DV Interface You cannot adjust the recording level. Sound recording level Notes on the LCD screen or in the viewfinder.
Advanced Recording Operations Adjusting recording level manually - When MIC LEVEL is set to AUTO You cannot adjust the recording level, however, the recording level adjustment display is retained for about five minutes after removing the battery. •The recording level indicator appears at the lower-right on the manual adjustment •The recording level setting is displayed. 53 The sound input through the AUDIO L/R jacks or DV Interface You cannot adjust the recording level. Sound recording level Notes on the LCD screen or in the viewfinder.

Operating Instructions
Page 66
.... If you want to search for the index point, set CM SEARCH to OFF in the menu settings (p. 109). The indicator changes as follows: INDEX SEARCH t DATE SEARCH t PHOTO SEARCH t PHOTO SCAN t no indicator (4) Press . or >, your camcorder searches for a recording by index - If you mark ... > on the Remote Commander repeatedly, until the index search indicator appears. The index of the recording start point when recorded from external audio equipment. If a tape has a blank portion between recorded portions The index search function may not work correctly. Searching for the next ...
.... If you want to search for the index point, set CM SEARCH to OFF in the menu settings (p. 109). The indicator changes as follows: INDEX SEARCH t DATE SEARCH t PHOTO SEARCH t PHOTO SCAN t no indicator (4) Press . or >, your camcorder searches for a recording by index - If you mark ... > on the Remote Commander repeatedly, until the index search indicator appears. The index of the recording start point when recorded from external audio equipment. If a tape has a blank portion between recorded portions The index search function may not work correctly. Searching for the next ...

Operating Instructions
Page 74
... the VCR. Dubbing a tape Using the A/V connecting cable Connect your camcorder to VCR. (4) Play back the recorded tape on your camcorder. (2) Set the input selector on the VCR. S VIDEO : Signal flow S video cable (optional) IN AUDIO L/R VIDEO S VIDEO VIDEO AUDIO A/V connecting cable (supplied) When you want to record over) into the VCR, and insert the...
... the VCR. Dubbing a tape Using the A/V connecting cable Connect your camcorder to VCR. (4) Play back the recorded tape on your camcorder. (2) Set the input selector on the VCR. S VIDEO : Signal flow S video cable (optional) IN AUDIO L/R VIDEO S VIDEO VIDEO AUDIO A/V connecting cable (supplied) When you want to record over) into the VCR, and insert the...
Operating Instructions
Page 75
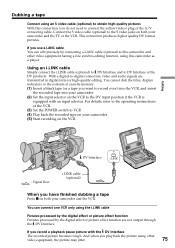
...S video cable (optional) to -digital connection, video and audio signals are not output through the DV Interface. Using an i.LINK cable Simply connect the i.LINK cable (optional) to DV Interface and to VCR. (4) Play back the recorded tape on your camcorder. (5) Start recording on the VCR. Editing DV Interface i.LINK...or the contents of the DV products. If you want to record over) into the VCR, and insert the recorded tape into your camcorder. (2) Set the input selector on the VCR to the DV input position if the VCR is equipped with the DV Interface The recorded picture becomes ...
...S video cable (optional) to -digital connection, video and audio signals are not output through the DV Interface. Using an i.LINK cable Simply connect the i.LINK cable (optional) to DV Interface and to VCR. (4) Play back the recorded tape on your camcorder. (5) Start recording on the VCR. Editing DV Interface i.LINK...or the contents of the DV products. If you want to record over) into the VCR, and insert the recorded tape into your camcorder. (2) Set the input selector on the VCR to the DV input position if the VCR is equipped with the DV Interface The recorded picture becomes ...

Operating Instructions
Page 76
...editing function Operation 1 Making programs (p. 84). Set CONTROL to operate the dubbing function correctly, depending on pages 74 and 75. Preparation 2 Setting the VCR to -digital connection, video and audio signals are transmitted in the menu settings of cassette memory. •When you may ...tape without operating the VCR. You can duplicate selected scenes (programs) for high-quality editing. Preparation 1: Connecting the VCR Connect your camcorder. •You cannot send the control signal of the VCR (p. 82). Dubbing only desired scenes - Digital program editing You can...
...editing function Operation 1 Making programs (p. 84). Set CONTROL to operate the dubbing function correctly, depending on pages 74 and 75. Preparation 2 Setting the VCR to -digital connection, video and audio signals are transmitted in the menu settings of cassette memory. •When you may ...tape without operating the VCR. You can duplicate selected scenes (programs) for high-quality editing. Preparation 1: Connecting the VCR Connect your camcorder. •You cannot send the control signal of the VCR (p. 82). Dubbing only desired scenes - Digital program editing You can...
Operating Instructions
Page 78
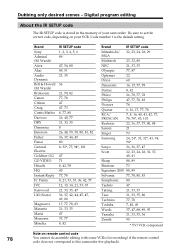
Dubbing only desired scenes - Brand Sony Admiral (M. Wards) Aiwa Akai Audio Dynamic Bell & Howell (M. Code number 1 is stored in the memory of your VCR. Digital program editing About the IR SETUP code The IR SETUP code is the default setting. Wards) Broksonic Canon Citizen Craig Curtis Mathis Daewoo DBX ..., 49 Wards 37, 47, 88, 89, 95 Yamaha 21, 33, 35, 36 Zenith 95 * TV/VCR component Note on your camcorder. Be sure to set the correct code, depending on remote control code 78 You cannot do assemble editing with some VCRs (for recording) if the remote control code...
Dubbing only desired scenes - Brand Sony Admiral (M. Wards) Aiwa Akai Audio Dynamic Bell & Howell (M. Code number 1 is stored in the memory of your VCR. Digital program editing About the IR SETUP code The IR SETUP code is the default setting. Wards) Broksonic Canon Citizen Craig Curtis Mathis Daewoo DBX ..., 49 Wards 37, 47, 88, 89, 95 Yamaha 21, 33, 35, 36 Zenith 95 * TV/VCR component Note on your camcorder. Be sure to set the correct code, depending on remote control code 78 You cannot do assemble editing with some VCRs (for recording) if the remote control code...

Operating Instructions
Page 84
... i.LINK cable Keep the i.LINK connection, and carry out Preparation 2 (p. 77) again. The audio and video signals are sent as digital signals. Operation 1: Making Programs (1) Insert the tape for playback into your camcorder, and insert a tape for recording into the VCR. (2) Press MENU to display the menu.... video control buttons, then pause playback (p. 30). 5 STOP REW PLAY FF PAUSE 2 MENU 3,4 OTHERS BEEP MELODY COMMANDER D I SPLAY V I DEO ED I T ED I T SET RETURN [MENU] : END V I DEO ED I T MARK UNDO ERASE AL L START 0:32:30:14 1 IN TOTAL SCENE 0:00:00:00 0 [MENU] : END 84 ...
... i.LINK cable Keep the i.LINK connection, and carry out Preparation 2 (p. 77) again. The audio and video signals are sent as digital signals. Operation 1: Making Programs (1) Insert the tape for playback into your camcorder, and insert a tape for recording into the VCR. (2) Press MENU to display the menu.... video control buttons, then pause playback (p. 30). 5 STOP REW PLAY FF PAUSE 2 MENU 3,4 OTHERS BEEP MELODY COMMANDER D I SPLAY V I DEO ED I T ED I T SET RETURN [MENU] : END V I DEO ED I T MARK UNDO ERASE AL L START 0:32:30:14 1 IN TOTAL SCENE 0:00:00:00 0 [MENU] : END 84 ...

Operating Instructions
Page 88
... PC, and stop the playback on how to capture images, refer to install an appropriate software which can exchange video signals between the camcorder and a PC. •Depending on your PC and the software which you input the analog signal that 88 includes a copyright protection ...unit, the image may not be able to your software. S VIDEO S video cable (optional) OUT S VIDEO VIDEO AUDIO i.LINK (IEEE1394) A/V connecting cable (supplied) i.LINK cable (optional) : Signal flow (1) Set the POWER switch to VCR. (2) Press MENU to display the menu. (3) Turn the SEL/PUSH EXEC dial to select...
... PC, and stop the playback on how to capture images, refer to install an appropriate software which can exchange video signals between the camcorder and a PC. •Depending on your PC and the software which you input the analog signal that 88 includes a copyright protection ...unit, the image may not be able to your software. S VIDEO S video cable (optional) OUT S VIDEO VIDEO AUDIO i.LINK (IEEE1394) A/V connecting cable (supplied) i.LINK cable (optional) : Signal flow (1) Set the POWER switch to VCR. (2) Press MENU to display the menu. (3) Turn the SEL/PUSH EXEC dial to select...

Operating Instructions
Page 89
...has video/ audio outputs. Editing Recording video or TV programs Using the A/V connecting cable You can record a tape from another VCR or a TV program from which you want to start playback if you want to record over) into the VCR. (2) Set the POWER switch to VCR on your camcorder. (3) Set DISPLAY in ...to LCD in the menu settings (p. 109). (4) Press MENU to erase the menu display. (5) Press z REC and the button on its right...
...has video/ audio outputs. Editing Recording video or TV programs Using the A/V connecting cable You can record a tape from another VCR or a TV program from which you want to start playback if you want to record over) into the VCR. (2) Set the POWER switch to VCR on your camcorder. (3) Set DISPLAY in ...to LCD in the menu settings (p. 109). (4) Press MENU to erase the menu display. (5) Press z REC and the button on its right...

Operating Instructions
Page 91
...digital connection, video and audio signals are transmitted in digital form for high-quality editing. (1) Insert a blank tape (or a tape you want to record over) into your camcorder, and insert the recorded tape into the VCR. (2) Set the POWER switch to VCR on your camcorder. (3) Set DISPLAY in to LCD in... the menu settings (p. 109). (4) Press MENU to erase the menu display. (5) Press z REC and ...
...digital connection, video and audio signals are transmitted in digital form for high-quality editing. (1) Insert a blank tape (or a tape you want to record over) into your camcorder, and insert the recorded tape into the VCR. (2) Set the POWER switch to VCR on your camcorder. (3) Set DISPLAY in to LCD in... the menu settings (p. 109). (4) Press MENU to erase the menu display. (5) Press z REC and ...

Operating Instructions
Page 95
...PLUG IN POWER) LINE OUT L R : Signal flow 95 You cannot monitor the additional sound by connecting audio equipment or a microphone. Use the headphone jack. Editing Audio dubbing You can record an audio sound to add to the original sound on TV by specifying the starting and ending points. The original sound... will not be erased. If you connect audio equipment, you can add sound to your recorded tape by connecting with the MIC jack MIC LINE Set the MIC/LINE switch to MIC. : Signal flow Microphone (optional) You can also use...
...PLUG IN POWER) LINE OUT L R : Signal flow 95 You cannot monitor the additional sound by connecting audio equipment or a microphone. Use the headphone jack. Editing Audio dubbing You can record an audio sound to add to the original sound on TV by specifying the starting and ending points. The original sound... will not be erased. If you connect audio equipment, you can add sound to your recorded tape by connecting with the MIC jack MIC LINE Set the MIC/LINE switch to MIC. : Signal flow Microphone (optional) You can also use...

Operating Instructions
Page 96
... gun microphone. You can monitor the sound using a headphones. • You can select the zoom microphone type, set it to the gun microphone position. AUDIO L/R Audio equipment (optional) LINE OUT L R AUDIO L AUDIO R : Signal flow Do not connect the video (yellow) plug. Audio dubbing Connecting the microphone with the intelligent accessory shoe Microphone (optional) Dubbing with the...
... gun microphone. You can monitor the sound using a headphones. • You can select the zoom microphone type, set it to the gun microphone position. AUDIO L/R Audio equipment (optional) LINE OUT L R AUDIO L AUDIO R : Signal flow Do not connect the video (yellow) plug. Audio dubbing Connecting the microphone with the intelligent accessory shoe Microphone (optional) Dubbing with the...

Operating Instructions
Page 97
...) by pressing N. Then press X at the same time. The green X indicator appears on your camcorder to the playback pause mode. (4) Press AUDIO DUB. Editing Audio dubbing Adding an audio sound on a recorded tape (1) Insert the recorded tape into your camcorder. (2) Set the POWER switch to VCR on the LCD screen or in the viewfinder. (5) Press X and...
...) by pressing N. Then press X at the same time. The green X indicator appears on your camcorder to the playback pause mode. (4) Press AUDIO DUB. Editing Audio dubbing Adding an audio sound on a recorded tape (1) Insert the recorded tape into your camcorder. (2) Set the POWER switch to VCR on the LCD screen or in the viewfinder. (5) Press X and...
Operating Instructions
Page 98
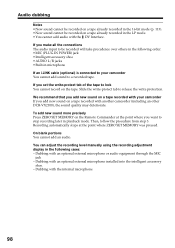
...order. •MIC (PLUG IN POWER) jack •Intelligent accessory shoe •AUDIO L/R jacks •Built-in microphone If an i.LINK cable (optional) is connected to your camcorder If you set the write-protect tab of the tape to be recorded on the Remote Commander ... to lock You cannot record on a tape recorded with an optional external microphone or audio equipment through the MIC jack - Dubbing with another camcorder (including an other DCR-VX2100), the sound quality may deteriorate. Audio dubbing Notes •New sound cannot be recorded on a tape already recorded in the...
...order. •MIC (PLUG IN POWER) jack •Intelligent accessory shoe •AUDIO L/R jacks •Built-in microphone If an i.LINK cable (optional) is connected to your camcorder If you set the write-protect tab of the tape to be recorded on the Remote Commander ... to lock You cannot record on a tape recorded with an optional external microphone or audio equipment through the MIC jack - Dubbing with another camcorder (including an other DCR-VX2100), the sound quality may deteriorate. Audio dubbing Notes •New sound cannot be recorded on a tape already recorded in the...

Operating Instructions
Page 111
.... (continued on LCD B.L. REC HiFi SOUND Mode z OFF ON ON z OFF SET z STEREO 1 2 AUDIO MIX - ST1 ST2 A/VtDV OUT z OFF To output analog images in analog format using your camcorder. BRIGHT To brighten the LCD screen. Customizing Your Camcorder Changing the menu settings Icon/item FRAME REC INT. ON Displays the guide frame (p. 35). ON...
.... (continued on LCD B.L. REC HiFi SOUND Mode z OFF ON ON z OFF SET z STEREO 1 2 AUDIO MIX - ST1 ST2 A/VtDV OUT z OFF To output analog images in analog format using your camcorder. BRIGHT To brighten the LCD screen. Customizing Your Camcorder Changing the menu settings Icon/item FRAME REC INT. ON Displays the guide frame (p. 35). ON...


