Operating Instructions
Page 2
.... Consult the dealer or an experienced radio/TV technician for a Class B digital device, pursuant to constitute a risk of important operating and maintenance (servicing) Trade Name: SONY Model No.: DCR-VX2100 Responsible Party: Sony Electronics Inc. Welcome! You will not occur in this manual could void your...Center 1-800-222SONY (7669) The number below is no guarantee that may not cause harmful interference, and (2) this Sony Digital Handycam camcorder. This symbol is intended to alert the user to comply with Canadian ICES-003. You are recyclable. Increase the ...
.... Consult the dealer or an experienced radio/TV technician for a Class B digital device, pursuant to constitute a risk of important operating and maintenance (servicing) Trade Name: SONY Model No.: DCR-VX2100 Responsible Party: Sony Electronics Inc. Welcome! You will not occur in this manual could void your...Center 1-800-222SONY (7669) The number below is no guarantee that may not cause harmful interference, and (2) this Sony Digital Handycam camcorder. This symbol is intended to alert the user to comply with Canadian ICES-003. You are recyclable. Increase the ...
Operating Instructions
Page 3
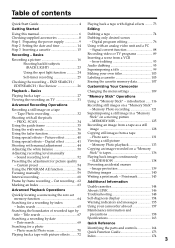
...special effects - Index search 65 Using your own titles 103 Labeling a cassette 105 Erasing the cassette memory data 107 Customizing Your Camcorder Playback - Tape Photo recording 32 Superimposing a still image in a "Memory Shooting with an analog video unit and a PC -...to tapes 136 - Insert editing 93 Audio dubbing 95 Superimposing a title 99 Making your camcorder abroad 157 Searching the boundaries of contents Quick Start Guide 4 Playing back a tape with digital effects ......... 73 Getting Started Editing Using this manual 6 Checking supplied accessories 8 Step 1 ...
...special effects - Index search 65 Using your own titles 103 Labeling a cassette 105 Erasing the cassette memory data 107 Customizing Your Camcorder Playback - Tape Photo recording 32 Superimposing a still image in a "Memory Shooting with an analog video unit and a PC -...to tapes 136 - Insert editing 93 Audio dubbing 95 Superimposing a title 99 Making your camcorder abroad 157 Searching the boundaries of contents Quick Start Guide 4 Playing back a tape with digital effects ......... 73 Getting Started Editing Using this manual 6 Checking supplied accessories 8 Step 1 ...

Operating Instructions
Page 32
... image may be blurred. This is also recorded. To change the mode or setting. •The PHOTO button does not work: - While the digital effect function is useful when you cannot change the image, release PHOTO, select an image again, and then press and hold PHOTO lightly. (2) Press... PHOTO deeper. Your camcorder immediately records an image on the Remote Commander. When shooting a moving object in the viewfinder. See page 34 for about seven seconds and your...
... image may be blurred. This is also recorded. To change the mode or setting. •The PHOTO button does not work: - While the digital effect function is useful when you cannot change the image, release PHOTO, select an image again, and then press and hold PHOTO lightly. (2) Press... PHOTO deeper. Your camcorder immediately records an image on the Remote Commander. When shooting a moving object in the viewfinder. See page 34 for about seven seconds and your...

Operating Instructions
Page 34
...(Since this mode, the resolution of a second, which the screen lights up . 1 MENU 5 MENU PROG. Shooting with all the pixels - This camcorder takes in the normal mode. This is clearer than those recorded on the progressive recording mode A normal TV broadcast divides the screen into two finer... recording mode, moving images to your PC to view still images, we recommend recording in normal mode.) (1) Press MENU to too much jitter. Digital zooming - SCAN To import moving images recorded in standby mode. (2) Turn the SEL/PUSH EXEC dial to select , then press the dial. ...
...(Since this mode, the resolution of a second, which the screen lights up . 1 MENU 5 MENU PROG. Shooting with all the pixels - This camcorder takes in the normal mode. This is clearer than those recorded on the progressive recording mode A normal TV broadcast divides the screen into two finer... recording mode, moving images to your PC to view still images, we recommend recording in normal mode.) (1) Press MENU to too much jitter. Digital zooming - SCAN To import moving images recorded in standby mode. (2) Turn the SEL/PUSH EXEC dial to select , then press the dial. ...

Operating Instructions
Page 39
Note You cannot use the following functions while using the fader function, and vice versa: - As the image is carried out, your camcorder automatically returns to the normal mode. 1 FADER FADER 2 POWER VCR MEMORY OFF CAMERA (CHG) To cancel the fader function Press FADER until ... desired fader indicator flashes. Tape Photo recording - Advanced Recording Operations Using the fader function (1) When fading in OVERLAP, WIPE, or DOT mode) - Digital effect - Cut recording When the OVERLAP, WIPE, or DOT indicator appears Your camcorder automatically stores the image recorded on a tape.
Note You cannot use the following functions while using the fader function, and vice versa: - As the image is carried out, your camcorder automatically returns to the normal mode. 1 FADER FADER 2 POWER VCR MEMORY OFF CAMERA (CHG) To cancel the fader function Press FADER until ... desired fader indicator flashes. Tape Photo recording - Advanced Recording Operations Using the fader function (1) When fading in OVERLAP, WIPE, or DOT mode) - Digital effect - Cut recording When the OVERLAP, WIPE, or DOT indicator appears Your camcorder automatically stores the image recorded on a tape.

Operating Instructions
Page 46
..., a rare phenomenon may be lost. As you set the shutter speed value to 1/30 or smaller You cannot use the spot light (p. 24) and digital effect (p. 41) functions. 46 Use a tripod and adjust the focus manually. The available shutter speed ranges from the LCD or viewfinder screen. y 1/4000.... Shooting with manual adjustment Adjusting the shutter speed (1) Set the AUTO LOCK selector to the center (auto lock release) position while the camcorder is lit, press PROGRAM AE repeatedly until the indicator disappears from the LCD or viewfinder screen. (3) Press SHUTTER SPEED. The shutter speed...
..., a rare phenomenon may be lost. As you set the shutter speed value to 1/30 or smaller You cannot use the spot light (p. 24) and digital effect (p. 41) functions. 46 Use a tripod and adjust the focus manually. The available shutter speed ranges from the LCD or viewfinder screen. y 1/4000.... Shooting with manual adjustment Adjusting the shutter speed (1) Set the AUTO LOCK selector to the center (auto lock release) position while the camcorder is lit, press PROGRAM AE repeatedly until the indicator disappears from the LCD or viewfinder screen. (3) Press SHUTTER SPEED. The shutter speed...

Operating Instructions
Page 58
...(W) 58 If this happens, turn the PROGRAM AE function off. This is because your camcorder is set to focus only on subjects in the middle to far distance. •In sunset & moon mode, your... camcorder is selected You can vary with the iris (F value) and the focal length. The depth... color may occur in front. Overlap - Raising the F value (small iris) provides a larger depth of field. Digital effect - Dot - About the depth of field The depth of field Shallow Iris Near open (Low F value) Zoom Telephoto (T)...
...(W) 58 If this happens, turn the PROGRAM AE function off. This is because your camcorder is set to focus only on subjects in the middle to far distance. •In sunset & moon mode, your... camcorder is selected You can vary with the iris (F value) and the focal length. The depth... color may occur in front. Overlap - Raising the F value (small iris) provides a larger depth of field. Digital effect - Dot - About the depth of field The depth of field Shallow Iris Near open (Low F value) Zoom Telephoto (T)...

Operating Instructions
Page 73
...the SEL/PUSH EXEC dial until the desired digital effect indicator (STILL, FLASH, LUMI. The digital effect indicator lights up and the bars appear. When you have processed using the digital effect function, record the pictures on the VCR, using your camcorder as a still picture at the time you... can process a scene using the digital effect function that is stored ...
...the SEL/PUSH EXEC dial until the desired digital effect indicator (STILL, FLASH, LUMI. The digital effect indicator lights up and the bars appear. When you have processed using the digital effect function, record the pictures on the VCR, using your camcorder as a still picture at the time you... can process a scene using the digital effect function that is stored ...
Operating Instructions
Page 75
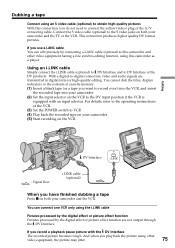
...equipment having a fine synchro-editing function, using the i.LINK cable Pictures processed by the digital effect or picture effect function Pictures processed by connecting a LANC cable (optional) to this camcorder as a player. You cannot dub the titles, display indicators or the contents of the..., refer to VCR. (4) Play back the recorded tape on your camcorder. (5) Start recording on the VCR. This connection produces higher quality DV format pictures. Connect the S video cable (optional) to -digital connection, video and audio signals are not output through the DV Interface...
...equipment having a fine synchro-editing function, using the i.LINK cable Pictures processed by the digital effect or picture effect function Pictures processed by connecting a LANC cable (optional) to this camcorder as a player. You cannot dub the titles, display indicators or the contents of the..., refer to VCR. (4) Play back the recorded tape on your camcorder. (5) Start recording on the VCR. This connection produces higher quality DV format pictures. Connect the S video cable (optional) to -digital connection, video and audio signals are not output through the DV Interface...

Operating Instructions
Page 76
... Set CONTROL to operate the dubbing function correctly, depending on pages 74 and 75. Operation 2 Performing a digital program editing (Dubbing a tape) (p. 87). Preparation 1: Connecting the VCR Connect your camcorder. •You cannot send the control signal of the VCR (p. 82). Dubbing only desired scenes...LINK cable, you may not be selected by infrared rays emitter (p. 77)/Setting the VCR to -digital connection, video and audio signals are transmitted in the menu settings of your camcorder and the VCR as shown on the VCR. Preparation 2 Setting the VCR to operate by frame. ...
... Set CONTROL to operate the dubbing function correctly, depending on pages 74 and 75. Operation 2 Performing a digital program editing (Dubbing a tape) (p. 87). Preparation 1: Connecting the VCR Connect your camcorder. •You cannot send the control signal of the VCR (p. 82). Dubbing only desired scenes...LINK cable, you may not be selected by infrared rays emitter (p. 77)/Setting the VCR to -digital connection, video and audio signals are transmitted in the menu settings of your camcorder and the VCR as shown on the VCR. Preparation 2 Setting the VCR to operate by frame. ...

Operating Instructions
Page 77
.../PUSH EXEC dial to select IR SETUP, then press the dial. (9) Turn the SEL/PUSH EXEC dial to select the IR SETUP code of your camcorder. (2) Turn the power of the connected VCR on, then set its POWER switch to VCR. (3) Press MENU to display the menu. (4) Turn the SEL/PUSH... VCR. Dubbing only desired scenes - When you connect using the VCR, send the control signal by infrared ray to select IR, then press the dial. Digital program editing Preparation 2: Setting the VCR to operate by infrared rays emitter To edit using the A/V cable, this procedure is required. (1) Set the POWER ...
.../PUSH EXEC dial to select IR SETUP, then press the dial. (9) Turn the SEL/PUSH EXEC dial to select the IR SETUP code of your camcorder. (2) Turn the power of the connected VCR on, then set its POWER switch to VCR. (3) Press MENU to display the menu. (4) Turn the SEL/PUSH... VCR. Dubbing only desired scenes - When you connect using the VCR, send the control signal by infrared ray to select IR, then press the dial. Digital program editing Preparation 2: Setting the VCR to operate by infrared rays emitter To edit using the A/V cable, this procedure is required. (1) Set the POWER ...
Operating Instructions
Page 78
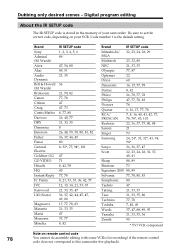
Code number 1 is stored in the memory of your VCR. Brand Sony Admiral (M. Wards) Aiwa Akai Audio Dynamic Bell & Howell (M. Digital program editing About the IR SETUP code The IR SETUP code is the default setting. Wards) Broksonic Canon Citizen Craig Curtis Mathis Daewoo DBX Dimensia ... Technics 77, 78 Toshiba 7, 40, 49 Wards 37, 47, 88, 89, 95 Yamaha 21, 33, 35, 36 Zenith 95 * TV/VCR component Note on your camcorder. Be sure to set the correct code, depending on remote control code 78 You cannot do assemble editing with some VCRs (for recording) if the...
Code number 1 is stored in the memory of your VCR. Brand Sony Admiral (M. Wards) Aiwa Akai Audio Dynamic Bell & Howell (M. Digital program editing About the IR SETUP code The IR SETUP code is the default setting. Wards) Broksonic Canon Citizen Craig Curtis Mathis Daewoo DBX Dimensia ... Technics 77, 78 Toshiba 7, 40, 49 Wards 37, 47, 88, 89, 95 Yamaha 21, 33, 35, 36 Zenith 95 * TV/VCR component Note on your camcorder. Be sure to set the correct code, depending on remote control code 78 You cannot do assemble editing with some VCRs (for recording) if the...

Operating Instructions
Page 79
...the button to cancel recording pause is X. • Select REC if the button to cancel recording pause is B. Editing Dubbing only desired scenes - Digital program editing Setting the buttons to cancel the recording pause on the VCR (1) Turn the SEL/PUSH EXEC dial to select PAUSEMODE, then press the... "CUT-I N" "CUT-OUT" I R SETUP PAUSEMODE PAUSE I R TEST RETURN [MENU] : END The buttons to face each other Locate the infrared ray emitter of your camcorder and face it towards the remote sensor of the VCR. Remote sensor 79 Set the devices about 30 cm (about 11 7/8 in) apart, and remove...
...the button to cancel recording pause is X. • Select REC if the button to cancel recording pause is B. Editing Dubbing only desired scenes - Digital program editing Setting the buttons to cancel the recording pause on the VCR (1) Turn the SEL/PUSH EXEC dial to select PAUSEMODE, then press the... "CUT-I N" "CUT-OUT" I R SETUP PAUSEMODE PAUSE I R TEST RETURN [MENU] : END The buttons to face each other Locate the infrared ray emitter of your camcorder and face it towards the remote sensor of the VCR. Remote sensor 79 Set the devices about 30 cm (about 11 7/8 in) apart, and remove...
Operating Instructions
Page 81
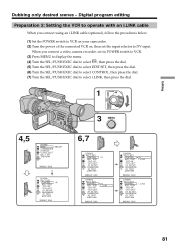
... R i . When you connect using an i.LINK cable (optional), follow the procedures below. (1) Set the POWER switch to VCR on your camcorder. (2) Turn the power of the connected VCR on, then set its POWER switch to VCR. (3) Press MENU to display the menu. (4) ... [MENU] : END 81 L I NK [MENU] : END OTHERS ED I T SET CONTROL ADJ TEST "CUT-I N" "CUT-OUT" I R SETUP PAUSEMODE I R i . Editing Dubbing only desired scenes - Digital program editing Preparation 2: Setting the VCR to operate with an i.LINK cable When you connect a video camera recorder, set the input selector to select i.LINK...
... R i . When you connect using an i.LINK cable (optional), follow the procedures below. (1) Set the POWER switch to VCR on your camcorder. (2) Turn the power of the connected VCR on, then set its POWER switch to VCR. (3) Press MENU to display the menu. (4) ... [MENU] : END 81 L I NK [MENU] : END OTHERS ED I T SET CONTROL ADJ TEST "CUT-I N" "CUT-OUT" I R SETUP PAUSEMODE I R i . Editing Dubbing only desired scenes - Digital program editing Preparation 2: Setting the VCR to operate with an i.LINK cable When you connect a video camera recorder, set the input selector to select i.LINK...

Operating Instructions
Page 82
Digital program editing Preparation 3: Adjusting the synchronization of the VCR ...for notes. When finished, the indicator changes to recording pause. Dubbing only desired scenes - When you connect to a Sony VCR using an i.LINK cable and have to turn the recording VCR to recording pause mode. (2) Set the POWER...CEAONDNDJ TRTOESLT COMPLETE "CUT-I N" "CUT-OUT" I R SETUP PAUSEMODE I R TEST RETURN [MENU] : END 82 Remove the cassette from the camcorder beforehand. Take a note of the opening numerical value of each CUT-IN and the closing numerical value of each CUT-OUT. (9) Calculate the average ...
Digital program editing Preparation 3: Adjusting the synchronization of the VCR ...for notes. When finished, the indicator changes to recording pause. Dubbing only desired scenes - When you connect to a Sony VCR using an i.LINK cable and have to turn the recording VCR to recording pause mode. (2) Set the POWER...CEAONDNDJ TRTOESLT COMPLETE "CUT-I N" "CUT-OUT" I R SETUP PAUSEMODE I R TEST RETURN [MENU] : END 82 Remove the cassette from the camcorder beforehand. Take a note of the opening numerical value of each CUT-IN and the closing numerical value of each CUT-OUT. (9) Calculate the average ...
Operating Instructions
Page 83
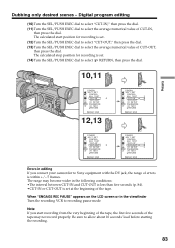
Note If you connect your camcorder to Sony equipment with the DV jack, the range of errors is set . (12)Turn the SEL/PUSH EXEC dial to select "CUT-OUT," then press the ... mode. The range may not record properly. The calculated stop position for recording is set at the beginning of CUT-OUT, then press the dial. Digital program editing (10)Turn the SEL/PUSH EXEC dial to select "CUT-IN," then press the dial. (11)Turn the SEL/PUSH EXEC dial to...
Note If you connect your camcorder to Sony equipment with the DV jack, the range of errors is set . (12)Turn the SEL/PUSH EXEC dial to select "CUT-OUT," then press the ... mode. The range may not record properly. The calculated stop position for recording is set at the beginning of CUT-OUT, then press the dial. Digital program editing (10)Turn the SEL/PUSH EXEC dial to select "CUT-IN," then press the dial. (11)Turn the SEL/PUSH EXEC dial to...

Operating Instructions
Page 84
Dubbing only desired scenes - The audio and video signals are sent as digital signals. Digital program editing If the VCR does not operate correctly Make sure the IR SETUP code is correct; Operation 1: Making Programs (1) Insert the tape for playback into your camcorder, and insert a tape for recording into the VCR. (2) Press MENU to...
Dubbing only desired scenes - The audio and video signals are sent as digital signals. Digital program editing If the VCR does not operate correctly Make sure the IR SETUP code is correct; Operation 1: Making Programs (1) Insert the tape for playback into your camcorder, and insert a tape for recording into the VCR. (2) Press MENU to...
Operating Instructions
Page 87
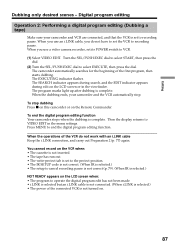
...for the beginning of the VCR do not have to set its POWER switch to VCR. (1) Select VIDEO EDIT. To end the digital program editing function Your camcorder stops when the dubbing is set to the protect position. • The IR SETUP code is not correct. (When IR is ...87 To stop . When the dubbing ends, your camcorder and VCR are connected, and that the VCR is complete. Digital program editing Operation 2: Performing a digital program editing (Dubbing a tape) Make sure your camcorder and the VCR automatically stop dubbing Press x on this camcorder or on the LCD screen or in the menu ...
...for the beginning of the VCR do not have to set its POWER switch to VCR. (1) Select VIDEO EDIT. To end the digital program editing function Your camcorder stops when the dubbing is set to the protect position. • The IR SETUP code is not correct. (When IR is ...87 To stop . When the dubbing ends, your camcorder and VCR are connected, and that the VCR is complete. Digital program editing Operation 2: Performing a digital program editing (Dubbing a tape) Make sure your camcorder and the VCR automatically stop dubbing Press x on this camcorder or on the LCD screen or in the menu ...

Operating Instructions
Page 88
... capturing procedures on the condition of the analog video signals, the PC may contain noise or incorrect colors. •The camcorder cannot output the digital signal when you input the analog signal that 88 includes a copyright protection signal. The operation procedures depend on your PC and...) connector to install an appropriate software which you convert analog video signals into digital video signals via your software. For details on the analog video unit slightly ahead of your PC and your camcorder. Using with an analog video unit and a PC - Depending on the analog...
... capturing procedures on the condition of the analog video signals, the PC may contain noise or incorrect colors. •The camcorder cannot output the digital signal when you input the analog signal that 88 includes a copyright protection signal. The operation procedures depend on your PC and...) connector to install an appropriate software which you convert analog video signals into digital video signals via your software. For details on the analog video unit slightly ahead of your PC and your camcorder. Using with an analog video unit and a PC - Depending on the analog...

Operating Instructions
Page 91
..., video and audio signals are transmitted in digital form for high-quality editing. (1) Insert a blank tape (or a tape you want to record over) into your camcorder, and insert the recorded tape into the VCR. (2) Set the POWER switch to VCR on your camcorder. (3) Set DISPLAY in to LCD in step 7, ...(p. 109). (4) Press MENU to erase the menu display. (5) Press z REC and the button on its right simultaneously on your camcorder, then immediately press X on your camcorder at the scene from which you have finished recording Press x on the VCR to DV Interface of the DV products. The picture to...
..., video and audio signals are transmitted in digital form for high-quality editing. (1) Insert a blank tape (or a tape you want to record over) into your camcorder, and insert the recorded tape into the VCR. (2) Set the POWER switch to VCR on your camcorder. (3) Set DISPLAY in to LCD in step 7, ...(p. 109). (4) Press MENU to erase the menu display. (5) Press z REC and the button on its right simultaneously on your camcorder, then immediately press X on your camcorder at the scene from which you have finished recording Press x on the VCR to DV Interface of the DV products. The picture to...


