
Operating Instructions
Page 1
Record the serial number in the space provided below. DCR-VX2100 ©2003 Sony Corporation Refer to these numbers whenever you call upon your Sony dealer regarding this manual thoroughly, and retain it for future reference. AC- Model No. Owner's Record The model and serial numbers are located on the bottom. Serial No. 3-087-414-11 (1) Digital Video Camera Recorder Operating Instructions Before operating the unit, please read this product. DCR-VX2100 Model No. Serial No.
Record the serial number in the space provided below. DCR-VX2100 ©2003 Sony Corporation Refer to these numbers whenever you call upon your Sony dealer regarding this manual thoroughly, and retain it for future reference. AC- Model No. Owner's Record The model and serial numbers are located on the bottom. Serial No. 3-087-414-11 (1) Digital Video Camera Recorder Operating Instructions Before operating the unit, please read this product. DCR-VX2100 Model No. Serial No.
Operating Instructions
Page 5
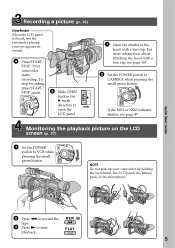
... attaching the hood with a lens cap. REW PLAY 5 MEMORY OFF CAMERA (CHG) VCR 4 Press START/ STOP. NOTE Do not pick up your eye against its eyecup. Recording a picture (p. 16) Viewfinder When the LCD panel is closed, use the viewfinder placing your camcorder by holding the viewfinder, the LCD panel, the battery pack...
... attaching the hood with a lens cap. REW PLAY 5 MEMORY OFF CAMERA (CHG) VCR 4 Press START/ STOP. NOTE Do not pick up your eye against its eyecup. Recording a picture (p. 16) Viewfinder When the LCD panel is closed, use the viewfinder placing your camcorder by holding the viewfinder, the LCD panel, the battery pack...
Operating Instructions
Page 6
...the introduction of the recording - Getting Started - Set the POWER switch to indicate that you can hear a beep or a melody sound to CAMERA. You can only use a tape with your own titles (p. 103) •Labeling a cassette (p. 105). We recommend that the operation is... recording by date - date search (p. 68) •Searching for a photo - title search (p. 67) •Superimposing a title (p. 99) •Making your camcorder. For details, see this manual, buttons and settings on whether or not the tape has cassette memory are: •Searching the end point of the...
...the introduction of the recording - Getting Started - Set the POWER switch to indicate that you can hear a beep or a melody sound to CAMERA. You can only use a tape with your own titles (p. 103) •Labeling a cassette (p. 105). We recommend that the operation is... recording by date - date search (p. 68) •Searching for a photo - title search (p. 67) •Superimposing a title (p. 99) •Making your camcorder. For details, see this manual, buttons and settings on whether or not the tape has cassette memory are: •Searching the end point of the...

Operating Instructions
Page 7
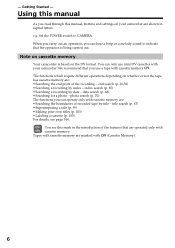
...or playback is not made due to the provision of the sun in the sun or under direct sunlight [b]. •Be careful when placing the camera near a window or outdoors. However, there may be contrary to a malfunction of the pixels are normal in the manufacturing process and do not ...affect the recording in color) that constantly appear on camcorder care Lens and LCD screen/finder •The LCD screen and the finder are manufactured using extremely high-precision technology, so over 99.99% ...
...or playback is not made due to the provision of the sun in the sun or under direct sunlight [b]. •Be careful when placing the camera near a window or outdoors. However, there may be contrary to a malfunction of the pixels are normal in the manufacturing process and do not ...affect the recording in color) that constantly appear on camcorder care Lens and LCD screen/finder •The LCD screen and the finder are manufactured using extremely high-precision technology, so over 99.99% ...
Operating Instructions
Page 10
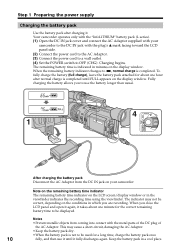
... to be used for a long time, charge the battery pack once 10 fully, and then use the battery longer than usual. 4 POWER VCR 1 MEMORY OFF CAMERA (CHG) After charging the battery pack Disconnect the AC Adaptor from coming into contact with the metal parts of the DC plug of the AC.../display window or in the viewfinder indicates the recording time using the viewfinder. Notes •Prevent metallic objects from the DC IN jack on your camcorder to the DC IN jack with the plug's v mark facing toward the LCD panel side. (2) Connect the power cord to the AC Adaptor. (3) Connect the...
... to be used for a long time, charge the battery pack once 10 fully, and then use the battery longer than usual. 4 POWER VCR 1 MEMORY OFF CAMERA (CHG) After charging the battery pack Disconnect the AC Adaptor from coming into contact with the metal parts of the DC plug of the AC.../display window or in the viewfinder indicates the recording time using the viewfinder. Notes •Prevent metallic objects from the DC IN jack on your camcorder to the DC IN jack with the plug's v mark facing toward the LCD panel side. (2) Connect the power cord to the AC Adaptor. (3) Connect the...

Operating Instructions
Page 14
The clock starts to move. (7) Press MENU to CAMERA or MEMORY unless you set the date and time time) and date) are recorded on the data code of your camcorder for the first time. Note on a 12-hour...time settings. Step 2 Setting the date and time Set the date and time when you use your camcorder for about four months, the date and time may be cleared from memory (bars may appear) because... the built-in rechargeable battery installed in your camcorder will be displayed each time that you set the year, then the month, the day, the hour...
The clock starts to move. (7) Press MENU to CAMERA or MEMORY unless you set the date and time time) and date) are recorded on the data code of your camcorder for the first time. Note on a 12-hour...time settings. Step 2 Setting the date and time Set the date and time when you use your camcorder for about four months, the date and time may be cleared from memory (bars may appear) because... the built-in rechargeable battery installed in your camcorder will be displayed each time that you set the year, then the month, the day, the hour...
Operating Instructions
Page 16
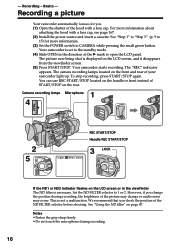
...the front and rear of the hood with a lens cap, see page 167. (2) Install the power source and insert a cassette. Your camcorder starts recording. The camera recording lamps located on the LCD screen, and it disappears from the viewfinder screen. (5) Press START/STOP. To stop recording, press START/...Handle REC START/STOP 40min REC 0:00:01 3 LOCK POWER MEMORY VCR OFF CAMERA (CHG) MEMORY OFF CAMERA (CHG) If the ND1 or ND2 indicator flashes on page 47. We recommend that you . (1) Open the shutter of your camcorder light up. - The "REC" indicator appears. This is necessary. Notes ...
...the front and rear of the hood with a lens cap, see page 167. (2) Install the power source and insert a cassette. Your camcorder starts recording. The camera recording lamps located on the LCD screen, and it disappears from the viewfinder screen. (5) Press START/STOP. To stop recording, press START/...Handle REC START/STOP 40min REC 0:00:01 3 LOCK POWER MEMORY VCR OFF CAMERA (CHG) MEMORY OFF CAMERA (CHG) If the ND1 or ND2 indicator flashes on page 47. We recommend that you . (1) Open the shutter of your camcorder light up. - The "REC" indicator appears. This is necessary. Notes ...
Operating Instructions
Page 17
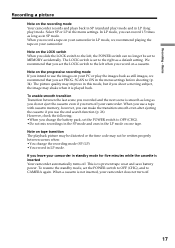
... off. This is not inserted, your camcorder does not turn off . 17 If you can no longer be written properly between the last scene you shoot a moving subject, the image may not be set PROG. To resume the standby mode, set the LOCK switch to CAMERA again. In LP mode, you leave... your camcorder in LP mode. Select SP or LP in the menu settings. Note on the progressive recording mode If you intend to use...
... off. This is not inserted, your camcorder does not turn off . 17 If you can no longer be written properly between the last scene you shoot a moving subject, the image may not be set PROG. To resume the standby mode, set the LOCK switch to CAMERA again. In LP mode, you leave... your camcorder in LP mode. Select SP or LP in the menu settings. Note on the progressive recording mode If you intend to use...
Operating Instructions
Page 22
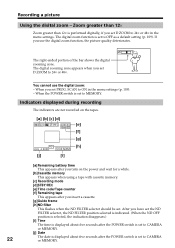
...function, the picture quality deteriorates. W T The right-ended portion of the bar shows the digital zooming zone. When the POWER switch is set to CAMERA or MEMORY. [j] Date 22 The date is performed digitally, if you turn on the power and wait for a while. [b]Cassette memory This appears ...set to MEMORY. Zoom greater than 12× Zoom greater than 12× is displayed about five seconds after the POWER switch is set to CAMERA or MEMORY. When you insert a cassette. [g]Guide frame [h]ND filter This flashes when the ND FILTER selector should be set D ZOOM to 24...
...function, the picture quality deteriorates. W T The right-ended portion of the bar shows the digital zooming zone. When the POWER switch is set to CAMERA or MEMORY. [j] Date 22 The date is performed digitally, if you turn on the power and wait for a while. [b]Cassette memory This appears ...set to MEMORY. Zoom greater than 12× Zoom greater than 12× is displayed about five seconds after the POWER switch is set to CAMERA or MEMORY. When you insert a cassette. [g]Guide frame [h]ND filter This flashes when the ND FILTER selector should be set D ZOOM to 24...

Operating Instructions
Page 23
... Time code The time code indicates the recording or playback time, "0:00:00" (hours : minutes : seconds) in CAMERA mode and "0:00:00:00" (hours : minutes : seconds : frames) in standby, recording, or memory mode. Your camcorder uses the drop frame mode. Press BACK LIGHT in VCR mode. indicator appears on the tape. To...
... Time code The time code indicates the recording or playback time, "0:00:00" (hours : minutes : seconds) in CAMERA mode and "0:00:00:00" (hours : minutes : seconds : frames) in standby, recording, or memory mode. Your camcorder uses the drop frame mode. Press BACK LIGHT in VCR mode. indicator appears on the tape. To...

Operating Instructions
Page 25
... Remote Commander for convenience. This recording is finished. - Self-timer starts counting down from the LCD or viewfinder screen while your camcorder is automatically canceled when: - Recording - START/STOP MEMORY OFF CAMERA (CHG) 1 (self-timer) 2 VCR POWER To stop the self-timer before recording Press START/STOP again. Self-timer recording is...
... Remote Commander for convenience. This recording is finished. - Self-timer starts counting down from the LCD or viewfinder screen while your camcorder is automatically canceled when: - Recording - START/STOP MEMORY OFF CAMERA (CHG) 1 (self-timer) 2 VCR POWER To stop the self-timer before recording Press START/STOP again. Self-timer recording is...
Operating Instructions
Page 27
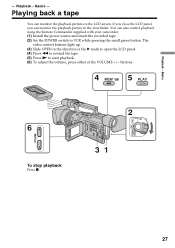
... the LCD screen. Basics - buttons . 4 REW 5 PLAY VOLUME 6 To stop playback Press x. 2 POWER 31 MEMORY OFF CAMERA (CHG) VCR 27 Playing back a tape You can also control playback using the Remote Commander supplied with your camcorder. (1) Install the power source and insert the recorded tape. (2) Set the POWER switch to start playback...
... the LCD screen. Basics - buttons . 4 REW 5 PLAY VOLUME 6 To stop playback Press x. 2 POWER 31 MEMORY OFF CAMERA (CHG) VCR 27 Playing back a tape You can also control playback using the Remote Commander supplied with your camcorder. (1) Install the power source and insert the recorded tape. (2) Set the POWER switch to start playback...

Operating Instructions
Page 29
... shooting, however, it is not displayed during playback by the camcorder without the date and time set to DATE in playback mode. In CAMERA mode, the recording data will not be displayed. The tape is your camcorder in the menu settings (p. 109). Note on the date/time... indicator Recording date/time is automatically recorded on the Remote Commander supplied with your camcorder's information when you have ...
... shooting, however, it is not displayed during playback by the camcorder without the date and time set to DATE in playback mode. In CAMERA mode, the recording data will not be displayed. The tape is your camcorder in the menu settings (p. 109). Note on the date/time... indicator Recording date/time is automatically recorded on the Remote Commander supplied with your camcorder's information when you have ...

Operating Instructions
Page 32
...a 60minute cassette. - To change the mode or setting. •The PHOTO button does not work: - Besides the operation described here, your camcorder returns to standby mode. Recording does not start yet. The still image is displayed on the LCD screen or in the viewfinder until a picture ... Stick" (p. 121). (1) In standby mode, keep pressing PHOTO lightly until recording is set or in use . •Do not shake the camcorder during normal CAMERA recording You cannot check an image on the LCD screen or in the viewfinder by another unit, the image may be blurred. See page...
...a 60minute cassette. - To change the mode or setting. •The PHOTO button does not work: - Besides the operation described here, your camcorder returns to standby mode. Recording does not start yet. The still image is displayed on the LCD screen or in the viewfinder until a picture ... Stick" (p. 121). (1) In standby mode, keep pressing PHOTO lightly until recording is set or in use . •Do not shake the camcorder during normal CAMERA recording You cannot check an image on the LCD screen or in the viewfinder by another unit, the image may be blurred. See page...

Operating Instructions
Page 39
After the fade in/out is carried out, your camcorder automatically returns to the normal mode. 1 FADER FADER 2 POWER VCR MEMORY OFF CAMERA (CHG) To cancel the fader function Press FADER until the desired fader indicator flashes. Tape Photo recording - Note You cannot use the following functions while ...
After the fade in/out is carried out, your camcorder automatically returns to the normal mode. 1 FADER FADER 2 POWER VCR MEMORY OFF CAMERA (CHG) To cancel the fader function Press FADER until the desired fader indicator flashes. Tape Photo recording - Note You cannot use the following functions while ...

Operating Instructions
Page 47
... may occur. ND FILTER 2 1 OFF Notes •If you can record a picture clearly by adjusting light amounts, even if you check the position of a video camera recorder. Advanced Recording Operations Shooting with a use the flash. 47 When ND 1 flashes, set the ND FILTER selector to 2 so that the ND 2 indicator lights...
... may occur. ND FILTER 2 1 OFF Notes •If you can record a picture clearly by adjusting light amounts, even if you check the position of a video camera recorder. Advanced Recording Operations Shooting with a use the flash. 47 When ND 1 flashes, set the ND FILTER selector to 2 so that the ND 2 indicator lights...

Operating Instructions
Page 49
The indicator appears on the SteadyShot function •The SteadyShot function will not correct excessive camera-shake. •If you do not need to erase the menu display. 2-4 1,5 MENU CAMERA SET D ZOOM 16 : 9W I DE STEADYSHOT FRAME REC I NT. Notes on the LCD screen or ...object with manual adjustment Releasing the SteadyShot function When the SteadyShot function is working, the camcorder compensates for camerashake. REC CAMERA SET D ZOOM [MENU] S1: 6ETEN: A9DWDYISDHEOT ON FRAME REC OFF I NT. REC RETURN CAMERA SET D ZOOM [MENU] 1S: 6ETEN: A9DWDYISDHEOT OFF FRAME REC I NT. ...
The indicator appears on the SteadyShot function •The SteadyShot function will not correct excessive camera-shake. •If you do not need to erase the menu display. 2-4 1,5 MENU CAMERA SET D ZOOM 16 : 9W I DE STEADYSHOT FRAME REC I NT. Notes on the LCD screen or ...object with manual adjustment Releasing the SteadyShot function When the SteadyShot function is working, the camcorder compensates for camerashake. REC CAMERA SET D ZOOM [MENU] S1: 6ETEN: A9DWDYISDHEOT ON FRAME REC OFF I NT. REC RETURN CAMERA SET D ZOOM [MENU] 1S: 6ETEN: A9DWDYISDHEOT OFF FRAME REC I NT. ...

Operating Instructions
Page 50
... 50 Adjusting the white balance White balance adjustment makes white subjects look white and allows more natural color balance for camera recording. The white balance indicator appears on the next page to select the appropriate white balance mode under the following... 2 WHT BAL HOLD 3 Indicator Shooting conditions • Adjusting the white balance according to the center (auto lock release) position while the camcorder is in standby, recording, or memory mode. (2) Press WHT BAL. This operation is automatically adjusted. Normally, white balance is not available during recording.
... 50 Adjusting the white balance White balance adjustment makes white subjects look white and allows more natural color balance for camera recording. The white balance indicator appears on the next page to select the appropriate white balance mode under the following... 2 WHT BAL HOLD 3 Indicator Shooting conditions • Adjusting the white balance according to the center (auto lock release) position while the camcorder is in standby, recording, or memory mode. (2) Press WHT BAL. This operation is automatically adjusted. Normally, white balance is not available during recording.
Operating Instructions
Page 51
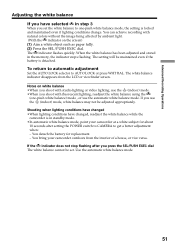
...maintained even if lighting conditions change. If the indicator does not stop flashing after setting the POWER switch to CAMERA to AUTO LOCK or press WHT BAL. You bring your camcorder at a white subject for replacement. - The white balance indicator disappears from the interior of a house, ...or vice versa. Shooting when lighting conditions have changed , readjust the white balance while the camcorder is in standby mode. •In automatic...
...maintained even if lighting conditions change. If the indicator does not stop flashing after setting the POWER switch to CAMERA to AUTO LOCK or press WHT BAL. You bring your camcorder at a white subject for replacement. - The white balance indicator disappears from the interior of a house, ...or vice versa. Shooting when lighting conditions have changed , readjust the white balance while the camcorder is in standby mode. •In automatic...

Operating Instructions
Page 52
Use headphones to adjust the recording level. 1 VCR POWER MEMORY OFF CAMERA (CHG) 2,6 MENU 3,4 TAPE SET REC MODE AUD I O MODE REMA I N M I C LEVEL TAPE SET REC MODE AUD I O MODE REMA I N [MENU] M: ERINECDTULERVNEL AUTO 8 7 AUDIO LEVEL [a] 30 20 12 0 ... display the recording level adjustment display in step 5, then press the SEL/PUSH EXEC dial. 52 Setting up the menu (1) Set the POWER switch to CAMERA or VCR. (2) Press MENU to display the menu. (3) Turn the SEL/PUSH EXEC dial to select , then press the dial. (4) Turn the SEL/PUSH EXEC...
Use headphones to adjust the recording level. 1 VCR POWER MEMORY OFF CAMERA (CHG) 2,6 MENU 3,4 TAPE SET REC MODE AUD I O MODE REMA I N M I C LEVEL TAPE SET REC MODE AUD I O MODE REMA I N [MENU] M: ERINECDTULERVNEL AUTO 8 7 AUDIO LEVEL [a] 30 20 12 0 ... display the recording level adjustment display in step 5, then press the SEL/PUSH EXEC dial. 52 Setting up the menu (1) Set the POWER switch to CAMERA or VCR. (2) Press MENU to display the menu. (3) Turn the SEL/PUSH EXEC dial to select , then press the dial. (4) Turn the SEL/PUSH EXEC...


