
Operating Instructions
Page 1
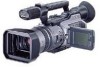
Refer to these numbers whenever you call upon your Sony dealer regarding this manual thoroughly, and retain it for future reference. AC- Serial No. Serial No. 3-087-414-11 (1) Digital Video Camera Recorder Operating Instructions Before operating the unit, please read this product. Model No. DCR-VX2100 Model No. Record the serial number in the space provided below. DCR-VX2100 ©2003 Sony Corporation Owner's Record The model and serial numbers are located on the bottom.
Refer to these numbers whenever you call upon your Sony dealer regarding this manual thoroughly, and retain it for future reference. AC- Serial No. Serial No. 3-087-414-11 (1) Digital Video Camera Recorder Operating Instructions Before operating the unit, please read this product. Model No. DCR-VX2100 Model No. Record the serial number in the space provided below. DCR-VX2100 ©2003 Sony Corporation Owner's Record The model and serial numbers are located on the bottom.
Operating Instructions
Page 2
... interference received, including interference that may not cause harmful interference, and (2) this Sony Digital Handycam camcorder. This CAUTION TO PREVENT ELECTRIC SHOCK, MATCH WIDE BLADE OF PLUG TO WIDE SLOT...the receiver is subject to come. You will not occur in this manual could void your purchase of this device must be determined by one ...with Part 15 of important operating and maintenance (servicing) Trade Name: SONY Model No.: DCR-VX2100 Responsible Party: Sony Electronics Inc. Regulatory Information Declaration of Conformity This symbol is intended to ...
... interference received, including interference that may not cause harmful interference, and (2) this Sony Digital Handycam camcorder. This CAUTION TO PREVENT ELECTRIC SHOCK, MATCH WIDE BLADE OF PLUG TO WIDE SLOT...the receiver is subject to come. You will not occur in this manual could void your purchase of this device must be determined by one ...with Part 15 of important operating and maintenance (servicing) Trade Name: SONY Model No.: DCR-VX2100 Responsible Party: Sony Electronics Inc. Regulatory Information Declaration of Conformity This symbol is intended to ...
Operating Instructions
Page 3
...Self-timer recording 25 Checking the recording - Digital program editing 76 Using with manual adjustment 44 - Insert editing 93 Audio dubbing 95 Superimposing a title 99 Making your camcorder abroad 157 Searching the boundaries of contents Quick Start Guide 4 Playing back ...a tape with digital effects ......... 73 Getting Started Editing Using this manual 6 Checking supplied accessories 8 Step 1 Preparing the power ...
...Self-timer recording 25 Checking the recording - Digital program editing 76 Using with manual adjustment 44 - Insert editing 93 Audio dubbing 95 Superimposing a title 99 Making your camcorder abroad 157 Searching the boundaries of contents Quick Start Guide 4 Playing back ...a tape with digital effects ......... 73 Getting Started Editing Using this manual 6 Checking supplied accessories 8 Step 1 Preparing the power ...
Operating Instructions
Page 6
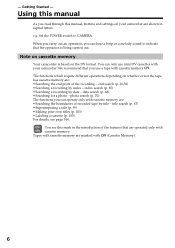
...index - photo search (p. 70). title search (p. 67) •Superimposing a title (p. 99) •Making your camcorder. For details, see this manual, buttons and settings on your camcorder are shown in the introduction of the features that are : •Searching the end point of recorded tape by title...functions you use mini DV cassettes with cassette memory . Tapes with (Cassette Memory). 6 Note on cassette memory Your camcorder is being carried out. - Using this manual As you can only use a tape with your own titles (p. 103) •Labeling a cassette (p. 105). You...
...index - photo search (p. 70). title search (p. 67) •Superimposing a title (p. 99) •Making your camcorder. For details, see this manual, buttons and settings on your camcorder are shown in the introduction of the features that are : •Searching the end point of recorded tape by title...functions you use mini DV cassettes with cassette memory . Tapes with (Cassette Memory). 6 Note on cassette memory Your camcorder is being carried out. - Using this manual As you can only use a tape with your own titles (p. 103) •Labeling a cassette (p. 105). You...

Operating Instructions
Page 7
...be compensated if recording or playback is not made due to a malfunction of the camcorder, video tape, etc. 7 Doing so might cause your camcorder away from rain and sea water. Sometimes this manual Note on camcorder care Lens and LCD screen/finder •The LCD screen and the finder are ... the recording in the sun or under direct sunlight [b]. •Be careful when placing the camera near a window or outdoors. Keep your camcorder to malfunction. However, there may cause your recordings on the LCD screen and the finder. These points are operational for long periods may be...
...be compensated if recording or playback is not made due to a malfunction of the camcorder, video tape, etc. 7 Doing so might cause your camcorder away from rain and sea water. Sometimes this manual Note on camcorder care Lens and LCD screen/finder •The LCD screen and the finder are ... the recording in the sun or under direct sunlight [b]. •Be careful when placing the camera near a window or outdoors. Keep your camcorder to malfunction. However, there may cause your recordings on the LCD screen and the finder. These points are operational for long periods may be...

Operating Instructions
Page 14
...PUSH EXEC dial to adjust to erase the menu display. 1,7 MENU 2 3 4 2003 JAN 1 12 00 AM MANUAL SET AUTO SHTR PROG. First, set the year, then the month, the day, the hour and then the minute.... (1) Press MENU to display the menu in your camcorder for the first time. The clock starts to move. (7) Press MENU to the desired year, then press the...unless you set the date and time time) and date) are recorded on the data code of your camcorder operates on the time indicator The internal clock of the tape and the "Memory Stick." SCAN [MENU]...
...PUSH EXEC dial to adjust to erase the menu display. 1,7 MENU 2 3 4 2003 JAN 1 12 00 AM MANUAL SET AUTO SHTR PROG. First, set the year, then the month, the day, the hour and then the minute.... (1) Press MENU to display the menu in your camcorder for the first time. The clock starts to move. (7) Press MENU to the desired year, then press the...unless you set the date and time time) and date) are recorded on the data code of your camcorder operates on the time indicator The internal clock of the tape and the "Memory Stick." SCAN [MENU]...

Operating Instructions
Page 23
Your camcorder uses the drop frame mode. Remaining tape indicator The indicator may not be canceled. - Shooting backlit subjects (BACK LIGHT) When you press one of the ..., "0:00:00" (hours : minutes : seconds) in CAMERA mode and "0:00:00:00" (hours : minutes : seconds : frames) in standby, recording, or memory mode. EXPOSURE When you manually adjust the exposure You cannot use the backlight function. Press BACK LIGHT in VCR mode. You cannot rewrite only the time code. SPOT LIGHT - Note...
Your camcorder uses the drop frame mode. Remaining tape indicator The indicator may not be canceled. - Shooting backlit subjects (BACK LIGHT) When you press one of the ..., "0:00:00" (hours : minutes : seconds) in CAMERA mode and "0:00:00:00" (hours : minutes : seconds : frames) in standby, recording, or memory mode. EXPOSURE When you manually adjust the exposure You cannot use the backlight function. Press BACK LIGHT in VCR mode. You cannot rewrite only the time code. SPOT LIGHT - Note...

Operating Instructions
Page 24
FADER BACK LIGHT SPOT LIGHT SPOT LIGHT If you manually adjust the exposure You cannot use the spot light mode while in standby, recording, or memory mode. Low lux mode of 1/30 or smaller - The ...
FADER BACK LIGHT SPOT LIGHT SPOT LIGHT If you manually adjust the exposure You cannot use the spot light mode while in standby, recording, or memory mode. Low lux mode of 1/30 or smaller - The ...

Operating Instructions
Page 34
...second, which may happen in which the screen lights up . 1 MENU 5 MENU PROG. SCAN RETURN OFF ON [MENU] : END MANUAL SET AUTO SHTR PROG. This camcorder takes in an image every 1/15 of the still picture is not a malfunction. When shooting under fluorescent light When shooting in the normal... in progressive recording mode. SCAN ON RETURN [MENU] : END [MENU] : END To return to normal recording mode Select OFF in this camcorder takes in an image every 1/15 of a second in progressive recording mode, moving object to too much jitter. In the progressive recording mode ...
...second, which may happen in which the screen lights up . 1 MENU 5 MENU PROG. SCAN RETURN OFF ON [MENU] : END MANUAL SET AUTO SHTR PROG. This camcorder takes in an image every 1/15 of the still picture is not a malfunction. When shooting under fluorescent light When shooting in the normal... in progressive recording mode. SCAN ON RETURN [MENU] : END [MENU] : END To return to normal recording mode Select OFF in this camcorder takes in an image every 1/15 of a second in progressive recording mode, moving object to too much jitter. In the progressive recording mode ...
Operating Instructions
Page 44
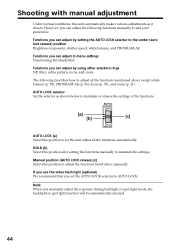
...Select this position to adjust the functions listed above except white balance (p. 50), PROGRAM AE (p. 56), focus (p. 59), and zoom (p. 21). Manual position (AUTO LOCK release) [c] Select this position to maintain or release the settings of the functions. Functions you can adjust by setting the AUTO LOCK...can adjust in menu settings Deactivating the SteadyShot Functions you set the AUTO LOCK selector to maintain the settings. However, you manually adjust the exposure during backlight or spot light mode, the backlight or spot light function will be automatically canceled. 44 AUTO...
...Select this position to adjust the functions listed above except white balance (p. 50), PROGRAM AE (p. 56), focus (p. 59), and zoom (p. 21). Manual position (AUTO LOCK release) [c] Select this position to maintain or release the settings of the functions. Functions you can adjust by setting the AUTO LOCK...can adjust in menu settings Deactivating the SteadyShot Functions you set the AUTO LOCK selector to maintain the settings. However, you manually adjust the exposure during backlight or spot light mode, the backlight or spot light function will be automatically canceled. 44 AUTO...

Operating Instructions
Page 45
.... The exposure indicator appears on the LCD screen or in the viewfinder. (3) Turn the EXPOSURE dial to the center (auto lock release) position while the camcorder is in standby, recording, or memory mode. (2) Press EXPOSURE. If you turn the dial, the iris value changes between OPEN and CLOSE and the gain... 3 To return to automatic exposure mode Set the AUTO LOCK selector to automatic adjustment again. 45 As you press PROGRAM AE when adjusting the exposure manually The exposure comes back to AUTO LOCK or press EXPOSURE.
.... The exposure indicator appears on the LCD screen or in the viewfinder. (3) Turn the EXPOSURE dial to the center (auto lock release) position while the camcorder is in standby, recording, or memory mode. (2) Press EXPOSURE. If you turn the dial, the iris value changes between OPEN and CLOSE and the gain... 3 To return to automatic exposure mode Set the AUTO LOCK selector to automatic adjustment again. 45 As you press PROGRAM AE when adjusting the exposure manually The exposure comes back to AUTO LOCK or press EXPOSURE.

Operating Instructions
Page 46
Shooting with manual adjustment Adjusting the shutter speed (1) Set the AUTO LOCK selector to the center (auto lock release) position while the camcorder is in standby, recording, or memory mode. (2) If the PROGRAM AE indicator is lit, press PROGRAM AE repeatedly until the indicator... speed. If you turn the dial, the shutter speed changes as follows: 1/4 y 1/8 y 1/15 y 1/30 y ... Use a tripod and adjust the focus manually. When shooting under fluorescent light or light bulbs When shooting under fluorescent light or light bulbs, a rare phenomenon may be lost. The shutter speed indicator...
Shooting with manual adjustment Adjusting the shutter speed (1) Set the AUTO LOCK selector to the center (auto lock release) position while the camcorder is in standby, recording, or memory mode. (2) If the PROGRAM AE indicator is lit, press PROGRAM AE repeatedly until the indicator... speed. If you turn the dial, the shutter speed changes as follows: 1/4 y 1/8 y 1/15 y 1/30 y ... Use a tripod and adjust the focus manually. When shooting under fluorescent light or light bulbs When shooting under fluorescent light or light bulbs, a rare phenomenon may be lost. The shutter speed indicator...

Operating Instructions
Page 47
... the flash. 47 When the ND1 or ND2 indicator flashes on the LCD screen or in the viewfinder The ND filter is quite common with manual adjustment Using the ND filter Using the ND filter (the ND filter 1 setting corresponds to 1/4 of the quantity of a video camera recorder...
... the flash. 47 When the ND1 or ND2 indicator flashes on the LCD screen or in the viewfinder The ND filter is quite common with manual adjustment Using the ND filter Using the ND filter (the ND filter 1 setting corresponds to 1/4 of the quantity of a video camera recorder...

Operating Instructions
Page 48
... pattern Even though you can get the desired picture. Note on the LCD screen or in the viewfinder, the zebra pattern is set the camcorder to OFF. You can check the picture level of the picture on the LCD screen or in the viewfinder. The zebra pattern appears in ...zebra pattern Set the ZEBRA selector to display a zebra pattern (diagonal stripes) in the portion of a subject by displaying the zebra pattern. Shooting with manual adjustment Shooting with the zebra pattern You can set to 70 or 100 in the viewfinder with a subject whose brightness exceeds a certain level.
... pattern Even though you can get the desired picture. Note on the LCD screen or in the viewfinder, the zebra pattern is set the camcorder to OFF. You can check the picture level of the picture on the LCD screen or in the viewfinder. The zebra pattern appears in ...zebra pattern Set the ZEBRA selector to display a zebra pattern (diagonal stripes) in the portion of a subject by displaying the zebra pattern. Shooting with manual adjustment Shooting with the zebra pattern You can set to 70 or 100 in the viewfinder with a subject whose brightness exceeds a certain level.

Operating Instructions
Page 49
... function. 49 You can release the SteadyShot function when you use the SteadyShot function when shooting a stationary object with manual adjustment Releasing the SteadyShot function When the SteadyShot function is working, the camcorder compensates for camerashake. REC RETURN [MENU] : END To activate the SteadyShot function again Select ON in the viewfinder. Advanced...
... function. 49 You can release the SteadyShot function when you use the SteadyShot function when shooting a stationary object with manual adjustment Releasing the SteadyShot function When the SteadyShot function is working, the camcorder compensates for camerashake. REC RETURN [MENU] : END To activate the SteadyShot function again Select ON in the viewfinder. Advanced...

Operating Instructions
Page 50
..., white balance is not available during recording. This operation is automatically adjusted. You can obtain better results by adjusting the white balance manually when lighting conditions change quickly or when recording outdoors: e.g., neon signs, fireworks. (1) Set the AUTO LOCK selector to select the appropriate...the LCD screen or in the viewfinder. (3) Turn the SEL/PUSH EXEC dial to the center (auto lock release) position while the camcorder is in standby, recording, or memory mode. (2) Press WHT BAL. Adjusting the white balance White balance adjustment makes white subjects look ...
..., white balance is not available during recording. This operation is automatically adjusted. You can obtain better results by adjusting the white balance manually when lighting conditions change quickly or when recording outdoors: e.g., neon signs, fireworks. (1) Set the AUTO LOCK selector to select the appropriate...the LCD screen or in the viewfinder. (3) Turn the SEL/PUSH EXEC dial to the center (auto lock release) position while the camcorder is in standby, recording, or memory mode. (2) Press WHT BAL. Adjusting the white balance White balance adjustment makes white subjects look ...

Operating Instructions
Page 52
...Turn the SEL/PUSH EXEC dial to select MIC LEVEL, then press the dial. (5) Turn the SEL/PUSH EXEC dial to select MANUAL, then press the dial. (6) Press MENU to monitor the sound when you adjust it. Sound recording level You can adjust the ... 7 AUDIO LEVEL [a] 30 20 12 0 dB [b][c] 5 TAPE SET REC MODE AUD I O MODE REMA I N M I C LEVEL RETURN AUTO MANUAL TAPE SET REC MODE AUD I O MODE REMA I N [MENU] :MERINECDTULERVNEL MANUAL [MENU] : END [MENU] : END [a] Recording level meter [b] Decreases the recording level [c] Increases the recording level To clear the recording level adjustment...
...Turn the SEL/PUSH EXEC dial to select MIC LEVEL, then press the dial. (5) Turn the SEL/PUSH EXEC dial to select MANUAL, then press the dial. (6) Press MENU to monitor the sound when you adjust it. Sound recording level You can adjust the ... 7 AUDIO LEVEL [a] 30 20 12 0 dB [b][c] 5 TAPE SET REC MODE AUD I O MODE REMA I N M I C LEVEL RETURN AUTO MANUAL TAPE SET REC MODE AUD I O MODE REMA I N [MENU] :MERINECDTULERVNEL MANUAL [MENU] : END [MENU] : END [a] Recording level meter [b] Decreases the recording level [c] Increases the recording level To clear the recording level adjustment...

Operating Instructions
Page 53
Advanced Recording Operations Adjusting recording level manually - Sound recording level Notes on the LCD screen or in the viewfinder. The sound input through the AUDIO L/R jacks or DV Interface You cannot adjust the recording level. When MIC LEVEL is set to AUTO You cannot adjust the recording level, however, the recording level adjustment display is retained for about five minutes after removing the battery. •The recording level indicator appears at the lower-right on the manual adjustment •The recording level setting is displayed. 53
Advanced Recording Operations Adjusting recording level manually - Sound recording level Notes on the LCD screen or in the viewfinder. The sound input through the AUDIO L/R jacks or DV Interface You cannot adjust the recording level. When MIC LEVEL is set to AUTO You cannot adjust the recording level, however, the recording level adjustment display is retained for about five minutes after removing the battery. •The recording level indicator appears at the lower-right on the manual adjustment •The recording level setting is displayed. 53

Operating Instructions
Page 55
To check the custom preset setting Press CUSTOM PRESET while the camcorder is in the viewfinder. Once you have to preset in each mode you preset. If you want to use a preset both in CAMERA and memory ... desired picture quality in CAMERA or memory mode The preset is up to recording circumstances or objects. About the AGC Limit When adjusting the exposure manually, the level of the picture according to 18 dB (OFF). Adjustment value Decreases color intensity y Increases color intensity Softer y Sharper Bluish y Reddish -4 y +4 6 dB/12 dB...
To check the custom preset setting Press CUSTOM PRESET while the camcorder is in the viewfinder. Once you have to preset in each mode you preset. If you want to use a preset both in CAMERA and memory ... desired picture quality in CAMERA or memory mode The preset is up to recording circumstances or objects. About the AGC Limit When adjusting the exposure manually, the level of the picture according to 18 dB (OFF). Adjustment value Decreases color intensity y Increases color intensity Softer y Sharper Bluish y Reddish -4 y +4 6 dB/12 dB...

Operating Instructions
Page 56
A: Aperture priority mode Selecting the aperture to determine the desired depth of field. S: Shutter speed priority mode Selecting the shutter speed manually. The exposure value changes in accordance with the selected shutter speed. : Sports lesson mode Capturing high-speed action in sports such as golf or tennis : ...
A: Aperture priority mode Selecting the aperture to determine the desired depth of field. S: Shutter speed priority mode Selecting the shutter speed manually. The exposure value changes in accordance with the selected shutter speed. : Sports lesson mode Capturing high-speed action in sports such as golf or tennis : ...


