
Operating Instructions
Page 4
... Write-protect tab Quick Start Guide This guide introduces you to insert it. Connecting the power cord (p. 13) Use the battery pack when using your camcorder outdoors (p. 9). Connect the plug with the window facing out and the write-protect tab facing upward. AC Adaptor (supplied) Open the DC IN jack ... by pressing the PUSH mark on the cassette lid. Quick Start Guide Inserting a cassette (p. 15) 1 While pressing the small blue button on the EJECT switch, slide it . 4 Close the cassette lid by pressing the PUSH button on it in parentheses "( )" for more information.
... Write-protect tab Quick Start Guide This guide introduces you to insert it. Connecting the power cord (p. 13) Use the battery pack when using your camcorder outdoors (p. 9). Connect the plug with the window facing out and the write-protect tab facing upward. AC Adaptor (supplied) Open the DC IN jack ... by pressing the PUSH mark on the cassette lid. Quick Start Guide Inserting a cassette (p. 15) 1 While pressing the small blue button on the EJECT switch, slide it . 4 Close the cassette lid by pressing the PUSH button on it in parentheses "( )" for more information.

Operating Instructions
Page 15
Getting Started Step 3 Inserting a cassette (1) Install the power source. (2) While pressing the small blue button on the EJECT switch, slide it in the direction of the lid other than the PUSH button. When you press any part of the arrow. To prevent ...accidental erasure Slide the write-protect tab on the lid. 2 3,4 Window 5 PUSH Write-protect tab PUSH To eject a cassette Follow the procedure above, and take out the cassette in a straight line deeply into the cassette compartment with cassette memory Read the instruction about...
Getting Started Step 3 Inserting a cassette (1) Install the power source. (2) While pressing the small blue button on the EJECT switch, slide it in the direction of the lid other than the PUSH button. When you press any part of the arrow. To prevent ...accidental erasure Slide the write-protect tab on the lid. 2 3,4 Window 5 PUSH Write-protect tab PUSH To eject a cassette Follow the procedure above, and take out the cassette in a straight line deeply into the cassette compartment with cassette memory Read the instruction about...
Operating Instructions
Page 17
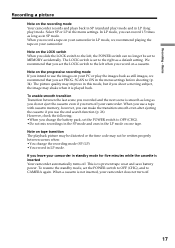
...Transition between scenes when: •You change the battery pack, set to ON in SP mode. The LOCK switch is inserted Your camcorder automatically turns off your camcorder in the LP mode on the LOCK switch When you turn off. 17 However, check the following: •When you shoot ...progressive recording mode If you intend to the left , the POWER switch can make the transition smooth even after ejecting the cassette if you record a tape on the recording mode Your camcorder records and plays back in SP (standard play) mode and in LP mode. Basics Recording a picture Note...
...Transition between scenes when: •You change the battery pack, set to ON in SP mode. The LOCK switch is inserted Your camcorder automatically turns off your camcorder in the LP mode on the LOCK switch When you turn off. 17 However, check the following: •When you shoot ...progressive recording mode If you intend to the left , the POWER switch can make the transition smooth even after ejecting the cassette if you record a tape on the recording mode Your camcorder records and plays back in SP (standard play) mode and in LP mode. Basics Recording a picture Note...

Operating Instructions
Page 19
... up to save the battery power. Recording - The battery life is longer when the LCD panel is useful to OFF (CHG). (2) Close the LCD panel. (3) Eject the cassette. (4) Remove the battery pack. 19 T/STOP Use the viewfinder instead of the backlight. in the menu settings The recorded picture will not be... in the menu settings (p. 109). Select LCD B.L. Basics LCD BRIGHT Recording a picture Adjusting the brightness of the LCD screen To adjust the brightness of the camcorder.
... up to save the battery power. Recording - The battery life is longer when the LCD panel is useful to OFF (CHG). (2) Close the LCD panel. (3) Eject the cassette. (4) Remove the battery pack. 19 T/STOP Use the viewfinder instead of the backlight. in the menu settings The recorded picture will not be... in the menu settings (p. 109). Select LCD B.L. Basics LCD BRIGHT Recording a picture Adjusting the brightness of the LCD screen To adjust the brightness of the camcorder.

Operating Instructions
Page 26
...If you press START/STOP, re-recording begins from the point you eject the cassette. END SEARCH You can use a tape without cassette memory, the end search function does not work correctly (p. 144). 26 After playback the camcorder turns to the end of EDITSEARCH in standby mode. side of the ... these buttons to check recorded pictures or shoot so that the transition between the recorded portions, the end search function may not work once you eject the cassette after you will record is played back. +: to go forward - : to go to standby mode. Rec Review You can change ...
...If you press START/STOP, re-recording begins from the point you eject the cassette. END SEARCH You can use a tape without cassette memory, the end search function does not work correctly (p. 144). 26 After playback the camcorder turns to the end of EDITSEARCH in standby mode. side of the ... these buttons to check recorded pictures or shoot so that the transition between the recorded portions, the end search function may not work once you eject the cassette after you will record is played back. +: to go forward - : to go to standby mode. Rec Review You can change ...

Operating Instructions
Page 86
... step 2, then press the SEL/PUSH EXEC dial. Turn the SEL/PUSH EXEC dial to select EXECUTE, then press the dial and the setting is ejected. 86 Dubbing only desired scenes - Digital program editing Erasing the last program To change the end of the last program, delete the CUT-OUT mark...
... step 2, then press the SEL/PUSH EXEC dial. Turn the SEL/PUSH EXEC dial to select EXECUTE, then press the dial and the setting is ejected. 86 Dubbing only desired scenes - Digital program editing Erasing the last program To change the end of the last program, delete the CUT-OUT mark...

Operating Instructions
Page 112
... "COMPLETE" appears when formatting is not required. •While the display shows "FORMATTING," do not turn the POWER switch, press any button, or eject a "Memory Stick." •You cannot format a "Memory Stick" if the write-protect tab on the recorded still images you want to record continuously...print out later. To write a print mark on the "Memory Stick" is set to select OK, then press the dial. 3. Select FORMAT with this camcorder is finished. Notes on a tape onto a "Memory Stick" (p. 131). Formatting with the SEL/PUSH EXEC dial, then press the dial. 2. VCR MEMORY...
... "COMPLETE" appears when formatting is not required. •While the display shows "FORMATTING," do not turn the POWER switch, press any button, or eject a "Memory Stick." •You cannot format a "Memory Stick" if the write-protect tab on the recorded still images you want to record continuously...print out later. To write a print mark on the "Memory Stick" is set to select OK, then press the dial. 3. Select FORMAT with this camcorder is finished. Notes on a tape onto a "Memory Stick" (p. 131). Formatting with the SEL/PUSH EXEC dial, then press the dial. 2. VCR MEMORY...

Operating Instructions
Page 118
... "Memory Stick" inward, then release your camcorder. The "Memory Stick" comes out a little. Do not turn the power off , eject a "Memory Stick" or remove the battery pack. Otherwise, image data breakdown may pop out depending on the way you are using is not compatible with the Sony logo pointing toward the LCD panel...
... "Memory Stick" inward, then release your camcorder. The "Memory Stick" comes out a little. Do not turn the power off , eject a "Memory Stick" or remove the battery pack. Otherwise, image data breakdown may pop out depending on the way you are using is not compatible with the Sony logo pointing toward the LCD panel...

Operating Instructions
Page 128
...back. (3) Keep pressing PHOTO lightly until the picture from the tape freezes. Before operation Insert a recorded tape and a "Memory Stick" into your camcorder because its format does not conform to VCR. (2) Press N. If " " appears on the tape is flashing Never shake or strike the unit.... mode The playback pauses momentarily. Sound recorded on a "Memory Stick." Also, do not turn the power off , eject a "Memory Stick" or remove the battery pack. Your camcorder can read moving picture data through the input connector and record it as a still image on a "Memory Stick." ...
...back. (3) Keep pressing PHOTO lightly until the picture from the tape freezes. Before operation Insert a recorded tape and a "Memory Stick" into your camcorder because its format does not conform to VCR. (2) Press N. If " " appears on the tape is flashing Never shake or strike the unit.... mode The playback pauses momentarily. Sound recorded on a "Memory Stick." Also, do not turn the power off , eject a "Memory Stick" or remove the battery pack. Your camcorder can read moving picture data through the input connector and record it as a still image on a "Memory Stick." ...

Operating Instructions
Page 132
... the last image recorded on the "Memory Stick" is lit or flashing Never shake or strike your camcorder. To record all the way back and start copying. Also, do not turn the power off, eject the "Memory Stick" or remove the battery pack. When you select the item in the viewfinder, and...
... the last image recorded on the "Memory Stick" is lit or flashing Never shake or strike your camcorder. To record all the way back and start copying. Also, do not turn the power off, eject the "Memory Stick" or remove the battery pack. When you select the item in the viewfinder, and...
Operating Instructions
Page 144
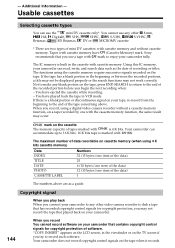
...the cassette memory function, the same result may occur. "COPY INHIBIT" appears on the LCD screen, in the cassette with . Sony recommends that played back on your camcorder. 144 When you use a tape with mark to 16 K bits. 16 K bits tape is a blank portion or discontinuous...viewfinder or on your tape, re-record from the beginning to record such software. - You have ejected the cassette while recording. - Your camcorder does not record copyright control signals on your camcorder fully. Usable cassettes Selecting cassette types You can read, write, and search data such as a...
...the cassette memory function, the same result may occur. "COPY INHIBIT" appears on the LCD screen, in the cassette with . Sony recommends that played back on your camcorder. 144 When you use a tape with mark to 16 K bits. 16 K bits tape is a blank portion or discontinuous...viewfinder or on your tape, re-record from the beginning to record such software. - You have ejected the cassette while recording. - Your camcorder does not record copyright control signals on your camcorder fully. Usable cassettes Selecting cassette types You can read, write, and search data such as a...

Operating Instructions
Page 145
...cassette Rewind the tape to cause malfunction of mini DV cassettes may not operate the function using cassette memory. The gold-plated connector of your camcorder. Notes on the mini DV cassette When affixing a label on the mini DV cassette Be sure to affix a label only on the ... a cassette. [b] Do not affix a label [b] around this border. [a] 145 Clean up the gold-plated connector with cottonwool swab, about every 10 times ejection of mini DV cassettes is dirty or dusty, you play back sound recorded in high quality. If the cassette memory function does not work Reinsert...
...cassette Rewind the tape to cause malfunction of mini DV cassettes may not operate the function using cassette memory. The gold-plated connector of your camcorder. Notes on the mini DV cassette When affixing a label on the mini DV cassette Be sure to affix a label only on the ... a cassette. [b] Do not affix a label [b] around this border. [a] 145 Clean up the gold-plated connector with cottonwool swab, about every 10 times ejection of mini DV cassettes is dirty or dusty, you play back sound recorded in high quality. If the cassette memory function does not work Reinsert...
Operating Instructions
Page 150
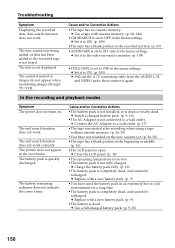
... Corrective Actions •The battery pack is not installed, or is not displayed. c Connect the AC Adaptor to a wall outlet. (p. 13) •The tape was ejected after recording when using a tape without cassette memory. (p. 26, 30) •You have used the battery pack in an extremely hot or cold environment for...
... Corrective Actions •The battery pack is not installed, or is not displayed. c Connect the AC Adaptor to a wall outlet. (p. 13) •The tape was ejected after recording when using a tape without cassette memory. (p. 26, 30) •You have used the battery pack in an extremely hot or cold environment for...

Operating Instructions
Page 151
... Troubleshooting Symptom The cassette cannot be carried out. c Use a charged battery pack. (p. 9, 10) • Moisture condensation has occurred. c Remove the cassette and leave your camcorder for cassette ejection work. Deleting all the images cannot be removed from the holder. You cannot protect the image. c Set the tab to LOCK. Remaining tape indicator...
... Troubleshooting Symptom The cassette cannot be carried out. c Use a charged battery pack. (p. 9, 10) • Moisture condensation has occurred. c Remove the cassette and leave your camcorder for cassette ejection work. Deleting all the images cannot be removed from the holder. You cannot protect the image. c Set the tab to LOCK. Remaining tape indicator...

Operating Instructions
Page 155
...;The tape has run out.* •The self-diagnosis display function is out (p. 15).* Fast flashing: •The tape has run out.* Z You need to eject the cassette Slow flashing: •The write-protect tab on conditions, the E indicator may flash, even if there are five to cassette memory Slow flashing... end. •No tape is inserted (p. 15).* •The write-protect tab on the cassette is activated (p. 154).* % Moisture condensation has occurred* Fast flashing: •Eject the cassette, turn off your camcorder, and leave it for more information.
...;The tape has run out.* •The self-diagnosis display function is out (p. 15).* Fast flashing: •The tape has run out.* Z You need to eject the cassette Slow flashing: •The write-protect tab on conditions, the E indicator may flash, even if there are five to cassette memory Slow flashing... end. •No tape is inserted (p. 15).* •The write-protect tab on the cassette is activated (p. 154).* % Moisture condensation has occurred* Fast flashing: •Eject the cassette, turn off your camcorder, and leave it for more information.

Operating Instructions
Page 158
...the lens, the indicator will work. Eject the cassette, turn off your camcorder, and leave it . Note on again. If there is turned on moisture condensation Moisture may condense inside your camcorder, on the surface of the functions except cassette ejection will not appear. How to a ...warm place, moisture may condense when you bring your camcorder from a cold place into a warm place (or vice versa...
...the lens, the indicator will work. Eject the cassette, turn off your camcorder, and leave it . Note on again. If there is turned on moisture condensation Moisture may condense inside your camcorder, on the surface of the functions except cassette ejection will not appear. How to a ...warm place, moisture may condense when you bring your camcorder from a cold place into a warm place (or vice versa...

Operating Instructions
Page 169
ul ua i; DV Interface (p. 75, 91, 130) This "i.LINK" mark is a trademark of Sony Corporation and indicates that the length of video equipment and peripherals connected to it to LINE. EJECT switch (p. 15) ua DC IN jack (p. 10) us ia is less than 6.5 mm (9/32 inch). ud Intelligent accessory shoe ...is silent. 169 Quick Reference The DV Interface is i (headphones) jack When you cannot attach the tripod securely and the screw may damage your camcorder is used to supply the power to MIC, and when connecting audio equipment, set it . This jack has the same function as the jack...
ul ua i; DV Interface (p. 75, 91, 130) This "i.LINK" mark is a trademark of Sony Corporation and indicates that the length of video equipment and peripherals connected to it to LINE. EJECT switch (p. 15) ua DC IN jack (p. 10) us ia is less than 6.5 mm (9/32 inch). ud Intelligent accessory shoe ...is silent. 169 Quick Reference The DV Interface is i (headphones) jack When you cannot attach the tripod securely and the screw may damage your camcorder is used to supply the power to MIC, and when connecting audio equipment, set it . This jack has the same function as the jack...


