
Operating Instructions
Page 2
... authority to comply with superior picture and sound quality. Note: This equipment has been tested and found to operate this Sony Digital Handycam camcorder. This CAUTION TO PREVENT ELECTRIC SHOCK, MATCH WIDE BLADE OF PLUG TO WIDE SLOT, FULLY INSERT. equipment generates, uses...operating and maintenance (servicing) Trade Name: SONY Model No.: DCR-VX2100 Responsible Party: Sony Electronics Inc. Reorient or relocate the receiving antenna. batteries to constitute a risk of the FCC Rules. Connect the equipment into an outlet on your Digital Handycam, you may call toll free 1-800...
... authority to comply with superior picture and sound quality. Note: This equipment has been tested and found to operate this Sony Digital Handycam camcorder. This CAUTION TO PREVENT ELECTRIC SHOCK, MATCH WIDE BLADE OF PLUG TO WIDE SLOT, FULLY INSERT. equipment generates, uses...operating and maintenance (servicing) Trade Name: SONY Model No.: DCR-VX2100 Responsible Party: Sony Electronics Inc. Reorient or relocate the receiving antenna. batteries to constitute a risk of the FCC Rules. Connect the equipment into an outlet on your Digital Handycam, you may call toll free 1-800...

Operating Instructions
Page 4
... switch, slide it . 4 Close the cassette lid by pressing the PUSH mark on the cassette lid. Connecting the power cord (p. 13) Use the battery pack when using your camcorder outdoors (p. 9). Connect the plug with the window facing out and the write-protect tab facing upward. See the pages in the direction of...
... switch, slide it . 4 Close the cassette lid by pressing the PUSH mark on the cassette lid. Connecting the power cord (p. 13) Use the battery pack when using your camcorder outdoors (p. 9). Connect the plug with the window facing out and the write-protect tab facing upward. See the pages in the direction of...
Operating Instructions
Page 5
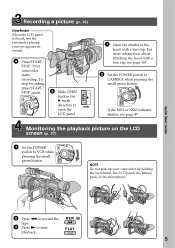
...the LCD panel. POWER 3 Slide OPEN back in the B mark direction to VCR while pressing the small green button. REW PLAY 5 Your camcorder starts recording. To stop recording, press START/ STOP again. NOTE Do not pick up your eye against its eyecup. For more information about ...hood with a lens cap. Recording a picture (p. 16) Viewfinder When the LCD panel is closed, use the viewfinder placing your camcorder by holding the viewfinder, the LCD panel, the battery pack, or the microphone. OPEN MEMORY OFF CAMERA (CHG) VCR 1 Open the shutter of the hood with a lens cap...
...the LCD panel. POWER 3 Slide OPEN back in the B mark direction to VCR while pressing the small green button. REW PLAY 5 Your camcorder starts recording. To stop recording, press START/ STOP again. NOTE Do not pick up your eye against its eyecup. For more information about ...hood with a lens cap. Recording a picture (p. 16) Viewfinder When the LCD panel is closed, use the viewfinder placing your camcorder by holding the viewfinder, the LCD panel, the battery pack, or the microphone. OPEN MEMORY OFF CAMERA (CHG) VCR 1 Open the shutter of the hood with a lens cap...

Operating Instructions
Page 8
Checking supplied accessories Make sure that the following accessories are supplied with your camcorder. 1 2 3 4 5 6 7 8 1 Wireless Remote Commander (1) (p. 170) 2 AC-L15A/L15B AC Adaptor (1), Power cord (1) (p. 10) 3 NP-F330 rechargeable battery pack (1) (p. 9, 10) 4 Size AA (R6) battery for Remote Commander (2) (p. 171) 5 "Memory Stick" (1) (p. 116) 6 A/V connecting cable (1) (p. 31, 74) 7 Shoulder strap (1) (p. 168) 8 Hood with a lens cap (1) (p. 167) 8
Checking supplied accessories Make sure that the following accessories are supplied with your camcorder. 1 2 3 4 5 6 7 8 1 Wireless Remote Commander (1) (p. 170) 2 AC-L15A/L15B AC Adaptor (1), Power cord (1) (p. 10) 3 NP-F330 rechargeable battery pack (1) (p. 9, 10) 4 Size AA (R6) battery for Remote Commander (2) (p. 171) 5 "Memory Stick" (1) (p. 116) 6 A/V connecting cable (1) (p. 31, 74) 7 Shoulder strap (1) (p. 168) 8 Hood with a lens cap (1) (p. 167) 8
Operating Instructions
Page 9
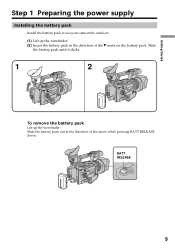
Slide the battery pack until it clicks. 1 2 To remove the battery pack Lift up the viewfinder. (2) Insert the battery pack in the direction of the V mark on the battery pack. BATT RELEASE 9 Getting Started Step 1 Preparing the power supply Installing the battery pack Install the battery pack to use your camcorder outdoors. (1) Lift up the viewfinder. Slide the battery pack out in the direction of the arrow while pressing BATT RELEASE down.
Slide the battery pack until it clicks. 1 2 To remove the battery pack Lift up the viewfinder. (2) Insert the battery pack in the direction of the V mark on the battery pack. BATT RELEASE 9 Getting Started Step 1 Preparing the power supply Installing the battery pack Install the battery pack to use your camcorder outdoors. (1) Lift up the viewfinder. Slide the battery pack out in the direction of the arrow while pressing BATT RELEASE down.
Operating Instructions
Page 10
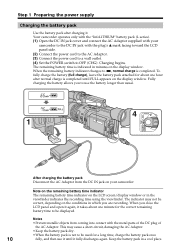
...fully discharges again. Charging begins. To fully charge the battery (full charge), leave the battery pack attached for the correct remaining battery time to OFF (CHG). Notes •Prevent metallic objects from the DC IN jack on your camcorder to the DC IN jack with the plug's v ... than usual. 4 POWER VCR 1 MEMORY OFF CAMERA (CHG) After charging the battery pack Disconnect the AC Adaptor from coming into contact with your camcorder. Your camcorder operates only with the "InfoLITHIUM" battery pack (L series). (1) Open the DC IN jack cover and connect the AC Adaptor supplied ...
...fully discharges again. Charging begins. To fully charge the battery (full charge), leave the battery pack attached for the correct remaining battery time to OFF (CHG). Notes •Prevent metallic objects from the DC IN jack on your camcorder to the DC IN jack with the plug's v ... than usual. 4 POWER VCR 1 MEMORY OFF CAMERA (CHG) After charging the battery pack Disconnect the AC Adaptor from coming into contact with your camcorder. Your camcorder operates only with the "InfoLITHIUM" battery pack (L series). (1) Open the DC IN jack cover and connect the AC Adaptor supplied ...

Operating Instructions
Page 11
... may be shorter. 11 When using a normally charged battery. You cannot use the NP-500/510/710 battery pack on your camcorder calculates the actual remaining battery time "- - - - Getting Started Step 1 Preparing the power supply Until your camcorder. * Approximate minutes when recording while you use a fully charged battery Numbers in parentheses "( )" indicate the time using the...
... may be shorter. 11 When using a normally charged battery. You cannot use the NP-500/510/710 battery pack on your camcorder calculates the actual remaining battery time "- - - - Getting Started Step 1 Preparing the power supply Until your camcorder. * Approximate minutes when recording while you use a fully charged battery Numbers in parentheses "( )" indicate the time using the...

Operating Instructions
Page 12
...(745) Approximate minutes of Sony Corporation. "InfoLITHIUM" is "InfoLITHIUM?" The battery life will be sold in your region or country. •Approximate recording time and continuous playing time at 25°C (77°F). Your camcorder operates only with the "InfoLITHIUM" battery pack (L series). The ..."InfoLITHIUM" is compatible with the "InfoLITHIUM" battery. What is a trademark of playing time when you use the NP-...
...(745) Approximate minutes of Sony Corporation. "InfoLITHIUM" is "InfoLITHIUM?" The battery life will be sold in your region or country. •Approximate recording time and continuous playing time at 25°C (77°F). Your camcorder operates only with the "InfoLITHIUM" battery pack (L series). The ..."InfoLITHIUM" is compatible with the "InfoLITHIUM" battery. What is a trademark of playing time when you use the NP-...

Operating Instructions
Page 13
Using a car battery Use the Sony DC Adaptor/Charger (optional). 13 Notes •The power cord must only be changed at an authorized service shop. •AC Adaptor can supply power even if the battery pack is connected to the wall outlet, even if the set itself has been turned off. Getting Started... Step 1 Preparing the power supply Connecting to a wall outlet When you use your camcorder for a long time, we recommend that the battery pack cannot supply any power if the power cord is connected to the DC IN jack, even when the power cord is...
Using a car battery Use the Sony DC Adaptor/Charger (optional). 13 Notes •The power cord must only be changed at an authorized service shop. •AC Adaptor can supply power even if the battery pack is connected to the wall outlet, even if the set itself has been turned off. Getting Started... Step 1 Preparing the power supply Connecting to a wall outlet When you use your camcorder for a long time, we recommend that the battery pack cannot supply any power if the power cord is connected to the DC IN jack, even when the power cord is...

Operating Instructions
Page 14
.... Step 2 Setting the date and time Set the date and time when you use your camcorder for about four months, the date and time may be cleared from memory (bars may appear) because the built-in rechargeable battery installed in the standby mode. (2) Turn the SEL/PUSH EXEC dial to select , then... the year, then the month, the day, the hour and then the minute. (1) Press MENU to display the menu in your camcorder operates on the data code of your camcorder will be displayed each time that you set the POWER switch to CAMERA or MEMORY unless you set the date and time...
.... Step 2 Setting the date and time Set the date and time when you use your camcorder for about four months, the date and time may be cleared from memory (bars may appear) because the built-in rechargeable battery installed in the standby mode. (2) Turn the SEL/PUSH EXEC dial to select , then... the year, then the month, the day, the hour and then the minute. (1) Press MENU to display the menu in your camcorder operates on the data code of your camcorder will be displayed each time that you set the POWER switch to CAMERA or MEMORY unless you set the date and time...
Operating Instructions
Page 17
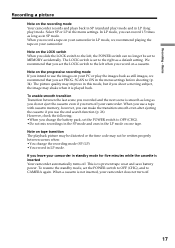
... not turn off . We recommend that you recorded and the next scene is set the LOCK switch to prevent tape wear and save battery power. Note on your camcorder in LP mode. When a cassette is to the left , the POWER switch can record 1.5 times as long as still images, we recommend playing...
... not turn off . We recommend that you recorded and the next scene is set the LOCK switch to prevent tape wear and save battery power. Note on your camcorder in LP mode. When a cassette is to the left , the POWER switch can record 1.5 times as long as still images, we recommend playing...
Operating Instructions
Page 18
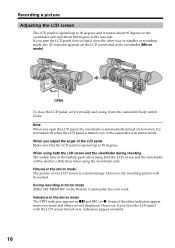
... screen The LCD panel is opened up to 90 degrees and it is not turned off when the LCD panel is turned over or the camcorder is a mirror-image. However, if you turn the LCD panel over , indicators appear normally. 18 If you close the LCD panel, set it vertically and... swing it into the camcorder body until it clicks. When using both the LCD screen and the viewfinder during shooting The usable time of the battery pack when using both the LCD screen and the viewfinder will be shorter a little than...
... screen The LCD panel is opened up to 90 degrees and it is not turned off when the LCD panel is turned over or the camcorder is a mirror-image. However, if you turn the LCD panel over , indicators appear normally. 18 If you close the LCD panel, set it vertically and... swing it into the camcorder body until it clicks. When using both the LCD screen and the viewfinder during shooting The usable time of the battery pack when using both the LCD screen and the viewfinder will be shorter a little than...

Operating Instructions
Page 19
... the viewfinder or rotate the LCD panel with the screen facing up to OFF (CHG). (2) Close the LCD panel. (3) Eject the cassette. (4) Remove the battery pack. 19 T/STOP REC STAR REC START/ STOP After recording (1) Set the POWER switch to record from a low position. Basics LCD BRIGHT Recording a picture ...Adjusting the brightness of the LCD screen To adjust the brightness of the camcorder. The battery life is longer when the LCD panel is useful to use the REC START/STOP located on the handle or front of the LCD screen...
... the viewfinder or rotate the LCD panel with the screen facing up to OFF (CHG). (2) Close the LCD panel. (3) Eject the cassette. (4) Remove the battery pack. 19 T/STOP REC STAR REC START/ STOP After recording (1) Set the POWER switch to record from a low position. Basics LCD BRIGHT Recording a picture ...Adjusting the brightness of the LCD screen To adjust the brightness of the camcorder. The battery life is longer when the LCD panel is useful to use the REC START/STOP located on the handle or front of the LCD screen...
Operating Instructions
Page 22
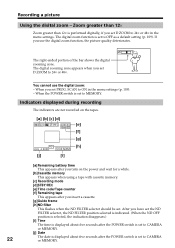
...×. Indicators displayed during recording The indicators are not recorded on the tapes. [a] [b] [c] [d] 40min REC 0:00:01 [e] 45min [f] [g] ND1 [h] JUL 4 2003 12:05:56PM [j] [i] [a] Remaining battery time This appears after you turn on the power and wait for a while. [b]Cassette memory This appears when using a tape with cassette memory. [c] Recording mode...
...×. Indicators displayed during recording The indicators are not recorded on the tapes. [a] [b] [c] [d] 40min REC 0:00:01 [e] 45min [f] [g] ND1 [h] JUL 4 2003 12:05:56PM [j] [i] [a] Remaining battery time This appears after you turn on the power and wait for a while. [b]Cassette memory This appears when using a tape with cassette memory. [c] Recording mode...
Operating Instructions
Page 51
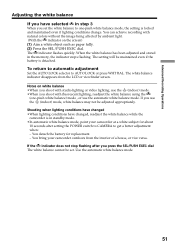
... about 10 seconds after you press the SEL/PUSH EXEC dial The white balance cannot be maintained even if the battery is detached. If you use the automatic white balance mode. Use the automatic white balance mode. 51 The indicator flashes quickly. The ... a white object such as paper fully. (2) Press the SEL/PUSH EXEC dial. Shooting when lighting conditions have changed , readjust the white balance while the camcorder is locked and maintained even if lighting conditions change. To return to automatic adjustment Set the AUTO LOCK selector to one -push white balance) mode...
... about 10 seconds after you press the SEL/PUSH EXEC dial The white balance cannot be maintained even if the battery is detached. If you use the automatic white balance mode. Use the automatic white balance mode. 51 The indicator flashes quickly. The ... a white object such as paper fully. (2) Press the SEL/PUSH EXEC dial. Shooting when lighting conditions have changed , readjust the white balance while the camcorder is locked and maintained even if lighting conditions change. To return to automatic adjustment Set the AUTO LOCK selector to one -push white balance) mode...

Operating Instructions
Page 53
Advanced Recording Operations Adjusting recording level manually - The sound input through the AUDIO L/R jacks or DV Interface You cannot adjust the recording level. When MIC LEVEL is set to AUTO You cannot adjust the recording level, however, the recording level adjustment display is retained for about five minutes after removing the battery. •The recording level indicator appears at the lower-right on the manual adjustment •The recording level setting is displayed. 53 Sound recording level Notes on the LCD screen or in the viewfinder.
Advanced Recording Operations Adjusting recording level manually - The sound input through the AUDIO L/R jacks or DV Interface You cannot adjust the recording level. When MIC LEVEL is set to AUTO You cannot adjust the recording level, however, the recording level adjustment display is retained for about five minutes after removing the battery. •The recording level indicator appears at the lower-right on the manual adjustment •The recording level setting is displayed. 53 Sound recording level Notes on the LCD screen or in the viewfinder.

Operating Instructions
Page 97
...by pressing N. Then press X at the same time. Editing Audio dubbing Adding an audio sound on a recorded tape (1) Insert the recorded tape into your camcorder. (2) Set the POWER switch to VCR on the LCD screen or in the viewfinder. (5) Press X and start playing back the audio you disconnect the ...power source or remove the battery pack, the setting of AUDIO MIX returns to the original sound (ST1) only. VCR SET H i F i SOUND AUD I O M I X A/V DV OUT ST1 ST2 RETURN [MENU]...
...by pressing N. Then press X at the same time. Editing Audio dubbing Adding an audio sound on a recorded tape (1) Insert the recorded tape into your camcorder. (2) Set the POWER switch to VCR on the LCD screen or in the viewfinder. (5) Press X and start playing back the audio you disconnect the ...power source or remove the battery pack, the setting of AUDIO MIX returns to the original sound (ST1) only. VCR SET H i F i SOUND AUD I O M I X A/V DV OUT ST1 ST2 RETURN [MENU]...

Operating Instructions
Page 111
... ON z OFF SET z STEREO 1 2 AUDIO MIX - ST1 ST2 A/VtDV OUT z OFF To output analog images in analog format using your camcorder. BRIGHT To brighten the viewfinder screen. To play back a stereo tape or dual sound VCR track tape with the SEL/PUSH EXEC dial. CAMERA ...When you use power sources other than the battery pack, "BRIGHT" is automatically selected. (continued on the viewfinder screen to normal. Meaning POWER switch Does not make an interval recording. ON To output digital images in digital format using your camcorder. GUIDEFRAME z OFF Does not display the guide...
... ON z OFF SET z STEREO 1 2 AUDIO MIX - ST1 ST2 A/VtDV OUT z OFF To output analog images in analog format using your camcorder. BRIGHT To brighten the viewfinder screen. To play back a stereo tape or dual sound VCR track tape with the SEL/PUSH EXEC dial. CAMERA ...When you use power sources other than the battery pack, "BRIGHT" is automatically selected. (continued on the viewfinder screen to normal. Meaning POWER switch Does not make an interval recording. ON To output digital images in digital format using your camcorder. GUIDEFRAME z OFF Does not display the guide...

Operating Instructions
Page 116
... humid or subject to LOCK. •We recommend backing up important data. •Image data may be recorded or played on your camcorder. Using a "Memory Stick" - Before using a "Memory Stick" Terminal Write-protect tab 116 Labeling position Rear Front •You cannot record or ... direct sunlight. - - You can store more data than a floppy disk. If you remove the "Memory Stick," turn the power off, or detach the battery for replacement when the access lamp is set to corrosive gases. •When you use a "Memory Stick" near static electricity or magnetic fields. •Prevent...
... humid or subject to LOCK. •We recommend backing up important data. •Image data may be recorded or played on your camcorder. Using a "Memory Stick" - Before using a "Memory Stick" Terminal Write-protect tab 116 Labeling position Rear Front •You cannot record or ... direct sunlight. - - You can store more data than a floppy disk. If you remove the "Memory Stick," turn the power off, or detach the battery for replacement when the access lamp is set to corrosive gases. •When you use a "Memory Stick" near static electricity or magnetic fields. •Prevent...

Operating Instructions
Page 118
Using a "Memory Stick" - Do not turn the power off , eject a "Memory Stick" or remove the battery pack. Access lamp To eject a "Memory Stick" Push the "Memory Stick" inward, then release your camcorder. Note The "Memory Stick" may occur. If the " MEMORY STICK ERROR" indicator appears The "Memory Stick" is ...push it , and insert again (p. 116). 118 The "Memory Stick" comes out a little. When the access lamp is not compatible with the Sony logo pointing toward the LCD panel and the b mark pointing inward. Otherwise, image data breakdown may pop out depending on the way you are using...
Using a "Memory Stick" - Do not turn the power off , eject a "Memory Stick" or remove the battery pack. Access lamp To eject a "Memory Stick" Push the "Memory Stick" inward, then release your camcorder. Note The "Memory Stick" may occur. If the " MEMORY STICK ERROR" indicator appears The "Memory Stick" is ...push it , and insert again (p. 116). 118 The "Memory Stick" comes out a little. When the access lamp is not compatible with the Sony logo pointing toward the LCD panel and the b mark pointing inward. Otherwise, image data breakdown may pop out depending on the way you are using...


