PIXELA ImageMixer 1.0 Manual
Page 22
...Capture Environment Capture window Capture Tasks Import file mode display Importing files Digital Camera Import Mode Digital camera import display Importing files from a digital camera Audio CD Recording Mode Control panel Caution Recording music files ...Troubleshooting Sound Recording Mode Control panel Recording sound files Recording sound files while previewing movie images Troubleshooting USB Device Capture Mode (Win) Control panel Connection status Capturing movie scenes Capturing still pictures DV Camcorder...
...Capture Environment Capture window Capture Tasks Import file mode display Importing files Digital Camera Import Mode Digital camera import display Importing files from a digital camera Audio CD Recording Mode Control panel Caution Recording music files ...Troubleshooting Sound Recording Mode Control panel Recording sound files Recording sound files while previewing movie images Troubleshooting USB Device Capture Mode (Win) Control panel Connection status Capturing movie scenes Capturing still pictures DV Camcorder...
PIXELA ImageMixer 1.0 Manual
Page 23
CD Recording Mode button Click to start digital camera import mode. Digital Camera Import Mode button Click to start sound recording mode. USB Device Capture Mode button Click to start USB device capture mode. (Windows only) DV Camcorder Click to start CD recording mode. Sound ...Recording Mode button Click to start import file mode. All rights reserved. Import File Mode button Click to start DV camcorder capture mode. (Windows Capture Mode button only) Copyright © 2001 PIXELA Corp. Thumbnail list window Depending on the capture mode ...
CD Recording Mode button Click to start digital camera import mode. Digital Camera Import Mode button Click to start sound recording mode. USB Device Capture Mode button Click to start USB device capture mode. (Windows only) DV Camcorder Click to start CD recording mode. Sound ...Recording Mode button Click to start import file mode. All rights reserved. Import File Mode button Click to start DV camcorder capture mode. (Windows Capture Mode button only) Copyright © 2001 PIXELA Corp. Thumbnail list window Depending on the capture mode ...
PIXELA ImageMixer 1.0 Manual
Page 52
Monitor window Displays the movie directly from a digital video camera connected to the IEEE1394 port of your PC. Control panel From the control panel, you to capture both still pictures and movie scenes a digital video cameras connected to your computer. 2-7-1 DV Camcorder Capture Mode (Windows Only) ImageMixer enables you can play or record media from the digital video camera.
Monitor window Displays the movie directly from a digital video camera connected to the IEEE1394 port of your PC. Control panel From the control panel, you to capture both still pictures and movie scenes a digital video cameras connected to your computer. 2-7-1 DV Camcorder Capture Mode (Windows Only) ImageMixer enables you can play or record media from the digital video camera.
PIXELA ImageMixer 1.0 Manual
Page 55
2-7-2 DV Camcorder Capture Mode (Windows Only) Changing the display size When capturing files from a digital video camera (DV camcorder), there are two monitor sizes from which to Connection status button or the [large monitor] button to choose: small monitor and large monitor. Click the [small monitor] change the monitor size.
2-7-2 DV Camcorder Capture Mode (Windows Only) Changing the display size When capturing files from a digital video camera (DV camcorder), there are two monitor sizes from which to Connection status button or the [large monitor] button to choose: small monitor and large monitor. Click the [small monitor] change the monitor size.
PIXELA ImageMixer 1.0 Manual
Page 56
...the connection between the PC and the device is working properly: A blue monitor window is a problem with the connection between the PC & the digital video camera, try clicking the [refresh connection] button. DV cassette indication When a DV cassette is inactive (appears gray). If there is displayed.... panel will read 'There is ... When a cassette is not present, the icon is present in the information display panel will say "Camcorder Not Found." Copyright © 2001 PIXELA Corp. Depending on the tape inside the machine. That is not set it to capture still picture...
...the connection between the PC and the device is working properly: A blue monitor window is a problem with the connection between the PC & the digital video camera, try clicking the [refresh connection] button. DV cassette indication When a DV cassette is inactive (appears gray). If there is displayed.... panel will read 'There is ... When a cassette is not present, the icon is present in the information display panel will say "Camcorder Not Found." Copyright © 2001 PIXELA Corp. Depending on the tape inside the machine. That is not set it to capture still picture...
PIXELA ImageMixer 1.0 Manual
Page 57
..., the movie file will be shown. To prevent frame jumping on low-spec machines, it may be impossible to save the captured movie file. 2. 2-7-3 DV Camcorder Capture Mode (Windows Only) Capturing movie scenes Follow the steps below will be automatically added to the album designated in step 1. Select an album. This...
..., the movie file will be shown. To prevent frame jumping on low-spec machines, it may be impossible to save the captured movie file. 2. 2-7-3 DV Camcorder Capture Mode (Windows Only) Capturing movie scenes Follow the steps below will be automatically added to the album designated in step 1. Select an album. This...
PIXELA ImageMixer 1.0 Manual
Page 61
This function is MPEG1. Movie capture settings Here you can effectively "set preferences related to the USB device capture mode or the DV camcorder capture mode, both of storage space. q Minimum amount of free disk space If you can set aside" a minimum amount of free disk space by selecting a ...
This function is MPEG1. Movie capture settings Here you can effectively "set preferences related to the USB device capture mode or the DV camcorder capture mode, both of storage space. q Minimum amount of free disk space If you can set aside" a minimum amount of free disk space by selecting a ...

Operating Instructions (primary manual)
Page 4
...Viewing images recorded on "Memory Stick"s using the USB cable (except DCR-TRV240) (p. 155) •Viewing images recorded on a tape using the USB cable (p. 94) •Viewing images live on your computer from your camcorder using the USB cable (p. 103) •Capturing images from an...8226;Adjusting the exposure manually (p. 53) Functions for giving images more impact •Digital zoom [MENU] (p. 24) The default setting is OFF. (To zoom greater than 25×, (DCR-TRV240/TRV340)/15× (DCR-TRV740/TRV840), select the digital zoom power in D ZOOM in the menu settings.) •Fader (p. 44) ...
...Viewing images recorded on "Memory Stick"s using the USB cable (except DCR-TRV240) (p. 155) •Viewing images recorded on a tape using the USB cable (p. 94) •Viewing images live on your computer from your camcorder using the USB cable (p. 103) •Capturing images from an...8226;Adjusting the exposure manually (p. 53) Functions for giving images more impact •Digital zoom [MENU] (p. 24) The default setting is OFF. (To zoom greater than 25×, (DCR-TRV240/TRV340)/15× (DCR-TRV740/TRV840), select the digital zoom power in D ZOOM in the menu settings.) •Fader (p. 44) ...
Operating Instructions (primary manual)
Page 5
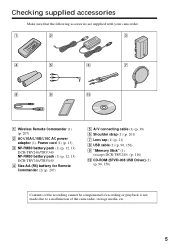
... accessories Make sure that the following accessories are supplied with your camcorder. 1 2 3 4 5 6 7 8 9 0 1 Wireless Remote Commander (1) (p. 207) 2 AC-L10A/L10B/L10C AC power adaptor (1), Power cord (1) (p. 13) 3 NP-FM30 battery pack (1) (p. 12, 13) DCR-TRV240/TRV340 NP-FM50 battery pack (1) (p. 12, 13) DCR-TRV740/TRV840 4 Size AA (R6) battery for Remote Commander (2) (p. 207) 5 A/V connecting cable...
... accessories Make sure that the following accessories are supplied with your camcorder. 1 2 3 4 5 6 7 8 9 0 1 Wireless Remote Commander (1) (p. 207) 2 AC-L10A/L10B/L10C AC power adaptor (1), Power cord (1) (p. 13) 3 NP-FM30 battery pack (1) (p. 12, 13) DCR-TRV240/TRV340 NP-FM50 battery pack (1) (p. 12, 13) DCR-TRV740/TRV840 4 Size AA (R6) battery for Remote Commander (2) (p. 207) 5 A/V connecting cable...
Operating Instructions (primary manual)
Page 6
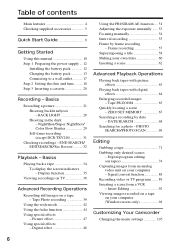
NightShot/Super NightShot/ Color Slow Shutter 29 Self-timer recording (except DCR-TRV240 31 Checking recordings - BACK LIGHT 28 Shooting in the dark - Digital program editing (on tapes 74 Capturing images from a VCR - Table of contents Main features 4 Checking supplied ... tape 71 Dubbing only desired scenes - Frame recording 57 Superimposing a title 58 Making your computer (Windows users only 94 Customizing Your Camcorder Changing the menu settings 105 6 Signal convert function 88 Recording video or TV programs ....... 89 Inserting a scene from an analog video...
NightShot/Super NightShot/ Color Slow Shutter 29 Self-timer recording (except DCR-TRV240 31 Checking recordings - BACK LIGHT 28 Shooting in the dark - Digital program editing (on tapes 74 Capturing images from a VCR - Table of contents Main features 4 Checking supplied ... tape 71 Dubbing only desired scenes - Frame recording 57 Superimposing a title 58 Making your computer (Windows users only 94 Customizing Your Camcorder Changing the menu settings 105 6 Signal convert function 88 Recording video or TV programs ....... 89 Inserting a scene from an analog video...
Operating Instructions (primary manual)
Page 7
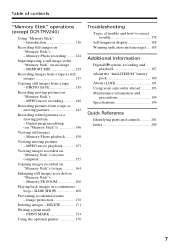
... .......... 150 Viewing moving pictures on "Memory Stick"s - Digital program editing (on an image - MPEG movie playback 153 Viewing images recorded on "Memory Stick"s on your camcorder abroad .......... 193 Maintenance information and precautions 194 Specifications 199... Quick Reference Identifying parts and controls 201 Index 209 7 DELETE 171 Writing a print mark - PRINT MARK 174 Using the optional printer 176 Troubleshooting Types of contents "Memory Stick" operations (except DCR...
... .......... 150 Viewing moving pictures on "Memory Stick"s - Digital program editing (on an image - MPEG movie playback 153 Viewing images recorded on "Memory Stick"s on your camcorder abroad .......... 193 Maintenance information and precautions 194 Specifications 199... Quick Reference Identifying parts and controls 201 Index 209 7 DELETE 171 Writing a print mark - PRINT MARK 174 Using the optional printer 176 Troubleshooting Types of contents "Memory Stick" operations (except DCR...
Operating Instructions (primary manual)
Page 8
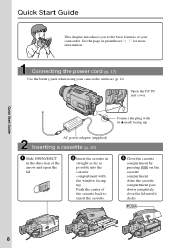
...on the cassette compartment. Connect the plug with the window facing up . Open the DC IN jack cover. Push the center of your camcorder outdoors (p. 12). After the cassette compartment goes down completely, close the lid until it clicks. See the page in straight as far ...into the cassette compartment with its v mark facing up . Quick Start Guide 8 Connecting the power cord (p. 17) Use the battery pack when using your camcorder. AC power adaptor (supplied) Inserting a cassette (p. 20) 1 Slide OPEN/EJECT in the direction of the arrow and open the lid. 2 Insert ...
...on the cassette compartment. Connect the plug with the window facing up . Open the DC IN jack cover. Push the center of your camcorder outdoors (p. 12). After the cassette compartment goes down completely, close the lid until it clicks. See the page in straight as far ...into the cassette compartment with its v mark facing up . Quick Start Guide 8 Connecting the power cord (p. 17) Use the battery pack when using your camcorder. AC power adaptor (supplied) Inserting a cassette (p. 20) 1 Slide OPEN/EJECT in the direction of the arrow and open the lid. 2 Insert ...
Operating Instructions (primary manual)
Page 9
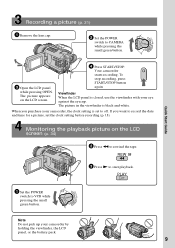
Your camcorder starts recording. Monitoring the playback picture on the LCD screen. 4 Press START/STOP. V POWER CAM M Note Do not pick up your eye against the eyecup. ... while pressing the small green button. Viewfinder When the LCD panel is closed, use the viewfinder with your camcorder by holding the viewfinder, the LCD panel, or the battery pack. 9 If you purchase your camcorder, the clock setting is black and white. The picture appears on the LCD screen (p. 34) 2 Press m to...
Your camcorder starts recording. Monitoring the playback picture on the LCD screen. 4 Press START/STOP. V POWER CAM M Note Do not pick up your eye against the eyecup. ... while pressing the small green button. Viewfinder When the LCD panel is closed, use the viewfinder with your camcorder by holding the viewfinder, the LCD panel, or the battery pack. 9 If you purchase your camcorder, the clock setting is black and white. The picture appears on the LCD screen (p. 34) 2 Press m to...
Operating Instructions (primary manual)
Page 10
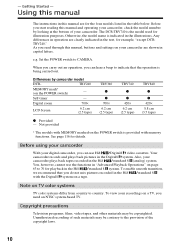
...recordings on the POWER switch) - Otherwise, the model name is the model used for details. To view your camcorder. Digital zoom 700× LCD Screen 6.2 cm (2.5 type) TRV340 z z 700× 6.2 cm (2.5 type) TRV740 z z 420× 6.2 cm (2.5 type) TRV840 z z 420× 8.8 cm (3.5 type) z Provided...on the POWER switch is being carried out. Note on your digital camcorder, you do not mix pictures recorded in the Digital8 system. Also, your camcorder, check the model number by camcorder model DCR- Any differences in operation are shown in the table below....
...recordings on the POWER switch) - Otherwise, the model name is the model used for details. To view your camcorder. Digital zoom 700× LCD Screen 6.2 cm (2.5 type) TRV340 z z 700× 6.2 cm (2.5 type) TRV740 z z 420× 6.2 cm (2.5 type) TRV840 z z 420× 8.8 cm (3.5 type) z Provided...on the POWER switch is being carried out. Note on your digital camcorder, you do not mix pictures recorded in the Digital8 system. Also, your camcorder, check the model number by camcorder model DCR- Any differences in operation are shown in the table below....
Operating Instructions (primary manual)
Page 11
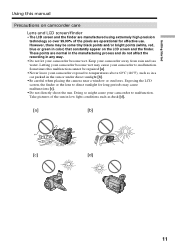
... this malfunction cannot be some tiny black points and/or bright points (white, red, blue or green in color) that constantly appear on camcorder care Lens and LCD screen/finder • The LCD screen and the finder are manufactured using extremely high-precision technology so over 99.99%... of the pixels are normal in the manufacturing process and do not affect the recording in any way. •Do not let your camcorder become wet may cause your camcorder to temperatures above 60°C (140°F), such as in a car parked in low light conditions such as dusk [d]. [a] [b] [c] [d] ...
... this malfunction cannot be some tiny black points and/or bright points (white, red, blue or green in color) that constantly appear on camcorder care Lens and LCD screen/finder • The LCD screen and the finder are manufactured using extremely high-precision technology so over 99.99%... of the pixels are normal in the manufacturing process and do not affect the recording in any way. •Do not let your camcorder become wet may cause your camcorder to temperatures above 60°C (140°F), such as in a car parked in low light conditions such as dusk [d]. [a] [b] [c] [d] ...
Operating Instructions (primary manual)
Page 12
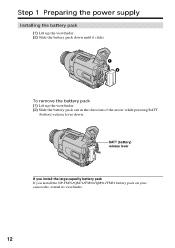
Step 1 Preparing the power supply Installing the battery pack (1) Lift up the viewfinder. (2) Slide the battery pack down until it clicks. 1 2 To remove the battery pack (1) Lift up the viewfinder. (2) Slide the battery pack out in the direction of the arrow while pressing BATT (battery) release lever down. BATT (battery) release lever If you install the large-capacity battery pack If you install the NP-FM70/QM71/FM90/QM91/FM91 battery pack on your camcorder, extend its viewfinder. 12
Step 1 Preparing the power supply Installing the battery pack (1) Lift up the viewfinder. (2) Slide the battery pack down until it clicks. 1 2 To remove the battery pack (1) Lift up the viewfinder. (2) Slide the battery pack out in the direction of the arrow while pressing BATT (battery) release lever down. BATT (battery) release lever If you install the large-capacity battery pack If you install the NP-FM70/QM71/FM90/QM91/FM91 battery pack on your camcorder, extend its viewfinder. 12
Operating Instructions (primary manual)
Page 13
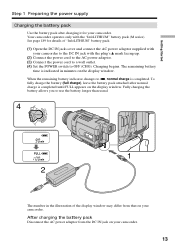
...Started OFCFR(CHG) E ERMAORY CAM M Step 1 Preparing the power supply Charging the battery pack Use the battery pack after normal charge is completed. Your camcorder operates only with the plug's v mark facing up. (2) Connect the power cord to the AC power adaptor. (3) Connect the power cord to a ...in the illustration of "InfoLITHIUM" battery pack. (1) Open the DC IN jack cover and connect the AC power adaptor supplied with your camcorder. After charging the battery pack Disconnect the AC power adaptor from that on the display window. Charging begins. To fully charge the battery...
...Started OFCFR(CHG) E ERMAORY CAM M Step 1 Preparing the power supply Charging the battery pack Use the battery pack after normal charge is completed. Your camcorder operates only with the plug's v mark facing up. (2) Connect the power cord to the AC power adaptor. (3) Connect the power cord to a ...in the illustration of "InfoLITHIUM" battery pack. (1) Open the DC IN jack cover and connect the AC power adaptor supplied with your camcorder. After charging the battery pack Disconnect the AC power adaptor from that on the display window. Charging begins. To fully charge the battery...
Operating Instructions (primary manual)
Page 14
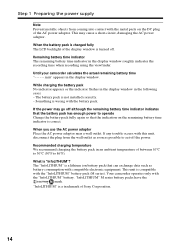
...window in the display window. When you use the AC power adaptor Place the AC power adaptor near a wall outlet. Your camcorder operates only with compatible electronic equipment. Recommended charging temperature We recommend charging the battery pack in the display window roughly indicates the recording... is wrong with the "InfoLITHIUM" battery pack (M series). Something is a lithium ion battery pack that the indication on the DC plug of Sony Corporation. 14 This unit is correct. min" appears in the following cases: - If any trouble occurs with this unit, disconnect the plug ...
...window in the display window. When you use the AC power adaptor Place the AC power adaptor near a wall outlet. Your camcorder operates only with compatible electronic equipment. Recommended charging temperature We recommend charging the battery pack in the display window roughly indicates the recording... is wrong with the "InfoLITHIUM" battery pack (M series). Something is a lithium ion battery pack that the indication on the DC plug of Sony Corporation. 14 This unit is correct. min" appears in the following cases: - If any trouble occurs with this unit, disconnect the plug ...
Operating Instructions (primary manual)
Page 16
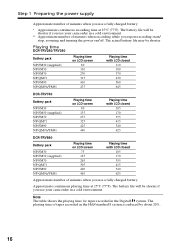
... 130 270 315 410 475 Playing time with LCD closed 110 180 370 430 560 645 DCR-TRV740 Battery pack NP-FM30 NP-FM50 (supplied) NP-FM70 NP-QM71 NP-FM90 NP-QM91/...8 system is reduced by about 20%.. 16 The battery life will be shorter if you use your camcorder in a cold environment. ** Approximate number of minutes when recording while you repeat recording start/ stop,... time of tapes recorded in the Digital8 system. The battery life will be shorter if you use your camcorder in a cold environment. Step 1 Preparing the power supply Approximate number of minutes when you use a fully...
... 130 270 315 410 475 Playing time with LCD closed 110 180 370 430 560 645 DCR-TRV740 Battery pack NP-FM30 NP-FM50 (supplied) NP-FM70 NP-QM71 NP-FM90 NP-QM91/...8 system is reduced by about 20%.. 16 The battery life will be shorter if you use your camcorder in a cold environment. ** Approximate number of minutes when recording while you repeat recording start/ stop,... time of tapes recorded in the Digital8 system. The battery life will be shorter if you use your camcorder in a cold environment. Step 1 Preparing the power supply Approximate number of minutes when you use a fully...
Operating Instructions (primary manual)
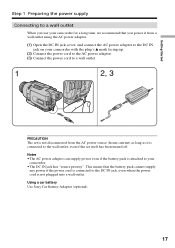
Page 17
Using a car battery Use Sony Car Battery Adaptor (optional). 17 Notes •The AC power adaptor can supply power even if the ...house current) as long as it is not plugged into a wall outlet. This means that you use your camcorder for a long time, we recommend that the battery pack cannot supply any power if the power cord is connected to your... camcorder with the plug's v mark facing up. (2) Connect the power cord to the AC power adaptor. (3) Connect the power cord to a ...
Using a car battery Use Sony Car Battery Adaptor (optional). 17 Notes •The AC power adaptor can supply power even if the ...house current) as long as it is not plugged into a wall outlet. This means that you use your camcorder for a long time, we recommend that the battery pack cannot supply any power if the power cord is connected to your... camcorder with the plug's v mark facing up. (2) Connect the power cord to the AC power adaptor. (3) Connect the power cord to a ...


