
Operating Instructions
Page 2
... that may be producing home video that any questions about this equipment. DISPOSAL OF LITHIUM ION BATTERY. DISPOSE OF PROPERLY. If you call : Sony Customer Information Center 1-800-222-SONY (7669) or write to : Sony Customer Information Center 1 Sony Drive, Mail Drop #T1-...two conditions.: (1) This device may not cause harmful interference, and (2) this Sony Digital Handycam camcorder. Your Digital Handycam is loaded with superior picture and sound quality. Welcome! Declaration of Conformity Trade Name: SONY Model No.: DCR-TRV720 Responsible Party: Sony Electronics lnc.
... that may be producing home video that any questions about this equipment. DISPOSAL OF LITHIUM ION BATTERY. DISPOSE OF PROPERLY. If you call : Sony Customer Information Center 1-800-222-SONY (7669) or write to : Sony Customer Information Center 1 Sony Drive, Mail Drop #T1-...two conditions.: (1) This device may not cause harmful interference, and (2) this Sony Digital Handycam camcorder. Your Digital Handycam is loaded with superior picture and sound quality. Welcome! Declaration of Conformity Trade Name: SONY Model No.: DCR-TRV720 Responsible Party: Sony Electronics lnc.
Operating Instructions
Page 4
...digital effects 51 Enlarging recorded images - Memory Photo recording 79 Advanced Recording Operations Recording a still image on "Memory Stick" - END SEARCH / EDITSEARCH / Rec Review 24 Advanced Playback Operations Playing back a tape with picture effects 50 Playing back a tape with analog video unit and PC - Signal convert function 60 Recording video... 8 Getting started Using this manual 9 Step 1 Preparing the power supply ... 11 Installing the battery pack 11 Charging the battery pack 12 Connecting to tapes 94 Enlarging still images recorded on "Memory Stick"s -
...digital effects 51 Enlarging recorded images - Memory Photo recording 79 Advanced Recording Operations Recording a still image on "Memory Stick" - END SEARCH / EDITSEARCH / Rec Review 24 Advanced Playback Operations Playing back a tape with picture effects 50 Playing back a tape with analog video unit and PC - Signal convert function 60 Recording video... 8 Getting started Using this manual 9 Step 1 Preparing the power supply ... 11 Installing the battery pack 11 Charging the battery pack 12 Connecting to tapes 94 Enlarging still images recorded on "Memory Stick"s -
Operating Instructions
Page 5
Introduction ....... 104 Making prints - Split printing 119 Additional Information Digital8 system, recording and playback 121 About i.LINK 123 Changing the lithium battery in your camcorder 125 Troubleshooting 127 Self-diagnosis display 133 Warning indicators and messages .... 134 Using ... of Microsoft Corporation, registered in this manual. 5 Table of split screens - Standard print ........ 112 Making prints of contents Printing operations (DCR-TRV820 only) Using the printer - Furthermore, "™" and "®" are not mentioned in each case in the United States and other...
Introduction ....... 104 Making prints - Split printing 119 Additional Information Digital8 system, recording and playback 121 About i.LINK 123 Changing the lithium battery in your camcorder 125 Troubleshooting 127 Self-diagnosis display 133 Warning indicators and messages .... 134 Using ... of Microsoft Corporation, registered in this manual. 5 Table of split screens - Standard print ........ 112 Making prints of contents Printing operations (DCR-TRV820 only) Using the printer - Furthermore, "™" and "®" are not mentioned in each case in the United States and other...
Operating Instructions
Page 6
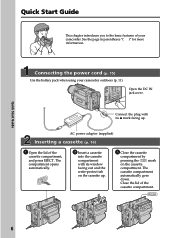
... the lid of the cassette compartment. The compartment opens automatically. See the page in parentheses "( )" for more information. Connecting the power cord (p. 15) Use the battery pack when using your camcorder. The cassette compartment automatically goes down.
... the lid of the cassette compartment. The compartment opens automatically. See the page in parentheses "( )" for more information. Connecting the power cord (p. 15) Use the battery pack when using your camcorder. The cassette compartment automatically goes down.
Operating Instructions
Page 7
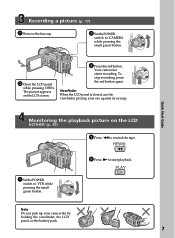
... Do not pick up your eye against its eyecup. VTR OFF (CHARGE) MEMORY CAMERA Recording a picture (p. 17) 1 Remove the lens cap. 2 SetthePOWER switch to VTR while pressing the small green button. To stop recording, press the red button again. OFF (CHARGE) VTR 3 Press N to rewind the tape. The ... Viewfinder When the LCD panel is closed, use the viewfinder placing your camcorder by holding the viewfinder, the LCD panel, or the battery pack. 7 VTR OFF (CHARGE) MEMORY CAMERA Quick Start Guide Monitoring the playback picture on the LCD screen. 4 Press the red button.
... Do not pick up your eye against its eyecup. VTR OFF (CHARGE) MEMORY CAMERA Recording a picture (p. 17) 1 Remove the lens cap. 2 SetthePOWER switch to VTR while pressing the small green button. To stop recording, press the red button again. OFF (CHARGE) VTR 3 Press N to rewind the tape. The ... Viewfinder When the LCD panel is closed, use the viewfinder placing your camcorder by holding the viewfinder, the LCD panel, or the battery pack. 7 VTR OFF (CHARGE) MEMORY CAMERA Quick Start Guide Monitoring the playback picture on the LCD screen. 4 Press the red button.

Operating Instructions
Page 8
... (1) (p. 151) 2 AC-L10A/L10B/L10C AC power adaptor (1), Power cord (1) (p. 12) 3 NP-F330 battery pack (1) (p. 11, 12) 4 CR2025 lithium battery (1) (p. 125) The lithium battery is already installed in your camcorder. 5 Size AA (R6) battery for Remote Commander (2) (p. 151) 6 A/V connecting cable (1) (p. 28) 7 Shoulder strap (1) (p. 147) 8...sheets × 1) Sticker type/Standard size (10 sheets × 1) Sticker type/9 split size (10 sheets × 1) DCR-TRV820 only qd Print cartridge (2) (p. 106) DCR-TRV820 only qf Head cleaner (1) (p. 139) DCR-TRV820 only qg Platen roller cleaner (1) (p. 140...
... (1) (p. 151) 2 AC-L10A/L10B/L10C AC power adaptor (1), Power cord (1) (p. 12) 3 NP-F330 battery pack (1) (p. 11, 12) 4 CR2025 lithium battery (1) (p. 125) The lithium battery is already installed in your camcorder. 5 Size AA (R6) battery for Remote Commander (2) (p. 151) 6 A/V connecting cable (1) (p. 28) 7 Shoulder strap (1) (p. 147) 8...sheets × 1) Sticker type/Standard size (10 sheets × 1) Sticker type/9 split size (10 sheets × 1) DCR-TRV820 only qd Print cartridge (2) (p. 106) DCR-TRV820 only qf Head cleaner (1) (p. 139) DCR-TRV820 only qg Platen roller cleaner (1) (p. 140...
Operating Instructions
Page 11
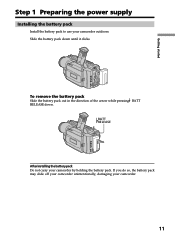
Slide the battery pack down . BATT RELEASE After installing the battery pack Do not carry your camcorder. 11 If you do so, the battery pack may slide off your camcorder unintentionally, damaging your camcorder by holding the battery pack. To remove the battery pack Slide the battery pack out in the direction of the arrow while pressing BATT RELEASE down until it clicks. Getting started Step 1 Preparing the power supply Installing the battery pack Install the battery pack to use your camcorder outdoors.
Slide the battery pack down . BATT RELEASE After installing the battery pack Do not carry your camcorder. 11 If you do so, the battery pack may slide off your camcorder unintentionally, damaging your camcorder by holding the battery pack. To remove the battery pack Slide the battery pack out in the direction of the arrow while pressing BATT RELEASE down until it clicks. Getting started Step 1 Preparing the power supply Installing the battery pack Install the battery pack to use your camcorder outdoors.
Operating Instructions
Page 12
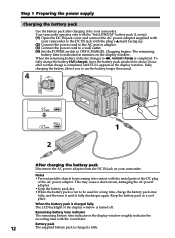
...window is completed. Keep the battery pack in the display window roughly indicates the recording time with the viewfinder. When the battery pack is charged fully The LCD backlight of the AC power adaptor. Remaining battery time indicator The remaining battery time indicator in a cool ...display window. To fully charge the battery (full charge), leave the battery pack attached for a long time, charge the battery pack once fully, and then use the battery longer than usual. 4 VTR OFF (CHARGE) MEMORY CAMERA 1 2 After charging the battery pack Disconnect the AC power adaptor...
...window is completed. Keep the battery pack in the display window roughly indicates the recording time with the viewfinder. When the battery pack is charged fully The LCD backlight of the AC power adaptor. Remaining battery time indicator The remaining battery time indicator in a cool ...display window. To fully charge the battery (full charge), leave the battery pack attached for a long time, charge the battery pack once fully, and then use the battery longer than usual. 4 VTR OFF (CHARGE) MEMORY CAMERA 1 2 After charging the battery pack Disconnect the AC power adaptor...

Operating Instructions
Page 13
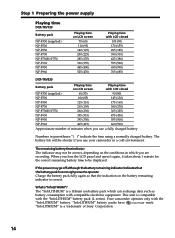
...(150) NP-F730/F730H/F750 300 (240) NP-F930/F950 390 (330) NP-F960 420 (360) Approximate number of minutes to charge an empty battery pack Recording time Battery pack NP-F330 (supplied) NP-F530 NP-F550 NP-F730 NP-F730H/F750 NP-F930 NP-F950 NP-F960... (520) 325 (295) 675 (610) 385 (345) 790 (710) 450 (405) Recording with the battery pack. The AC power adaptor is not installed correctly. - The actual battery life may be shorter if you use your camcorder calculates the actual remaining battery time "- - - - min" appears in the following cases: - Something is wrong with the...
...(150) NP-F730/F730H/F750 300 (240) NP-F930/F950 390 (330) NP-F960 420 (360) Approximate number of minutes to charge an empty battery pack Recording time Battery pack NP-F330 (supplied) NP-F530 NP-F550 NP-F730 NP-F730H/F750 NP-F930 NP-F950 NP-F960... (520) 325 (295) 675 (610) 385 (345) 790 (710) 450 (405) Recording with the battery pack. The AC power adaptor is not installed correctly. - The actual battery life may be shorter if you use your camcorder calculates the actual remaining battery time "- - - - min" appears in the following cases: - Something is wrong with the...
Operating Instructions
Page 14
... power supply Playing time DCR-TRV720 Battery pack NP-F330 (supplied...) 555 (500) NP-F960 465 (415) 660 (590) Approximate number of Sony Corporation. 14 "InfoLITHIUM" battery packs have the mark. If the power may not be shorter if you close ...recording. The "InfoLITHIUM" is a lithium ion battery pack which you use your camcorder in which can exchange data such as battery consumption with compatible electronic equipment. The battery life will be correct, depending on the battery remaining indicator is compatible with the "InfoLITHIUM" battery. The remaining battery...
... power supply Playing time DCR-TRV720 Battery pack NP-F330 (supplied...) 555 (500) NP-F960 465 (415) 660 (590) Approximate number of Sony Corporation. 14 "InfoLITHIUM" battery packs have the mark. If the power may not be shorter if you close ...recording. The "InfoLITHIUM" is a lithium ion battery pack which you use your camcorder in which can exchange data such as battery consumption with compatible electronic equipment. The battery life will be correct, depending on the battery remaining indicator is compatible with the "InfoLITHIUM" battery. The remaining battery...

Operating Instructions
Page 15
Using a car battery Use Sony DC Adaptor/Charger (not supplied). 15 Notes •The AC power adaptor can supply power even if the battery pack is attached to your camcorder with the plug's v mark facing up. (2) Connect the power cord to the AC power adaptor. (3) Connect the power cord ... a wall outlet. Getting started Step 1 Preparing the power supply Connecting to a wall outlet When you use your camcorder for a long time, we recommend that the battery pack cannot supply any power if the power cord is connected to the DC IN jack, even when the power cord is connected to the...
Using a car battery Use Sony DC Adaptor/Charger (not supplied). 15 Notes •The AC power adaptor can supply power even if the battery pack is attached to your camcorder with the plug's v mark facing up. (2) Connect the power cord to the AC power adaptor. (3) Connect the power cord ... a wall outlet. Getting started Step 1 Preparing the power supply Connecting to a wall outlet When you use your camcorder for a long time, we recommend that the battery pack cannot supply any power if the power cord is connected to the DC IN jack, even when the power cord is connected to the...

Operating Instructions
Page 18
...image. Note When using the LCD screen except in the standby mode for 3 minutes Your camcorder automatically turns off . When you use the viewfinder. During recording in direct sunlight The LCD screen may be difficult to see. To resume the standby mode, set to MEMORY accidentally. However, the picture will be... appears on the LCD screen and in the mirror mode The picture on the LCD is to save battery power and to the lens side. If this happens, we recommend that it to CAMERA again. Picture in the viewfinder (Mirror mode). 180° to brighten to dim 90° When closing ...
...image. Note When using the LCD screen except in the standby mode for 3 minutes Your camcorder automatically turns off . When you use the viewfinder. During recording in direct sunlight The LCD screen may be difficult to see. To resume the standby mode, set to MEMORY accidentally. However, the picture will be... appears on the LCD screen and in the mirror mode The picture on the LCD is to save battery power and to the lens side. If this happens, we recommend that it to CAMERA again. Picture in the viewfinder (Mirror mode). 180° to brighten to dim 90° When closing ...
Operating Instructions
Page 20
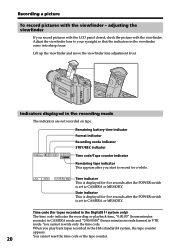
adjusting the viewfinder If you start to CAMERA or MEMORY. Date indicator This is set to record for five seconds after the POWER switch is displayed for a while. Remaining battery time indicator Format indicator Recording mode indicator STBY/REC indicator 40min SP REC 0:00:01 Time code/Tape counter ...:05:56 AM Time indicator This is set to your eyesight so that the indicators in the recording mode The indicators are not recorded on tape. Adjust the viewfinder lens to CAMERA or MEMORY. You cannot rewrite only the time code. Indicators displayed in the viewfinder come into ...
adjusting the viewfinder If you start to CAMERA or MEMORY. Date indicator This is set to record for five seconds after the POWER switch is displayed for a while. Remaining battery time indicator Format indicator Recording mode indicator STBY/REC indicator 40min SP REC 0:00:01 Time code/Tape counter ...:05:56 AM Time indicator This is set to your eyesight so that the indicators in the recording mode The indicators are not recorded on tape. Adjust the viewfinder lens to CAMERA or MEMORY. You cannot rewrite only the time code. Indicators displayed in the viewfinder come into ...
Operating Instructions
Page 67
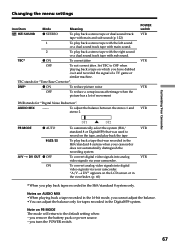
...on the tape, and play back the tape To play back a tape that was recorded in the Hi8/standard 8 system when your camcorder does not automatically distinguish the recording system To convert digital video signals into digital video siginals via your camcorder. Notes on the LCD screen or in the viewfinder. (p. 60..."A/V t DV" appears on AUDIO MIX •When playing back a tape recorded in the 16-bit mode, you play back a stereo tape with the right sound or a dual sound track tape with sub sound. you remove the battery pack or power source. - Set TBC to the default setting when: -...
...on the tape, and play back the tape To play back a tape that was recorded in the Hi8/standard 8 system when your camcorder does not automatically distinguish the recording system To convert digital video signals into digital video siginals via your camcorder. Notes on the LCD screen or in the viewfinder. (p. 60..."A/V t DV" appears on AUDIO MIX •When playing back a tape recorded in the 16-bit mode, you play back a stereo tape with the right sound or a dual sound track tape with sub sound. you remove the battery pack or power source. - Set TBC to the default setting when: -...

Operating Instructions
Page 68
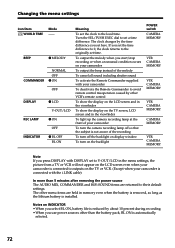
... is reduced by about 10 percent during recording. • When you use power sources other than the battery pack, BRIGHT is automatically selected. 68 LCD COLOR Mode z BRT NORMAL BRIGHT Meaning To set the brightness in the viewfinder normal BRIGHT To brighten the viewfinder VTR CAMERA MEMORY Notes on LCD B.L. To adjust the...
... is reduced by about 10 percent during recording. • When you use power sources other than the battery pack, BRIGHT is automatically selected. 68 LCD COLOR Mode z BRT NORMAL BRIGHT Meaning To set the brightness in the viewfinder normal BRIGHT To brighten the viewfinder VTR CAMERA MEMORY Notes on LCD B.L. To adjust the...
Operating Instructions
Page 72
..., battery life is reduced by about 10 percent during recording. • When you use power sources other VCR's remote control To show the display on the LCD screen and in the viewfinder To show the display on the TV screen, LCD screen and in the viewfinder To light up the camera recording lamp... on display window To turn the camera recording lamp off so that the subject is not aware of the melody To cancel all sound including shutter sound To activate the Remote Commander supplied with your camcorder is connected with the i.LINK cable) In more than the battery pack, BL ON is installed.
..., battery life is reduced by about 10 percent during recording. • When you use power sources other VCR's remote control To show the display on the LCD screen and in the viewfinder To show the display on the TV screen, LCD screen and in the viewfinder To light up the camera recording lamp... on display window To turn the camera recording lamp off so that the subject is not aware of the melody To cancel all sound including shutter sound To activate the Remote Commander supplied with your camcorder is connected with the i.LINK cable) In more than the battery pack, BL ON is installed.

Operating Instructions
Page 73
...set the year, then the month, the day, the hour and then the minute. (1) While the camcorder is recorded on a 12-hour cycle. •12:00 AM stands for midnight. •12:00 PM stands for noon.... 73 You must reset the date and time when the lithium battery becomes dead with the battery pack or other power source connected, you do not set the date and time is in ... (6) Set the minute by turning the SEL/PUSH EXEC dial and pressing the dial by the lithium battery. Note on the time indicator The internal clock of your camcorder operates on the tape and the "Memory...
...set the year, then the month, the day, the hour and then the minute. (1) While the camcorder is recorded on a 12-hour cycle. •12:00 AM stands for midnight. •12:00 PM stands for noon.... 73 You must reset the date and time when the lithium battery becomes dead with the battery pack or other power source connected, you do not set the date and time is in ... (6) Set the minute by turning the SEL/PUSH EXEC dial and pressing the dial by the lithium battery. Note on the time indicator The internal clock of your camcorder operates on the tape and the "Memory...

Operating Instructions
Page 74
...file name appears on the LCD screen or in locations that are: - If you remove the "Memory Stick", turn the power off, or detach the battery for "Memory Stick" (not supplied). If you carry or store a "Memory Stick", put it in JPEG format (extension .jpg). You can exchange ...backing up important data. •Image data may be damaged in the sun or under the scorching sun - Under direct sunlight - You can record and play back, record or delete still images. - Extremely hot such as a personal computer etc., using "Memory Stick" Terminal Write-protect tab Labeling position •...
...file name appears on the LCD screen or in locations that are: - If you remove the "Memory Stick", turn the power off, or detach the battery for "Memory Stick" (not supplied). If you carry or store a "Memory Stick", put it in JPEG format (extension .jpg). You can exchange ...backing up important data. •Image data may be damaged in the sun or under the scorching sun - Under direct sunlight - You can record and play back, record or delete still images. - Extremely hot such as a personal computer etc., using "Memory Stick" Terminal Write-protect tab Labeling position •...

Operating Instructions
Page 76
..., the image data breakdown may occur. 76 The "Memory Stick" pops up. Do not turn the power off , eject the "Memory Stick" or remove the battery pack. Using "Memory Stick"-introduction Inserting "Memory Stick" (1) Open the lid of the cassette compartment. (2) Insert the "Memory Stick" with the v mark facing toward the...
..., the image data breakdown may occur. 76 The "Memory Stick" pops up. Do not turn the power off , eject the "Memory Stick" or remove the battery pack. Using "Memory Stick"-introduction Inserting "Memory Stick" (1) Open the lid of the cassette compartment. (2) Insert the "Memory Stick" with the v mark facing toward the...

Operating Instructions
Page 87
...screen or in the viewfinder. The image displayed on the screen will be recorded on a "Memory Stick". Also do not turn the power off , eject the "Memory Stick" or remove the battery pack. Recording an image from a tape as a still image Your camcorder can read moving... image data through the input connector and record it as a still image on a tape You cannot record the audio from a tape. VTR 2 REW PLAY FF 1 "Memory Stick" operations OFF (CHARGE) MEMORY CAMERA 3 4...
...screen or in the viewfinder. The image displayed on the screen will be recorded on a "Memory Stick". Also do not turn the power off , eject the "Memory Stick" or remove the battery pack. Recording an image from a tape as a still image Your camcorder can read moving... image data through the input connector and record it as a still image on a tape You cannot record the audio from a tape. VTR 2 REW PLAY FF 1 "Memory Stick" operations OFF (CHARGE) MEMORY CAMERA 3 4...


