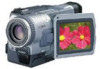
Operating Instructions
Page 6
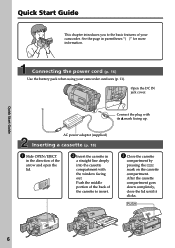
Open the DC IN jack cover. Connect the plug with the window facing out. Connecting the power cord (p. 16) Use the battery pack when using your camcorder. Push the middle portion of the back of the cassette ...
Open the DC IN jack cover. Connect the plug with the window facing out. Connecting the power cord (p. 16) Use the battery pack when using your camcorder. Push the middle portion of the back of the cassette ...
Operating Instructions
Page 9
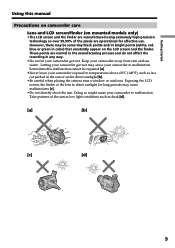
... get wet. Take pictures of the pixels are normal in the manufacturing process and do not affect the recording in the sun or under direct sunlight [b]. •Be careful when placing the camera near a window or outdoors. Getting started Using this malfunction cannot be some tiny black points and/or bright points (white...
... get wet. Take pictures of the pixels are normal in the manufacturing process and do not affect the recording in the sun or under direct sunlight [b]. •Be careful when placing the camera near a window or outdoors. Getting started Using this malfunction cannot be some tiny black points and/or bright points (white...
Operating Instructions
Page 12
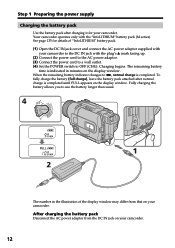
...for your camcorder. To fully charge the battery (full charge), leave the battery pack attached after charging it for details of the display window may differ from the DC IN jack on your camcorder. 12 When the remaining battery indicator changes to u, normal charge is completed. ...After charging the battery pack Disconnect the AC power adaptor from that on the display window. Your camcorder operates only with the plug's v mark facing up. (2) Connect the power cord to the AC power adaptor. (3) Connect the ...
...for your camcorder. To fully charge the battery (full charge), leave the battery pack attached after charging it for details of the display window may differ from the DC IN jack on your camcorder. 12 When the remaining battery indicator changes to u, normal charge is completed. ...After charging the battery pack Disconnect the AC power adaptor from that on the display window. Your camcorder operates only with the plug's v mark facing up. (2) Connect the power cord to the AC power adaptor. (3) Connect the ...

Operating Instructions
Page 13
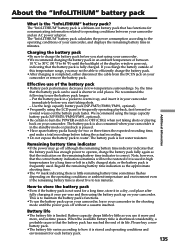
..."InfoLITHIUM" M series battery packs have the mark. While charging the battery pack, no indicator appears or the indicator flashes in the display window in a cool place. TM SERIES 13 Keep the battery pack in the following cases: - Something is compatible with the battery pack. min..." appears in the display window roughly indicates the recording time with the metal parts of the DC plug of Sony Corporation. Until your camcorder calculates the actual remaining battery time "- - - - If the power may ...
..."InfoLITHIUM" M series battery packs have the mark. While charging the battery pack, no indicator appears or the indicator flashes in the display window in a cool place. TM SERIES 13 Keep the battery pack in the following cases: - Something is compatible with the battery pack. min..." appears in the display window roughly indicates the recording time with the metal parts of the DC plug of Sony Corporation. Until your camcorder calculates the actual remaining battery time "- - - - If the power may ...
Operating Instructions
Page 18
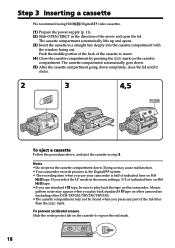
...procedure above, and eject the cassette in a straight line deeply into the cassette compartment with the window facing out. Push the middle portion of the back of the cassette to insert. (4) Close the...a cassette We recommend using Hi8 /Digital8 video cassettes. (1) Prepare the power supply (p. 11). (2) Slide OPEN/EJECT in the Digital8 system. • The recording time when you use standard 8 tape,... any part of the lid other DCR-TRV230/TRV330/TRV530). •The cassette compartment may cause malfunction. •Your camcorder records pictures in the direction of the arrow and open...
...procedure above, and eject the cassette in a straight line deeply into the cassette compartment with the window facing out. Push the middle portion of the back of the cassette to insert. (4) Close the...a cassette We recommend using Hi8 /Digital8 video cassettes. (1) Prepare the power supply (p. 11). (2) Slide OPEN/EJECT in the Digital8 system. • The recording time when you use standard 8 tape,... any part of the lid other DCR-TRV230/TRV330/TRV530). •The cassette compartment may cause malfunction. •Your camcorder records pictures in the direction of the arrow and open...
Operating Instructions
Page 44
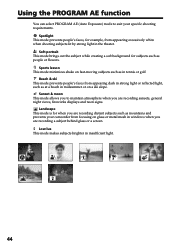
...mountains and prevents your specific shooting requirements. Soft portrait This mode brings out the subject while creating a soft background for when you are recording distant subjects such as people or flowers. Spotlight This mode prevents people's faces, for example, from appearing dark in strong light or... reflected light, such as at a beach in midsummer or on fast-moving subjects such as in windows when you are recording sunsets, general night views, fireworks displays and neon signs. Using the PROGRAM AE function You can select PROGRAM AE (Auto Exposure...
...mountains and prevents your specific shooting requirements. Soft portrait This mode brings out the subject while creating a soft background for when you are recording distant subjects such as people or flowers. Spotlight This mode prevents people's faces, for example, from appearing dark in strong light or... reflected light, such as at a beach in midsummer or on fast-moving subjects such as in windows when you are recording sunsets, general night views, fireworks displays and neon signs. Using the PROGRAM AE function You can select PROGRAM AE (Auto Exposure...

Operating Instructions
Page 87
... the viewfinder To light up the camera recording lamp at the front of your camcorder To turn the camera recording lamp off the backlight on display window To turn on the backlight POWER switch CAMERA MEMORY CAMERA VCR MEMORY CAMERA VCR MEMORY CAMERA VCR MEMORY CAMERA MEMORY VCR VCR CAMERA VCR MEMORY Note If you set ...the beep instead of your camcorder and a VCR for dubbing in memory even when the battery is not aware of the recording To make program and perform video editing (p. 63) To adjust and set the synchronicity of the melody To cancel all sound including shutter sound To activate...
... the viewfinder To light up the camera recording lamp at the front of your camcorder To turn the camera recording lamp off the backlight on display window To turn on the backlight POWER switch CAMERA MEMORY CAMERA VCR MEMORY CAMERA VCR MEMORY CAMERA VCR MEMORY CAMERA MEMORY VCR VCR CAMERA VCR MEMORY Note If you set ...the beep instead of your camcorder and a VCR for dubbing in memory even when the battery is not aware of the recording To make program and perform video editing (p. 63) To adjust and set the synchronicity of the melody To cancel all sound including shutter sound To activate...

Operating Instructions
Page 89
... still images recorded on other equipment (DCRTRV890E/TRV900/TRV900E or DSC-D700/D770) that does not conform with this universal standard. (These models are not sold in this camcorder. "Memory Stick" and are trademarks of Sony Corporation. • Microsoft® and Windows® are...89 Notes on image data compatibility •Image data files recorded on "Memory Stick"s by your camcorder following the steps on your camcorder conform with the Design Rules for Camera File Systems universal standard established by Windows OS or Macintosh computers do not have a guaranteed compatibility ...
... still images recorded on other equipment (DCRTRV890E/TRV900/TRV900E or DSC-D700/D770) that does not conform with this universal standard. (These models are not sold in this camcorder. "Memory Stick" and are trademarks of Sony Corporation. • Microsoft® and Windows® are...89 Notes on image data compatibility •Image data files recorded on "Memory Stick"s by your camcorder following the steps on your camcorder conform with the Design Rules for Camera File Systems universal standard established by Windows OS or Macintosh computers do not have a guaranteed compatibility ...
Operating Instructions
Page 110
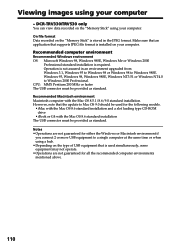
... in an environment upgraded from: Windows 3.1, Windows 95 to Windows 98 or Windows 98 to Windows 2000 Professional. Viewing images using your computer. DCR-TRV330/TRV530 only You can view data recorded on the "Memory Stick" is installed on your computer. Recommended computer environment Recommended Windows environment OS: Microsoft Windows 98, Windows 98SE, Windows Me or Windows 2000 Professional standard installation is used...
... in an environment upgraded from: Windows 3.1, Windows 95 to Windows 98 or Windows 98 to Windows 2000 Professional. Viewing images using your computer. DCR-TRV330/TRV530 only You can view data recorded on the "Memory Stick" is installed on your computer. Recommended computer environment Recommended Windows environment OS: Microsoft Windows 98, Windows 98SE, Windows Me or Windows 2000 Professional standard installation is used...
Operating Instructions
Page 111
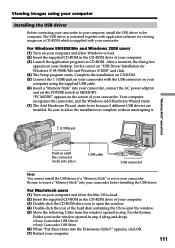
.... After a moment, the dialog box appears on the screen of your computer. (3) Launch the application program on "USB Driver Installation for Windows ® 98/98SE/Me and Windows ® 2000" and click. (4) The Setup program starts. Be sure to allow the Mac OS to load. (2) Insert the supplied ...icon of the hard disk containing the OS to open the window. (5) Move the following 2 files from the window opened in step 3 to the System Folder icon in the window opened in step 4 (drag and drop). •Sony Camcorder USB Driver •Sony Camcorder USB Shim (6) When "Put these items into place ...
.... After a moment, the dialog box appears on the screen of your computer. (3) Launch the application program on "USB Driver Installation for Windows ® 98/98SE/Me and Windows ® 2000" and click. (4) The Setup program starts. Be sure to allow the Mac OS to load. (2) Insert the supplied ...icon of the hard disk containing the OS to open the window. (5) Move the following 2 files from the window opened in step 3 to the System Folder icon in the window opened in step 4 (drag and drop). •Sony Camcorder USB Driver •Sony Camcorder USB Shim (6) When "Put these items into place ...

Operating Instructions
Page 112
...eject the "Memory Stick." For Macintosh users (1) Quit application programs opened. Viewing images using your computer Viewing images For Windows 98 users (1) Turn on the power of your computer and allow Windows 98 to load. (2) Connect one end of the USB cable to the (USB) jack on the camcorder and ...other end to the USB connector on the TaskTray and click to cancel the applicable drive. (2) A message to remove the device from the folder. For Windows 2000 users (1) Move the cursor to the "Unplug or Eject Hardware" icon on your camcorder and then to a wall outlet. (4) Set the POWER switch...
...eject the "Memory Stick." For Macintosh users (1) Quit application programs opened. Viewing images using your computer Viewing images For Windows 98 users (1) Turn on the power of your computer and allow Windows 98 to load. (2) Connect one end of the USB cable to the (USB) jack on the camcorder and ...other end to the USB connector on the TaskTray and click to cancel the applicable drive. (2) A message to remove the device from the folder. For Windows 2000 users (1) Move the cursor to the "Unplug or Eject Hardware" icon on your camcorder and then to a wall outlet. (4) Set the POWER switch...
Operating Instructions
Page 113
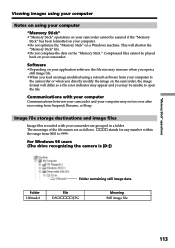
...life. •Do not compress the data on the "Memory Stick." Communications with your camcorder are as follows. For Windows 98 users (The drive recognizing the camera is [D:]) Folder 100msdcf Folder containing still image data File DSC0ssss.JPG Meaning Still image file 113 ssss stands for any...the file. The meanings of the file names are grouped in a folder. Image file storage destinations and image files Image files recorded with your computer Communications between your camcorder and your computer may not recover after recovering from your application software, the file size ...
...life. •Do not compress the data on the "Memory Stick." Communications with your camcorder are as follows. For Windows 98 users (The drive recognizing the camera is [D:]) Folder 100msdcf Folder containing still image data File DSC0ssss.JPG Meaning Still image file 113 ssss stands for any...the file. The meanings of the file names are grouped in a folder. Image file storage destinations and image files Image files recorded with your computer Communications between your camcorder and your computer may not recover after recovering from your application software, the file size ...
Operating Instructions
Page 125
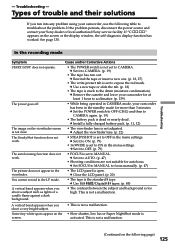
...ON in the standby mode for autofocus. Some tiny white spots appear on the screen or the display window, the self-diagnosis display function has worked. If the problem persists, disconnect the power source and ... Shooting conditions are not suitable for more than 3 minutes. You cannot record in the viewfinder. c Set it to CAMERA. c Set it to OFF. (p. 79) • FOCUS is not set to CAMERA again. (p. 19) • The battery pack is not adjusted. ...on the following table to acclimatize. (p. 139) • While being operated in CAMERA mode, your Sony dealer or local authorized...
...ON in the standby mode for autofocus. Some tiny white spots appear on the screen or the display window, the self-diagnosis display function has worked. If the problem persists, disconnect the power source and ... Shooting conditions are not suitable for more than 3 minutes. You cannot record in the viewfinder. c Set it to CAMERA. c Set it to OFF. (p. 79) • FOCUS is not set to CAMERA again. (p. 19) • The battery pack is not adjusted. ...on the following table to acclimatize. (p. 139) • While being operated in CAMERA mode, your Sony dealer or local authorized...
Operating Instructions
Page 129
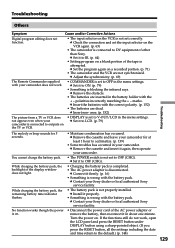
... inserted in about one minute. marks. While charging the battery pack, the backlight of other than Sony. c Remove the cassette and insert it to DV equipment of the display window does not light. No function works though the power is not set to LCD. (p. 79) ...(p. 152) The picture from a TV or VCR does not appear even when your camcorder. Troubleshooting Others Symptom Cause and/or Corrective Actions Digital program editing does not function. • The input selector on a recorded portion. (p. 71) • The camcorder and the VCR are not synchronized.
... inserted in about one minute. marks. While charging the battery pack, the backlight of other than Sony. c Remove the cassette and insert it to DV equipment of the display window does not light. No function works though the power is not set to LCD. (p. 79) ...(p. 152) The picture from a TV or VCR does not appear even when your camcorder. Troubleshooting Others Symptom Cause and/or Corrective Actions Digital program editing does not function. • The input selector on a recorded portion. (p. 71) • The camcorder and the VCR are not synchronized.

Operating Instructions
Page 130
...code chart. c Disconnect the power cord of a letter and figures) on the state of the 5-digit code. (example: E:61:10) If you are unable to acclimatize. (p. 139) • The video heads are using a battery pack that you try corrective actions a few times, contact your camcorder.... the cassette and leave your Sony dealer or local authorized Sony facility. If a 5-digit code is not an "InfoLITHIUM" battery pack. The last two digits (indicated by ss) will differ depending on the screen or in the display window. LCD screen, viewfinder or display window C:21:00 Self-diagnosis display...
...code chart. c Disconnect the power cord of a letter and figures) on the state of the 5-digit code. (example: E:61:10) If you are unable to acclimatize. (p. 139) • The video heads are using a battery pack that you try corrective actions a few times, contact your camcorder.... the cassette and leave your Sony dealer or local authorized Sony facility. If a 5-digit code is not an "InfoLITHIUM" battery pack. The last two digits (indicated by ss) will differ depending on the screen or in the display window. LCD screen, viewfinder or display window C:21:00 Self-diagnosis display...

Operating Instructions
Page 131
...;The "Memory Stick" is activated (p. 130). - Warning indicator as to "Memory Stick" formatting (DCR-TRV330/TRV530 only) Fast flashing: •"Memory Stick" is not formatted correctly (p. 84). •The "Memory... Stick" data is corrupted.* Q Warning indicator as to "Memory Stick"* (DCR-TRV330/TRV530 only) Slow flashing: • No "Memory Stick" is out (red) (p. 18).* Fast flashing...: •The battery is protected (p. 119). The still image is protected * (DCRTRV330/TRV530 only) Slow flashing: •The still image is nearly dead. Warning indicator as to ...
...;The "Memory Stick" is activated (p. 130). - Warning indicator as to "Memory Stick" formatting (DCR-TRV330/TRV530 only) Fast flashing: •"Memory Stick" is not formatted correctly (p. 84). •The "Memory... Stick" data is corrupted.* Q Warning indicator as to "Memory Stick"* (DCR-TRV330/TRV530 only) Slow flashing: • No "Memory Stick" is out (red) (p. 18).* Fast flashing...: •The battery is protected (p. 119). The still image is protected * (DCRTRV330/TRV530 only) Slow flashing: •The still image is nearly dead. Warning indicator as to ...
Operating Instructions
Page 135
...pack? When the available battery time is shortened considerably, a probable cause is that the battery pack has reached the end of the display window goes out, indicating that the indication on your camcorder. Charging the battery pack •Be sure to 86 °F) until the power goes...of your camcorder and an AC power adaptor. Note, however, that has functions for two or three times the expected recording time, and make a trial recordings before taking the actual recording. • Do not expose the battery pack to OFF (CHG) when not taking shots. - Remaining battery time ...
...pack? When the available battery time is shortened considerably, a probable cause is that the battery pack has reached the end of the display window goes out, indicating that the indication on your camcorder. Charging the battery pack •Be sure to 86 °F) until the power goes...of your camcorder and an AC power adaptor. Note, however, that has functions for two or three times the expected recording time, and make a trial recordings before taking the actual recording. • Do not expose the battery pack to OFF (CHG) when not taking shots. - Remaining battery time ...
Operating Instructions
Page 147
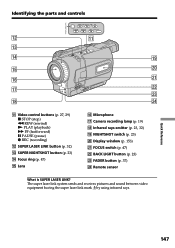
The super laser link system sends and receives pictures and sound between video equipment having the super laser link mark by using infrared rays. Display window (p. 153) wa FOCUS switch (p. 47) ws BACK LIGHT button (p. 23) wd FADER button (p. 37) wf Remote sensor What is SUPER ...qj ws wd qk wf qa Video control buttons (p. 27, 29) x STOP (stop) m REW (rewind) N PLAY (playback) M FF (fastforward) X PAUSE (pause) z REC (recording) qs SUPER LASER LINK button (p. 32) qd SUPER NIGHTSHOT button (p. 23) qf Focus ring (p. 47) qg Lens qh Microphone qj Camera recording lamp (p. 19) qk Infrared rays...
The super laser link system sends and receives pictures and sound between video equipment having the super laser link mark by using infrared rays. Display window (p. 153) wa FOCUS switch (p. 47) ws BACK LIGHT button (p. 23) wd FADER button (p. 37) wf Remote sensor What is SUPER ...qj ws wd qk wf qa Video control buttons (p. 27, 29) x STOP (stop) m REW (rewind) N PLAY (playback) M FF (fastforward) X PAUSE (pause) z REC (recording) qs SUPER LASER LINK button (p. 32) qd SUPER NIGHTSHOT button (p. 23) qf Focus ring (p. 47) qg Lens qh Microphone qj Camera recording lamp (p. 19) qk Infrared rays...
Operating Instructions
Page 153
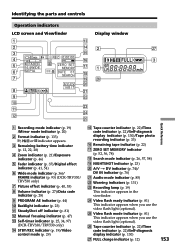
... (p. 130) wj FULL charge indicator (p. 12) 153 wf Video flash ready indicator (p. 81) This indicator appears when you use the video flash light (optional). Identifying the parts and controls Operation indicators LCD screen and Viewfinder Display window 1 qd 2 qf 2 wj 3 qg 4 40min SP ...Self-timer indicator (p. 25, 34, 97) (DCR-TRV330/TRV530 only) qf STBY/REC indicator (p. 19)/Video control mode (p. 29) qg Tape counter indicator (p. 22)/Time code indicator (p. 22)/Self-diagnosis display indicator (p. 130)/Tape photo recording indicator (p. 33) qh Remaining tape indicator (p. 22...
... (p. 130) wj FULL charge indicator (p. 12) 153 wf Video flash ready indicator (p. 81) This indicator appears when you use the video flash light (optional). Identifying the parts and controls Operation indicators LCD screen and Viewfinder Display window 1 qd 2 qf 2 wj 3 qg 4 40min SP ...Self-timer indicator (p. 25, 34, 97) (DCR-TRV330/TRV530 only) qf STBY/REC indicator (p. 19)/Video control mode (p. 29) qg Tape counter indicator (p. 22)/Time code indicator (p. 22)/Self-diagnosis display indicator (p. 130)/Tape photo recording indicator (p. 33) qh Remaining tape indicator (p. 22...


