Operating Instructions
Page 1
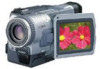
Serial No. DCR-TRV Model No. DCR-TRV530 TM SERIES DCR-TRV230/TRV330/TRV530 ©2001 Sony Corporation 3-065-262-13 (1) Digital Video Camera Recorder Operating Instructions Before operating the unit, please read this product. Model No. Serial No. Refer to these numbers whenever you call upon your Sony dealer regarding this manual thoroughly, and retain it for future reference. AC- Owner's Record The model and serial numbers are located on the bottom. Record the serial number in the space provided below.
Serial No. DCR-TRV Model No. DCR-TRV530 TM SERIES DCR-TRV230/TRV330/TRV530 ©2001 Sony Corporation 3-065-262-13 (1) Digital Video Camera Recorder Operating Instructions Before operating the unit, please read this product. Model No. Serial No. Refer to these numbers whenever you call upon your Sony dealer regarding this manual thoroughly, and retain it for future reference. AC- Owner's Record The model and serial numbers are located on the bottom. Record the serial number in the space provided below.
Operating Instructions
Page 4
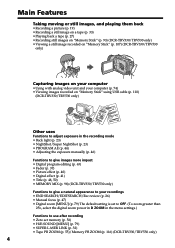
... them back • Recording a picture (p. 19) • Recording a still image on a tape (p. 33) • Playing back a tape (p. 27) • Recording still images on "Memory Stick" (p. 93) (DCR-TRV330/TRV530 only) • Viewing a still image recorded on "Memory Stick" (p. 107) (DCR-TRV330/TRV530 only) b Capturing images on your computer • Using with analog video unit and your computer (p. 74) • Viewing images recorded on "Memory Stick" using USB cable (p. 110) (DCR-TRV330/TRV530 only) Other uses Functions to adjust exposure in the recording mode • Back light (p. 23) •...
... them back • Recording a picture (p. 19) • Recording a still image on a tape (p. 33) • Playing back a tape (p. 27) • Recording still images on "Memory Stick" (p. 93) (DCR-TRV330/TRV530 only) • Viewing a still image recorded on "Memory Stick" (p. 107) (DCR-TRV330/TRV530 only) b Capturing images on your computer • Using with analog video unit and your computer (p. 74) • Viewing images recorded on "Memory Stick" using USB cable (p. 110) (DCR-TRV330/TRV530 only) Other uses Functions to adjust exposure in the recording mode • Back light (p. 23) •...
Operating Instructions
Page 5
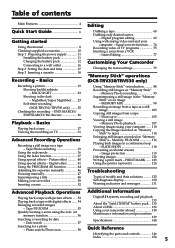
...Troubleshooting Types of contents Getting started Main Features 4 Quick Start Guide 6 Getting started Using this manual 8 Checking supplied accessories 10 Step 1 Preparing the power supply 11 Installing the battery pack 11 Charging the battery pack 12 Connecting to tapes 114 Enlarging still images recorded on an image - Date search 57 Searching for a photo - Digital program editing 63 Using with digital effects ...... 54 Enlarging recorded images - Memory PB ZOOM 116 Playing back images in the dark - Memory Photo playback 107 Viewing images using the zero set memory...
...Troubleshooting Types of contents Getting started Main Features 4 Quick Start Guide 6 Getting started Using this manual 8 Checking supplied accessories 10 Step 1 Preparing the power supply 11 Installing the battery pack 11 Charging the battery pack 12 Connecting to tapes 114 Enlarging still images recorded on an image - Date search 57 Searching for a photo - Digital program editing 63 Using with digital effects ...... 54 Enlarging recorded images - Memory PB ZOOM 116 Playing back images in the dark - Memory Photo playback 107 Viewing images using the zero set memory...
Operating Instructions
Page 7
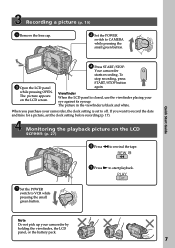
... tape. When you want to record the date and time for a picture, set to CAMERA while pressing the small green button. Your camcorder starts recording. Viewfinder When the LCD panel is black and white. REW 3 Press N to VCR while pressing the small green button. Recording a picture (p. 19) 1 Remove the lens cap. 2 Set the POWER switch to off. V POWER OFCFR(CHG) E ERMAORY E ERMAORY CAM M Quick Start Guide 3 Open the LCD panel while pressing OPEN. Monitoring the playback picture on the LCD screen. 4 Press START/STOP...
... tape. When you want to record the date and time for a picture, set to CAMERA while pressing the small green button. Your camcorder starts recording. Viewfinder When the LCD panel is black and white. REW 3 Press N to VCR while pressing the small green button. Recording a picture (p. 19) 1 Remove the lens cap. 2 Set the POWER switch to off. V POWER OFCFR(CHG) E ERMAORY E ERMAORY CAM M Quick Start Guide 3 Open the LCD panel while pressing OPEN. Monitoring the playback picture on the LCD screen. 4 Press START/STOP...
Operating Instructions
Page 8
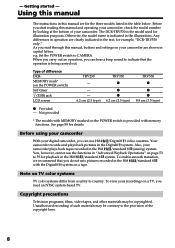
... DCR-TRV530 is indicated in "Advanced Playback Operations" on TV color systems TV color systems differ from country to indicate that you need an NTSC system-based TV. To view your digital camcorder, you can hear a beep sound to country. You, however, cannot use Hi8 /Digital8 video cassettes. Before using your camcorder With your recordings on the POWER switch) Self-timer (USB) jack LCD screen TRV230 - - - 6.2 cm (2.5 type) TRV330 z z z 6.2 cm (2.5 type) TRV530 z z z 8.8 cm (3.5 type) z Provided - Your camcorder records and plays...
... DCR-TRV530 is indicated in "Advanced Playback Operations" on TV color systems TV color systems differ from country to indicate that you need an NTSC system-based TV. To view your digital camcorder, you can hear a beep sound to country. You, however, cannot use Hi8 /Digital8 video cassettes. Before using your camcorder With your recordings on the POWER switch) Self-timer (USB) jack LCD screen TRV230 - - - 6.2 cm (2.5 type) TRV330 z z z 6.2 cm (2.5 type) TRV530 z z z 8.8 cm (3.5 type) z Provided - Your camcorder records and plays...
Operating Instructions
Page 17
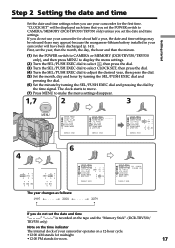
... [ MENU ] : END The year changes as follows: 1995 T t 2001 T t 2079 SETUP MENU CLOCK SET J UL 4 2001 AUTO TV ON 5:30:00 PM TV I NPUT LTR S I ZE L ANGUAGE DEMO MODE RETURN [ MENU ] : END If you do not use your camcorder for the first time. First, set the date and time is recorded on the tape and the "Memory Stick". (DCR-TRV330/ TRV530 only) Note on the time indicator The internal clock of your camcorder operates on...
... [ MENU ] : END The year changes as follows: 1995 T t 2001 T t 2079 SETUP MENU CLOCK SET J UL 4 2001 AUTO TV ON 5:30:00 PM TV I NPUT LTR S I ZE L ANGUAGE DEMO MODE RETURN [ MENU ] : END If you do not use your camcorder for the first time. First, set the date and time is recorded on the tape and the "Memory Stick". (DCR-TRV330/ TRV530 only) Note on the time indicator The internal clock of your camcorder operates on...
Operating Instructions
Page 20
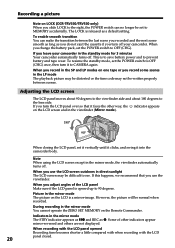
... camcorder body. When you use the viewfinder. To resume the standby mode, set it vertically until it clicks, and swing it to prevent battery and tape wear. Some of the LCD panel Make sure if the LCD panel is to save battery power and to CAMERA again. To enable smooth transition You can no longer be set the POWER switch to the lens side. This is opened Recording time...
... camcorder body. When you use the viewfinder. To resume the standby mode, set it vertically until it clicks, and swing it to prevent battery and tape wear. Some of the LCD panel Make sure if the LCD panel is to save battery power and to CAMERA again. To enable smooth transition You can no longer be set the POWER switch to the lens side. This is opened Recording time...
Operating Instructions
Page 22
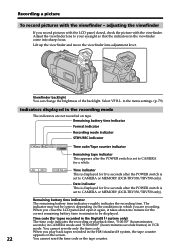
... POWER switch is set to CAMERA or MEMORY (DCR-TRV330/TRV530 only). Adjust the viewfinder lens to be correct, depending on the conditions in which you play back tapes recorded in the recording mode The indicators are recording. When you record pictures with the LCD panel closed, check the picture with the viewfinder - Time code (for the correct remaining battery time in minutes to your eyesight so that the indicators in VCR mode. Select VF B.L. Remaining battery time...
... POWER switch is set to CAMERA or MEMORY (DCR-TRV330/TRV530 only). Adjust the viewfinder lens to be correct, depending on the conditions in which you play back tapes recorded in the recording mode The indicators are recording. When you record pictures with the LCD panel closed, check the picture with the viewfinder - Time code (for the correct remaining battery time in minutes to your eyesight so that the indicators in VCR mode. Select VF B.L. Remaining battery time...
Operating Instructions
Page 31
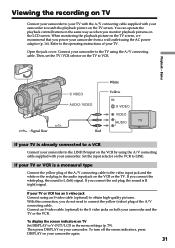
... recording on TV Connect your camcorder to your TV with the A/V connecting cable supplied with your camcorder. You can operate the playback control buttons in the menu settings (p. 79). Playback - To display the screen indicators on TV Set DISPLAY to LINE. Open the jack cover. Then, set the TV/VCR selector on the VCR to V-OUT/LCD in the same way as when you connect the red plug, the sound is R (right) signal. Basics : Signal flow S VIDEO AUDIO / VIDEO Red White...
... recording on TV Connect your camcorder to your TV with the A/V connecting cable supplied with your camcorder. You can operate the playback control buttons in the menu settings (p. 79). Playback - To display the screen indicators on TV Set DISPLAY to LINE. Open the jack cover. Then, set the TV/VCR selector on the VCR to V-OUT/LCD in the same way as when you connect the red plug, the sound is R (right) signal. Basics : Signal flow S VIDEO AUDIO / VIDEO Red White...
Operating Instructions
Page 32
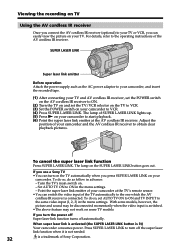
... connected. If you use a Sony TV • You can easily view the picture on some models, however, the picture and sound may be disconnected momentarily when the video input is lit) Your camcorder consumes power. Press SUPER LASER LINK to the same video input (1, 2, 3) in the menu settings. - To do so, do so, set the TV/VCR selector on the TV to VCR. (3) Set the POWER switch on your camcorder to obtain clear playback pictures. Turn...
... connected. If you use a Sony TV • You can easily view the picture on some models, however, the picture and sound may be disconnected momentarily when the video input is lit) Your camcorder consumes power. Press SUPER LASER LINK to the same video input (1, 2, 3) in the menu settings. - To do so, do so, set the TV/VCR selector on the TV to VCR. (3) Set the POWER switch on your camcorder to obtain clear playback pictures. Turn...
Operating Instructions
Page 33
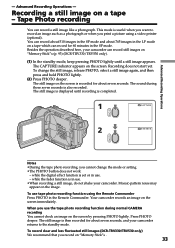
... that you use the tape photo recording function during those seven seconds is set or in the Remote Commander. Advanced Recording Operations - The sound during normal CAMERA recording You cannot check an image on "Memory Stick"s (p. 93) (DCR-TRV330/TRV530 only). (1) In the standby mode, keep pressing PHOTO lightly until recording is useful when you want to the standby mode. Your camcorder records an image on the image. To change the mode or setting. •The PHOTO button does not work: - To use tape photo recording function using a video printer (optional...
... that you use the tape photo recording function during those seven seconds is set or in the Remote Commander. Advanced Recording Operations - The sound during normal CAMERA recording You cannot check an image on "Memory Stick"s (p. 93) (DCR-TRV330/TRV530 only). (1) In the standby mode, keep pressing PHOTO lightly until recording is useful when you want to the standby mode. Your camcorder records an image on the image. To change the mode or setting. •The PHOTO button does not work: - To use tape photo recording function using a video printer (optional...
Operating Instructions
Page 64
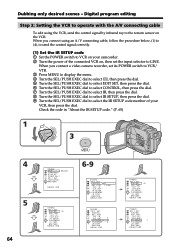
... " CUT- Digital program editing Step 2: Setting the VCR to operate with the A/V connecting cable To edit using an A/V connecting cable, follow the procedure below, (1) to (4), to send the control signal correctly. (1) Set the IR SETUP code 1 Set the POWER switch to VCR on your VCR, then press the dial. I N " " CUT-OUT " I R SETUP P AUS EMODE I R TEST RETURN [ MENU ] : END OTHERS ED I T SET CONTROL ADJ TEST " CUT- When you connect a video camera recorder, set the input selector to the remote sensor...
... " CUT- Digital program editing Step 2: Setting the VCR to operate with the A/V connecting cable To edit using an A/V connecting cable, follow the procedure below, (1) to (4), to send the control signal correctly. (1) Set the IR SETUP code 1 Set the POWER switch to VCR on your VCR, then press the dial. I N " " CUT-OUT " I R SETUP P AUS EMODE I R TEST RETURN [ MENU ] : END OTHERS ED I T SET CONTROL ADJ TEST " CUT- When you connect a video camera recorder, set the input selector to the remote sensor...
Operating Instructions
Page 68
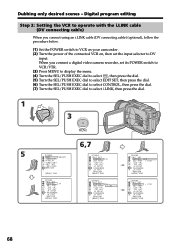
...- I N " " CUT-OUT " I R SETUP P AUS EMODE I R TEST RETURN [ MENU ] : END 6,7 OTHERS ED I T SET CONTROL I NK 68 L I NK OTHERS ED I R TEST RETURN [ MENU ] : END i . I N " " CUT-OUT " I R SETUP P AUS EMODE I T SET CONTROL ADJ TEST " CUT- Digital program editing Step 2: Setting the VCR to operate with the i.LINK cable (DV connecting cable) When you connect a digital video camera recorder, set the input selector to select i.LINK, then press the dial. 1 5 OFCFR(CHG) V POWER CAM M 3 E ERMAORY MENU OTHERS BEEP ME...
...- I N " " CUT-OUT " I R SETUP P AUS EMODE I R TEST RETURN [ MENU ] : END 6,7 OTHERS ED I T SET CONTROL I NK 68 L I NK OTHERS ED I R TEST RETURN [ MENU ] : END i . I N " " CUT-OUT " I R SETUP P AUS EMODE I T SET CONTROL ADJ TEST " CUT- Digital program editing Step 2: Setting the VCR to operate with the i.LINK cable (DV connecting cable) When you connect a digital video camera recorder, set the input selector to select i.LINK, then press the dial. 1 5 OFCFR(CHG) V POWER CAM M 3 E ERMAORY MENU OTHERS BEEP ME...
Operating Instructions
Page 71
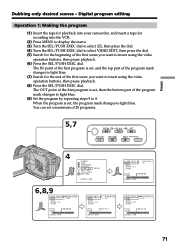
... recording into the VCR. (2) Press MENU to display the menu. (3) Turn the SEL/PUSH EXEC dial to select , then press the dial. (4) Turn the SEL/PUSH EXEC dial to insert using the video operation buttons, then pause playback. (8) Press the SEL/PUSH EXEC dial. Digital program editing Operation 1: Making the program (1) Insert the tape for playback into your camcorder, and insert a tape for the beginning of 20 programs. 5,7 REW PLAY...
... recording into the VCR. (2) Press MENU to display the menu. (3) Turn the SEL/PUSH EXEC dial to select , then press the dial. (4) Turn the SEL/PUSH EXEC dial to insert using the video operation buttons, then pause playback. (8) Press the SEL/PUSH EXEC dial. Digital program editing Operation 1: Making the program (1) Insert the tape for playback into your camcorder, and insert a tape for the beginning of 20 programs. 5,7 REW PLAY...
Operating Instructions
Page 73
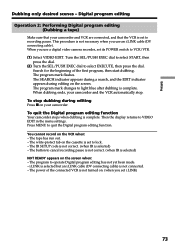
... Digital program editing (Dubbing a tape) Make sure that your camcorder. This procedure is complete. To quit the Digital program editing function Your camcorder stops when dubbing is not necessary when you use an i.LINK cable (DV connecting cable). When you use a digital video camera recorder, set to VCR/VTR. (1) Select VIDEO EDIT. The program mark flashes. Press MENU to select EXECUTE, then press the dial. The tape has run out. - The IR SETUP code...
... Digital program editing (Dubbing a tape) Make sure that your camcorder. This procedure is complete. To quit the Digital program editing function Your camcorder stops when dubbing is not necessary when you use an i.LINK cable (DV connecting cable). When you use a digital video camera recorder, set to VCR/VTR. (1) Select VIDEO EDIT. The program mark flashes. Press MENU to select EXECUTE, then press the dial. The tape has run out. - The IR SETUP code...
Operating Instructions
Page 85
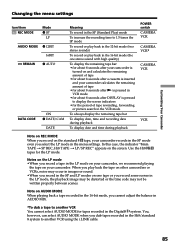
... amount of tape • for about 8 seconds after N is pressed in VCR mode • for about 8 seconds after DISPLAY is pressed to display the screen indicators • for the period of tape rewinding, forwarding or picture search in the VCR mode To always display the remaining tape bar To display date, time and recording data during playback To display date and time during playback POWER switch CAMERA VCR CAMERA VCR* CAMERA VCR VCR Note on REC MODE When you record on the standard 8 tape, your camcorder.
... amount of tape • for about 8 seconds after N is pressed in VCR mode • for about 8 seconds after DISPLAY is pressed to display the screen indicators • for the period of tape rewinding, forwarding or picture search in the VCR mode To always display the remaining tape bar To display date, time and recording data during playback To display date and time during playback POWER switch CAMERA VCR CAMERA VCR* CAMERA VCR VCR Note on REC MODE When you record on the standard 8 tape, your camcorder.
Operating Instructions
Page 111
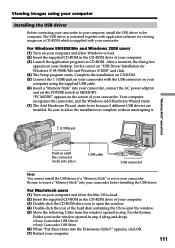
... because 2 different USB drivers are installed. After a moment, the dialog box appears on your camcorder with your camcorder, connect the AC power adaptor and set the POWER switch to the computer. Viewing images using the supplied USB cable. (6) Insert a "Memory Stick" into the Extensions folder?" Be sure to allow the Mac OS to the System Folder icon in the window opened in step 4 (drag and drop). •Sony Camcorder USB Driver •Sony Camcorder USB Shim (6) When...
... because 2 different USB drivers are installed. After a moment, the dialog box appears on your camcorder with your camcorder, connect the AC power adaptor and set the POWER switch to the computer. Viewing images using the supplied USB cable. (6) Insert a "Memory Stick" into the Extensions folder?" Be sure to allow the Mac OS to the System Folder icon in the window opened in step 4 (drag and drop). •Sony Camcorder USB Driver •Sony Camcorder USB Shim (6) When...
Operating Instructions
Page 133
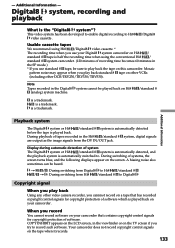
... you use standard 8 tape, be sure to play back standard 8 tape on the LCD screen, in the Digital8 system cannot be heard. During switching of system The Digital8 system or Hi8 /standard 8 system is automatically detected, and the playback system is played back. COPY INHIBIT appears on other VCRs (including other video camera recorder, you use your camcorder. This video system has been developed to enable digital recording to...
... you use standard 8 tape, be sure to play back standard 8 tape on the LCD screen, in the Digital8 system cannot be heard. During switching of system The Digital8 system or Hi8 /standard 8 system is automatically detected, and the playback system is played back. COPY INHIBIT appears on other VCRs (including other video camera recorder, you use your camcorder. This video system has been developed to enable digital recording to...
Operating Instructions
Page 144
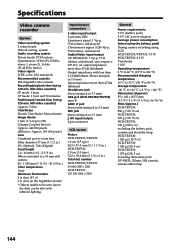
...; 220) DCR-TRV530 123 200 (560 × 220) General Power requirements 7.2 V (battery pack) 8.4 V (AC power adaptor) Average power consumption (when using the battery pack) During camera recording using 120 min. Specifications Video camera recorder System Video recording system 2 rotary heads Helical scaning system Audio recording system Rotary heads, PCM system Quantization: 12 bits (Fs 32 kHz, stereo 1, stereo 2), 16 bits (Fs 48 kHz, stereo) Video signal NTSC color, EIA standards Recommended cassette Hi8/Digital8 video cassette Recording/playback time (using 120...
...; 220) DCR-TRV530 123 200 (560 × 220) General Power requirements 7.2 V (battery pack) 8.4 V (AC power adaptor) Average power consumption (when using the battery pack) During camera recording using 120 min. Specifications Video camera recorder System Video recording system 2 rotary heads Helical scaning system Audio recording system Rotary heads, PCM system Quantization: 12 bits (Fs 32 kHz, stereo 1, stereo 2), 16 bits (Fs 48 kHz, stereo) Video signal NTSC color, EIA standards Recommended cassette Hi8/Digital8 video cassette Recording/playback time (using 120...
Operating Instructions
Page 154
... ZOOM 116 Memory photo recording ...... 93 "Memory Stick 88 Menu settings 79 Mirror mode 20 Moisture condensation ........ 139 Monaural 31 MONOTONE 37 Mosaic fader 37 NIGHTSHOT 23 NTSC system 138 O, P, Q OLD MOVIE 41 Operation indicators 153 OVERLAP 37 Photo scan 59 Photo search 58 PICTURE EFFECT 40, 53 Picture search 29 Playback pause 29 Print mark 123 PROGRAM AE 44 R Recording time 14 RESET button 129 Rec Review 26 Remaining battery time indicator 22, 28 Remaining tape...
... ZOOM 116 Memory photo recording ...... 93 "Memory Stick 88 Menu settings 79 Mirror mode 20 Moisture condensation ........ 139 Monaural 31 MONOTONE 37 Mosaic fader 37 NIGHTSHOT 23 NTSC system 138 O, P, Q OLD MOVIE 41 Operation indicators 153 OVERLAP 37 Photo scan 59 Photo search 58 PICTURE EFFECT 40, 53 Picture search 29 Playback pause 29 Print mark 123 PROGRAM AE 44 R Recording time 14 RESET button 129 Rec Review 26 Remaining battery time indicator 22, 28 Remaining tape...


