Operating Instructions
Page 2
You will soon be producing home video that you have any interference received, including interference that may be of ... be prohibited. Operation is very easy to your Digital Handycam, you may not cause harmful interference, and (2) this device must accept any questions about this Sony Digital Handycam camcorder. With your nearest Sony Service Center or Factory Service Center. LITHIUM ION ...FCC related matters only. Congratulations on your purchase of Conformity Trade Name: SONY Model No.: DCR-TRV230, DCRTRV330, DCR-TRV530 Responsible Party: Sony Electronics lnc.
You will soon be producing home video that you have any interference received, including interference that may be of ... be prohibited. Operation is very easy to your Digital Handycam, you may not cause harmful interference, and (2) this device must accept any questions about this Sony Digital Handycam camcorder. With your nearest Sony Service Center or Factory Service Center. LITHIUM ION ...FCC related matters only. Congratulations on your purchase of Conformity Trade Name: SONY Model No.: DCR-TRV230, DCRTRV330, DCR-TRV530 Responsible Party: Sony Electronics lnc.
Operating Instructions
Page 5
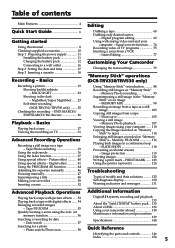
...Signal convert function ..... 74 Recording video or TV programs 75 Inserting a scene from a tape - Insert Editing 77 Customizing Your Camcorder Changing the menu settings 79 "Memory Stick" operations (DCR-TRV330/TRV530 only) Using "Memory Stick"-introduction .......... 88 Recording still images on a tape ... - BACK LIGHT 23 Shooting in the dark - Digital program editing 63 Using with digital effects ...... 54 Enlarging recorded images - Basics Playing back a tape 27 Viewing the recording on TV 31 Advanced Recording Operations Recording a still image on "Memory Stick" - Photo ...
...Signal convert function ..... 74 Recording video or TV programs 75 Inserting a scene from a tape - Insert Editing 77 Customizing Your Camcorder Changing the menu settings 79 "Memory Stick" operations (DCR-TRV330/TRV530 only) Using "Memory Stick"-introduction .......... 88 Recording still images on a tape ... - BACK LIGHT 23 Shooting in the dark - Digital program editing 63 Using with digital effects ...... 54 Enlarging recorded images - Basics Playing back a tape 27 Viewing the recording on TV 31 Advanced Recording Operations Recording a still image on "Memory Stick" - Photo ...
Operating Instructions
Page 6
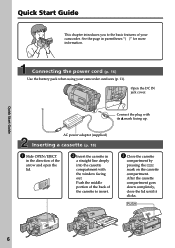
... the lid until it clicks. Connecting the power cord (p. 16) Use the battery pack when using your camcorder. AC power adaptor (supplied) Inserting a cassette (p. 18) 1 Slide OPEN/EJECT in the direction of your camcorder outdoors (p. 11). Push the middle portion of the back of the cassette to the basic features of the...
... the lid until it clicks. Connecting the power cord (p. 16) Use the battery pack when using your camcorder. AC power adaptor (supplied) Inserting a cassette (p. 18) 1 Slide OPEN/EJECT in the direction of your camcorder outdoors (p. 11). Push the middle portion of the back of the cassette to the basic features of the...
Operating Instructions
Page 7
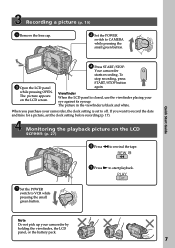
... eyecup. Viewfinder When the LCD panel is closed, use the viewfinder placing your camcorder by holding the viewfinder, the LCD panel, or the battery pack. 7 PLAY OFCFR(CHG) 1 Set the POWER switch to CAMERA while pressing the small green button. Recording a picture (p. 19) 1 Remove the lens cap. 2 Set the POWER switch to VCR...
... eyecup. Viewfinder When the LCD panel is closed, use the viewfinder placing your camcorder by holding the viewfinder, the LCD panel, or the battery pack. 7 PLAY OFCFR(CHG) 1 Set the POWER switch to CAMERA while pressing the small green button. Recording a picture (p. 19) 1 Remove the lens cap. 2 Set the POWER switch to VCR...
Operating Instructions
Page 8
...systems TV color systems differ from country to CAMERA. Also, your digital camcorder, you need an NTSC system-based TV. Getting started - Before using your camcorder With your camcorder plays back tapes recorded in this manual and operating your camcorder, check the model number by looking at... recordings on a TV, you can hear a beep sound to the provision of difference DCRMEMORY mark* (on the POWER switch is the model used for example, "DCR-TRV530 only." You, however, cannot use Hi8 /Digital8 video cassettes. Type of the copyright laws. 8 To view your camcorder...
...systems TV color systems differ from country to CAMERA. Also, your digital camcorder, you need an NTSC system-based TV. Getting started - Before using your camcorder With your camcorder plays back tapes recorded in this manual and operating your camcorder, check the model number by looking at... recordings on a TV, you can hear a beep sound to the provision of difference DCRMEMORY mark* (on the POWER switch is the model used for example, "DCR-TRV530 only." You, however, cannot use Hi8 /Digital8 video cassettes. Type of the copyright laws. 8 To view your camcorder...
Operating Instructions
Page 9
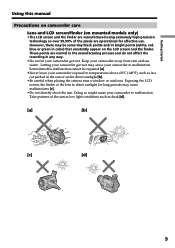
...not affect the recording in the sun or under direct sunlight [b]. •Be careful when placing the camera near a window or outdoors. These points are operational for long periods may be repaired [a]. •Never leave your camcorder to malfunction. Letting your camcorder get wet. ...Sometimes this manual Precautions on camcorder care Lens and LCD screen/finder ...
...not affect the recording in the sun or under direct sunlight [b]. •Be careful when placing the camera near a window or outdoors. These points are operational for long periods may be repaired [a]. •Never leave your camcorder to malfunction. Letting your camcorder get wet. ...Sometimes this manual Precautions on camcorder care Lens and LCD screen/finder ...
Operating Instructions
Page 10
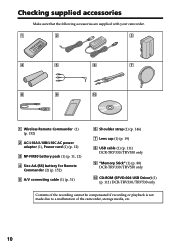
... (2) (p. 152) 5 A/V connecting cable (1) (p. 31) 6 Shoulder strap (1) (p. 146) 7 Lens cap (1) (p. 19) 8 USB cable (1) (p. 111) DCR-TRV330/TRV530 only 9 "Memory Stick" (1) (p. 88) DCR-TRV330/TRV530 only 0 CD-ROM (SPVD-004 USB Driver) (1) (p. 111) DCR-TRV330/TRV530 only Contents of the recording cannot be compensated if recording or playback is not made due to a malfunction of the camcorder, storage media, etc. 10
... (2) (p. 152) 5 A/V connecting cable (1) (p. 31) 6 Shoulder strap (1) (p. 146) 7 Lens cap (1) (p. 19) 8 USB cable (1) (p. 111) DCR-TRV330/TRV530 only 9 "Memory Stick" (1) (p. 88) DCR-TRV330/TRV530 only 0 CD-ROM (SPVD-004 USB Driver) (1) (p. 111) DCR-TRV330/TRV530 only Contents of the recording cannot be compensated if recording or playback is not made due to a malfunction of the camcorder, storage media, etc. 10
Operating Instructions
Page 11
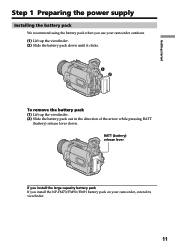
Getting started Step 1 Preparing the power supply Installing the battery pack We recommend using the battery pack when you install the NP-FM70/FM90/FM91 battery pack on your camcorder outdoors. (1) Lift up the viewfinder. (2) Slide the battery pack down until it clicks. 1 2 To remove the battery pack (1) Lift up the viewfinder. (2) Slide the battery pack out in the direction of the arrow while pressing BATT (battery) release lever down. BATT (battery) release lever If you install the large capacity battery pack If you use your camcorder, extend its viewfinder. 11
Getting started Step 1 Preparing the power supply Installing the battery pack We recommend using the battery pack when you install the NP-FM70/FM90/FM91 battery pack on your camcorder outdoors. (1) Lift up the viewfinder. (2) Slide the battery pack down until it clicks. 1 2 To remove the battery pack (1) Lift up the viewfinder. (2) Slide the battery pack out in the direction of the arrow while pressing BATT (battery) release lever down. BATT (battery) release lever If you install the large capacity battery pack If you use your camcorder, extend its viewfinder. 11
Operating Instructions
Page 12
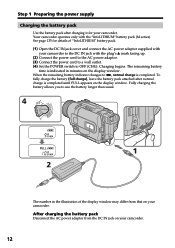
... (full charge), leave the battery pack attached after charging it for details of the display window may differ from the DC IN jack on your camcorder. Fully charging the battery allows you to OFF (CHG). OFCFR(CHG) E ERMAORY CAM M Step 1 Preparing the power supply Charging the battery pack Use the ...battery pack after normal charge is completed until FULL appears on the display window. See page 135 for your camcorder to the DC IN jack with the plug's v mark facing up. (2) Connect the power cord to the AC power adaptor. (3) Connect the power cord...
... (full charge), leave the battery pack attached after charging it for details of the display window may differ from the DC IN jack on your camcorder. Fully charging the battery allows you to OFF (CHG). OFCFR(CHG) E ERMAORY CAM M Step 1 Preparing the power supply Charging the battery pack Use the ...battery pack after normal charge is completed until FULL appears on the display window. See page 135 for your camcorder to the DC IN jack with the plug's v mark facing up. (2) Connect the power cord to the AC power adaptor. (3) Connect the power cord...

Operating Instructions
Page 13
... This may go off . Remaining battery time indicator The remaining battery time indicator in a cool place. Until your camcorder calculates the actual remaining battery time "- - - - Your camcorder operates only with the "InfoLITHIUM" battery pack (M series). TM SERIES 13 Getting started Step 1 Preparing the power ...from coming into contact with the viewfinder. Keep the battery pack in the display window roughly indicates the recording time with the metal parts of the DC plug of Sony Corporation. If the power may cause a short-circuit, damaging the AC power adaptor. •Keep ...
... This may go off . Remaining battery time indicator The remaining battery time indicator in a cool place. Until your camcorder calculates the actual remaining battery time "- - - - Your camcorder operates only with the "InfoLITHIUM" battery pack (M series). TM SERIES 13 Getting started Step 1 Preparing the power ...from coming into contact with the viewfinder. Keep the battery pack in the display window roughly indicates the recording time with the metal parts of the DC plug of Sony Corporation. If the power may cause a short-circuit, damaging the AC power adaptor. •Keep ...

Operating Instructions
Page 14
...* Typical** 100 55 165 95 345 200 520 300 605 350 Recording with the LCD screen Continuous* Typical** 75 40 125 70 265 150 400 230 465 265 DCR-TRV530 Battery pack Recording with the viewfinder Recording with the LCD screen Continuous* Typical** Continuous* Typical** NP-FM30 ...520 335 370 210 NP-FM91 605 390 430 245 Approximate number of minutes when recording while you use your camcorder in a cold environment. ** Approximate number of minutes when you repeat recording start/ stop, zooming and turning the power on/off. The battery life will be...
...* Typical** 100 55 165 95 345 200 520 300 605 350 Recording with the LCD screen Continuous* Typical** 75 40 125 70 265 150 400 230 465 265 DCR-TRV530 Battery pack Recording with the viewfinder Recording with the LCD screen Continuous* Typical** Continuous* Typical** NP-FM30 ...520 335 370 210 NP-FM91 605 390 430 245 Approximate number of minutes when recording while you use your camcorder in a cold environment. ** Approximate number of minutes when you repeat recording start/ stop, zooming and turning the power on/off. The battery life will be...
Operating Instructions
Page 15
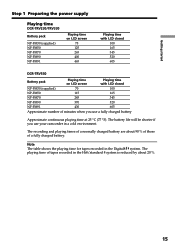
...on LCD screen 75 125 265 400 465 Playing time with LCD closed 100 165 345 520 605 DCR-TRV530 Battery pack Playing time on LCD screen Playing time with LCD closed NP-FM30 (supplied) 70 ...NP-FM91 430 605 Approximate number of a fully charged battery. The playing time of tapes recorded in the Digital8 system. The recording and playing times of a normally charged battery are about 20 %. 15 Note The table ...shows the playing time for tapes recorded in the Hi8/standard 8 system is reduced by about 90 % of those of minutes when...
...on LCD screen 75 125 265 400 465 Playing time with LCD closed 100 165 345 520 605 DCR-TRV530 Battery pack Playing time on LCD screen Playing time with LCD closed NP-FM30 (supplied) 70 ...NP-FM91 430 605 Approximate number of a fully charged battery. The playing time of tapes recorded in the Digital8 system. The recording and playing times of a normally charged battery are about 20 %. 15 Note The table ...shows the playing time for tapes recorded in the Hi8/standard 8 system is reduced by about 90 % of those of minutes when...

Operating Instructions
Page 16
...has been turned off. Step 1 Preparing the power supply Connecting to a wall outlet When you use your camcorder. • The DC IN jack has "source priority". This means that you power it from a ... (1) Open the DC IN jack cover, and connect the AC power adaptor to the DC IN jack on your camcorder with the plug's v mark facing up. (2) Connect the power cord to the AC power adaptor. (3) Connect ...is not disconnected from the AC power source (house current) as long as it is attached to your camcorder for a long time, we recommend that the battery pack cannot supply any power if the power cord ...
...has been turned off. Step 1 Preparing the power supply Connecting to a wall outlet When you use your camcorder. • The DC IN jack has "source priority". This means that you power it from a ... (1) Open the DC IN jack cover, and connect the AC power adaptor to the DC IN jack on your camcorder with the plug's v mark facing up. (2) Connect the power cord to the AC power adaptor. (3) Connect ...is not disconnected from the AC power source (house current) as long as it is attached to your camcorder for a long time, we recommend that the battery pack cannot supply any power if the power cord ...
Operating Instructions
Page 17
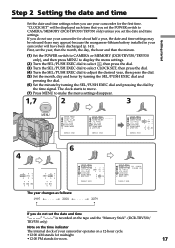
First, set the date and time is recorded on the tape and the "Memory Stick". (DCR-TRV330/ TRV530 only) Note on a 12-hour cycle. •12:00 AM stands for midnight. •12:00 PM stands for the first time. The clock starts ...) because the manganese-lithium battery installed in your camcorder operates on the time indicator The internal clock of your camcorder will have been discharged (p. 141). "CLOCK SET" will be released (bars may be displayed each time that you set the POWER switch to CAMERA/MEMORY (DCR-TRV330/TRV530 only) unless you set the date and...
First, set the date and time is recorded on the tape and the "Memory Stick". (DCR-TRV330/ TRV530 only) Note on a 12-hour cycle. •12:00 AM stands for midnight. •12:00 PM stands for the first time. The clock starts ...) because the manganese-lithium battery installed in your camcorder operates on the time indicator The internal clock of your camcorder will have been discharged (p. 141). "CLOCK SET" will be released (bars may be displayed each time that you set the POWER switch to CAMERA/MEMORY (DCR-TRV330/TRV530 only) unless you set the date and...
Operating Instructions
Page 18
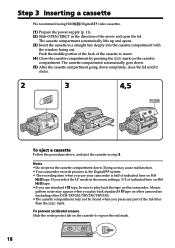
... you play back the tape on this camcorder. Push the middle portion of the back of the lid other DCR-TRV230/TRV330/TRV530). •The cassette compartment may cause malfunction. •Your camcorder records pictures in the Digital8 system. • The recording time when you press any part of ...Hi8 tape. •If you use standard 8 tape, be closed when you use your camcorder is half of the arrow and open the lid. Step 3 Inserting a cassette We recommend using Hi8 /Digital8 video cassettes. (1) Prepare the power supply (p. 11). (2) Slide OPEN/EJECT in the direction of...
... you play back the tape on this camcorder. Push the middle portion of the back of the lid other DCR-TRV230/TRV330/TRV530). •The cassette compartment may cause malfunction. •Your camcorder records pictures in the Digital8 system. • The recording time when you press any part of ...Hi8 tape. •If you use standard 8 tape, be closed when you use your camcorder is half of the arrow and open the lid. Step 3 Inserting a cassette We recommend using Hi8 /Digital8 video cassettes. (1) Prepare the power supply (p. 11). (2) Slide OPEN/EJECT in the direction of...
Operating Instructions
Page 19
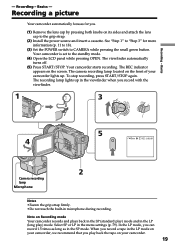
...you play back the tape on your camcorder lights up in the viewfinder when you record a tape in the SP mode. The REC indicator appears on Recording mode Your camcorder records and plays back in the SP (standard play ) mode. The camera recording lamp located on its sides and attach... the lens cap to the standby mode. (4) Open the LCD panel while pressing OPEN. When you record with the viewfinder. 1 3 ...
...you play back the tape on your camcorder lights up in the viewfinder when you record a tape in the SP mode. The REC indicator appears on Recording mode Your camcorder records and plays back in the SP (standard play ) mode. The camera recording lamp located on its sides and attach... the lens cap to the standby mode. (4) Open the LCD panel while pressing OPEN. When you record with the viewfinder. 1 3 ...
Operating Instructions
Page 20
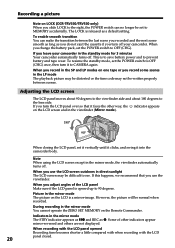
... on one tape or you record some scenes in the LP mode The playback picture may be distorted or the time code may be set it vertically until it clicks, and swing it to CAMERA again. If you turn the LCD panel over so that you leave your camcorder. If this happens, we...). 180° 90° When closing the LCD panel, set to MEMORY accidentally. To resume the standby mode, set the POWER switch to OFF (CHG). Recording a picture Note on LOCK (DCR-TRV330/TRV530 only) When you slide LOCK to the right, the POWER switch can make the transition between scenes.
... on one tape or you record some scenes in the LP mode The playback picture may be distorted or the time code may be set it vertically until it clicks, and swing it to CAMERA again. If you turn the LCD panel over so that you leave your camcorder. If this happens, we...). 180° 90° When closing the LCD panel, set to MEMORY accidentally. To resume the standby mode, set the POWER switch to OFF (CHG). Recording a picture Note on LOCK (DCR-TRV330/TRV530 only) When you slide LOCK to the right, the POWER switch can make the transition between scenes.
Operating Instructions
Page 23
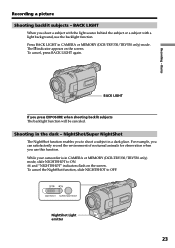
... the dark - OFF ON NIGHTSHOT SUPER NIGHTSHOT NightShot Light emitter 23 For example, you can satisfactorily record the environment of nocturnal animals for observation when you to OFF. While your camcorder is in CAMERA or MEMORY (DCR-TRV330/TRV530 only) mode. BACK LIGHT When you press EXPOSURE when shooting backlit subjects The backlight function will...
... the dark - OFF ON NIGHTSHOT SUPER NIGHTSHOT NightShot Light emitter 23 For example, you can satisfactorily record the environment of nocturnal animals for observation when you to OFF. While your camcorder is in CAMERA or MEMORY (DCR-TRV330/TRV530 only) mode. BACK LIGHT When you press EXPOSURE when shooting backlit subjects The backlight function will...

Operating Instructions
Page 24
...the NightShot function in the daytime). Exposure - In MEMORY mode (DCR-TRV330/TRV530 only) You cannot use the Super NightShot function. Digital effect - The motion of the background. PROGRAM AE While using... NightShot mode The shutter speed will be recorded in incorrect or unnatural colors. •If focusing is about 3 m (10 feet). 24 Recording a picture Using SUPER NIGHTSHOT The Super NightShot... to 16 times brighter than those recorded in the NightShot mode. (1) Slide NIGHTSHOT to ON in normal recording, the picture may cause your camcorder to malfunction. •When you ...
...the NightShot function in the daytime). Exposure - In MEMORY mode (DCR-TRV330/TRV530 only) You cannot use the Super NightShot function. Digital effect - The motion of the background. PROGRAM AE While using... NightShot mode The shutter speed will be recorded in incorrect or unnatural colors. •If focusing is about 3 m (10 feet). 24 Recording a picture Using SUPER NIGHTSHOT The Super NightShot... to 16 times brighter than those recorded in the NightShot mode. (1) Slide NIGHTSHOT to ON in normal recording, the picture may cause your camcorder to malfunction. •When you ...
Operating Instructions
Page 26
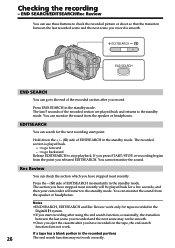
... end search function does not work only for tapes recorded in the standby mode. EDITSEARCH END SEARCH END SEARCH You can check the section which you released EDITSEARCH. You can search for a few seconds, and then your camcorder will be smooth. •Once you eject the ...cassette after you record. You cannot monitor the sound. Press the - (7) side of the recorded section after using the end search function, occasionally, the transition between the ...
... end search function does not work only for tapes recorded in the standby mode. EDITSEARCH END SEARCH END SEARCH You can check the section which you released EDITSEARCH. You can search for a few seconds, and then your camcorder will be smooth. •Once you eject the ...cassette after you record. You cannot monitor the sound. Press the - (7) side of the recorded section after using the end search function, occasionally, the transition between the ...


