Operating Instructions
Page 157
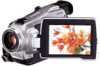
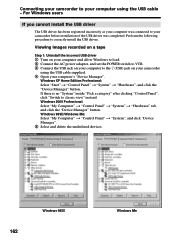
...1 GB (depending on the size of the USB driver before connecting the camcorder to view tape images on your computer (except DCR-TRV16). Recommended computer usage environment to the computer. The USB jack must install a USB driver onto your computer in order to connect the ... You can view images recorded on a "Memory Stick" on the computer OS: Microsoft Windows 98SE, Windows Me, Windows 2000 Professional, Windows XP Home Edition or Windows XP Professional. When connecting to a computer using the USB cable You must be able to install the USB driver correctly. CPU: Minimum 500...
...1 GB (depending on the size of the USB driver before connecting the camcorder to view tape images on your computer (except DCR-TRV16). Recommended computer usage environment to the computer. The USB jack must install a USB driver onto your computer in order to connect the ... You can view images recorded on a "Memory Stick" on the computer OS: Microsoft Windows 98SE, Windows Me, Windows 2000 Professional, Windows XP Home Edition or Windows XP Professional. When connecting to a computer using the USB cable You must be able to install the USB driver correctly. CPU: Minimum 500...
Operating Instructions
Page 159
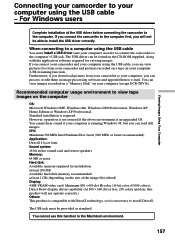
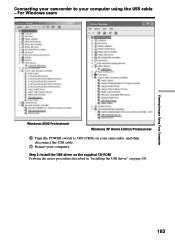
..., log in with permission of your computer without connecting the USB cable to your computer using the USB cable - Windows XP Home Edition/Professional users If you connect the USB cable before USB driver installation is ideal for details. 159 Connect the USB cable according to install the USB driver. (5) Remove the CD-ROM and then restart the computer...
..., log in with permission of your computer without connecting the USB cable to your computer using the USB cable - Windows XP Home Edition/Professional users If you connect the USB cable before USB driver installation is ideal for details. 159 Connect the USB cable according to install the USB driver. (5) Remove the CD-ROM and then restart the computer...
Operating Instructions
Page 161
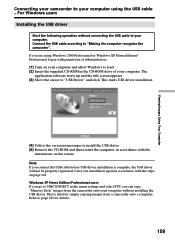
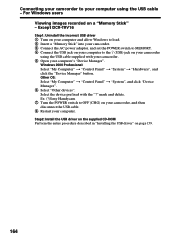
...Viewing images recorded on the LCD screen of your camcorder. Be sure to allow the installation to complete without interrupting it. For Windows users (11) Follow the on-screen messages so that the Add Hardware Wizard recognizes that the USB drivers have been...USB driver if a "Memory Stick" is NORMAL.) (1) Insert a "Memory Stick" into your camcorder. (2) Connect the AC power adaptor and set the POWER switch to your computer using the supplied USB cable. For Windows 2000 Professional, Windows XP Home Edition/Professional users: (12) After the "File Needed" screen appears. Except DCR...
...Viewing images recorded on the LCD screen of your camcorder. Be sure to allow the installation to complete without interrupting it. For Windows users (11) Follow the on-screen messages so that the Add Hardware Wizard recognizes that the USB drivers have been...USB driver if a "Memory Stick" is NORMAL.) (1) Insert a "Memory Stick" into your camcorder. (2) Connect the AC power adaptor and set the POWER switch to your computer using the supplied USB cable. For Windows 2000 Professional, Windows XP Home Edition/Professional users: (12) After the "File Needed" screen appears. Except DCR...
Operating Instructions
Page 162
... and delete the underlined devices. 162 Windows 98SE Windows Me Viewing images recorded on a tape Step 1: Uninstall the incorrect USB driver 1 Turn on your computer and allow Windows to load. 2 Connect the AC power adaptor, and set the POWER switch to VCR. 3 Connect the USB jack on your computer to the (USB) jack on your camcorder using the...
... and delete the underlined devices. 162 Windows 98SE Windows Me Viewing images recorded on a tape Step 1: Uninstall the incorrect USB driver 1 Turn on your computer and allow Windows to load. 2 Connect the AC power adaptor, and set the POWER switch to VCR. 3 Connect the USB jack on your computer to the (USB) jack on your camcorder using the...
Operating Instructions
Page 163
Step 2: Install the USB driver on the supplied CD-ROM Perform the entire procedure described in "Installing the USB driver" on your camcorder, and then disconnect the USB cable. 7 Restart your computer using the USB cable - Connecting your camcorder to OFF (CHG) on page 159. 163 For Windows users Viewing Images Using Your Computer Windows 2000 Professional Windows XP Home Edition/Professional 6 Turn the POWER switch to your computer.
Step 2: Install the USB driver on the supplied CD-ROM Perform the entire procedure described in "Installing the USB driver" on your camcorder, and then disconnect the USB cable. 7 Restart your computer using the USB cable - Connecting your camcorder to OFF (CHG) on page 159. 163 For Windows users Viewing Images Using Your Computer Windows 2000 Professional Windows XP Home Edition/Professional 6 Turn the POWER switch to your computer.
Operating Instructions
Page 164
mark and delete. Step2: Install the USB driver on the supplied CD-ROM Perform the entire procedure described in "Installing the USB driver" on a "Memory Stick" - Except DCR-TRV16 Step1: Uninstall the incorrect USB driver 1 Turn on your computer and allow Windows to load. 2 Insert a "Memory ... "System", and click "Device Manager". 6 Select "Other devices". For Windows users Viewing images recorded on page 159. 164 Select the device prefixed with your camcorder. 5 Open your camcorder using the USB cable - Ex: (?)Sony Handycam 7 Turn the POWER switch to OFF (CHG) on your computer...
mark and delete. Step2: Install the USB driver on the supplied CD-ROM Perform the entire procedure described in "Installing the USB driver" on a "Memory Stick" - Except DCR-TRV16 Step1: Uninstall the incorrect USB driver 1 Turn on your computer and allow Windows to load. 2 Insert a "Memory ... "System", and click "Device Manager". 6 Select "Other devices". For Windows users Viewing images recorded on page 159. 164 Select the device prefixed with your camcorder. 5 Open your camcorder using the USB cable - Ex: (?)Sony Handycam 7 Turn the POWER switch to OFF (CHG) on your computer...

Operating Instructions
Page 165
... as Power Users or Administrators. Viewing Images Using Your Computer The "PIXELA ImageMixer Ver.1.0 for Sony" You need to install the USB driver and "PIXELA ImageMixer" to view images recorded on the screen. Viewing images recorded on your computer and allow Windows to load. (2) Connect the AC power adaptor, and insert a tape into your camcorder. (3) Set...
... as Power Users or Administrators. Viewing Images Using Your Computer The "PIXELA ImageMixer Ver.1.0 for Sony" You need to install the USB driver and "PIXELA ImageMixer" to view images recorded on the screen. Viewing images recorded on your computer and allow Windows to load. (2) Connect the AC power adaptor, and insert a tape into your camcorder. (3) Set...
Operating Instructions
Page 167
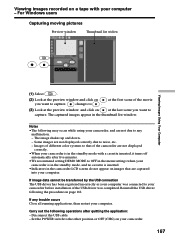
...window. Set the POWER switch to the other position or OFF (CHG) on page 162. Reinstall the USB driver following the procedure on your camcorder is inserted. •Indicators in the camcorder LCD screen do not appear on at the last scene you want to capture. Viewing images recorded... appear in the standby mode with your camcorder before installation of the USB driver was completed. Carry out the following may occur while using your computer. For Windows users Capturing moving pictures Preview window Thumbnail list widow Viewing Images Using Your Computer (1) Select . (2) ...
...window. Set the POWER switch to the other position or OFF (CHG) on page 162. Reinstall the USB driver following the procedure on your camcorder is inserted. •Indicators in the camcorder LCD screen do not appear on at the last scene you want to capture. Viewing images recorded... appear in the standby mode with your camcorder before installation of the USB driver was completed. Carry out the following may occur while using your computer. For Windows users Capturing moving pictures Preview window Thumbnail list widow Viewing Images Using Your Computer (1) Select . (2) ...
Operating Instructions
Page 169
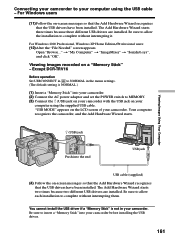
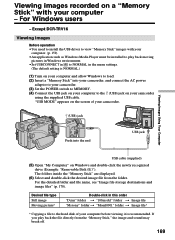
... (1) Turn on your computer and allow Windows to load. (2) Insert a "Memory Stick" into the end USB jack Viewing Images Using Your Computer USB cable (supplied) (5) Open "My Computer" on Windows and double-click the newly recognized drive ...DCR-TRV16 Viewing images Before operation •You need to install the USB driver to view "Memory Stick" images with your computer - For the detailed folder and file name, see "Image file storage destinations and image files" (p. 170). Viewing images recorded on a "Memory Stick" with your computer. (p. 159) •An application such as Windows...
... (1) Turn on your computer and allow Windows to load. (2) Insert a "Memory Stick" into the end USB jack Viewing Images Using Your Computer USB cable (supplied) (5) Open "My Computer" on Windows and double-click the newly recognized drive ...DCR-TRV16 Viewing images Before operation •You need to install the USB driver to view "Memory Stick" images with your computer - For the detailed folder and file name, see "Image file storage destinations and image files" (p. 170). Viewing images recorded on a "Memory Stick" with your computer. (p. 159) •An application such as Windows...
Operating Instructions
Page 190
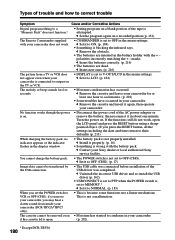
...* Except DCR-TRV16 190 Types of trouble and how to correct trouble Symptom Cause and/or Corrective Actions Digital program editing to a "Memory Stick" does not function.* • Setting program on a recorded portion (p....window. • The battery pack is set to condense in the menu settings. c Remove the cassette and leave your camcorder (DCR-TRV25/TRV27 only). • This is on. • Disconnect the power cord of the USB driver... indicator flashes in your Sony dealer or local authorized Sony service facility. c Remove the obstacle. • The batteries are dead.
...* Except DCR-TRV16 190 Types of trouble and how to correct trouble Symptom Cause and/or Corrective Actions Digital program editing to a "Memory Stick" does not function.* • Setting program on a recorded portion (p....window. • The battery pack is set to condense in the menu settings. c Remove the cassette and leave your camcorder (DCR-TRV25/TRV27 only). • This is on. • Disconnect the power cord of the USB driver... indicator flashes in your Sony dealer or local authorized Sony service facility. c Remove the obstacle. • The batteries are dead.
PIXELA ImageMixer 1.0 Manual
Page 6
...displayed correctly. Pentium ® III 800MHz or faster is not supported. for Windows ® XP you must meet the following minimum system requirements. Direct Draw driver compatible ImageMixer will not be authorized as a Power User or Administrator; Macintosh Please... or faster. (Pentium ® III 500MHz or faster for capturing a movie via USB or IEEE1394. Introduction Chapter 1 Before Use 1-1 System Requirements System Requirements Windows Macintosh Setup Installation Uninstalling Basic Operations Starting ImageMixer ImageMixer startup screen Outline of tasks Selector ...
...displayed correctly. Pentium ® III 800MHz or faster is not supported. for Windows ® XP you must meet the following minimum system requirements. Direct Draw driver compatible ImageMixer will not be authorized as a Power User or Administrator; Macintosh Please... or faster. (Pentium ® III 500MHz or faster for capturing a movie via USB or IEEE1394. Introduction Chapter 1 Before Use 1-1 System Requirements System Requirements Windows Macintosh Setup Installation Uninstalling Basic Operations Starting ImageMixer ImageMixer startup screen Outline of tasks Selector ...
Marketing Specifications
Page 2
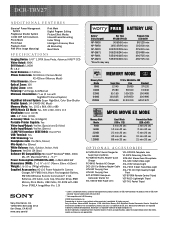
... owners. DCR-TRV27 ADDITIONAL FEATURES Stamina® Power Management System Progressive Shutter System 14 Bit DXP A/D Conversion Photo Mode Photo Save Playback Zoom PIM (Print Image Matching) Print Mark Digital Program Editing Picture Effect Modes Interval/Frame Recording Index Titling...Video Actual: 690K Still Actual: 1,000K F: 1.8-2 Focal Distance: 3.7-37mm 35mm Conversion: 50-500mm (Camera Mode) 42-420mm (Memory Mode) Filter Diameter: 30mm Optical Zoom: 10X Digital Zoom: 120X Focusing: Full Range Auto/Manual Minimum Illumination: 7 Lux (0 Lux with USB Streaming. ©2002 Sony ...
... owners. DCR-TRV27 ADDITIONAL FEATURES Stamina® Power Management System Progressive Shutter System 14 Bit DXP A/D Conversion Photo Mode Photo Save Playback Zoom PIM (Print Image Matching) Print Mark Digital Program Editing Picture Effect Modes Interval/Frame Recording Index Titling...Video Actual: 690K Still Actual: 1,000K F: 1.8-2 Focal Distance: 3.7-37mm 35mm Conversion: 50-500mm (Camera Mode) 42-420mm (Memory Mode) Filter Diameter: 30mm Optical Zoom: 10X Digital Zoom: 120X Focusing: Full Range Auto/Manual Minimum Illumination: 7 Lux (0 Lux with USB Streaming. ©2002 Sony ...


