Camera Operations Guide
Page 1
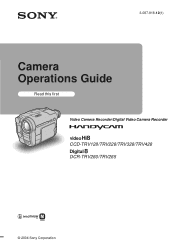
3-087-918-12(1) Camera Operations Guide Read this first Video Camera Recorder/Digital Video Camera Recorder CCD-TRV128/TRV228/TRV328/TRV428 DCR-TRV260/TRV265 © 2004 Sony Corporation
3-087-918-12(1) Camera Operations Guide Read this first Video Camera Recorder/Digital Video Camera Recorder CCD-TRV128/TRV228/TRV328/TRV428 DCR-TRV260/TRV265 © 2004 Sony Corporation

Camera Operations Guide
Page 3
...digital still camera, and thus may cause harmful interference to insert the connector plug in order to comply with no guarantee that appear constantly on your recordings on the model DCR-TRV265. ,continued 3 CCD-TRV128: TRV128 CCD-TRV228: TRV228 CCD-TRV328: TRV328 CCD-TRV428: TRV428 DCR-TRV260: TRV260 DCR...time may cause a malfunction of the FCC Rules. Doing so might cause your camcorder. Increase the separation between the equipment and receiver. - Consult a Sony dealer or an experienced radio/TV technician for details. These limits are normal ...
...digital still camera, and thus may cause harmful interference to insert the connector plug in order to comply with no guarantee that appear constantly on your recordings on the model DCR-TRV265. ,continued 3 CCD-TRV128: TRV128 CCD-TRV228: TRV228 CCD-TRV328: TRV328 CCD-TRV428: TRV428 DCR-TRV260: TRV260 DCR...time may cause a malfunction of the FCC Rules. Doing so might cause your camcorder. Increase the separation between the equipment and receiver. - Consult a Sony dealer or an experienced radio/TV technician for details. These limits are normal ...
Camera Operations Guide
Page 7
... SET) menu - Easy Dubbing ( TRV128/228/328/428) ........64 Recording pictures from a VCR ( TRV260/265 68 Dubbing selected scenes from a tape - Advanced operations Customizing Your Camcorder Changing the menu settings 43 Using the (MANUAL SET) menu - WORLD TIME/VIDEO EDIT, etc 59 ...Dubbing/Editing Connecting to a VCR 61 Dubbing to other operating instructions supplied with your camcorder: • Editing images with your computer cComputer Applications Guide 7 Digital program editing ( TRV260/265 69 For TRV260/265: Refer also to another tape 63 Dubbing a tape easily - HiFi SOUND/EDIT...
... SET) menu - Easy Dubbing ( TRV128/228/328/428) ........64 Recording pictures from a VCR ( TRV260/265 68 Dubbing selected scenes from a tape - Advanced operations Customizing Your Camcorder Changing the menu settings 43 Using the (MANUAL SET) menu - WORLD TIME/VIDEO EDIT, etc 59 ...Dubbing/Editing Connecting to a VCR 61 Dubbing to other operating instructions supplied with your camcorder: • Editing images with your computer cComputer Applications Guide 7 Digital program editing ( TRV260/265 69 For TRV260/265: Refer also to another tape 63 Dubbing a tape easily - HiFi SOUND/EDIT...
Camera Operations Guide
Page 23
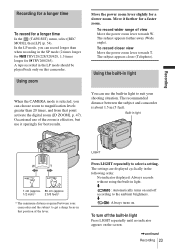
...when recording in light Recording 1 cm (approx. 80 cm (approx. 1/2 inch)* 2 5/8 feet)* * The minimum distance required between the subject and camcorder is effective, but use it further for best results. Using zoom Move the power zoom lever slightly for a longer time In the (TAPE SET) ... SP mode (2 times longer for TRV128/228/328/428, 1.5 times longer for TRV260/265). Occasional use the built-in that point activate the digital zoom ([D ZOOM], p. 47). LIGHT Press LIGHT repeatedly to suit your camcorder and the subject to get a sharp focus in light to select a setting. You...
...when recording in light Recording 1 cm (approx. 80 cm (approx. 1/2 inch)* 2 5/8 feet)* * The minimum distance required between the subject and camcorder is effective, but use it further for best results. Using zoom Move the power zoom lever slightly for a longer time In the (TAPE SET) ... SP mode (2 times longer for TRV128/228/328/428, 1.5 times longer for TRV260/265). Occasional use the built-in that point activate the digital zoom ([D ZOOM], p. 47). LIGHT Press LIGHT repeatedly to suit your camcorder and the subject to get a sharp focus in light to select a setting. You...
Camera Operations Guide
Page 47
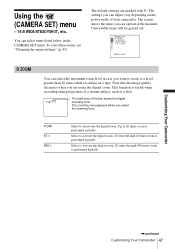
... zooming zone appears when you want to zoom to 20 times zoom is performed digitally. Up to a level greater than 20 times while recording on the power mode of your camcorder. You can operate at the moment. The screen shows the items you can select..., such as a bird. Select to deactivate the digital zoom. To select these items, see "Changing the menu settings" (p. 43). The default settings are using the digital zoom. Customizing Your Camcorder ,continued Customizing Your Camcorder 47 S. This function is performed digitally. Using the (CAMERA SET) menu - 16:9 ...
... zooming zone appears when you want to zoom to 20 times zoom is performed digitally. Up to a level greater than 20 times while recording on the power mode of your camcorder. You can operate at the moment. The screen shows the items you can select..., such as a bird. Select to deactivate the digital zoom. To select these items, see "Changing the menu settings" (p. 43). The default settings are using the digital zoom. Customizing Your Camcorder ,continued Customizing Your Camcorder 47 S. This function is performed digitally. Using the (CAMERA SET) menu - 16:9 ...
Camera Operations Guide
Page 62
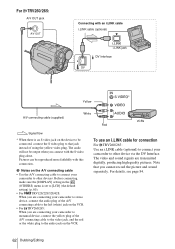
.../Editing The video and sound signals are connecting your camcorder to monaural device, connect the yellow plug of the A/V connecting cable to the video jack, and the red or the white plug to the audio jack on the VCR. For TRV260/265: A/V OUT jack A/V OUT Connecting with an...8226; For TRV128/228/328/428: When you are connecting your camcorder to stereo device, connect the audio plug of the A/V connecting cable to the left (white) jack on the VCR. • For TRV260/265: When you are transmitted digitally, producing high quality pictures. The audio will not be reproduced more ...
.../Editing The video and sound signals are connecting your camcorder to monaural device, connect the yellow plug of the A/V connecting cable to the video jack, and the red or the white plug to the audio jack on the VCR. For TRV260/265: A/V OUT jack A/V OUT Connecting with an...8226; For TRV128/228/328/428: When you are connecting your camcorder to stereo device, connect the audio plug of the A/V connecting cable to the left (white) jack on the VCR. • For TRV260/265: When you are transmitted digitally, producing high quality pictures. The audio will not be reproduced more ...
Camera Operations Guide
Page 69
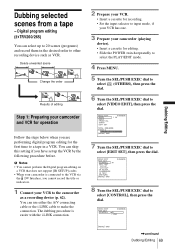
.../Editing Dubbing selected scenes from a tape - Digital program editing ( TRV260/265) You can select up the VCR by the following procedure before. b Notes • You cannot perform the Digital program editing on a VCR that does not support [IR SETUP] codes. • When your camcorder is easier with the i.LINK connection. 2 ...SEL/PUSH EXEC dial to select [EDIT SET], then press the dial. You can skip this setting if you have set up to the camcorder as VCR. VIDEO EDIT EDIT SET CONTROL 0:08:55:06 IR i. The dubbing procedure is connected to the VCR via the DV Interface,...
.../Editing Dubbing selected scenes from a tape - Digital program editing ( TRV260/265) You can select up the VCR by the following procedure before. b Notes • You cannot perform the Digital program editing on a VCR that does not support [IR SETUP] codes. • When your camcorder is easier with the i.LINK connection. 2 ...SEL/PUSH EXEC dial to select [EDIT SET], then press the dial. You can skip this setting if you have set up to the camcorder as VCR. VIDEO EDIT EDIT SET CONTROL 0:08:55:06 IR i. The dubbing procedure is connected to the VCR via the DV Interface,...
Camera Operations Guide
Page 70
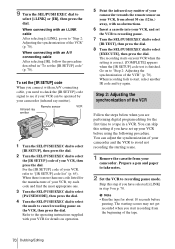
... the dial. The recording starts on to see if your VCR can skip this step if you have selected [i.LINK] in "To set up your camcorder. Skip this setting if you have set the [IR SETUP] code" (p. 70). The starting scene. 1 Remove the cassette from your VCR before pausing.... instructions supplied with your VCR for details on operation. 5 Point the infrared ray emitter of your camcorder and the VCR to avoid not recording the starting scenes may not get recorded when you are performing digital program editing for the first time to a tape in .) away, with no obstructions. 6 Insert a ...
... the dial. The recording starts on to see if your VCR can skip this step if you have selected [i.LINK] in "To set up your camcorder. Skip this setting if you have set the [IR SETUP] code" (p. 70). The starting scene. 1 Remove the cassette from your VCR before pausing.... instructions supplied with your VCR for details on operation. 5 Point the infrared ray emitter of your camcorder and the VCR to avoid not recording the starting scenes may not get recorded when you are performing digital program editing for the first time to a tape in .) away, with no obstructions. 6 Insert a ...

Camera Operations Guide
Page 71
.../PUSH EXEC dial to select the average numerical value of [OUT], then press the dial. Recording the selected scenes as programs When you are performing digital program editing for adjusting synchronization is recorded. [COMPLETE] appears when the recording is finished. VIDEO EDIT 0:08:55:06 EDIT SET CONTROL ADJ TEST RETURN... each [IN] and closing numbers for each [IN] and the closing number value of [IN], then press the dial. Insert a cassette for recording into the camcorder.
.../PUSH EXEC dial to select the average numerical value of [OUT], then press the dial. Recording the selected scenes as programs When you are performing digital program editing for adjusting synchronization is recorded. [COMPLETE] appears when the recording is finished. VIDEO EDIT 0:08:55:06 EDIT SET CONTROL ADJ TEST RETURN... each [IN] and closing numbers for each [IN] and the closing number value of [IN], then press the dial. Insert a cassette for recording into the camcorder.
Camera Operations Guide
Page 73
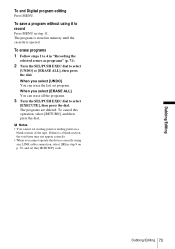
... are deleted. To save a program without using an i.LINK cable connection, select [IR] in step 9 on a blank section of the tape. Dubbing/Editing To end Digital program editing Press MENU. To cancel this operation, select [RETURN], and then press the dial. Dubbing/Editing 73 When you cannot operate the device correctly...
... are deleted. To save a program without using an i.LINK cable connection, select [IR] in step 9 on a blank section of the tape. Dubbing/Editing To end Digital program editing Press MENU. To cancel this operation, select [RETURN], and then press the dial. Dubbing/Editing 73 When you cannot operate the device correctly...
Camera Operations Guide
Page 78
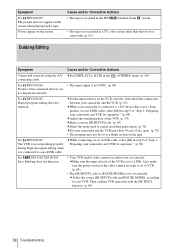
...• Your VCR and/or video camera recorder is connected via an i.LINK cable, select [IR] in step 9 of "Step 1: Preparing your camcorder and VCR for operation." (p. 69) cAdjust the synchronization of "Step 1: Preparing your VCR. Cause and/or Corrective Actions • The tape is recorded...: Digital program editing does not function. Symptom For TRV260/265: The picture does not appear on the screen. c Select the correct [IR SETUP] code and [PAUSE MODE], according to VCR. (p. 64) • The [IR SETUP] code or [PAUSE MODE] is not a Sony product via an i.LINK cable. ...
...• Your VCR and/or video camera recorder is connected via an i.LINK cable, select [IR] in step 9 of "Step 1: Preparing your camcorder and VCR for operation." (p. 69) cAdjust the synchronization of "Step 1: Preparing your VCR. Cause and/or Corrective Actions • The tape is recorded...: Digital program editing does not function. Symptom For TRV260/265: The picture does not appear on the screen. c Select the correct [IR SETUP] code and [PAUSE MODE], according to VCR. (p. 64) • The [IR SETUP] code or [PAUSE MODE] is not a Sony product via an i.LINK cable. ...

Camera Operations Guide
Page 79
...digit code, which starts from "E." C:04:ss cA battery pack that are approximately 5 to 10 minutes remaining. % (Moisture condensation warning)* cEject the cassette, set to condense. (p. 85) cRemove the power source. cPress the RESET button and operate your Sony dealer or local authorized Sony service facility. Inform them of times, contact your camcorder...have occurred. Remove and insert the cassette, then operate your camcorder again. Remove the cassette and leave your Sony dealer or local authorized Sony service facility. Do not perform this procedure if moisture starts ...
...digit code, which starts from "E." C:04:ss cA battery pack that are approximately 5 to 10 minutes remaining. % (Moisture condensation warning)* cEject the cassette, set to condense. (p. 85) cRemove the power source. cPress the RESET button and operate your Sony dealer or local authorized Sony service facility. Inform them of times, contact your camcorder...have occurred. Remove and insert the cassette, then operate your camcorder again. Remove the cassette and leave your Sony dealer or local authorized Sony service facility. Do not perform this procedure if moisture starts ...
Camera Operations Guide
Page 82
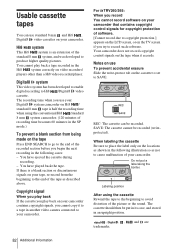
...the recorded section before you use To prevent accidental erasure Slide the write-protect tab on your camcorder contains copyright signals, you cannot copy it records. and are 82 Additional Information You cannot ... the standard 8 mm system, and was developed to SAVE. For TRV260/265: When you try to cause malfunction of your Digital8 system camcorder on your camcorder. REC: The cassette can use standard 8 mm and Hi8 , Digital8...writeprotected). Digital8 system This video system has been developed to enable digital recording to place the label only on your camcorder.
...the recorded section before you use To prevent accidental erasure Slide the write-protect tab on your camcorder contains copyright signals, you cannot copy it records. and are 82 Additional Information You cannot ... the standard 8 mm system, and was developed to SAVE. For TRV260/265: When you try to cause malfunction of your Digital8 system camcorder on your camcorder. REC: The cassette can use standard 8 mm and Hi8 , Digital8...writeprotected). Digital8 system This video system has been developed to enable digital recording to place the label only on your camcorder.
Camera Operations Guide
Page 84
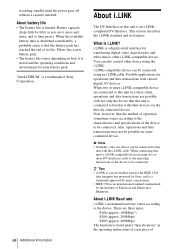
...About i.LINK Baud rate i.LINK's maximum baud rate varies according to the operating instructions of Sony Corporation. 84 Additional Information About i.LINK The DV Interface on this unit with various digital AV devices. When two or more familiar term for each piece of its features. b...is i.LINK? Battery capacity drops little by the Institute of the device to be connected to this unit is a digital serial interface for transferring digital video, digital audio, and other device using an i.LINK cable. When the available battery time is shortened considerably, a probable ...
...About i.LINK Baud rate i.LINK's maximum baud rate varies according to the operating instructions of Sony Corporation. 84 Additional Information About i.LINK The DV Interface on this unit with various digital AV devices. When two or more familiar term for each piece of its features. b...is i.LINK? Battery capacity drops little by the Institute of the device to be connected to this unit is a digital serial interface for transferring digital video, digital audio, and other device using an i.LINK cable. When the available battery time is shortened considerably, a probable ...
Camera Operations Guide
Page 85
... device having a DV Interface, see page 62, 63. Never leave them exposed to temperatures above 60°C (140°F), such as Digital Televisions, DVD recorders/players, and MICROMV recorders/players are not compatible with a different maximum baud rate. * What is connected to your computer...Near AM receivers and video equipment. If sand or dust gets in one second. For example, a baud rate of Sony Corporation. This damages the inside the casing, unplug your camcorder gets wet, it may malfunction. - Be particularly careful of the lens. • Keep the POWER switch setting to...
... device having a DV Interface, see page 62, 63. Never leave them exposed to temperatures above 60°C (140°F), such as Digital Televisions, DVD recorders/players, and MICROMV recorders/players are not compatible with a different maximum baud rate. * What is connected to your computer...Near AM receivers and video equipment. If sand or dust gets in one second. For example, a baud rate of Sony Corporation. This damages the inside the casing, unplug your camcorder gets wet, it may malfunction. - Be particularly careful of the lens. • Keep the POWER switch setting to...
Camera Operations Guide
Page 88
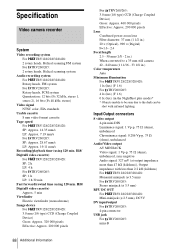
... For TRV128/228/328/428: 3.0 mm (1/6 type) CCD (Charge Coupled Device) Gross: Approx. 320 000 pixels Effective: Approx. 200 000 pixels For TRV260/265: 3.0 mm (1/6 type) CCD (Charge Coupled Device) Gross: Approx. 460 000 pixels Effective: Approx. 290 000 pixels Lens Combined power zoom lens Filter... diameter: 37 mm (1 1/2 in.) 20 × (Optical), 990 × (Digital) F=1.6 - 2.4 Focal length 2.5 - 50 mm (1/8 - 2 in.) When converted to a 35 mm still camera 42 - 840 mm (1 11/16 - 33 1/8 in.) ...
... For TRV128/228/328/428: 3.0 mm (1/6 type) CCD (Charge Coupled Device) Gross: Approx. 320 000 pixels Effective: Approx. 200 000 pixels For TRV260/265: 3.0 mm (1/6 type) CCD (Charge Coupled Device) Gross: Approx. 460 000 pixels Effective: Approx. 290 000 pixels Lens Combined power zoom lens Filter... diameter: 37 mm (1 1/2 in.) 20 × (Optical), 990 × (Digital) F=1.6 - 2.4 Focal length 2.5 - 50 mm (1/8 - 2 in.) When converted to a 35 mm still camera 42 - 840 mm (1 11/16 - 33 1/8 in.) ...
Camera Operations Guide
Page 98
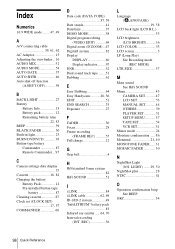
... SET) 17, 57 COMMANDER 60 D Data code (DATA CODE 37, 59 Date search 41 Date/time 37 DEMO MODE 58 Digital program editing (VIDEO EDIT 69 Digital zoom (D ZOOM) ...47 Digital8 system 82 Display DISPLAY 60 Display indicator .........97 DNR 52 Dual sound track tape ........51 Dubbing 61... E Easy Dubbing 64 Easy Handycam ...........26, 36 EDIT 51 END SEARCH 33 Exposure 27 F FADER 30 Focus 29 Frame recording (...
... SET) 17, 57 COMMANDER 60 D Data code (DATA CODE 37, 59 Date search 41 Date/time 37 DEMO MODE 58 Digital program editing (VIDEO EDIT 69 Digital zoom (D ZOOM) ...47 Digital8 system 82 Display DISPLAY 60 Display indicator .........97 DNR 52 Dual sound track tape ........51 Dubbing 61... E Easy Dubbing 64 Easy Handycam ...........26, 36 EDIT 51 END SEARCH 33 Exposure 27 F FADER 30 Focus 29 Frame recording (...
Computer Applications Guide
Page 4
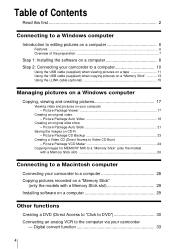
Digital convert function 33 4 Picture Package Auto Slide 21 Saving the images ... on a computer 6 Features ...6 Overview of the preparation 7 Step 1: Installing the software on a computer 8 Step 2: Connecting your camcorder to a computer 10 Using the USB cable (supplied) when viewing pictures on a tape 11 Using the USB cable (supplied) when copying... to a "Memory Stick" (only the models with a Memory Stick slot 26 Connecting to a Macintosh computer Connecting your camcorder to a computer 28 Copying pictures recorded on a "Memory Stick" (only the models with a Memory Stick slot 29 ...
Digital convert function 33 4 Picture Package Auto Slide 21 Saving the images ... on a computer 6 Features ...6 Overview of the preparation 7 Step 1: Installing the software on a computer 8 Step 2: Connecting your camcorder to a computer 10 Using the USB cable (supplied) when viewing pictures on a tape 11 Using the USB cable (supplied) when copying... to a "Memory Stick" (only the models with a Memory Stick slot 26 Connecting to a Macintosh computer Connecting your camcorder to a computer 28 Copying pictures recorded on a "Memory Stick" (only the models with a Memory Stick slot 29 ...
Computer Applications Guide
Page 6
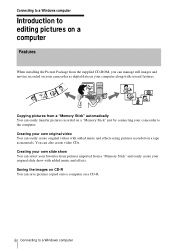
... on a "Memory Stick" just by connecting your computer along with several features. You can manage still images and movies recorded on your camcorder as materials. Connecting to a Windows computer Introduction to editing pictures on a computer Features When installing the Picture Package from the supplied CD-...a "Memory Stick" and easily create your own slide show with added music and effects using pictures recorded on a tape as digital data on your camcorder to the computer. Creating your original slide show You can easily create original videos with added music and effects.
... on a "Memory Stick" just by connecting your computer along with several features. You can manage still images and movies recorded on your camcorder as materials. Connecting to a Windows computer Introduction to editing pictures on a computer Features When installing the Picture Package from the supplied CD-...a "Memory Stick" and easily create your own slide show with added music and effects using pictures recorded on a tape as digital data on your camcorder to the computer. Creating your original slide show You can easily create original videos with added music and effects.
Computer Applications Guide
Page 11
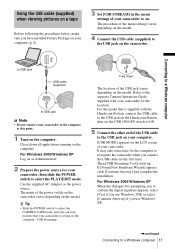
... slide the POWER switch to select the PLAY/EDIT mode. For the model that your camcorder is supplied with your camcorder to on. For Windows 2000/Windows XP When the dialogue box prompting you to confirm the digital signature appears, select [Yes] if you use Windows XP. ,continued Connecting to a ...your computer (p. 8). 3 Set [USB STREAM] in the menu settings of your camcorder for the location. Refer to the separate Camera Operations Guide supplied with the Handycam Station, connect the USB cable to the USB jack on the Handycam Station, then set the USB ON/OFF switch to ON. 5 Connect the ...
... slide the POWER switch to select the PLAY/EDIT mode. For the model that your camcorder is supplied with your camcorder to on. For Windows 2000/Windows XP When the dialogue box prompting you to confirm the digital signature appears, select [Yes] if you use Windows XP. ,continued Connecting to a ...your computer (p. 8). 3 Set [USB STREAM] in the menu settings of your camcorder for the location. Refer to the separate Camera Operations Guide supplied with the Handycam Station, connect the USB cable to the USB jack on the Handycam Station, then set the USB ON/OFF switch to ON. 5 Connect the ...


