
Camera Operations Guide
Page 3
... Part 15 of FCC Rules. The interface cable supplied must be some tiny black points and/ or bright points (white, red, blue, or green in the proper direction. Notes on the LCD screen and the viewfinder. Note on connecting other device Before connecting your camcorder. Consult a Sony dealer or an experienced radio/TV technician for details. Be careful when placing the camera near a window or...
... Part 15 of FCC Rules. The interface cable supplied must be some tiny black points and/ or bright points (white, red, blue, or green in the proper direction. Notes on the LCD screen and the viewfinder. Note on connecting other device Before connecting your camcorder. Consult a Sony dealer or an experienced radio/TV technician for details. Be careful when placing the camera near a window or...
Camera Operations Guide
Page 7
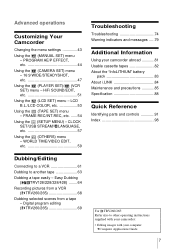
LCD B.L./LCD COLOR, etc 53 Using the (TAPE SET) menu - Advanced operations Customizing Your Camcorder Changing the menu settings 43 Using the (MANUAL SET) menu - FRAME REC/INT.REC, etc. ......54 Using the (SETUP MENU) - Digital program editing ( TRV260/265 69 For TRV260/265: Refer also to other operating instructions supplied with your camcorder: • Editing images with your camcorder abroad 81 Usable cassette tapes 82 About the "InfoLITHIUM" battery pack 83 About i.LINK 84 Maintenance and precautions 85 Specification 88 Quick Reference Identifying parts and...
LCD B.L./LCD COLOR, etc 53 Using the (TAPE SET) menu - Advanced operations Customizing Your Camcorder Changing the menu settings 43 Using the (MANUAL SET) menu - FRAME REC/INT.REC, etc. ......54 Using the (SETUP MENU) - Digital program editing ( TRV260/265 69 For TRV260/265: Refer also to other operating instructions supplied with your camcorder: • Editing images with your camcorder abroad 81 Usable cassette tapes 82 About the "InfoLITHIUM" battery pack 83 About i.LINK 84 Maintenance and precautions 85 Specification 88 Quick Reference Identifying parts and...

Camera Operations Guide
Page 13
... while pressing the BATT (battery) release button down. Battery Info DSPL/BATT INFO OPEN POWER switch BATTERY INFO BATTERY CHARGE LEVEL 0% 50% 100% REC TIME AVAILABLE LCD SCREEN: 81 min VIEWFINDER: 112 min A Battery charge level: Displays approximate remaining amount of power left in the direction of the battery pack. B Approximate possible recording time using the viewfinder. See page 83 about 7 seconds. b Note • If you use up the viewfinder. 2 Set the POWER switch to (CHG) OFF. 3 Slide...
... while pressing the BATT (battery) release button down. Battery Info DSPL/BATT INFO OPEN POWER switch BATTERY INFO BATTERY CHARGE LEVEL 0% 50% 100% REC TIME AVAILABLE LCD SCREEN: 81 min VIEWFINDER: 112 min A Battery charge level: Displays approximate remaining amount of power left in the direction of the battery pack. B Approximate possible recording time using the viewfinder. See page 83 about 7 seconds. b Note • If you use up the viewfinder. 2 Set the POWER switch to (CHG) OFF. 3 Slide...
Camera Operations Guide
Page 23
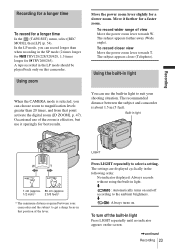
.... m : Automatically turns on the screen. ,continued Recording 23 Using zoom Move the power zoom lever slightly for a longer time In the (TAPE SET) menu, select [REC MODE], then [LP] (p. 54). To turn off the built-in that point activate the digital zoom ([D ZOOM], p. 47). To record closer view Move the power zoom lever towards W. Occasional use the built-in light to suit your camcorder and the subject to get a sharp focus in light Press LIGHT repeatedly until...
.... m : Automatically turns on the screen. ,continued Recording 23 Using zoom Move the power zoom lever slightly for a longer time In the (TAPE SET) menu, select [REC MODE], then [LP] (p. 54). To turn off the built-in that point activate the digital zoom ([D ZOOM], p. 47). To record closer view Move the power zoom lever towards W. Occasional use the built-in light to suit your camcorder and the subject to get a sharp focus in light Press LIGHT repeatedly until...
Camera Operations Guide
Page 40
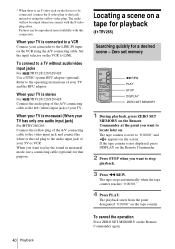
... an S video jack on the VCR using the yellow video plug. When your TV and the RFU adaptor. Zero set memory m REW PLAY STOP DISPLAY ZERO SET MEMORY 1 During playback, press ZERO SET MEMORY on the VCR to a TV without audio/video input jacks For TRV128/228/328/428: Use a NTSC system RFU adaptor (optional). Set the input selector on the Remote Commander at the point you want to play the sound in monaural mode, use a connecting cable (optional) for...
... an S video jack on the VCR using the yellow video plug. When your TV and the RFU adaptor. Zero set memory m REW PLAY STOP DISPLAY ZERO SET MEMORY 1 During playback, press ZERO SET MEMORY on the VCR to a TV without audio/video input jacks For TRV128/228/328/428: Use a NTSC system RFU adaptor (optional). Set the input selector on the Remote Commander at the point you want to play the sound in monaural mode, use a connecting cable (optional) for...
Camera Operations Guide
Page 57
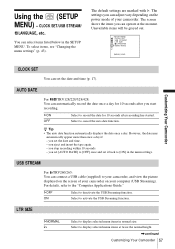
... "Changing the menu settings" (p. 43). you stop recording within 10 seconds. - However, the date may automatically appear more than once a day if: - you eject and insert the tape again. - For details, refer to cancel the auto date function. Select to your camcorder, and view the picture displayed on your camcorder. z Tip • The auto date function automatically displays the date once a day. You can set the date and time. - you can connect a USB cable (supplied) to display selected menu...
... "Changing the menu settings" (p. 43). you stop recording within 10 seconds. - However, the date may automatically appear more than once a day if: - you eject and insert the tape again. - For details, refer to cancel the auto date function. Select to your camcorder, and view the picture displayed on your camcorder. z Tip • The auto date function automatically displays the date once a day. You can set the date and time. - you can connect a USB cable (supplied) to display selected menu...
Camera Operations Guide
Page 77
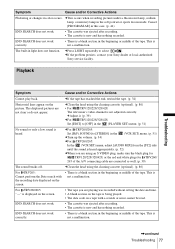
... recorded. Playback Troubleshooting Symptom Cause and/or Corrective Actions Cannot play back. cFor TRV260/265: Set [HiFi SOUND] to [STEREO] in the soft portrait or sports lesson mode. END SEARCH does not work correctly. • There is being played. • The data code on the screen. • The tape you are using an S VIDEO plug, make sure the black plug for TRV128/228/328/428, or the red and white plugs for TRV260...
... recorded. Playback Troubleshooting Symptom Cause and/or Corrective Actions Cannot play back. cFor TRV260/265: Set [HiFi SOUND] to [STEREO] in the soft portrait or sports lesson mode. END SEARCH does not work correctly. • There is being played. • The data code on the screen. • The tape you are using an S VIDEO plug, make sure the black plug for TRV128/228/328/428, or the red and white plugs for TRV260...
Camera Operations Guide
Page 87
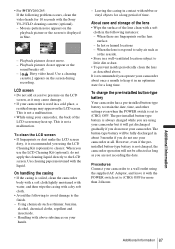
... screen during recording. • For TRV260/265: If the following problem occurs, clean the video heads for 10 seconds with the liquid. Playback pictures do not appear or the sound breaks off. - [ Dirty video head. About care and storage of the lens • Wipe the surface of the lens clean with a soft cloth in contact with the POWER switch set to retain the date, time, and other settings even when the POWER switch...
... screen during recording. • For TRV260/265: If the following problem occurs, clean the video heads for 10 seconds with the liquid. Playback pictures do not appear or the sound breaks off. - [ Dirty video head. About care and storage of the lens • Wipe the surface of the lens clean with a soft cloth in contact with the POWER switch set to retain the date, time, and other settings even when the POWER switch...
Camera Operations Guide
Page 88
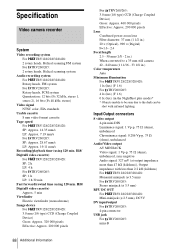
... input/output For TRV260/265: 4-pin connector USB jack For TRV260/265: mini-B 88 Additional Information Hi8/ Digital8 video cassette) Approx. 5 min Viewfinder Electric viewfinder (monochrome) Image device For TRV128/228/328/428: 3.0 mm (1/6 type) CCD (Charge Coupled Device) Gross: Approx. 320 000 pixels Effective: Approx. 200 000 pixels For TRV260/265: 3.0 mm (1/6 type) CCD (Charge Coupled Device) Gross: Approx. 460 000 pixels Effective: Approx. 290 000 pixels Lens Combined power zoom lens...
... input/output For TRV260/265: 4-pin connector USB jack For TRV260/265: mini-B 88 Additional Information Hi8/ Digital8 video cassette) Approx. 5 min Viewfinder Electric viewfinder (monochrome) Image device For TRV128/228/328/428: 3.0 mm (1/6 type) CCD (Charge Coupled Device) Gross: Approx. 320 000 pixels Effective: Approx. 200 000 pixels For TRV260/265: 3.0 mm (1/6 type) CCD (Charge Coupled Device) Gross: Approx. 460 000 pixels Effective: Approx. 290 000 pixels Lens Combined power zoom lens...
Camera Operations Guide
Page 98
...-installed button-type battery 87 Cleaning cassette 87 Clock set (CLOCK SET) 17, 57 COMMANDER 60 D Data code (DATA CODE 37, 59 Date search 41 Date/time 37 DEMO MODE 58 Digital program editing (VIDEO EDIT 69 Digital zoom (D ZOOM) ...47 Digital8 system 82 Display DISPLAY 60 Display indicator .........97 DNR 52 Dual sound track tape ........51 Dubbing 61 E Easy Dubbing 64 Easy Handycam ...........26, 36 EDIT 51 END SEARCH 33 Exposure 27 F FADER 30 Focus 29 Frame recording (FRAME REC...
...-installed button-type battery 87 Cleaning cassette 87 Clock set (CLOCK SET) 17, 57 COMMANDER 60 D Data code (DATA CODE 37, 59 Date search 41 Date/time 37 DEMO MODE 58 Digital program editing (VIDEO EDIT 69 Digital zoom (D ZOOM) ...47 Digital8 system 82 Display DISPLAY 60 Display indicator .........97 DNR 52 Dual sound track tape ........51 Dubbing 61 E Easy Dubbing 64 Easy Handycam ...........26, 36 EDIT 51 END SEARCH 33 Exposure 27 F FADER 30 Focus 29 Frame recording (FRAME REC...

Computer Applications Guide
Page 18
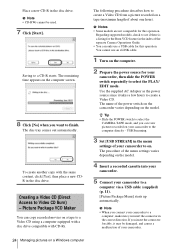
... can play, stop, and pause movies using the buttons at the top of the power switch on the camcorder varies depending on a computer is not necessary when connecting the camcorder to a folder Right-click on a Windows computer z Tip • This operation is 10 minutes. Movie files You can create on the model. 3 Set [USB STREAM] in the menu settings of the screen. To add comments to the computer via an i.LINK cable...
... can play, stop, and pause movies using the buttons at the top of the power switch on the camcorder varies depending on a computer is not necessary when connecting the camcorder to a folder Right-click on a Windows computer z Tip • This operation is 10 minutes. Movie files You can create on the model. 3 Set [USB STREAM] in the menu settings of the screen. To add comments to the computer via an i.LINK cable...
Computer Applications Guide
Page 24
... supported models, check to select the PLAY/ EDIT mode. You cannot use a USB cable for this operation. b Note • When you insert the connector in the index of the separate Camera Operations Guide. • You can only use an i.LINK cable. 1 Turn on a tape (maximum length of about one hour). The disc tray comes out automatically. . Picture Package VCD Maker You can view pictures recorded on your camcorder to create a Video CD from a picture recorded...
... supported models, check to select the PLAY/ EDIT mode. You cannot use a USB cable for this operation. b Note • When you insert the connector in the index of the separate Camera Operations Guide. • You can only use an i.LINK cable. 1 Turn on a tape (maximum length of about one hour). The disc tray comes out automatically. . Picture Package VCD Maker You can view pictures recorded on your camcorder to create a Video CD from a picture recorded...
Computer Applications Guide
Page 29
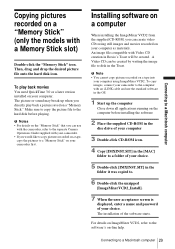
... Connecting to a Macintosh computer Copying pictures recorded on a "Memory Stick" (only the models with Video CD creation in Roxio's Toast will be created by writing the image file to the separate Camera Operations Guide supplied with an i.LINK cable and use the standard software in the Toast. Then, drag and drop the desired picture file onto the hard disk icon. Connecting to the hard disk before installing the software 2 Place the supplied CD-ROM in the disc drive...
... Connecting to a Macintosh computer Copying pictures recorded on a "Memory Stick" (only the models with Video CD creation in Roxio's Toast will be created by writing the image file to the separate Camera Operations Guide supplied with an i.LINK cable and use the standard software in the Toast. Then, drag and drop the desired picture file onto the hard disk icon. Connecting to the hard disk before installing the software 2 Place the supplied CD-ROM in the disc drive...

Computer Applications Guide
Page 30
... DVDs when you turn on your camcorder is set up . Other functions Creating a DVD (Direct Access to "Click to DVD") to i.LINK (IEEE1394) connector i.LINK cable (optional) to DV Interface or b Notes • Some models are not compatible for this operation. Regarding supported models, check to see if there is automatically copied and written to a DVD. You can be used to DVD Automatic Mode Launcher] starts up for each Windows XP user. 1 Turn on a tape...
... DVDs when you turn on your camcorder is set up . Other functions Creating a DVD (Direct Access to "Click to DVD") to i.LINK (IEEE1394) connector i.LINK cable (optional) to DV Interface or b Notes • Some models are not compatible for this operation. Regarding supported models, check to see if there is automatically copied and written to a DVD. You can be used to DVD Automatic Mode Launcher] starts up for each Windows XP user. 1 Turn on a tape...
Computer Applications Guide
Page 33
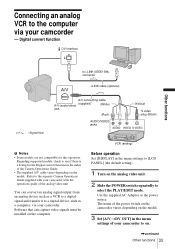
... A/V connecting cable (supplied)* A/V (audio/video) (White) jack (Red) AUDIO/VIDEO jacks (Yellow) S video plug (Black) b Notes • Some models are not compatible for the Digital convert function in the menu settings to [LCD PANEL] (the default setting). 1 Turn on the model. Software that can convert an analog signal output from an analog device such as a VCR to a digital signal and transfer it to a digital device, such as the power source. Refer to the separate Camera Operations Guide supplied with your camcorder with the operations guide of...
... A/V connecting cable (supplied)* A/V (audio/video) (White) jack (Red) AUDIO/VIDEO jacks (Yellow) S video plug (Black) b Notes • Some models are not compatible for the Digital convert function in the menu settings to [LCD PANEL] (the default setting). 1 Turn on the model. Software that can convert an analog signal output from an analog device such as a VCR to a digital signal and transfer it to a digital device, such as the power source. Refer to the separate Camera Operations Guide supplied with your camcorder with the operations guide of...
Computer Applications Guide
Page 36
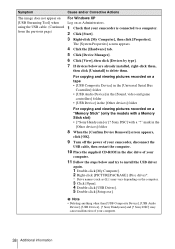
... installed, right-click them . Sony DSC] with a Memory Stick slot) • [? mark in the [Other devices] folder 5 When the [Confirm Device Removal] screen appears, click [OK]. 6 Turn off the power of your camcorder, disconnect the USB cable, then restart the computer. 7 Place the supplied CD-ROM in the [Universal Serial Bus Controller] folder For copying and viewing pictures recorded on a "Memory Stick" (only the models with a "?" Sony Handycam] or [? For Windows 98*/Windows 98SE/Windows Me * When copying or playing...
... installed, right-click them . Sony DSC] with a Memory Stick slot) • [? mark in the [Other devices] folder 5 When the [Confirm Device Removal] screen appears, click [OK]. 6 Turn off the power of your camcorder, disconnect the USB cable, then restart the computer. 7 Place the supplied CD-ROM in the [Universal Serial Bus Controller] folder For copying and viewing pictures recorded on a "Memory Stick" (only the models with a "?" Sony Handycam] or [? For Windows 98*/Windows 98SE/Windows Me * When copying or playing...
Computer Applications Guide
Page 37
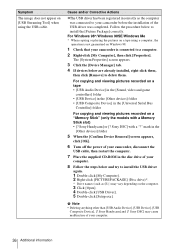
... [Confirm Device Removal] screen appears, click [OK]. 8 Turn off the power of your camcorder, disconnect the USB cable, then restart the computer. 9 Place the supplied CD-ROM in the [Other devices] folder For copying and viewing pictures recorded on a "Memory Stick" (only the models with a "?" For copying and viewing pictures recorded on a tape • [USB Composite Device] in the [Universal Serial Bus Controller] folder • [USB Audio Device] in the [Sound, video and game controller] folder • [Composite USB Device] in the disc drive of your...
... [Confirm Device Removal] screen appears, click [OK]. 8 Turn off the power of your camcorder, disconnect the USB cable, then restart the computer. 9 Place the supplied CD-ROM in the [Other devices] folder For copying and viewing pictures recorded on a "Memory Stick" (only the models with a "?" For copying and viewing pictures recorded on a tape • [USB Composite Device] in the [Universal Serial Bus Controller] folder • [USB Audio Device] in the [Sound, video and game controller] folder • [Composite USB Device] in the disc drive of your...
Computer Applications Guide
Page 38
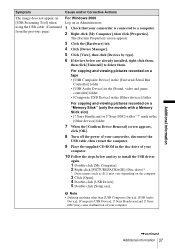
... camcorder, disconnect the USB cable, then restart the computer. 10 Place the supplied CD-ROM in the [Other devices] folder For copying and viewing pictures recorded on a "Memory Stick" (only the models with a "?" b Note • Deleting anything other than [USB Composite Device], [USB Audio Device], [USB Device], [? Sony Handycam] or [? For copying and viewing pictures recorded on a tape • [USB Composite Device] in the [Universal Serial Bus Controller] folder • [USB Audio Device] in the [Sound, video and game controllers] folder • [USB Device] in the disc drive...
... camcorder, disconnect the USB cable, then restart the computer. 10 Place the supplied CD-ROM in the [Other devices] folder For copying and viewing pictures recorded on a "Memory Stick" (only the models with a "?" b Note • Deleting anything other than [USB Composite Device], [USB Audio Device], [USB Device], [? Sony Handycam] or [? For copying and viewing pictures recorded on a tape • [USB Composite Device] in the [Universal Serial Bus Controller] folder • [USB Audio Device] in the [Sound, video and game controllers] folder • [USB Device] in the disc drive...

Marketing Specifications
Page 1
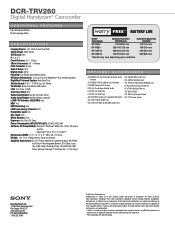
... interface, including camcorders, digital VTRs, capture cards and PCs. Stamina® Battery Power Management System Using the optional NP-QM91D InfoLithium® battery the DCR-TRV260 can even playback your videos when shooting in low light with low power consumption. ➤Photo Mode Using Sony's unique Adaptive Frame Interpolation for monitoring or playback. ® DCR-TRV260 Digital Handycam® Camcorder The DCR-TRV260 is turned off. You can continuously record up to a life shortening "memory effect". Choose from Black, Mosaic, White, and Monotone...
... interface, including camcorders, digital VTRs, capture cards and PCs. Stamina® Battery Power Management System Using the optional NP-QM91D InfoLithium® battery the DCR-TRV260 can even playback your videos when shooting in low light with low power consumption. ➤Photo Mode Using Sony's unique Adaptive Frame Interpolation for monitoring or playback. ® DCR-TRV260 Digital Handycam® Camcorder The DCR-TRV260 is turned off. You can continuously record up to a life shortening "memory effect". Choose from Black, Mosaic, White, and Monotone...
Marketing Specifications
Page 2
... and specifications subject to designate that a product contains an IEEE1394 connector. DCR-TRV260 Digital Handycam® Camcorder ADDITIONAL FEATURES Easy Handycam Button Multi-Language Menu S P E C I F I C AT I O N S Imaging Device: 1/6" 460K Gross Pixel CCD Video Actual: 290K Pixels Still Actual: N/A F: 1.6-2.4 Focal Distance: 2.5 - 50mm 35mm Conversion: 42 - 840mm Filter Diameter: 37mm Optical Zoom: 20X Digital Zoom: 990X Focusing: Full Range Auto/Manual (Dial) Minimum Illumination: 4 Lux (0 Lux with USB Driver (Picture Package™ Software Ver. 1.0 for Super Quick batteries...
... and specifications subject to designate that a product contains an IEEE1394 connector. DCR-TRV260 Digital Handycam® Camcorder ADDITIONAL FEATURES Easy Handycam Button Multi-Language Menu S P E C I F I C AT I O N S Imaging Device: 1/6" 460K Gross Pixel CCD Video Actual: 290K Pixels Still Actual: N/A F: 1.6-2.4 Focal Distance: 2.5 - 50mm 35mm Conversion: 42 - 840mm Filter Diameter: 37mm Optical Zoom: 20X Digital Zoom: 990X Focusing: Full Range Auto/Manual (Dial) Minimum Illumination: 4 Lux (0 Lux with USB Driver (Picture Package™ Software Ver. 1.0 for Super Quick batteries...


