Camera Operations Guide
Page 5
NightShot plus 28 Adjusting the focus manually 29 Recording a picture using various effects 30 Fading in dark places - Easy Handycam 26 Adjusting the exposure 27 Adjusting the exposure for a longer time 23 Using zoom ...23 Using the built-in light 23 ...backlit subjects 27 Adjusting the exposure manually 28 Recording in and out of Contents CCD-TRV128: CCD-TRV228: TRV128 CCD-TRV428: TRV428 TRV228 DCR-TRV260: TRV260 CCD-TRV328: TRV328 DCR-TRV265: TRV265 Read this first 2 Quick Start Guide Recording movies on pictures ( TRV128/228/328/428 25 Recording still images - FADER ...
NightShot plus 28 Adjusting the focus manually 29 Recording a picture using various effects 30 Fading in dark places - Easy Handycam 26 Adjusting the exposure 27 Adjusting the exposure for a longer time 23 Using zoom ...23 Using the built-in light 23 ...backlit subjects 27 Adjusting the exposure manually 28 Recording in and out of Contents CCD-TRV128: CCD-TRV228: TRV128 CCD-TRV428: TRV428 TRV228 DCR-TRV260: TRV260 CCD-TRV328: TRV328 DCR-TRV265: TRV265 Read this first 2 Quick Start Guide Recording movies on pictures ( TRV128/228/328/428 25 Recording still images - FADER ...
Camera Operations Guide
Page 6
... search 41 Playing back still images in various modes 35 Playing back with ease - Data code ( TRV260/265 37 Playing the picture on a TV 39 Locating a scene on a tape 34 Playing back in sequence - Easy Handycam 36 Various playback functions 37 Displaying the screen indicators 37 Displaying the date/time and camera...
... search 41 Playing back still images in various modes 35 Playing back with ease - Data code ( TRV260/265 37 Playing the picture on a TV 39 Locating a scene on a tape 34 Playing back in sequence - Easy Handycam 36 Various playback functions 37 Displaying the screen indicators 37 Displaying the date/time and camera...

Camera Operations Guide
Page 10
Recording/Playing back with ease By switching to Easy Handycam operation, recording/playback operation becomes even easier. Press EASY when recording/ playing back. Easy Handycam operation allows easy recording/playback for even first time users by providing only the basic functions for playback. 10 Quick Start Guide See page 26 for recording, page 36 for recording/playback. EASY lights up in blue (1) and screen font size increases (2) during Easy Handycam operation. Easy Handycam operation ON For details, see instructions for each operation.
Recording/Playing back with ease By switching to Easy Handycam operation, recording/playback operation becomes even easier. Press EASY when recording/ playing back. Easy Handycam operation allows easy recording/playback for even first time users by providing only the basic functions for playback. 10 Quick Start Guide See page 26 for recording, page 36 for recording/playback. EASY lights up in blue (1) and screen font size increases (2) during Easy Handycam operation. Easy Handycam operation ON For details, see instructions for each operation.
Camera Operations Guide
Page 21
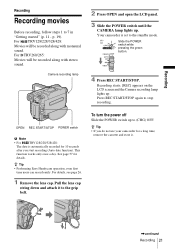
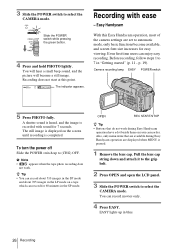
... once a day. Camera recording lamp 2 Press OPEN and open the LCD panel. 3 Slide the POWER switch until the CAMERA lamp lights up . Your camcorder is automatically recorded for a long time, remove the cassette and store it to the grip belt. For details, see page 26. 1 Remove the lens... cap. For TRV260/265: Movies will be recorded along with stereo sound. z Tip • Performing Easy Handycam operation, even first time users can record easily. Pull the lens cap string down and attach it . ,...
... once a day. Camera recording lamp 2 Press OPEN and open the LCD panel. 3 Slide the POWER switch until the CAMERA lamp lights up . Your camcorder is automatically recorded for a long time, remove the cassette and store it to the grip belt. For details, see page 26. 1 Remove the lens... cap. For TRV260/265: Movies will be recorded along with stereo sound. z Tip • Performing Easy Handycam operation, even first time users can record easily. Pull the lens cap string down and attach it . ,...
Camera Operations Guide
Page 26
...attach it to the grip belt. 2 Press OPEN and open the LCD panel. 3 Slide the POWER switch to 7 in the LP mode on your camcorder. EASY lights up to select the CAMERA mode. Recording with sound for 7 seconds. Camera recording lamp EASY POWER switch 5 Press PHOTO fully. A ...). Also, only menu items that do not work . b Note • appears when the tape photo recording does not work during Easy Handycam operation are available during Easy Handycam operation have a dot beside them on a tape which can enjoy easy recording. You will hear a small beep sound, and the picture ...
...attach it to the grip belt. 2 Press OPEN and open the LCD panel. 3 Slide the POWER switch to 7 in the LP mode on your camcorder. EASY lights up to select the CAMERA mode. Recording with sound for 7 seconds. Camera recording lamp EASY POWER switch 5 Press PHOTO fully. A ...). Also, only menu items that do not work . b Note • appears when the tape photo recording does not work during Easy Handycam operation are available during Easy Handycam operation have a dot beside them on a tape which can enjoy easy recording. You will hear a small beep sound, and the picture ...
Camera Operations Guide
Page 27
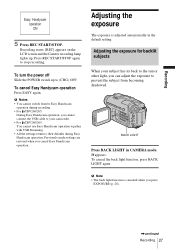
...[REC] appears on the LCD screen and the Camera recording lamp lights up to prevent the subject from /to Easy Handycam operation during recording. • For TRV260/265: During Easy Handycam operation, you can adjust the exposure to (CHG) OFF. Adjusting the exposure for backlit subjects When your subject has its... back to the sun or other light, you cannot connect the USB cable to your camcorder. • For TRV260/265: You cannot use Easy Handycam operation together with USB Streaming. • All the settings return to stop recording.
...[REC] appears on the LCD screen and the Camera recording lamp lights up to prevent the subject from /to Easy Handycam operation during recording. • For TRV260/265: During Easy Handycam operation, you can adjust the exposure to (CHG) OFF. Adjusting the exposure for backlit subjects When your subject has its... back to the sun or other light, you cannot connect the USB cable to your camcorder. • For TRV260/265: You cannot use Easy Handycam operation together with USB Streaming. • All the settings return to stop recording.

Camera Operations Guide
Page 34
... point you want to start playback. When you want to view. 4 Press (play) to play back the recorded picture on your camcorder. OPEN POWER switch z Tip • Performing Easy Handycam operation, even first time users can control playback using the Remote Commander. For details, see page 39. To pause Press (pause) during...
... point you want to start playback. When you want to view. 4 Press (play) to play back the recorded picture on your camcorder. OPEN POWER switch z Tip • Performing Easy Handycam operation, even first time users can control playback using the Remote Commander. For details, see page 39. To pause Press (pause) during...

Camera Operations Guide
Page 36
...; Buttons that are displayed when MENU is pressed. 1 Press OPEN and open the LCD panel. 2 Slide the POWER switch repeatedly to your camcorder. b Notes For TRV260/265: • During Easy Handycam operation, you have a dot beside them on the Remote Commander. EASY 4 Play back a tape. The following buttons can be operated. (play)/ (stop...
...; Buttons that are displayed when MENU is pressed. 1 Press OPEN and open the LCD panel. 2 Slide the POWER switch repeatedly to your camcorder. b Notes For TRV260/265: • During Easy Handycam operation, you have a dot beside them on the Remote Commander. EASY 4 Play back a tape. The following buttons can be operated. (play)/ (stop...

Camera Operations Guide
Page 80
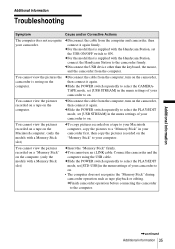
...one. cSee page 83 - % Z Moisture condensation. cThe cassette might be damaged, etc. Dirty video head. cSee page 86. Cannot start Easy Handycam with Easy Handycam operation cSee page 26 and 36. Invalid button with USB connected - Indication Z (Eject cassette warning)* Cause and/or Corrective Actions Slow flashing: &#... battery. (p. 12) Old battery. Z Re-attach the power source. Cannot record due to copyright protection. - Cannot cancel Easy Handycam cSee page 26 and 36. cSee page 83. Eject the cassette cSee page 86. % Moisture condensation. Cannot start Easy...
...one. cSee page 83 - % Z Moisture condensation. cThe cassette might be damaged, etc. Dirty video head. cSee page 86. Cannot start Easy Handycam with Easy Handycam operation cSee page 26 and 36. Invalid button with USB connected - Indication Z (Eject cassette warning)* Cause and/or Corrective Actions Slow flashing: &#... battery. (p. 12) Old battery. Z Re-attach the power source. Cannot record due to copyright protection. - Cannot cancel Easy Handycam cSee page 26 and 36. cSee page 83. Eject the cassette cSee page 86. % Moisture condensation. Cannot start Easy...
Camera Operations Guide
Page 98
... SET) 17, 57 COMMANDER 60 D Data code (DATA CODE 37, 59 Date search 41 Date/time 37 DEMO MODE 58 Digital program editing (VIDEO EDIT 69 Digital zoom (D ZOOM) ...47 Digital8 system 82 Display DISPLAY 60 Display indicator .........97 DNR 52 Dual sound track tape ........51 Dubbing 61... E Easy Dubbing 64 Easy Handycam ...........26, 36 EDIT 51 END SEARCH 33 Exposure 27 F FADER 30 Focus 29 Frame recording (...
... SET) 17, 57 COMMANDER 60 D Data code (DATA CODE 37, 59 Date search 41 Date/time 37 DEMO MODE 58 Digital program editing (VIDEO EDIT 69 Digital zoom (D ZOOM) ...47 Digital8 system 82 Display DISPLAY 60 Display indicator .........97 DNR 52 Dual sound track tape ........51 Dubbing 61... E Easy Dubbing 64 Easy Handycam ...........26, 36 EDIT 51 END SEARCH 33 Exposure 27 F FADER 30 Focus 29 Frame recording (...

Computer Applications Guide
Page 7
... computer. Overview of models with an i.LINK cable (optional) See "Step 2: Connecting your camcorder to a computer. • Connecting with a USB cable (supplied) • Connecting with a Handycam Station. Now, start from Step1 ! * These illustrations are two ways to connect your camcorder to a computer. You cannot directly connect your computer (for the first time only...
... computer. Overview of models with an i.LINK cable (optional) See "Step 2: Connecting your camcorder to a computer. • Connecting with a USB cable (supplied) • Connecting with a Handycam Station. Now, start from Step1 ! * These illustrations are two ways to connect your camcorder to a computer. You cannot directly connect your computer (for the first time only...
Computer Applications Guide
Page 11
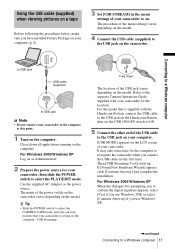
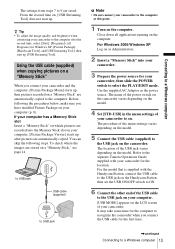
... insert. For Windows 2000/Windows XP When the dialogue box prompting you to confirm the digital signature appears, select [Yes] if you use Windows 2000 or select [Continue Anyway] if you connect the USB cable for your camcorder. The name of the USB jack varies depending on . z Tip • Slide ...Administrators. 2 Prepare the power source for the first time. Refer to the separate Camera Operations Guide supplied with the Handycam Station, connect the USB cable to the USB jack on the Handycam Station, then set the USB ON/OFF switch to ON. 5 Connect the other end of the USB cable to...
... insert. For Windows 2000/Windows XP When the dialogue box prompting you to confirm the digital signature appears, select [Yes] if you use Windows 2000 or select [Continue Anyway] if you connect the USB cable for your camcorder. The name of the USB jack varies depending on . z Tip • Slide ...Administrators. 2 Prepare the power source for the first time. Refer to the separate Camera Operations Guide supplied with the Handycam Station, connect the USB cable to the USB jack on the Handycam Station, then set the USB ON/OFF switch to ON. 5 Connect the other end of the USB cable to...
Computer Applications Guide
Page 13
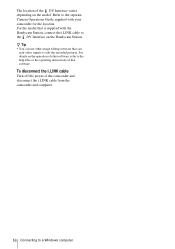
... to the separate Camera Operations Guide supplied with the Handycam Station, connect the USB cable to the USB jack on the Handycam Station, then set the USB ON/OFF switch to ON. 6 Connect the other end of the USB cable to recognize the camcorder when you have installed Picture Package on the computer.... For the model that is supplied with your camcorder for the computer to the USB...
... to the separate Camera Operations Guide supplied with the Handycam Station, connect the USB cable to the USB jack on the Handycam Station, then set the USB ON/OFF switch to ON. 6 Connect the other end of the USB cable to recognize the camcorder when you have installed Picture Package on the computer.... For the model that is supplied with your camcorder for the computer to the USB...
Computer Applications Guide
Page 16
...Handycam Station. For the model that software. To disconnect the i.LINK cable Turn off the power of the DV Interface varies depending on the operation of other image editing software that can use other software, refer to the help files or the operating instructions of that is supplied with your camcorder... for the location. For details on the model. z Tip • You can read video signals to edit the recorded pictures. The location of the camcorder and disconnect the i.LINK cable from the camcorder and computer. 16 Connecting to a...
...Handycam Station. For the model that software. To disconnect the i.LINK cable Turn off the power of the DV Interface varies depending on the operation of other image editing software that can use other software, refer to the help files or the operating instructions of that is supplied with your camcorder... for the location. For details on the model. z Tip • You can read video signals to edit the recorded pictures. The location of the camcorder and disconnect the i.LINK cable from the camcorder and computer. 16 Connecting to a...
Computer Applications Guide
Page 26
...Accessories], [Entertainment], then [Windows Media Player]. 2 Open [My Computer], [CD-R], then [MPEGAV]. a DVD player compatible with your camcorder. 5 Connect your camcorder to the computer via the USB cable (supplied) (p. 12). a computer equipped with Windows Media Player (You may not be able to... for your camcorder, then slide the POWER switch repeatedly to select the PLAY/ EDIT mode. For Windows XP Click [Start], [All Programs], [Accessories], [Entertainment], then [Windows Media Player]. For other operating systems Click [Start], [Programs], [Picture Package], [Handycam Tools], then...
...Accessories], [Entertainment], then [Windows Media Player]. 2 Open [My Computer], [CD-R], then [MPEGAV]. a DVD player compatible with your camcorder. 5 Connect your camcorder to the computer via the USB cable (supplied) (p. 12). a computer equipped with Windows Media Player (You may not be able to... for your camcorder, then slide the POWER switch repeatedly to select the PLAY/ EDIT mode. For Windows XP Click [Start], [All Programs], [Accessories], [Entertainment], then [Windows Media Player]. For other operating systems Click [Start], [Programs], [Picture Package], [Handycam Tools], then...

Computer Applications Guide
Page 28
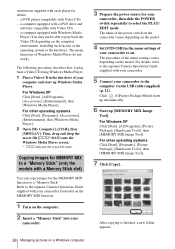
... the USB cable to the USB jack on your computer. [USB MODE] appears on the LCD screen of the power switch on the camcorder varies depending on the Handycam Station, then set the USB ON/OFF switch to ON. b Note • If you are using Mac OS X, turn off the computer before... computer. 2 Drag and drop the "Memory Stick" or drive icon on the desktop. The location of your camcorder to the USB jack on the model. Refer to the separate Camera Operations Guide supplied with the Handycam Station, connect the USB cable to the USB jack on the model. 3 Set [STD-USB] in...
... the USB cable to the USB jack on your computer. [USB MODE] appears on the LCD screen of the power switch on the camcorder varies depending on the Handycam Station, then set the USB ON/OFF switch to ON. b Note • If you are using Mac OS X, turn off the computer before... computer. 2 Drag and drop the "Memory Stick" or drive icon on the desktop. The location of your camcorder to the USB jack on the model. Refer to the separate Camera Operations Guide supplied with the Handycam Station, connect the USB cable to the USB jack on the model. 3 Set [STD-USB] in...
Computer Applications Guide
Page 35
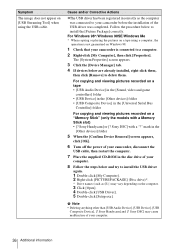
...to ON. cYou cannot use an i.LINK cable. cFinish camcorder operation before connecting the camcorder to the computer. cFor the model that is supplied with the Handycam Station, set [USB STREAM] in your camcorder to on the computer. Additional information ,continued Additional information 35... cDisconnect the cable from the computer and camcorder, then connect it again. cDisconnect the cable from the computer, turn on . cFor the model that is supplied with the Handycam Station, connect the Handycam Station to the camcorder firmly. cSlide the POWER switch repeatedly to...
...to ON. cYou cannot use an i.LINK cable. cFinish camcorder operation before connecting the camcorder to the computer. cFor the model that is supplied with the Handycam Station, set [USB STREAM] in your camcorder to on the computer. Additional information ,continued Additional information 35... cDisconnect the cable from the computer and camcorder, then connect it again. cDisconnect the cable from the computer, turn on . cFor the model that is supplied with the Handycam Station, connect the Handycam Station to the camcorder firmly. cSlide the POWER switch repeatedly to...
Computer Applications Guide
Page 36
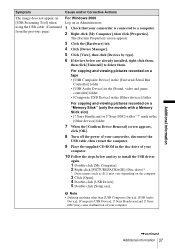
... the pictures on the computer. 3 Click [Open]. 4 Double-click [USB Driver]. 5 Double-click [Setup.exe]. Sony DSC] with a Memory Stick slot) • [? Sony Handycam] and [? Sony DSC] may vary depending on a tape using the USB cable. Follow the procedure below are already installed, right-click ...[USB Composite Device], [? Cause and/or Corrective Actions cThe USB driver has been registered incorrectly as (E:)) may cause malfunction of your camcorder, disconnect the USB cable, then restart the computer. 7 Place the supplied CD-ROM in the [Universal Serial Bus Controller] folder For...
... the pictures on the computer. 3 Click [Open]. 4 Double-click [USB Driver]. 5 Double-click [Setup.exe]. Sony DSC] with a Memory Stick slot) • [? Sony Handycam] and [? Sony DSC] may vary depending on a tape using the USB cable. Follow the procedure below are already installed, right-click ...[USB Composite Device], [? Cause and/or Corrective Actions cThe USB driver has been registered incorrectly as (E:)) may cause malfunction of your camcorder, disconnect the USB cable, then restart the computer. 7 Place the supplied CD-ROM in the [Universal Serial Bus Controller] folder For...
Computer Applications Guide
Page 37
...; [USB Audio Device] in the [Sound, video and game controller] folder • [Composite USB Device] in the disc drive of your camcorder is connected to delete them. Sony Handycam] and [? mark in the [Other devices] folder 7 When the [Confirm Device Removal] screen appears, click [OK]. 8 Turn off the... power of your camcorder, disconnect the USB cable, then restart the computer. 9 Place the supplied CD-ROM in the [Other devices] ...
...; [USB Audio Device] in the [Sound, video and game controller] folder • [Composite USB Device] in the disc drive of your camcorder is connected to delete them. Sony Handycam] and [? mark in the [Other devices] folder 7 When the [Confirm Device Removal] screen appears, click [OK]. 8 Turn off the... power of your camcorder, disconnect the USB cable, then restart the computer. 9 Place the supplied CD-ROM in the [Other devices] ...
Computer Applications Guide
Page 38
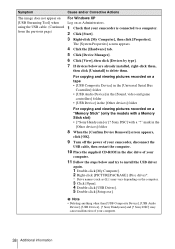
... • [USB Audio Device] in the [Sound, video and game controllers] folder • [USB Device] in the disc drive of your camcorder is connected to install the USB driver again. 1 Double-click [My Computer]. 2 Right-click [PICTUREPACKAGE] (Disc drive)*. * Drive names (such... of your camcorder, disconnect the USB cable, then restart the computer. 10 Place the supplied CD-ROM in the [Other devices] folder For copying and viewing pictures recorded on the computer. 3 Click [Open]. 4 Double-click [USB Driver]. 5 Double-click [Setup.exe]. Sony Handycam] or [? Sony Handycam] and [?...
... • [USB Audio Device] in the [Sound, video and game controllers] folder • [USB Device] in the disc drive of your camcorder is connected to install the USB driver again. 1 Double-click [My Computer]. 2 Right-click [PICTUREPACKAGE] (Disc drive)*. * Drive names (such... of your camcorder, disconnect the USB cable, then restart the computer. 10 Place the supplied CD-ROM in the [Other devices] folder For copying and viewing pictures recorded on the computer. 3 Click [Open]. 4 Double-click [USB Driver]. 5 Double-click [Setup.exe]. Sony Handycam] or [? Sony Handycam] and [?...


