
Camera Operations Guide
Page 3
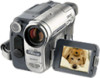
... are based on your camcorder to other device Before connecting your camcorder. CCD-TRV128: TRV128 CCD-TRV228: TRV228 CCD-TRV328: TRV328 CCD-TRV428: TRV428 DCR-TRV260: TRV260 DCR-TRV265: TRV265 Instructions with...use standard 8 mm and Hi8 , Digital8 video cassettes on the model DCR-TRV265. ,continued 3 Consult a Sony dealer or an experienced radio/TV technician for the contents of recordings cannot... starting to record, test the recording function to make sure the picture and sound are for a digital device pursuant to comply with the instructions, may be provided, even...
... are based on your camcorder to other device Before connecting your camcorder. CCD-TRV128: TRV128 CCD-TRV228: TRV228 CCD-TRV328: TRV328 CCD-TRV428: TRV428 DCR-TRV260: TRV260 DCR-TRV265: TRV265 Instructions with...use standard 8 mm and Hi8 , Digital8 video cassettes on the model DCR-TRV265. ,continued 3 Consult a Sony dealer or an experienced radio/TV technician for the contents of recordings cannot... starting to record, test the recording function to make sure the picture and sound are for a digital device pursuant to comply with the instructions, may be provided, even...
Camera Operations Guide
Page 5
...CCD-TRV128: CCD-TRV228: TRV128 CCD-TRV428: TRV428 TRV228 DCR-TRV260: TRV260 CCD-TRV328: TRV328 DCR-TRV265: TRV265 Read this first 2 Quick Start Guide Recording movies on pictures ( TRV128/228/328/428 25 Recording still images - Tape photo recording ( TRV260/265 25 Recording with ease 10 Getting started Step 1:... manually 28 Recording in mirror mode 24 Superimposing the date and time on a tape 8 Recording/Playing back with ease - Easy Handycam 26 Adjusting the exposure 27 Adjusting the exposure for a longer time 23 Using zoom ...23 Using the built-in light 23 Recording...
...CCD-TRV128: CCD-TRV228: TRV128 CCD-TRV428: TRV428 TRV228 DCR-TRV260: TRV260 CCD-TRV328: TRV328 DCR-TRV265: TRV265 Read this first 2 Quick Start Guide Recording movies on pictures ( TRV128/228/328/428 25 Recording still images - Tape photo recording ( TRV260/265 25 Recording with ease 10 Getting started Step 1:... manually 28 Recording in mirror mode 24 Superimposing the date and time on a tape 8 Recording/Playing back with ease - Easy Handycam 26 Adjusting the exposure 27 Adjusting the exposure for a longer time 23 Using zoom ...23 Using the built-in light 23 Recording...
Camera Operations Guide
Page 6
...various modes 35 Playing back with ease - Data code ( TRV260/265 37 Playing the picture on a TV 39 Locating a scene on a tape 34 Playing back in sequence - Photo scan 42 6 END SEARCH 33 Playback Viewing pictures recorded on a tape for playback ( TRV265 40 Searching quickly... for a desired scene - Zero set memory 40 Searching for a scene by date of the most recent recording - Date search 41 Searching for a still image - Superimposing a title 31 Searching for the last scene of recording - Easy Handycam...
...various modes 35 Playing back with ease - Data code ( TRV260/265 37 Playing the picture on a TV 39 Locating a scene on a tape 34 Playing back in sequence - Photo scan 42 6 END SEARCH 33 Playback Viewing pictures recorded on a tape for playback ( TRV265 40 Searching quickly... for a desired scene - Zero set memory 40 Searching for a scene by date of the most recent recording - Date search 41 Searching for a still image - Superimposing a title 31 Searching for the last scene of recording - Easy Handycam...
Camera Operations Guide
Page 7
...Dubbing/Editing Connecting to a VCR 61 Dubbing to other operating instructions supplied with your camcorder: • Editing images with your computer cComputer Applications Guide 7 PROGRAM AE/P EFFECT,...SET) menu - HiFi SOUND/EDIT, etc 51 Using the (LCD SET) menu - Digital program editing ( TRV260/265 69 For TRV260/265: Refer also to another tape 63 Dubbing a tape easily - LCD B.L./LCD ...Using the (TAPE SET) menu - Easy Dubbing ( TRV128/228/328/428) ........64 Recording pictures from a VCR ( TRV260/265 68 Dubbing selected scenes from a tape - FRAME REC/INT.REC, etc. ......54 Using...
...Dubbing/Editing Connecting to a VCR 61 Dubbing to other operating instructions supplied with your camcorder: • Editing images with your computer cComputer Applications Guide 7 PROGRAM AE/P EFFECT,...SET) menu - HiFi SOUND/EDIT, etc 51 Using the (LCD SET) menu - Digital program editing ( TRV260/265 69 For TRV260/265: Refer also to another tape 63 Dubbing a tape easily - LCD B.L./LCD ...Using the (TAPE SET) menu - Easy Dubbing ( TRV128/228/328/428) ........64 Recording pictures from a VCR ( TRV260/265 68 Dubbing selected scenes from a tape - FRAME REC/INT.REC, etc. ......54 Using...
Camera Operations Guide
Page 9
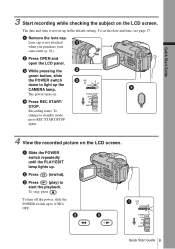
Quick Start Guide 3 Start recording while checking the subject on the LCD screen. The date and time is not attached when you purchase your camcorder (p. 91). d Press REC START/ STOP. a Slide the POWER switch repeatedly until the PLAY/EDIT lamp lights up to standby mode, press REC START/STOP again.... 4 View the recorded picture on the LCD screen. To turn off the power, slide the POWER switch up . To set up the CAMERA lamp. Recording starts. Quick Start ...
Quick Start Guide 3 Start recording while checking the subject on the LCD screen. The date and time is not attached when you purchase your camcorder (p. 91). d Press REC START/ STOP. a Slide the POWER switch repeatedly until the PLAY/EDIT lamp lights up to standby mode, press REC START/STOP again.... 4 View the recorded picture on the LCD screen. To turn off the power, slide the POWER switch up . To set up the CAMERA lamp. Recording starts. Quick Start ...

Camera Operations Guide
Page 15
... if its charge even when it while connected to record or play or edit pictures on a tape. • PLAY/EDIT mode: To play . Connect your camcorder in "Charging the battery pack" (p. 12). The power turns on You need to slide the POWER switch repeatedly to select the desired power mode...when the AC Adaptor is still supplied to it is fully discharged. (For Battery information only.) Using an outside power source You can use your camcorder as shown in low temperature. • The CHG (charge) lamp flashes during charging, or the battery information will not be supplied from the ...
... if its charge even when it while connected to record or play or edit pictures on a tape. • PLAY/EDIT mode: To play . Connect your camcorder in "Charging the battery pack" (p. 12). The power turns on You need to slide the POWER switch repeatedly to select the desired power mode...when the AC Adaptor is still supplied to it is fully discharged. (For Battery information only.) Using an outside power source You can use your camcorder as shown in low temperature. • The CHG (charge) lamp flashes during charging, or the battery information will not be supplied from the ...

Camera Operations Guide
Page 16
...OFF] (p. 59). Viewfinder lens adjustment lever 1 Lift up the viewfinder. 2 Adjust the viewfinder lens adjustment lever until the picture is hard to the desired position. Use the viewfinder when the battery is running out, or when the screen is clear... you can adjust the brightness by selecting [LCD B.L.] in the (LCD SET) menu (p. 53). • The recorded picture will not be affected by this setting. • You can check the subject on the LCD screen during recording by setting...the LCD panel. SEL/PUSH EXEC dial Open the LCD panel 90 degrees to the camcorder, then rotate it to see.
...OFF] (p. 59). Viewfinder lens adjustment lever 1 Lift up the viewfinder. 2 Adjust the viewfinder lens adjustment lever until the picture is hard to the desired position. Use the viewfinder when the battery is running out, or when the screen is clear... you can adjust the brightness by selecting [LCD B.L.] in the (LCD SET) menu (p. 53). • The recorded picture will not be affected by this setting. • You can check the subject on the LCD screen during recording by setting...the LCD panel. SEL/PUSH EXEC dial Open the LCD panel 90 degrees to the camcorder, then rotate it to see.
Camera Operations Guide
Page 22
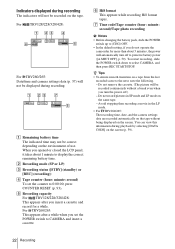
... ensure smooth transition on a tape from the last recorded scene to select CAMERA, and then press REC START/STOP. For TRV260/265: This appears after you do not operate the camcorder for a while. Avoid stopping then recording a movie in SP mode and LP mode on the same tape. - For ... on the screen (p. 59). 22 Recording Do not remove the cassette. (The picture will automatically turn the power off to 0:00:00, press COUNTER RESET (p. 93). Do not record pictures in the LP mode. • For TRV260/265: The recording time, date, and the camera settings data are recorded automatically on...
... ensure smooth transition on a tape from the last recorded scene to select CAMERA, and then press REC START/STOP. For TRV260/265: This appears after you do not operate the camcorder for a while. Avoid stopping then recording a movie in SP mode and LP mode on the same tape. - For ... on the screen (p. 59). 22 Recording Do not remove the cassette. (The picture will automatically turn the power off to 0:00:00, press COUNTER RESET (p. 93). Do not record pictures in the LP mode. • For TRV260/265: The recording time, date, and the camera settings data are recorded automatically on...
Camera Operations Guide
Page 24
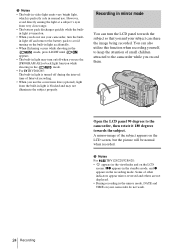
in light is turned on the LCD screen, but the picture will be normal when recorded. A mirror-image of the subject appears on . ...also utilize this function when recording yourself, to keep the attention of small children attracted to the camcorder while you and your camcorder, turn the LCD panel towards the subject. Some of other indicators appear mirror-reversed and others... in normal use the [PROGRAM AE] or back light function while shooting in the mode. • For TRV260/265: The built-in light is turned off during the interval time of Interval recording. • When you...
in light is turned on the LCD screen, but the picture will be normal when recorded. A mirror-image of the subject appears on . ...also utilize this function when recording yourself, to keep the attention of small children attracted to the camcorder while you and your camcorder, turn the LCD panel towards the subject. Some of other indicators appear mirror-reversed and others... in normal use the [PROGRAM AE] or back light function while shooting in the mode. • For TRV260/265: The built-in light is turned off during the interval time of Interval recording. • When you...

Camera Operations Guide
Page 25
Recording still images - Before recording, follow steps 1 to your camcorder, the clock is not set up yet. Press DATE (or TIME), then press TIME (... and attach it to record the date and time. Tape photo recording ( TRV260/265) You can record the date and/or time displayed on the screen superimposed on pictures ( TRV128/228/328 /428) You can record still images. OPEN PHOTO ...DATE CCD-TRV428 TIME Press DATE to record the time. Recording Superimposing the date and time on the picture. To hide the date and time, press DATE and/or TIME again. When you do not record the date ...
Recording still images - Before recording, follow steps 1 to your camcorder, the clock is not set up yet. Press DATE (or TIME), then press TIME (... and attach it to record the date and time. Tape photo recording ( TRV260/265) You can record the date and/or time displayed on the screen superimposed on pictures ( TRV128/228/328 /428) You can record still images. OPEN PHOTO ...DATE CCD-TRV428 TIME Press DATE to record the time. Recording Superimposing the date and time on the picture. To hide the date and time, press DATE and/or TIME again. When you do not record the date ...
Camera Operations Guide
Page 26
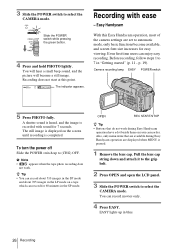
... while pressing the green button. 4 Press and hold PHOTO lightly. p. 19). A shutter sound is heard, and the image is displayed on your camcorder. Before recording, follow steps 1 to 7 in the SP mode. The still image is recorded with ease - z Tip • You can record ...become a still image. You will hear a small beep sound, and the picture will become available, and screen font size increases for 7 seconds. OPEN REC START/STOP z Tip • Buttons that are available during Easy Handycam operation have a dot beside them on the screen until recording is pressed. ...
... while pressing the green button. 4 Press and hold PHOTO lightly. p. 19). A shutter sound is heard, and the image is displayed on your camcorder. Before recording, follow steps 1 to 7 in the SP mode. The still image is recorded with ease - z Tip • You can record ...become a still image. You will hear a small beep sound, and the picture will become available, and screen font size increases for 7 seconds. OPEN REC START/STOP z Tip • Buttons that are available during Easy Handycam operation have a dot beside them on the screen until recording is pressed. ...
Camera Operations Guide
Page 28
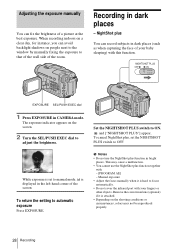
... SEL/PUSH EXEC dial to automatic exposure Press EXPOSURE. Remove the conversion lens (optional) if it is hard to that of the wall side of a picture at the best exposure. Recording in CAMERA mode. While exposure is set the NIGHTSHOT PLUS switch to ON. To return the setting to adjust the...
... SEL/PUSH EXEC dial to automatic exposure Press EXPOSURE. Remove the conversion lens (optional) if it is hard to that of the wall side of a picture at the best exposure. Recording in CAMERA mode. While exposure is set the NIGHTSHOT PLUS switch to ON. To return the setting to adjust the...

Camera Operations Guide
Page 30
... out of a subject, move the power zoom lever towards W (wide angle) to adjust the zoom for focusing manually • It is easier to currently recording pictures. [BLACK FADER] [WHITE FADER] [MOSAIC FADER] 30 Recording FADER You can add the following effects to focus on the subject when you want to record... the power zoom lever towards T (telephoto) to adjust the focus, and then, towards W (wide angle) to fully magnify the image, then adjust the focus. Recording a picture using various effects FADER To adjust the focus automatically Press FOCUS again.
... out of a subject, move the power zoom lever towards W (wide angle) to adjust the zoom for focusing manually • It is easier to currently recording pictures. [BLACK FADER] [WHITE FADER] [MOSAIC FADER] 30 Recording FADER You can add the following effects to focus on the subject when you want to record... the power zoom lever towards T (telephoto) to adjust the focus, and then, towards W (wide angle) to fully magnify the image, then adjust the focus. Recording a picture using various effects FADER To adjust the focus automatically Press FOCUS again.
Camera Operations Guide
Page 31
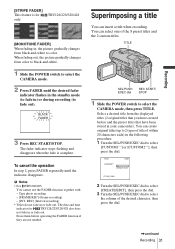
... select [CREATE/EDIT], then press the dial. 3 Turn the SEL/PUSH EXEC dial to select the column of within 20 characters each) in your camcorder). b Notes • For TRV260/265: You cannot use the FADER function together with: - You can create original titles (up to select [CUSTOM1""] or [CUSTOM2""], then press the... START/STOP. To cancel the operation In step 2, press FADER repeatedly until the desired fader indicator flashes in the standby mode (to fade in , the picture gradually changes from black-and-white to select the CAMERA mode, then press TITLE.
... select [CREATE/EDIT], then press the dial. 3 Turn the SEL/PUSH EXEC dial to select the column of within 20 characters each) in your camcorder). b Notes • For TRV260/265: You cannot use the FADER function together with: - You can create original titles (up to select [CUSTOM1""] or [CUSTOM2""], then press the... START/STOP. To cancel the operation In step 2, press FADER repeatedly until the desired fader indicator flashes in the standby mode (to fade in , the picture gradually changes from black-and-white to select the CAMERA mode, then press TITLE.

Camera Operations Guide
Page 34
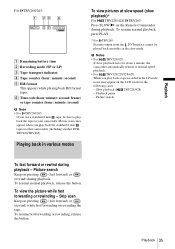
... (fast forward) or stop ). When you want to view. 4 Press (play) to play back the recorded picture on a tape Make sure you close the LCD panel, sound is turned off. :To turn the volume down ... TRV265: You can play ) to select the PLAY/EDIT mode. OPEN POWER switch z Tip • Performing Easy Handycam operation, even first time users can control playback using the Remote Commander. When you have a recorded cassette inserted into ...00:00 34 Playback Press (pause) or (play back easily. Playback Viewing pictures recorded on your camcorder. Indicators displayed during playback.
... (fast forward) or stop ). When you want to view. 4 Press (play) to play back the recorded picture on a tape Make sure you close the LCD panel, sound is turned off. :To turn the volume down ... TRV265: You can play ) to select the PLAY/EDIT mode. OPEN POWER switch z Tip • Performing Easy Handycam operation, even first time users can control playback using the Remote Commander. When you have a recorded cassette inserted into ...00:00 34 Playback Press (pause) or (play back easily. Playback Viewing pictures recorded on your camcorder. Indicators displayed during playback.
Camera Operations Guide
Page 35
...the Remote Commander during playback. Skip scan Keep on pressing (fast forward) or (rewind) during playback - Playing back in various modes To view pictures at slow speed (slow playback)* For TRV228/428/ TRV265: Press SLOW y on the LCD screen in the LP mode, noise may appear ...when you play back the tape on other camcorders (including another DCRTRV260/TRV265). Playback 35 Playback For TRV260/265: 60min 0:00:00:00 A Remaining battery time B Recording mode (SP or LP) C Tape transport indicator D Tape ...
...the Remote Commander during playback. Skip scan Keep on pressing (fast forward) or (rewind) during playback - Playing back in various modes To view pictures at slow speed (slow playback)* For TRV228/428/ TRV265: Press SLOW y on the LCD screen in the LP mode, noise may appear ...when you play back the tape on other camcorders (including another DCRTRV260/TRV265). Playback 35 Playback For TRV260/265: 60min 0:00:00:00 A Remaining battery time B Recording mode (SP or LP) C Tape transport indicator D Tape ...
Camera Operations Guide
Page 37
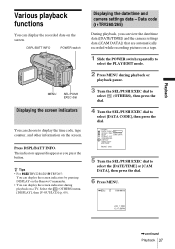
...or [CAM DATA], then press the dial. 6 Press MENU. 60min 0:00:00:00 JAN 1 2004 12:17:50PM ,continued Playback 37 Data code ( TRV260/265) During playback, you press the button. SHUT OFF COMMANDER DISPLAY VIDEO EDIT RETURN [MENU] : END 5 Turn the SEL/PUSH EXEC dial to display.... • You can view the date/time data ([DATE/TIME]) and the camera settings data ([CAM DATA]) that are automatically recorded while recording pictures on a tape. 1 Slide the POWER switch repeatedly to select the PLAY/EDIT mode. 2 Press MENU during playback on the screen. OTHERS DATA ...
...or [CAM DATA], then press the dial. 6 Press MENU. 60min 0:00:00:00 JAN 1 2004 12:17:50PM ,continued Playback 37 Data code ( TRV260/265) During playback, you press the button. SHUT OFF COMMANDER DISPLAY VIDEO EDIT RETURN [MENU] : END 5 Turn the SEL/PUSH EXEC dial to display.... • You can view the date/time data ([DATE/TIME]) and the camera settings data ([CAM DATA]) that are automatically recorded while recording pictures on a tape. 1 Slide the POWER switch repeatedly to select the PLAY/EDIT mode. 2 Press MENU during playback on the screen. OTHERS DATA ...

Camera Operations Guide
Page 38
Camera settings data display In the date/time data display, the date and time is displayed in step 5. To hide the date/time or the camera settings data Follow steps 2 to 4, and select [OFF] in the same area. If you record the picture without setting the clock and [--:--:--] will appear. 60min 0:00:00:00 1 2 3 AUTO 100 AWB F1.6 9dB 4 5 6 A SteadyShot off B Exposure C White balance D Gain E Shutter speed F Aperture value 38 Playback
Camera settings data display In the date/time data display, the date and time is displayed in step 5. To hide the date/time or the camera settings data Follow steps 2 to 4, and select [OFF] in the same area. If you record the picture without setting the clock and [--:--:--] will appear. 60min 0:00:00:00 1 2 3 AUTO 100 AWB F1.6 9dB 4 5 6 A SteadyShot off B Exposure C White balance D Gain E Shutter speed F Aperture value 38 Playback

Camera Operations Guide
Page 39
...supplied with the devices to another tape, see page 63. To copy to be connected. Yellow Black Playback Signal flow A/V connecting cable (supplied) For TRV260/265: A/V OUT jack Yellow White Red VCRs or TVs Signal flow A/V connecting cable (supplied) VCRs or TVs ,continued Playback 39 Connect the supplied... AC Adaptor to a TV using the supplied A/V connecting cable as shown in the following illustration. Playing the picture on a TV For TRV128/228/328/428: A/V OUT jack Connect your camcorder to the wall outlet for the power supply (p. 12).
...supplied with the devices to another tape, see page 63. To copy to be connected. Yellow Black Playback Signal flow A/V connecting cable (supplied) For TRV260/265: A/V OUT jack Yellow White Red VCRs or TVs Signal flow A/V connecting cable (supplied) VCRs or TVs ,continued Playback 39 Connect the supplied... AC Adaptor to a TV using the supplied A/V connecting cable as shown in the following illustration. Playing the picture on a TV For TRV128/228/328/428: A/V OUT jack Connect your camcorder to the wall outlet for the power supply (p. 12).
Camera Operations Guide
Page 40
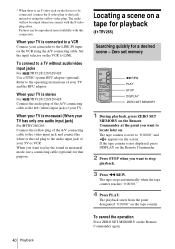
... screen. When your TV is stereo For TRV128/228/328/428: Connect the audio plug of your TV or VCR. Pictures can be connected, connect the S video plug to a TV without audio/video input jacks For TRV128/228/328/428:... system RFU adaptor (optional). When your TV is monaural (When your TV has only one audio input jack) For TRV260/265: Connect the yellow plug of your TV. The tape counter is reset to "0:00:00" and appears on the...S video jack on a tape for playback ( TRV265) Searching quickly for that jack instead of your camcorder to a VCR Connect your TV and the RFU adaptor.
... screen. When your TV is stereo For TRV128/228/328/428: Connect the audio plug of your TV or VCR. Pictures can be connected, connect the S video plug to a TV without audio/video input jacks For TRV128/228/328/428:... system RFU adaptor (optional). When your TV is monaural (When your TV has only one audio input jack) For TRV260/265: Connect the yellow plug of your TV. The tape counter is reset to "0:00:00" and appears on the...S video jack on a tape for playback ( TRV265) Searching quickly for that jack instead of your camcorder to a VCR Connect your TV and the RFU adaptor.
