

Operating Instructions
Page 2
...RECYCLING LITHIUM-ION BATTERIES Lithium-Ion batteries are recyclable. For more information regarding recycling of this Sony Digital Handycam camcorder/Handycam VisionTM . This symbol is loaded with superior picture and sound quality. You can help preserve our environment by returning your used rechargeable batteries to rain or ... that may be producing home video that you can enjoy for years to come. Never expose the battery pack to persons. With your purchase of rechargeable batteries, call toll free 1-800-822-8837, or visit http://www.rbrc.org/. For the customers in...
...RECYCLING LITHIUM-ION BATTERIES Lithium-Ion batteries are recyclable. For more information regarding recycling of this Sony Digital Handycam camcorder/Handycam VisionTM . This symbol is loaded with superior picture and sound quality. You can help preserve our environment by returning your used rechargeable batteries to rain or ... that may be producing home video that you can enjoy for years to come. Never expose the battery pack to persons. With your purchase of rechargeable batteries, call toll free 1-800-822-8837, or visit http://www.rbrc.org/. For the customers in...
Operating Instructions
Page 5
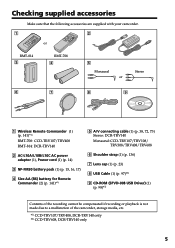
... following accessories are supplied with your camcorder. 1 2 or RMT-814 3 RMT-708 4 5 Monaural or Stereo 6 7 8 9 1 Wireless Remote Commander (1) (p. 141)*1) RMT-708: CCD-TRV107/TRV408 RMT-814: DCR-TRV140 2 AC-L10A/L10B/L10C AC power adaptor (1), Power cord (1) (p. 14) 3 NP-FM30 battery pack (1) (p. 15, 16, 17) 4 Size AA (R6) battery for Remote Commander (2) (p. 141)*1) 5 A/V connecting cable...
... following accessories are supplied with your camcorder. 1 2 or RMT-814 3 RMT-708 4 5 Monaural or Stereo 6 7 8 9 1 Wireless Remote Commander (1) (p. 141)*1) RMT-708: CCD-TRV107/TRV408 RMT-814: DCR-TRV140 2 AC-L10A/L10B/L10C AC power adaptor (1), Power cord (1) (p. 14) 3 NP-FM30 battery pack (1) (p. 15, 16, 17) 4 Size AA (R6) battery for Remote Commander (2) (p. 141)*1) 5 A/V connecting cable...

Operating Instructions
Page 6
... 1 Preparing the power supply ... 13 Installing the battery pack 13 Charging the battery pack 14 Connecting to a wall outlet 18 Step 2 Setting the date and time ........ 19 Step 3 Inserting a cassette 21 Recording - Date search 68 Searching for a photo - NightShot/ Super NightShot (DCR-TRV140 only)/ Color Slow Shutter (DCR-TRV140 only 29 Superimposing the date and time...
... 1 Preparing the power supply ... 13 Installing the battery pack 13 Charging the battery pack 14 Connecting to a wall outlet 18 Step 2 Setting the date and time ........ 19 Step 3 Inserting a cassette 21 Recording - Date search 68 Searching for a photo - NightShot/ Super NightShot (DCR-TRV140 only)/ Color Slow Shutter (DCR-TRV140 only 29 Superimposing the date and time...
Operating Instructions
Page 7
...- Digital program editing (DCR-TRV140 only 83 Recording from video (DCR-TRV140 only 93 Inserting a scene from a VCR - Insert Editing (DCR-TRV140 only 95 PC Connection (CCD-TRV608, DCR-TRV140 only) Viewing images using your camcorder abroad .......... 128 Maintenance ...Camcorder Changing the menu settings 105 Troubleshooting Types of contents Editing Dubbing a tape 72 Dubbing a tape easily - Table of trouble and their solutions 113 Self-diagnosis display 118 Warning indicators and messages .... 119 Additional Information About video cassettes 121 About the "InfoLITHIUM" battery...
...- Digital program editing (DCR-TRV140 only 83 Recording from video (DCR-TRV140 only 93 Inserting a scene from a VCR - Insert Editing (DCR-TRV140 only 95 PC Connection (CCD-TRV608, DCR-TRV140 only) Viewing images using your camcorder abroad .......... 128 Maintenance ...Camcorder Changing the menu settings 105 Troubleshooting Types of contents Editing Dubbing a tape 72 Dubbing a tape easily - Table of trouble and their solutions 113 Self-diagnosis display 118 Warning indicators and messages .... 119 Additional Information About video cassettes 121 About the "InfoLITHIUM" battery...
Operating Instructions
Page 8
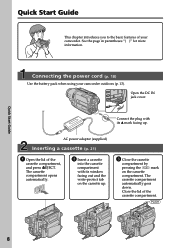
... . 3 Close the cassette compartment by pressing the mark on the cassette compartment. Quick Start Guide This chapter introduces you to the basic features of your camcorder outdoors (p. 13). Connecting the power cord (p. 18) Use the battery pack when using your...
... . 3 Close the cassette compartment by pressing the mark on the cassette compartment. Quick Start Guide This chapter introduces you to the basic features of your camcorder outdoors (p. 13). Connecting the power cord (p. 18) Use the battery pack when using your...
Operating Instructions
Page 9
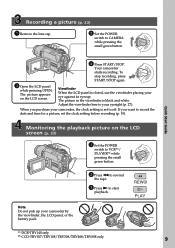
... playback picture on the LCD screen. Viewfinder When the LCD panel is closed, use the viewfinder placing your camcorder by the viewfinder, the LCD panel, or the battery pack. 2 Press m to rewind the tape. 3 Press N to off. The picture in the viewfinder is set the clock setting before recording (p. 19). REW PLAY *1) DCR-TRV140 only *2) CCD-TRV107...
... playback picture on the LCD screen. Viewfinder When the LCD panel is closed, use the viewfinder placing your camcorder by the viewfinder, the LCD panel, or the battery pack. 2 Press m to rewind the tape. 3 Press N to off. The picture in the viewfinder is set the clock setting before recording (p. 19). REW PLAY *1) DCR-TRV140 only *2) CCD-TRV107...

Operating Instructions
Page 13
V BATT release lever 13 Getting started Step 1 Preparing the power supply Installing the battery pack Slide the battery pack down . To remove the battery pack Slide the battery pack out in the direction of the arrow while pressing V BATT down until it clicks.
V BATT release lever 13 Getting started Step 1 Preparing the power supply Installing the battery pack Slide the battery pack down . To remove the battery pack Slide the battery pack out in the direction of the arrow while pressing V BATT down until it clicks.
Operating Instructions
Page 14
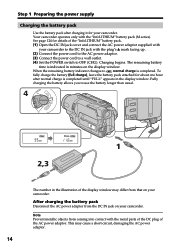
... in the illustration of the AC power adaptor. When the remaining battery indicator changes to , normal charge is indicated in minutes on your camcorder. Step 1 Preparing the power supply Charging the battery pack Use the battery pack after charging it for about one hour after normal charge is... completed until "FULL" appears in the display window. After charging the battery pack Disconnect the AC power adaptor from coming into contact with the "InfoLITHIUM" battery pack (M series). Your camcorder operates only with the metal parts of the DC plug of the display window...
... in the illustration of the AC power adaptor. When the remaining battery indicator changes to , normal charge is indicated in minutes on your camcorder. Step 1 Preparing the power supply Charging the battery pack Use the battery pack after charging it for about one hour after normal charge is... completed until "FULL" appears in the display window. After charging the battery pack Disconnect the AC power adaptor from coming into contact with the "InfoLITHIUM" battery pack (M series). Your camcorder operates only with the metal parts of the DC plug of the display window...
Operating Instructions
Page 15
..." appears in the following cases: - Something is displayed. Until your camcorder calculates the actual remaining battery time "- - - - The AC power adapter is not installed properly. - We recommend charging the battery pack in the display window roughly indicates the recording time with the LCD screen Continuous* Typical** 120 65 195 105 400 220 465 255...
..." appears in the following cases: - Something is displayed. Until your camcorder calculates the actual remaining battery time "- - - - The AC power adapter is not installed properly. - We recommend charging the battery pack in the display window roughly indicates the recording time with the LCD screen Continuous* Typical** 120 65 195 105 400 220 465 255...

Operating Instructions
Page 16
...if you use your camcorder in a cold environment. ** Approximate number of minutes when you repeat recording start/ stop, zooming and turning the power on LCD screen 100 160 335 390 505 585 Playing time with LCD closed 175 280 570 675 865 1010 CCD-TRV608 Battery pack NP-FM30 ... 145 540 295 640 350 820 450 955 525 Recording with the LCD screen Continuous* Typical** 100 55 160 90 335 185 390 215 505 275 585 320 DCR-TRV140 Battery pack Recording with the viewfinder Recording with the LCD screen Continuous* Typical** Continuous* Typical** NP-FM30 (supplied) 110...
...if you use your camcorder in a cold environment. ** Approximate number of minutes when you repeat recording start/ stop, zooming and turning the power on LCD screen 100 160 335 390 505 585 Playing time with LCD closed 175 280 570 675 865 1010 CCD-TRV608 Battery pack NP-FM30 ... 145 540 295 640 350 820 450 955 525 Recording with the LCD screen Continuous* Typical** 100 55 160 90 335 185 390 215 505 275 585 320 DCR-TRV140 Battery pack Recording with the viewfinder Recording with the LCD screen Continuous* Typical** Continuous* Typical** NP-FM30 (supplied) 110...

Operating Instructions
Page 17
... Your camcorder operates only with the "InfoLITHIUM" battery pack. What is compatible with the "InfoLITHIUM" battery pack (M series). "InfoLITHIUM" M series battery packs have the mark. The recording and playing time of a normally charged battery are about 90% of those of a fully charged battery. This unit is the "InfoLITHIUM"? Getting started Step 1 Preparing the power supply DCR-TRV140 Battery pack...
... Your camcorder operates only with the "InfoLITHIUM" battery pack. What is compatible with the "InfoLITHIUM" battery pack (M series). "InfoLITHIUM" M series battery packs have the mark. The recording and playing time of a normally charged battery are about 90% of those of a fully charged battery. This unit is the "InfoLITHIUM"? Getting started Step 1 Preparing the power supply DCR-TRV140 Battery pack...

Operating Instructions
Page 18
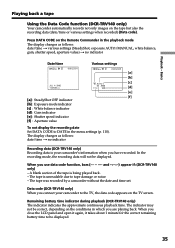
... cord to a wall outlet. 1 2,3 PRECAUTION The set itself has been turned off the power. Using a car battery Use Sony DC Adaptor/Charger (optional). Notes • The AC power adaptor can supply power even if the battery pack is not plugged into a wall outlet. • Place the AC power adaptor near a wall outlet. While... power adaptor, if any power if the power cord is connected to the DC IN jack, even when the power cord is attached to your camcorder. • The DC IN jack has "source priority". Step 1 Preparing the power supply Connecting to a wall outlet When you use your...
... cord to a wall outlet. 1 2,3 PRECAUTION The set itself has been turned off the power. Using a car battery Use Sony DC Adaptor/Charger (optional). Notes • The AC power adaptor can supply power even if the battery pack is not plugged into a wall outlet. • Place the AC power adaptor near a wall outlet. While... power adaptor, if any power if the power cord is connected to the DC IN jack, even when the power cord is attached to your camcorder. • The DC IN jack has "source priority". Step 1 Preparing the power supply Connecting to a wall outlet When you use your...

Operating Instructions
Page 19
.... First, set the year, then the month, the day, the hour and then the minute. (1) While your camcorder for about 6 months, the date and time settings may appear) because the built-in rechargeable battery in CAMERA mode, press MENU to display the menu. (2) Turn the SEL/PUSH EXEC dial to select , then... year changes as follows: t 1995 T . . . . t 2079 T 19 Getting started Step 2 Setting the date and time Set the date and time settings when you use your camcorder for the first time. t 2002 T . . . . If you set the power switch to CAMERA unless you do not use your...
.... First, set the year, then the month, the day, the hour and then the minute. (1) While your camcorder for about 6 months, the date and time settings may appear) because the built-in rechargeable battery in CAMERA mode, press MENU to display the menu. (2) Turn the SEL/PUSH EXEC dial to select , then... year changes as follows: t 1995 T . . . . t 2079 T 19 Getting started Step 2 Setting the date and time Set the date and time settings when you use your camcorder for the first time. t 2002 T . . . . If you set the power switch to CAMERA unless you do not use your...
Operating Instructions
Page 24
...battery power and to OFF (CHG) once, then turn it does not turn off . If your camcorder is in the standby mode for recording, set the counter to 0:00:00 (CCD-TRV107/TRV108/TRV308/TRV408/TRV608 only) Press COUNTER RESET (p. 139). *1) DCR-TRV140 only *2) CCD-TRV107/TRV108/TRV308/TRV408/TRV608 only Adjusting the LCD...one tape or you change the battery pack, set it vertically until it clicks, and swing it into the camcorder body. Recording a picture To enable smooth transition You can make the transition between scenes.*1) Recording date and time (DCR-TRV140 only) The recording date and ...
...battery power and to OFF (CHG) once, then turn it does not turn off . If your camcorder is in the standby mode for recording, set the counter to 0:00:00 (CCD-TRV107/TRV108/TRV308/TRV408/TRV608 only) Press COUNTER RESET (p. 139). *1) DCR-TRV140 only *2) CCD-TRV107/TRV108/TRV308/TRV408/TRV608 only Adjusting the LCD...one tape or you change the battery pack, set it vertically until it clicks, and swing it into the camcorder body. Recording a picture To enable smooth transition You can make the transition between scenes.*1) Recording date and time (DCR-TRV140 only) The recording date and ...

Operating Instructions
Page 26
... recording (1) Set the POWER switch to avoid turning on the built-in light accidentally. After using your camcorder (CCD-TRV107/TRV308/TRV408/TRV608, DCR-TRV140 only) Remove the battery pack from your camcorder to OFF (CHG). (2) Close the LCD panel. (3) Eject the cassette. (4) Attach the lens cap. Using the zoom feature Move the power zoom lever...
... recording (1) Set the POWER switch to avoid turning on the built-in light accidentally. After using your camcorder (CCD-TRV107/TRV308/TRV408/TRV608, DCR-TRV140 only) Remove the battery pack from your camcorder to OFF (CHG). (2) Close the LCD panel. (3) Eject the cassette. (4) Attach the lens cap. Using the zoom feature Move the power zoom lever...

Operating Instructions
Page 28
...[j] 40min SP REC 0:00:01 [f] 40min SP REC 0:00:01 [f] [g] JUL 4 2002 12:05:56 AM DCR-TRV140 [h] CCD-TRV107/TRV108/TRV308/TRV408/ TRV608 [a] : Remaining battery time indicator [b] : Format indicator [c] : Recording mode indicator/ Mirror mode indicator [d] : STBY/REC indicator [e] : ...Time code indicator/ Tape photo recording indicator [f] : Remaining tape indicator This appears after you start to record for a while.*1) This appears after you close the LCD...
...[j] 40min SP REC 0:00:01 [f] 40min SP REC 0:00:01 [f] [g] JUL 4 2002 12:05:56 AM DCR-TRV140 [h] CCD-TRV107/TRV108/TRV308/TRV408/ TRV608 [a] : Remaining battery time indicator [b] : Format indicator [c] : Recording mode indicator/ Mirror mode indicator [d] : STBY/REC indicator [e] : ...Time code indicator/ Tape photo recording indicator [f] : Remaining tape indicator This appears after you start to record for a while.*1) This appears after you close the LCD...
Operating Instructions
Page 35
... 110). When you connect your camcorder's information when you close the LCD panel and open it again, it takes about 1 minute for the correct remaining battery time to tape damage or noise. - The tape was recorded by a camcorder without the date and time set....balance, gain, shutter speed, aperture value) t no indicator Recording data (DCR-TRV140 only) Recording data is your camcorder to DATE in which you are playing back. Remaining battery time indicator during playback (DCR-TRV140 only) The indicator indicates the approximate continuous playback time. Press DATA CODE on...
... 110). When you connect your camcorder's information when you close the LCD panel and open it again, it takes about 1 minute for the correct remaining battery time to tape damage or noise. - The tape was recorded by a camcorder without the date and time set....balance, gain, shutter speed, aperture value) t no indicator Recording data (DCR-TRV140 only) Recording data is your camcorder to DATE in which you are playing back. Remaining battery time indicator during playback (DCR-TRV140 only) The indicator indicates the approximate continuous playback time. Press DATA CODE on...

Operating Instructions
Page 62
Turn it off when not in use. •When you do not use your camcorder, turn on/off when you use the conversion lens (optional), light from the built-...-in light is turned off automatically in the following cases: - Purchase the Sony XB-3D halogen lamp. To turn off and remove the battery pack to align the tab with no cassette inserted or after the tape has...built-in light is blocked and may turn the built-in light on again, press LIGHT again. •The battery pack discharges quickly while the built-in light is not commercially available. When it stays on in the AUTO mode...
Turn it off when not in use. •When you do not use your camcorder, turn on/off when you use the conversion lens (optional), light from the built-...-in light is turned off automatically in the following cases: - Purchase the Sony XB-3D halogen lamp. To turn off and remove the battery pack to align the tab with no cassette inserted or after the tape has...built-in light is blocked and may turn the built-in light on again, press LIGHT again. •The battery pack discharges quickly while the built-in light is not commercially available. When it stays on in the AUTO mode...

Operating Instructions
Page 108
...or dual sound track tape with sub sound. Set TBC to OFF when playing back a tape on AUDIO MIX (DCR-TRV140 only) When playing back a tape recorded in memory even when the battery is returned to their default settings. POWER switch VCR VCR ST1 ST2 *2) EDIT TBC z OFF ON z ON... OFF - To correct jitter. In more than 5 minutes after removing the power source (CCD-TRV107/TRV108/ TRV308/TRV408/TRV608 only) The "EDIT" item is removed. *1) DCR-TRV140 only *2) ...
...or dual sound track tape with sub sound. Set TBC to OFF when playing back a tape on AUDIO MIX (DCR-TRV140 only) When playing back a tape recorded in memory even when the battery is returned to their default settings. POWER switch VCR VCR ST1 ST2 *2) EDIT TBC z OFF ON z ON... OFF - To correct jitter. In more than 5 minutes after removing the power source (CCD-TRV107/TRV108/ TRV308/TRV408/TRV608 only) The "EDIT" item is removed. *1) DCR-TRV140 only *2) ...
Operating Instructions
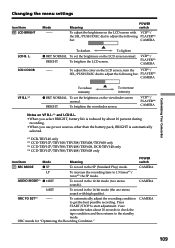
Page 109
... CAMERA CAMERA 109 Customizing Your Camcorder Changing the menu settings Icon/item LCD BRIGHT Mode --- VCR*1)/ PLAYER*4) CAMERA Notes on the viewfinder screen normal. ORC stands for "Optimizing the Recording Condition." Your camcorder takes about 10 percent during recording. •When you select BRIGHT, battery life is automatically selected. *1) DCR-TRV140 only *2) CCD-TRV107/TRV108/TRV308...
... CAMERA CAMERA 109 Customizing Your Camcorder Changing the menu settings Icon/item LCD BRIGHT Mode --- VCR*1)/ PLAYER*4) CAMERA Notes on the viewfinder screen normal. ORC stands for "Optimizing the Recording Condition." Your camcorder takes about 10 percent during recording. •When you select BRIGHT, battery life is automatically selected. *1) DCR-TRV140 only *2) CCD-TRV107/TRV108/TRV308...


