
Operating Instructions
Page 5
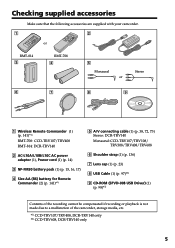
Checking supplied accessories Make sure that the following accessories are supplied with your camcorder. 1 2 or RMT-814 3 RMT-708 4 5 Monaural or Stereo 6 7 8 9 1 Wireless Remote Commander (1) (p. 141)*1) RMT-708: CCD-TRV107/TRV408 RMT-814: DCR-TRV140 2 AC-L10A/L10B/L10C AC power adaptor (1), Power cord (1) (p. 14) 3 NP-FM30 battery pack (1) (p. 15, 16, 17) 4 Size AA (R6) battery for...
Checking supplied accessories Make sure that the following accessories are supplied with your camcorder. 1 2 or RMT-814 3 RMT-708 4 5 Monaural or Stereo 6 7 8 9 1 Wireless Remote Commander (1) (p. 141)*1) RMT-708: CCD-TRV107/TRV408 RMT-814: DCR-TRV140 2 AC-L10A/L10B/L10C AC power adaptor (1), Power cord (1) (p. 14) 3 NP-FM30 battery pack (1) (p. 15, 16, 17) 4 Size AA (R6) battery for...
Operating Instructions
Page 8
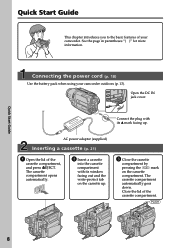
... (p. 21) 1 Open the lid of the cassette compartment. Quick Start Guide 8 See the page in parentheses "( )" for more information. Connecting the power cord (p. 18) Use the battery pack when using your camcorder. Connect the plug with its v mark facing up . 3 Close the cassette compartment by pressing the mark on the cassette compartment. Open... window facing out and the write-protect tab on the cassette up . Quick Start Guide This chapter introduces you to the basic features of your camcorder outdoors (p. 13).
... (p. 21) 1 Open the lid of the cassette compartment. Quick Start Guide 8 See the page in parentheses "( )" for more information. Connecting the power cord (p. 18) Use the battery pack when using your camcorder. Connect the plug with its v mark facing up . 3 Close the cassette compartment by pressing the mark on the cassette compartment. Open... window facing out and the write-protect tab on the cassette up . Quick Start Guide This chapter introduces you to the basic features of your camcorder outdoors (p. 13).
Operating Instructions
Page 14
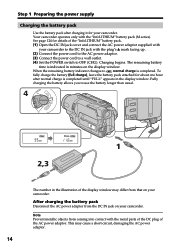
...coming into contact with the plug's v mark facing up. (2) Connect the power cord to the AC power adaptor. (3) Connect the power cord to a wall outlet. (4) Set the POWER switch to OFF (CHG). Step 1 Preparing the power supply Charging the battery pack Use the battery pack after charging it for ... is indicated in the display window. This may differ from that on your camcorder. When the remaining battery indicator changes to use the battery longer than usual. Your camcorder operates only with your camcorder. See page 124 for details of the display window may cause a short-...
...coming into contact with the plug's v mark facing up. (2) Connect the power cord to the AC power adaptor. (3) Connect the power cord to a wall outlet. (4) Set the POWER switch to OFF (CHG). Step 1 Preparing the power supply Charging the battery pack Use the battery pack after charging it for ... is indicated in the display window. This may differ from that on your camcorder. When the remaining battery indicator changes to use the battery longer than usual. Your camcorder operates only with your camcorder. See page 124 for details of the display window may cause a short-...

Operating Instructions
Page 18
... a wall outlet using the AC power adaptor, if any power if the power cord is connected to the DC IN jack, even when the power cord is attached to cut off . Using a car battery Use Sony DC Adaptor/Charger (optional). Step 1 Preparing the power supply Connecting to a wall outlet When you use your camcorder. • The DC IN jack...
... a wall outlet using the AC power adaptor, if any power if the power cord is connected to the DC IN jack, even when the power cord is attached to cut off . Using a car battery Use Sony DC Adaptor/Charger (optional). Step 1 Preparing the power supply Connecting to a wall outlet When you use your camcorder. • The DC IN jack...
Operating Instructions
Page 117
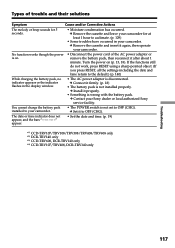
...power is not installed properly. c Contact your camcorder for 5 seconds. • Moisture condensation has occurred. The date or time indicator does not appear, and the bars appear. • Set the date and time. (p. 19) *1) CCD-TRV107/TRV108/TRV308/TRV408/TRV608 only *2) DCR-TRV140 only *3) CCD-TRV608, DCR-TRV140 only *4) CCD-TRV107/TRV408, DCR-TRV140...your camcorder. You cannot charge the battery pack installed to your camcorder. c Install it again, then operate your camcorder. • The POWER switch is disconnected. Turn the power on . • Disconnect the power cord of...
...power is not installed properly. c Contact your camcorder for 5 seconds. • Moisture condensation has occurred. The date or time indicator does not appear, and the bars appear. • Set the date and time. (p. 19) *1) CCD-TRV107/TRV108/TRV308/TRV408/TRV608 only *2) DCR-TRV140 only *3) CCD-TRV608, DCR-TRV140 only *4) CCD-TRV107/TRV408, DCR-TRV140...your camcorder. You cannot charge the battery pack installed to your camcorder. c Install it again, then operate your camcorder. • The POWER switch is disconnected. Turn the power on . • Disconnect the power cord of...
Operating Instructions
Page 118
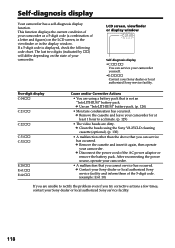
... code chart. After reconnecting the power source, operate your camcorder. • A malfunction that you cannot service has occurred. c Use an "InfoLITHIUM" battery pack. (p. 124) • Moisture condensation has occurred. c Disconnect the power cord of a letter and figures) on the state of your Sony dealer or local authorized Sony service facility. 118 LCD screen, viewfinder or display window...
... code chart. After reconnecting the power source, operate your camcorder. • A malfunction that you cannot service has occurred. c Use an "InfoLITHIUM" battery pack. (p. 124) • Moisture condensation has occurred. c Disconnect the power cord of a letter and figures) on the state of your Sony dealer or local authorized Sony service facility. 118 LCD screen, viewfinder or display window...

Operating Instructions
Page 132
... in a dusty place, protect it . If this malfunction cannot be used to your personal computer (DCR-TRV140 only) When recording an image processed or edited by the plug. Very humid - To disconnect the power cord, pull it away from the sand or dust. Extremely hot or cold - Dusty or dirty -...may occur and the unit may damage the finish. • Do not let sand get into your camcorder is not a malfunction. • Do not place the unit in use a new Hi8 /Digital8 tape. AC power adaptor • Unplug the unit from coming into contact with the i.LINK cable (DV connecting cable...
... in a dusty place, protect it . If this malfunction cannot be used to your personal computer (DCR-TRV140 only) When recording an image processed or edited by the plug. Very humid - To disconnect the power cord, pull it away from the sand or dust. Extremely hot or cold - Dusty or dirty -...may occur and the unit may damage the finish. • Do not let sand get into your camcorder is not a malfunction. • Do not place the unit in use a new Hi8 /Digital8 tape. AC power adaptor • Unplug the unit from coming into contact with the i.LINK cable (DV connecting cable...

Operating Instructions
Page 135
... 280 g (9.8 oz) excluding power cord Battery pack Maximum output voltage DC 8.4 V Output voltage DC 7.2 V Capacity 5.0 Wh (700 mAh) Operating temperature 0 °C to 40 °C (32 °F to change without notice. Specifications Mass (approx.) CCD-TRV107/TRV108/TRV308/ TRV408: 850 g (1 lb 14 oz) DCR-TRV140: 860 g (1 lb 14 ...oz) CCD-TRV608: 870 g (1 lb 14 oz) main unit only CCD-TRV107/TRV108/TRV308: 990 g (2 lb 3 oz) CCD-TRV408/TRV608, DCRTRV140: 1.0 kg (2 lb 3 oz) including the battery pack NP-FM30, Hi8/Digital8 cassette, lens cap, and shoulder...
... 280 g (9.8 oz) excluding power cord Battery pack Maximum output voltage DC 8.4 V Output voltage DC 7.2 V Capacity 5.0 Wh (700 mAh) Operating temperature 0 °C to 40 °C (32 °F to change without notice. Specifications Mass (approx.) CCD-TRV107/TRV108/TRV308/ TRV408: 850 g (1 lb 14 oz) DCR-TRV140: 860 g (1 lb 14 ...oz) CCD-TRV608: 870 g (1 lb 14 oz) main unit only CCD-TRV107/TRV108/TRV308: 990 g (2 lb 3 oz) CCD-TRV408/TRV608, DCRTRV140: 1.0 kg (2 lb 3 oz) including the battery pack NP-FM30, Hi8/Digital8 cassette, lens cap, and shoulder...


