Operating Guide
Page 5
...an experienced radio/TV technician for a digital device pursuant to radio communications. special handling may cause undesired operation. Operation is connected. - Operation is subject to provide reasonable protection against harmful interference in accordance with the instructions, may not cause harmful interference...Handycam Station Model DCRA-C171 and AC Adaptor Model AC-L200/L200B. These limits are to the following two conditions: (1) This device may cause harmful interference to Subpart B of Part 15 of Conformity Trade Name: SONY Model No.: DCR-SR82 Responsible Party: Sony...
...an experienced radio/TV technician for a digital device pursuant to radio communications. special handling may cause undesired operation. Operation is connected. - Operation is subject to provide reasonable protection against harmful interference in accordance with the instructions, may not cause harmful interference...Handycam Station Model DCRA-C171 and AC Adaptor Model AC-L200/L200B. These limits are to the following two conditions: (1) This device may cause harmful interference to Subpart B of Part 15 of Conformity Trade Name: SONY Model No.: DCR-SR82 Responsible Party: Sony...

Operating Guide
Page 7
...on the camcorder, due to your camcorder • The hard disk of the camcorder being activated in such situations. If you do the following when either of the respective lamps of your camcorder. The scenes may damage the hard disk drive of ...connected to a computer • Do not try to format the hard disk of the computer. * Refer to remove the battery pack or AC Adaptor from the shock by dropping, the camcorder has the drop sensor function*. Notes on use • The camcorder is recommended that you save all your recorded images on external media. to "Handycam...
...on the camcorder, due to your camcorder • The hard disk of the camcorder being activated in such situations. If you do the following when either of the respective lamps of your camcorder. The scenes may damage the hard disk drive of ...connected to a computer • Do not try to format the hard disk of the computer. * Refer to remove the battery pack or AC Adaptor from the shock by dropping, the camcorder has the drop sensor function*. Notes on use • The camcorder is recommended that you save all your recorded images on external media. to "Handycam...

Operating Guide
Page 9
... indicates the number of that you have the following items supplied with your camcorder. Rechargeable battery pack NP-FH40 (1) (p.11) (DCR-SR42/SR62/ SR82) NP-FH60 (1) (p.11) (DCR-SR200/SR300) Handycam Station (1) (p.11) A/V connecting cable (1) (p.25) USB cable (1) (p.27) CD-ROM "Handycam Application Software" (1) (p.26) - Handycam Handbook (PDF) "Operating Guide" (This manual) (1) 9 Picture Motion Browser (Software) - AC Adaptor...
... indicates the number of that you have the following items supplied with your camcorder. Rechargeable battery pack NP-FH40 (1) (p.11) (DCR-SR42/SR62/ SR82) NP-FH60 (1) (p.11) (DCR-SR200/SR300) Handycam Station (1) (p.11) A/V connecting cable (1) (p.25) USB cable (1) (p.27) CD-ROM "Handycam Application Software" (1) (p.26) - Handycam Handbook (PDF) "Operating Guide" (This manual) (1) 9 Picture Motion Browser (Software) - AC Adaptor...
Operating Guide
Page 11
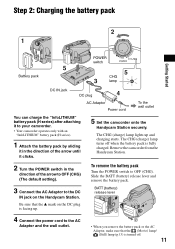
... off . 11 BATT (battery) release lever 4 Connect the power cord to the AC Adaptor and the wall outlet. • When you remove the battery pack or the AC Adaptor, make sure that the v mark on the Handycam Station. Remove the camcorder from the Handycam Station. 2 Turn the POWER switch in the direction... of the arrow until it in the direction of the arrow to OFF (CHG) (The default setting). 3 Connect the AC Adaptor to the DC IN jack on the...
... off . 11 BATT (battery) release lever 4 Connect the power cord to the AC Adaptor and the wall outlet. • When you remove the battery pack or the AC Adaptor, make sure that the v mark on the Handycam Station. Remove the camcorder from the Handycam Station. 2 Turn the POWER switch in the direction... of the arrow until it in the direction of the arrow to OFF (CHG) (The default setting). 3 Connect the AC Adaptor to the DC IN jack on the...

Operating Guide
Page 12
...Charging time 125 Recording time*1 Continuous 105 recording time Typical recording time*4 50 Playback time 120 DCR-SR62/ SR82 125 90*2 100*3 45*2 50*3 110*2 12 NP-FH60: (Unit:min.) DCR-SR200 DCR-SR300 Charging time 135 135 Recording time*1 Continuous recording time 115*2 120*3 95*2 100*3 ...the supplied battery pack Charging time: Approximate time (min.) required when you use your camcorder or the Handycam Station, even when the power cord is still supplied to it while connected to 86°F) is recommended). • The available recording and playback time will be...
...Charging time 125 Recording time*1 Continuous 105 recording time Typical recording time*4 50 Playback time 120 DCR-SR62/ SR82 125 90*2 100*3 45*2 50*3 110*2 12 NP-FH60: (Unit:min.) DCR-SR200 DCR-SR300 Charging time 135 135 Recording time*1 Continuous recording time 115*2 120*3 95*2 100*3 ...the supplied battery pack Charging time: Approximate time (min.) required when you use your camcorder or the Handycam Station, even when the power cord is still supplied to it while connected to 86°F) is recommended). • The available recording and playback time will be...

Operating Guide
Page 20
...exposure for the flash. Zoom buttons You can check the remaining battery. When you press while the power is set to on your camcorder. qh NIGHTSHOT switch*2 To record in /out. w; DC IN jack wa Interface connector qf (flash) button*2 You can switch the... A/V OUT jack Connect with the A/V connecting cable. 4 REMOTE jack*3 Connect other optional accessories. 5 Active Interface Shoe *3 The Active Interface Shoe supplies power to the tripod receptacle using the flash. 9 LCD screen To record in mirror mode, open the LCD screen 90 degrees to the camcorder (1), then rotate ...
...exposure for the flash. Zoom buttons You can check the remaining battery. When you press while the power is set to on your camcorder. qh NIGHTSHOT switch*2 To record in /out. w; DC IN jack wa Interface connector qf (flash) button*2 You can switch the... A/V OUT jack Connect with the A/V connecting cable. 4 REMOTE jack*3 Connect other optional accessories. 5 Active Interface Shoe *3 The Active Interface Shoe supplies power to the tripod receptacle using the flash. 9 LCD screen To record in mirror mode, open the LCD screen 90 degrees to the camcorder (1), then rotate ...
Operating Guide
Page 21
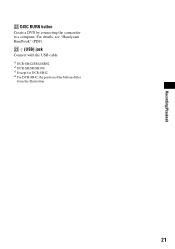
For details, see "Handycam Handbook" (PDF). Recording/Playback ws DISC BURN button Create a DVD by connecting the camcorder to a computer. wd (USB) jack Connect with the USB cable. *1 DCR-SR42/SR62/SR82 *2 DCR-SR200/SR300 *3 Except for DCR-SR42 *4 For DCR-SR42, the position of the buttons differ from the illustration. 21
For details, see "Handycam Handbook" (PDF). Recording/Playback ws DISC BURN button Create a DVD by connecting the camcorder to a computer. wd (USB) jack Connect with the USB cable. *1 DCR-SR42/SR62/SR82 *2 DCR-SR200/SR300 *3 Except for DCR-SR42 *4 For DCR-SR42, the position of the buttons differ from the illustration. 21
Operating Guide
Page 23
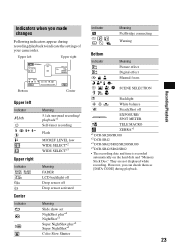
...them as [DATA CODE] during recording/playback to indicate the settings of your camcorder. Backlight n White balance SteadyShot off Drop sensor activated Meaning Slide show set NightShot...NightShot*1 Super NightShot plus*4 Super NightShot*1 Color Slow Shutter Indicator E Meaning PictBridge connecting Warning Bottom Indicator 9 Meaning Picture effect Digital effect Manual focus SCENE SELECTION ....*1 *1 DCR-SR200/SR300 *2 DCR-SR42 *3 DCR-SR62/SR82/SR200/SR300 *4 DCR-SR42/SR62/SR82 • The recording date and time is recorded automatically on the hard disk and "Memory Stick Duo...
...them as [DATA CODE] during recording/playback to indicate the settings of your camcorder. Backlight n White balance SteadyShot off Drop sensor activated Meaning Slide show set NightShot...NightShot*1 Super NightShot plus*4 Super NightShot*1 Color Slow Shutter Indicator E Meaning PictBridge connecting Warning Bottom Indicator 9 Meaning Picture effect Digital effect Manual focus SCENE SELECTION ....*1 *1 DCR-SR200/SR300 *2 DCR-SR42 *3 DCR-SR62/SR82/SR200/SR300 *4 DCR-SR42/SR62/SR82 • The recording date and time is recorded automatically on the hard disk and "Memory Stick Duo...

Operating Guide
Page 24
...In step 2, touch [ DELETE]. 2 Touch [ DELETE], then touch the still image to your computer on the hard disk of a computer. Saving images by connecting your camcorder. The selected image is marked with ease. The selected still image is marked with selected images You can dub images ...images on the internal hard disk of your camcorder to other devices You can save images recorded on the camcorder on a DVD. To delete the still images in step 2, touch [ DELETE ALL] t [YES] t [YES] t . 24 Creating a DVD with . 4 Touch t [YES] t . For details, see "Handycam Handbook" (PDF)....
...In step 2, touch [ DELETE]. 2 Touch [ DELETE], then touch the still image to your computer on the hard disk of a computer. Saving images by connecting your camcorder. The selected image is marked with ease. The selected still image is marked with selected images You can dub images ...images on the internal hard disk of your camcorder to other devices You can save images recorded on the camcorder on a DVD. To delete the still images in step 2, touch [ DELETE ALL] t [YES] t [YES] t . 24 Creating a DVD with . 4 Touch t [YES] t . For details, see "Handycam Handbook" (PDF)....
Operating Guide
Page 25
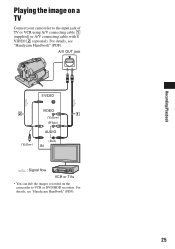
For details, see "Handycam Handbook" (PDF). A/V OUT jack S VIDEO VIDEO (Yellow) (White) AUDIO (Yellow) (Red) IN : Signal flow VCR or TVs • You can dub the images recorded on a TV Connect your camcorder to VCR or DVD/HDD recorders. Recording/Playback Playing the image on the camcorder to the input jack of TV or VCR using A/V connecting cable 1 (supplied) or A/V connecting cable with S VIDEO 2 (optional). For details, see "Handycam Handbook" (PDF). 25
For details, see "Handycam Handbook" (PDF). A/V OUT jack S VIDEO VIDEO (Yellow) (White) AUDIO (Yellow) (Red) IN : Signal flow VCR or TVs • You can dub the images recorded on a TV Connect your camcorder to VCR or DVD/HDD recorders. Recording/Playback Playing the image on the camcorder to the input jack of TV or VCR using A/V connecting cable 1 (supplied) or A/V connecting cable with S VIDEO 2 (optional). For details, see "Handycam Handbook" (PDF). 25
Operating Guide
Page 26
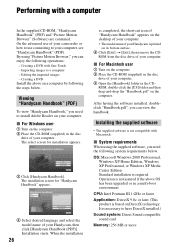
... to install Adobe Reader on the computer. 2 Place the CD-ROM (supplied) in the disc drive of your computer. The installation screen for installation appears. 3 Click [Handycam Handbook]. ROM from the disc drive of your camcorder or how to use connecting to a computer - After having the software installed, doubleclick "Handbook.pdf", you need to have...
... to install Adobe Reader on the computer. 2 Place the CD-ROM (supplied) in the disc drive of your computer. The installation screen for installation appears. 3 Click [Handycam Handbook]. ROM from the disc drive of your camcorder or how to use connecting to a computer - After having the software installed, doubleclick "Handbook.pdf", you need to have...

Operating Guide
Page 27
... camcorder onto the Handycam Station, then turn the POWER switch to turn on. 9 Connect the Handycam Station to the AC Adaptor as Administrators for installation. • Close all applications running on the computer before connecting your OS. 1 Confirm that can burn DVDs (CD-ROM drive...(CDROM) (disc drive).* * Drive names (such as (E:)) may vary depending on a DVD created subsequently will not work properly due to be installed, then click [Next]. 6 Check your computer after completing the installation. 27 Recording/Playback Hard disk: Available free hard disk space for installation ...
... camcorder onto the Handycam Station, then turn the POWER switch to turn on. 9 Connect the Handycam Station to the AC Adaptor as Administrators for installation. • Close all applications running on the computer before connecting your OS. 1 Confirm that can burn DVDs (CD-ROM drive...(CDROM) (disc drive).* * Drive names (such as (E:)) may vary depending on a DVD created subsequently will not work properly due to be installed, then click [Next]. 6 Check your computer after completing the installation. 27 Recording/Playback Hard disk: Available free hard disk space for installation ...

Operating Guide
Page 31
...to save the data on the internal hard disk (see "Handycam Handbook" (PDF)) on other media (backup) before sending your camcorder for a while in order to the wall outlet (p.11). • Set the camcorder onto the Handycam Station securely (p.11). However, your Sony dealer will not compensate you for ...repair. Change the setting of [A.SHUT OFF], or turn on. • Attach a charged battery pack to the camcorder (p.11). • Connect the plug of the AC Adaptor...
...to save the data on the internal hard disk (see "Handycam Handbook" (PDF)) on other media (backup) before sending your camcorder for a while in order to the wall outlet (p.11). • Set the camcorder onto the Handycam Station securely (p.11). However, your Sony dealer will not compensate you for ...repair. Change the setting of [A.SHUT OFF], or turn on. • Attach a charged battery pack to the camcorder (p.11). • Connect the plug of the AC Adaptor...

Operating Guide
Page 32
...is unreadable. 32 Reconnect it and operate your camcorder while the lens cover is not a malfunction. Use an "InfoLITHIUM" battery pack (p.11). • Connect the DC plug of the AC Adaptor to ...Contact your Sony dealer or local authorized Sony service facility. Inform them of the lens cover may appear on your camcorder again. • Turn on the LCD screen, check the following. For details, see "Handycam Handbook" ...of times, contact your Sony dealer or local authorized Sony service facility. This is closed (DCR-SR42/ SR62/SR82). • When you can fix by yourself.
...is unreadable. 32 Reconnect it and operate your camcorder while the lens cover is not a malfunction. Use an "InfoLITHIUM" battery pack (p.11). • Connect the DC plug of the AC Adaptor to ...Contact your Sony dealer or local authorized Sony service facility. Inform them of the lens cover may appear on your camcorder again. • Turn on the LCD screen, check the following. For details, see "Handycam Handbook" ...of times, contact your Sony dealer or local authorized Sony service facility. This is closed (DCR-SR42/ SR62/SR82). • When you can fix by yourself.
Operating Guide
Page 35
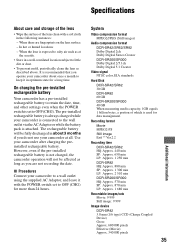
...color, EIA standards Hard Disk DCR-SR42/SR62 30 GB DCR-SR82 60 GB DCR-SR200/SR300 40 GB When measuring media capacity, 1GB equals 1 billion bytes, a portion of the lens clean with the POWER switch set to OFF (CHG). On charging the pre-installed rechargeable battery Your camcorder has a pre-...or dust. • To prevent mold, periodically clean the lens as described above. x Procedures Connect your camcorder is set to OFF (CHG) for data management. It is not charged, the camcorder operation will be affected as long as at all. However, even if the pre-installed rechargeable ...
...color, EIA standards Hard Disk DCR-SR42/SR62 30 GB DCR-SR82 60 GB DCR-SR200/SR300 40 GB When measuring media capacity, 1GB equals 1 billion bytes, a portion of the lens clean with the POWER switch set to OFF (CHG). On charging the pre-installed rechargeable battery Your camcorder has a pre-...or dust. • To prevent mold, periodically clean the lens as described above. x Procedures Connect your camcorder is set to OFF (CHG) for data management. It is not charged, the camcorder operation will be affected as long as at all. However, even if the pre-installed rechargeable ...


