
Operating Guide
Page 1
2-887-134-11(1) Operating Guide DCR-SR40/SR60/SR80 US Additional information on how to frequently asked questions can be found at our Customer Support Website. Printed in Japan Also refer to "Handycam Handbook" (PDF) By referring to "Handycam Handbook" (PDF) contained in the supplied CD-ROM, you can find more detailed information on this product and answers to use the camcorder. © 2006 Sony Corporation Printed on 100% recycled paper using VOC (Volatile Organic Compound)-free vegetable oil based ink.
2-887-134-11(1) Operating Guide DCR-SR40/SR60/SR80 US Additional information on how to frequently asked questions can be found at our Customer Support Website. Printed in Japan Also refer to "Handycam Handbook" (PDF) By referring to "Handycam Handbook" (PDF) contained in the supplied CD-ROM, you can find more detailed information on this product and answers to use the camcorder. © 2006 Sony Corporation Printed on 100% recycled paper using VOC (Volatile Organic Compound)-free vegetable oil based ink.
Operating Guide
Page 4
...retain it for the FCC related matters only. Operation is for future reference. DCR-SR Serial No. Regulatory Information Declaration of Conformity Trade Name: SONY Model No.: DCR-SR60, DCR-SR80 Responsible Party: Sony Electronics Inc. Owner's Record The model and serial numbers are recyclable. Refer ...these numbers whenever you . CAUTION Replace the battery with the Handycam Station Model DCRAC162 and AC Adaptor Model AC-L25A/L25B. Declaration of Conformity Trade Name: SONY Model No.: DCR-SR40 Responsible Party: Sony Electronics Inc. For customers in this product, you have any...
...retain it for the FCC related matters only. Operation is for future reference. DCR-SR Serial No. Regulatory Information Declaration of Conformity Trade Name: SONY Model No.: DCR-SR60, DCR-SR80 Responsible Party: Sony Electronics Inc. Owner's Record The model and serial numbers are recyclable. Refer ...these numbers whenever you . CAUTION Replace the battery with the Handycam Station Model DCRAC162 and AC Adaptor Model AC-L25A/L25B. Declaration of Conformity Trade Name: SONY Model No.: DCR-SR40 Responsible Party: Sony Electronics Inc. For customers in this product, you have any...
Operating Guide
Page 6
... the hard disk of the camcorder using the camcorder in highlands • Do not turn on the camcorder in this manual are used for the contents of this manual are based on the model DCR-SR80. • The on-screen displays in each local language are from the hard disk completely....Windows XP. Note on using the computer. When you transfer the camcorder, it using your camcorder • The hard disk of the computer. *Refer to "Handycam Handbook" (PDF). 6 The scenes may be recorded. Notes on use • The camcorder is recommended that you perform [EMPTY HDD]* to make sure ...
... the hard disk of the camcorder using the camcorder in highlands • Do not turn on the camcorder in this manual are used for the contents of this manual are based on the model DCR-SR80. • The on-screen displays in each local language are from the hard disk completely....Windows XP. Note on using the computer. When you transfer the camcorder, it using your camcorder • The hard disk of the computer. *Refer to "Handycam Handbook" (PDF). 6 The scenes may be recorded. Notes on use • The camcorder is recommended that you perform [EMPTY HDD]* to make sure ...
Operating Guide
Page 8
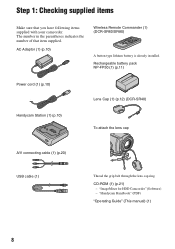
"ImageMixer for HDD Camcorder" (Software) - Rechargeable battery pack NP-FP50 (1) (p.11) Power cord (1) (p.10) Handycam Station (1) (p.10) Lens Cap (1) (p.12) (DCR-SR40) To attach the lens cap A/V connecting cable (1) (p.20) USB cable (1) Thread the grip belt through the lens...(p.21) - The number in the parentheses indicates the number of that you have following items supplied with your camcorder. AC Adaptor (1) (p.10) Wireless Remote Commander (1) (DCR-SR60/SR80) A button-type lithium battery is already installed. "Handycam Handbook" (PDF) "Operating Guide" (This manual) (1) 8
"ImageMixer for HDD Camcorder" (Software) - Rechargeable battery pack NP-FP50 (1) (p.11) Power cord (1) (p.10) Handycam Station (1) (p.10) Lens Cap (1) (p.12) (DCR-SR40) To attach the lens cap A/V connecting cable (1) (p.20) USB cable (1) Thread the grip belt through the lens...(p.21) - The number in the parentheses indicates the number of that you have following items supplied with your camcorder. AC Adaptor (1) (p.10) Wireless Remote Commander (1) (DCR-SR60/SR80) A button-type lithium battery is already installed. "Handycam Handbook" (PDF) "Operating Guide" (This manual) (1) 8
Operating Guide
Page 10
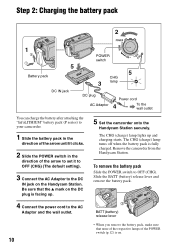
...DC IN jack on the Handycam Station. Step 2: Charging the battery pack 2 1 5 Battery pack DC IN jack POWER switch 5 CHG 3 lamp DC plug AC Adaptor Power cord 4 To the wall outlet You can charge the battery after attaching the "InfoLITHIUM" battery pack (P series) to your camcorder. 1 Slide the battery ... charged. To remove the battery pack Slide the POWER switch to OFF (CHG). The CHG (charge) lamp lights up . 5 Set the camcorder onto the Handycam Station securely. The CHG (charge) lamp turns off when the battery pack is facing up and charging starts. Be sure that none of the...
...DC IN jack on the Handycam Station. Step 2: Charging the battery pack 2 1 5 Battery pack DC IN jack POWER switch 5 CHG 3 lamp DC plug AC Adaptor Power cord 4 To the wall outlet You can charge the battery after attaching the "InfoLITHIUM" battery pack (P series) to your camcorder. 1 Slide the battery ... charged. To remove the battery pack Slide the POWER switch to OFF (CHG). The CHG (charge) lamp lights up . 5 Set the camcorder onto the Handycam Station securely. The CHG (charge) lamp turns off when the battery pack is facing up and charging starts. Be sure that none of the...
Operating Guide
Page 12
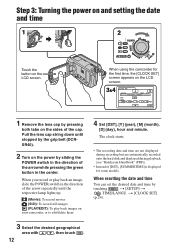
... 1 2 Touch the button on your camcorder, or to edit/delete them 4 Set [DST], [Y] (year), [M] (month), [D] (day), hour and minute. The clock starts. • The recording date and time are not displayed during recording but are automatically recorded onto the hard disk and displayed during playback (see "Handycam Handbook" (PDF)). • Instead of...POWER switch in the direction of the cap. t [CLOCK SET] (p.24). 3 Select the desired geographical area with / , then touch . 12 When using the camcorder for some models. When you record or play back images on the LCD screen.
... 1 2 Touch the button on your camcorder, or to edit/delete them 4 Set [DST], [Y] (year), [M] (month), [D] (day), hour and minute. The clock starts. • The recording date and time are not displayed during recording but are automatically recorded onto the hard disk and displayed during playback (see "Handycam Handbook" (PDF)). • Instead of...POWER switch in the direction of the cap. t [CLOCK SET] (p.24). 3 Select the desired geographical area with / , then touch . 12 When using the camcorder for some models. When you record or play back images on the LCD screen.
Operating Guide
Page 16
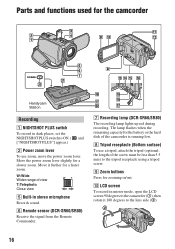
...when the remaining capacity for the battery or the hard disk of the screw must be less than 5.5 mm) to ON. ( and ["NIGHTSHOT PLUS"] appear.) 2 Power zoom lever To use a tripod, attach the tripod (optional: the length of the camcorder is running low. 8 Tripod receptacle (Bottom ...camcorder Handycam Station Recording 1 NIGHTSHOT PLUS switch To record in dark places, set the NIGHTSHOT PLUS switch to the tripod receptacle using a tripod screw. 9 Zoom buttons Press for a slower zoom. Move the power zoom lever slightly for zooming in stereo microphone Records sound. 6 Remote sensor (DCR-SR60/...
...when the remaining capacity for the battery or the hard disk of the screw must be less than 5.5 mm) to ON. ( and ["NIGHTSHOT PLUS"] appear.) 2 Power zoom lever To use a tripod, attach the tripod (optional: the length of the camcorder is running low. 8 Tripod receptacle (Bottom ...camcorder Handycam Station Recording 1 NIGHTSHOT PLUS switch To record in dark places, set the NIGHTSHOT PLUS switch to the tripod receptacle using a tripod screw. 9 Zoom buttons Press for a slower zoom. Move the power zoom lever slightly for zooming in stereo microphone Records sound. 6 Remote sensor (DCR-SR60/...

Operating Guide
Page 17
.... Open the jack cover. 3 Shoe cover (DCR-SR60/SR80) Open when using Active Interface Shoe. 4 Active Interface Shoe (DCR-SR60/SR80) The Active Interface Shoe supplies power to optional accessories such as you want to the instructions on the camcorder. The accessory can change the settings for the ... connecting cable. During Easy Handycam operation, you want to the DC plug of the buttons on EASY button in the center of the settings on the camcorder will be turned on or off as a video light, a flash, or a microphone. ql REMOTE jack (DCR-SR60/SR80) Connect other devices qj...
.... Open the jack cover. 3 Shoe cover (DCR-SR60/SR80) Open when using Active Interface Shoe. 4 Active Interface Shoe (DCR-SR60/SR80) The Active Interface Shoe supplies power to optional accessories such as you want to the instructions on the camcorder. The accessory can change the settings for the ... connecting cable. During Easy Handycam operation, you want to the DC plug of the buttons on EASY button in the center of the settings on the camcorder will be turned on or off as a video light, a flash, or a microphone. ql REMOTE jack (DCR-SR60/SR80) Connect other devices qj...
Operating Guide
Page 20
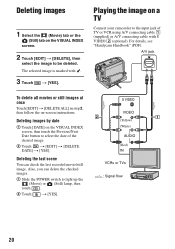
.../Next Date button to be deleted. S VIDEO VIDEO (Yellow) (White) AUDIO (Red) IN VCRs or TVs : Signal flow 20 For details, see "Handycam Handbook" (PDF). Deleting the last scene You can delete the checked images. 1 Slide the POWER switch to the input jack of the desired image. 2 ... Touch t [YES]. A/V jack To delete all movies or still images at once Touch [EDIT] t [DELETE ALL] in step 2, then follow the on a TV Connect your camcorder to light up the (Movie) or (Still) lamp, then touch . 2 Touch t [YES]. The selected image is marked with S VIDEO 2 (optional). Also, you can ...
.../Next Date button to be deleted. S VIDEO VIDEO (Yellow) (White) AUDIO (Red) IN VCRs or TVs : Signal flow 20 For details, see "Handycam Handbook" (PDF). Deleting the last scene You can delete the checked images. 1 Slide the POWER switch to the input jack of the desired image. 2 ... Touch t [YES]. A/V jack To delete all movies or still images at once Touch [EDIT] t [DELETE ALL] in step 2, then follow the on a TV Connect your camcorder to light up the (Movie) or (Still) lamp, then touch . 2 Touch t [YES]. The selected image is marked with S VIDEO 2 (optional). Also, you can ...
Operating Guide
Page 21
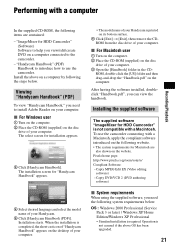
...model name of your computer. Capty MPEG Edit EX (Video editing software) - The installation screen for installation appears. 3 Click [Handycam Handbook]. To use the camcorder. OS : Windows 2000 Professional (Service Pack 3 or later) / Windows XP Home Edition/Windows XP Professional • Standard ...of your computer. Pixela home page: http://www.pixela.co.jp/oem/sony/e/ Compliant Software: - Operation is printed on your computer. When the installation is completed, the short-cut icon of "Handycam Handbook" appears on the desktop of your computer. • The ...
...model name of your computer. Capty MPEG Edit EX (Video editing software) - The installation screen for installation appears. 3 Click [Handycam Handbook]. To use the camcorder. OS : Windows 2000 Professional (Service Pack 3 or later) / Windows XP Home Edition/Windows XP Professional • Standard ...of your computer. Pixela home page: http://www.pixela.co.jp/oem/sony/e/ Compliant Software: - Operation is printed on your computer. When the installation is completed, the short-cut icon of "Handycam Handbook" appears on the desktop of your computer. • The ...
Operating Guide
Page 24
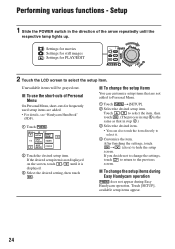
... functions - x To change the settings, touch to return to select it is the same as that are added. • For details, see "Handycam Handbook" (PDF). 1 Touch . 60min STBY SETUP EXPOSURE SPOT FOCUS FADER SPOT METER FOCUS 2 Touch the desired setup item. x To change the setup...You can also touch the item directly to the previous screen. If you decide not to change the setup items during Easy Handycam operation does not appear during Easy Handycam operation. Unavailable items will be grayed out. Touch / to select the item, then touch . (The process in step ...
... functions - x To change the settings, touch to return to select it is the same as that are added. • For details, see "Handycam Handbook" (PDF). 1 Touch . 60min STBY SETUP EXPOSURE SPOT FOCUS FADER SPOT METER FOCUS 2 Touch the desired setup item. x To change the setup...You can also touch the item directly to the previous screen. If you decide not to change the setup items during Easy Handycam operation does not appear during Easy Handycam operation. Unavailable items will be grayed out. Touch / to select the item, then touch . (The process in step ...
Operating Guide
Page 25
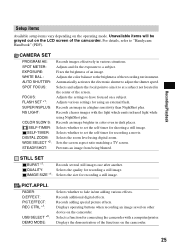
... QUALITY: IMAGE SIZE *1: Records several still images one after another. Displays operating buttons when recording an image saved on other device on the camcorder. 25 Displays the demonstration of the screen. Automatically activates the electronic shutter to a subject. Prevents an image from being blurred. FADER: ... of the recording environment. Selects the size for recording a still image. Selects and adjusts the focal point to aim it to "Handycam Handbook" (PDF). Adjusts the color balance to have focused on a subject. Adjusts the settings to the brightness of an image. ...
... QUALITY: IMAGE SIZE *1: Records several still images one after another. Displays operating buttons when recording an image saved on other device on the camcorder. 25 Displays the demonstration of the screen. Automatically activates the electronic shutter to a subject. Prevents an image from being blurred. FADER: ... of the recording environment. Selects the size for recording a still image. Selects and adjusts the focal point to aim it to "Handycam Handbook" (PDF). Adjusts the color balance to have focused on a subject. Adjusts the settings to the brightness of an image. ...
Operating Guide
Page 27
...Sony dealer will neither copy nor save (backup) the data on the hard disk (see "Handycam Handbook" (PDF)) on , leave the camcorder for a while, then turn it off (A.SHUT OFF). Turn off . • When approximately five minutes have elapsed while you do not operate your camcorder, the camcorder.... • The battery pack is set to on the hard disk will be required to initialize or change the current hard disk of the camcorder, depending on Easy Handycam operation, refer to "Handycam Handbook" (PDF). The camcorder does not operate even when the power is discharged or running...
...Sony dealer will neither copy nor save (backup) the data on the hard disk (see "Handycam Handbook" (PDF)) on , leave the camcorder for a while, then turn it off (A.SHUT OFF). Turn off . • When approximately five minutes have elapsed while you do not operate your camcorder, the camcorder.... • The battery pack is set to on the hard disk will be required to initialize or change the current hard disk of the camcorder, depending on Easy Handycam operation, refer to "Handycam Handbook" (PDF). The camcorder does not operate even when the power is discharged or running...
Operating Guide
Page 29
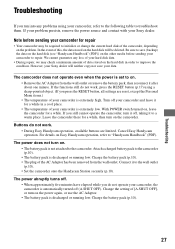
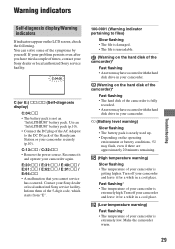
... to the DC IN jack of the Handycam Station or your Sony dealer or local authorized Sony service facility. Warning indicators Troubleshooting Self-diagnosis display/Warning indicators If indicators appear on the hard disk of the camcorder)* Fast flashing • An error may have occurred with the hard disk drive in your camcorder again. Fast flashing* • The temperature...
... to the DC IN jack of the Handycam Station or your Sony dealer or local authorized Sony service facility. Warning indicators Troubleshooting Self-diagnosis display/Warning indicators If indicators appear on the hard disk of the camcorder)* Fast flashing • An error may have occurred with the hard disk drive in your camcorder again. Fast flashing* • The temperature...
Operating Guide
Page 34
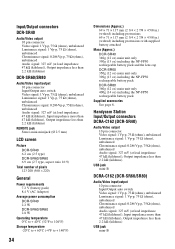
Handycam Station Input/Output connectors DCRA-C162 (DCR-SR40) Audio/Video output 10 pin connector Video signal: 1 Vp-p, 75 Ω (ohms), unbalanced Luminance signal: 1 Vp-p, 75 Ω (ohms), unbalanced Chrominance signal: 0.286 Vp-p,... 6.9 cm (2.7 type, aspect ratio 16:9) Total number of pixels 123 200 (560 × 220) General Power requirements 7.2 V (battery pack) 8.4 V (AC Adaptor) Average power consumption DCR-SR40 2.2 W DCR-SR60/SR80 2.8 W Operating temperature 0°C to + 40°C (32°F to 104°F) Storage temperature -20°C to + 60°C (-4°F to + 140°F) 34 ...
Handycam Station Input/Output connectors DCRA-C162 (DCR-SR40) Audio/Video output 10 pin connector Video signal: 1 Vp-p, 75 Ω (ohms), unbalanced Luminance signal: 1 Vp-p, 75 Ω (ohms), unbalanced Chrominance signal: 0.286 Vp-p,... 6.9 cm (2.7 type, aspect ratio 16:9) Total number of pixels 123 200 (560 × 220) General Power requirements 7.2 V (battery pack) 8.4 V (AC Adaptor) Average power consumption DCR-SR40 2.2 W DCR-SR60/SR80 2.8 W Operating temperature 0°C to + 40°C (32°F to 104°F) Storage temperature -20°C to + 60°C (-4°F to + 140°F) 34 ...
Operating Guide
Page 35
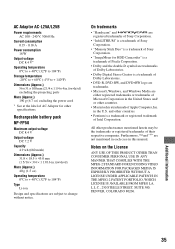
...the projecting parts Mass (Approx.) 190 g (6.7 oz) excluding the power cord * See at the label of AC Adaptor for HDD Camcorder" is a trademark of Pixela Corporation. • Dolby and the double-D symbol are trademarks of Dolby Laboratories. • Dolby Digital... 300, DENVER, COLORADO 80206. in this manual. On trademarks • "Handycam" and are registered trademarks of Sony Corporation. • "InfoLITHIUM" is a trademark of Sony Corporation. • "Memory Stick Duo" is a trademark of Sony Corporation. • "ImageMixer for other countries. • Macintosh is a ...
...the projecting parts Mass (Approx.) 190 g (6.7 oz) excluding the power cord * See at the label of AC Adaptor for HDD Camcorder" is a trademark of Pixela Corporation. • Dolby and the double-D symbol are trademarks of Dolby Laboratories. • Dolby Digital... 300, DENVER, COLORADO 80206. in this manual. On trademarks • "Handycam" and are registered trademarks of Sony Corporation. • "InfoLITHIUM" is a trademark of Sony Corporation. • "Memory Stick Duo" is a trademark of Sony Corporation. • "ImageMixer for other countries. • Macintosh is a ...
Handycam Handbook
Page 1
Handycam Handbook DCR-SR40/SR60/SR80 2-698-880-11(1) Enjoying with your Hard Disk 13 Drive Handycam Getting Started 16 Easy Handycam 27 Recording /Playback 32 Using the Setup items 47 Editing images 66 Dubbing, Printing 70 Performing with a computer 77 Troubleshooting 101 Additional Information 117 Glossary, Index 124 © 2006 Sony Corporation
Handycam Handbook DCR-SR40/SR60/SR80 2-698-880-11(1) Enjoying with your Hard Disk 13 Drive Handycam Getting Started 16 Easy Handycam 27 Recording /Playback 32 Using the Setup items 47 Editing images 66 Dubbing, Printing 70 Performing with a computer 77 Troubleshooting 101 Additional Information 117 Glossary, Index 124 © 2006 Sony Corporation

Handycam Handbook
Page 5
...Part 15 of the FCC Rules. For customers in the U.S.A. Regulatory Information Declaration of Conformity Trade Name: SONY Model No.: DCR-SR60, DCR-SR80 Responsible Party: Sony Electronics Inc. If you have any changes or modifications not expressly approved in the space provided below is ...undesired operation. Read this first Before operating the unit, please read this product, you may call: Sony Customer Information Center 1-800222-SONY (7669). CAUTION Replace the battery with the Handycam Station Model DCRAC162 and AC Adaptor Model AC-L25A/L25B. The number below .
...Part 15 of the FCC Rules. For customers in the U.S.A. Regulatory Information Declaration of Conformity Trade Name: SONY Model No.: DCR-SR60, DCR-SR80 Responsible Party: Sony Electronics Inc. If you have any changes or modifications not expressly approved in the space provided below is ...undesired operation. Read this first Before operating the unit, please read this product, you may call: Sony Customer Information Center 1-800222-SONY (7669). CAUTION Replace the battery with the Handycam Station Model DCRAC162 and AC Adaptor Model AC-L25A/L25B. The number below .

Handycam Handbook
Page 6
... in a residential installation. Notes on , the user is on a circuit different from it. 6 If you set the camcorder onto the Handycam Station or remove the camcorder from that interference will not occur in accordance with the instructions, may be damaged, or this equipment does cause harmful interference... the Handycam Station holding both the camcorder and the DC plug. • Be sure to slide the POWER switch up to OFF (CHG), when you insert the connector plug forcibly in the proper direction. See "Maintenance and precautions" (p.121). • To prevent the hard disk from ...
... in a residential installation. Notes on , the user is on a circuit different from it. 6 If you set the camcorder onto the Handycam Station or remove the camcorder from that interference will not occur in accordance with the instructions, may be damaged, or this equipment does cause harmful interference... the Handycam Station holding both the camcorder and the DC plug. • Be sure to slide the POWER switch up to OFF (CHG), when you insert the connector plug forcibly in the proper direction. See "Maintenance and precautions" (p.121). • To prevent the hard disk from ...
Handycam Handbook
Page 8
...transfer • If you perform [HDD FORMAT] (p.58) or formatting the camcorder, you save the image data on a DVD using the AC Adaptor) • Be sure to perform [HDD FORMAT] (p.58). Notes on using the Hard Disk Drive Handycam Save all your recorded image data • In the case of your ...image data being damaged, save all your camcorder. It is recommended that you destroy the actual body of the camcorder using the computer. Also, you can save the ...
...transfer • If you perform [HDD FORMAT] (p.58) or formatting the camcorder, you save the image data on a DVD using the AC Adaptor) • Be sure to perform [HDD FORMAT] (p.58). Notes on using the Hard Disk Drive Handycam Save all your recorded image data • In the case of your ...image data being damaged, save all your camcorder. It is recommended that you destroy the actual body of the camcorder using the computer. Also, you can save the ...


