Operating Guide
Page 8
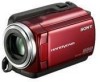
...lead) (1) A/V connecting cable (1) USB cable (1) Rechargeable battery pack Only for DCR-SR47/SR48/SR67: NP-FH30 (1) Only for DCR-SR87: NP-FH50 (1) CD-ROM "Handycam Application Software" (1) (p. 25) "PMB" (software) including "PMB Guide" "Handycam Handbook" (PDF) "... is connected. Consult the dealer or an experienced radio/ TV technician for a digital device pursuant to the camcorder. When a drop occurs, or under a nongravity condition, the block noise made when this function is not dustproofed, ...
...lead) (1) A/V connecting cable (1) USB cable (1) Rechargeable battery pack Only for DCR-SR47/SR48/SR67: NP-FH30 (1) Only for DCR-SR87: NP-FH50 (1) CD-ROM "Handycam Application Software" (1) (p. 25) "PMB" (software) including "PMB Guide" "Handycam Handbook" (PDF) "... is connected. Consult the dealer or an experienced radio/ TV technician for a digital device pursuant to the camcorder. When a drop occurs, or under a nongravity condition, the block noise made when this function is not dustproofed, ...

Operating Guide
Page 26
... the supplied USB cable. US 26 The [USB SELECT] screen appears on the camcorder screen automatically. Touch [ USB CONNECT] on the camcorder screen. If the [USB SELECT] screen does not appear, touch (HOME) (OTHERS) [USB CONNECT]. Click [Continue] on the computer, you may not work correctly. See page 45 on the "Handycam Handbook...
... the supplied USB cable. US 26 The [USB SELECT] screen appears on the camcorder screen automatically. Touch [ USB CONNECT] on the camcorder screen. If the [USB SELECT] screen does not appear, touch (HOME) (OTHERS) [USB CONNECT]. Click [Continue] on the computer, you may not work correctly. See page 45 on the "Handycam Handbook...

Operating Guide
Page 27
... (p. 25), however, do not start "PMB." Connect your camcorder to the wall outlet (wall socket) using the USB cable. To disconnect your camcorder from your computer. Other icons may appear. No icon may appear depending on the installation procedure. The "Handycam Handbook" is completed, following icons will appear. Remove the CD...
... (p. 25), however, do not start "PMB." Connect your camcorder to the wall outlet (wall socket) using the USB cable. To disconnect your camcorder from your computer. Other icons may appear. No icon may appear depending on the installation procedure. The "Handycam Handbook" is completed, following icons will appear. Remove the CD...
Operating Guide
Page 28
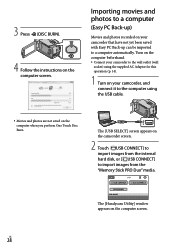
The [Handycam Utility] window appears on the computer screen. 3 Press (DISC BURN). 4 Follow the instructions on the computer screen. The [USB SELECT] screen appears on your camcorder, and connect it to the computer using the USB cable. Movies and photos are not saved on the computer when you... perform One Touch Disc Burn. US 28 Importing movies and photos to a computer (Easy PC Back-up) Movies and photos recorded on the camcorder screen. 2 Touch [ USB CONNECT] to ...
The [Handycam Utility] window appears on the computer screen. 3 Press (DISC BURN). 4 Follow the instructions on the computer screen. The [USB SELECT] screen appears on your camcorder, and connect it to the computer using the USB cable. Movies and photos are not saved on the computer when you... perform One Touch Disc Burn. US 28 Importing movies and photos to a computer (Easy PC Back-up) Movies and photos recorded on the camcorder screen. 2 Touch [ USB CONNECT] to ...
Operating Guide
Page 31
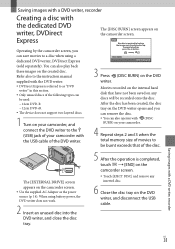
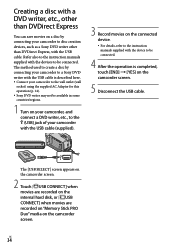
... opens and you can also operate with the USB cable of the disc. 5 After the operation is referred to be recorded onto the disc. Refer also to the instruction manual supplied with the DVD writer. DVDirect Express is completed, touch [END] on the camcorder screen. Touch [EJECT DISC] and remove...
... opens and you can also operate with the USB cable of the disc. 5 After the operation is referred to be recorded onto the disc. Refer also to the instruction manual supplied with the DVD writer. DVDirect Express is completed, touch [END] on the camcorder screen. Touch [EJECT DISC] and remove...

Operating Guide
Page 32
...to confirm the image. The DVD writer is completed, touch [EXIT] [END] on the camcorder screen. Close the disc tray on the DVD writer, and disconnect the USB cable from the camcorder You cannot add movies to a created disc. Play the created disc to make ... perform this operation. Touch [DISC BURN OPTION] in step 3 above. To create a disc with the USB cable of the DVD writer. Touch to return to the (USB) jack of your camcorder. If [Failed.] or [DISC BURN failed.] appears on the screen, insert another disc of the same...
...to confirm the image. The DVD writer is completed, touch [EXIT] [END] on the camcorder screen. Close the disc tray on the DVD writer, and disconnect the USB cable from the camcorder You cannot add movies to a created disc. Play the created disc to make ... perform this operation. Touch [DISC BURN OPTION] in step 3 above. To create a disc with the USB cable of the DVD writer. Touch to return to the (USB) jack of your camcorder. If [Failed.] or [DISC BURN failed.] appears on the screen, insert another disc of the same...
Operating Guide
Page 34
... camcorder with the USB cable (supplied). 3 Record movies on the camcorder screen. 5 Disconnect the USB cable. The [USB SELECT] screen appears on the camcorder screen. 2 Touch [ USB CONNECT] when movies are recorded on the internal hard disk, or [ USB CONNECT] when movies are recorded on "Memory Stick PRO Duo" media on a disc by connecting your camcorder to a Sony DVD writer with the USB cable...
... camcorder with the USB cable (supplied). 3 Record movies on the camcorder screen. 5 Disconnect the USB cable. The [USB SELECT] screen appears on the camcorder screen. 2 Touch [ USB CONNECT] when movies are recorded on the internal hard disk, or [ USB CONNECT] when movies are recorded on "Memory Stick PRO Duo" media on a disc by connecting your camcorder to a Sony DVD writer with the USB cable...
Operating Guide
Page 47
...disk (p. 37). An error may have tried to fix a couple of times, contact your Sony dealer or local authorized Sony service facility. Reconnect it in a cool place. The temperature of your camcorder again. E:20: / E:31: / E:61: / E:62:&#...32: Remove the power source. Delete unnecessary images on other than the keyboard, mouse, and your camcorder. Disconnect the USB cable from "E." 101-0001 When the indicator flashes slowly, the file is damaged or unreadable. The hard ...
...disk (p. 37). An error may have tried to fix a couple of times, contact your Sony dealer or local authorized Sony service facility. Reconnect it in a cool place. The temperature of your camcorder again. E:20: / E:31: / E:61: / E:62:&#...32: Remove the power source. Delete unnecessary images on other than the keyboard, mouse, and your camcorder. Disconnect the USB cable from "E." 101-0001 When the indicator flashes slowly, the file is damaged or unreadable. The hard ...
Operating Guide
Page 58
Index A A/V connecting cable...........24, 35 B Backlight 38 Battery 13 C Capturing photos from a movie 30 ... 35 DST SET 15 Dubbing 40 DVDirect Express 31 DVD writer 31 E Easy Handycam operation.........20 Easy PC Back-up 28 Editing movies 30 F Format 37 H Handycam Handbook 45 HELP function 41 HOME MENU 41, 42 I Install 25 L Language... Software 25 Specifications 51 Supplied items 8 T Tripod 38 Troubleshooting 46 Turning the power on 15 TV 24 TV Type 24 U USB 25, 31 Using a wall outlet (wall socket) as a power source 14 V VISUAL INDEX 21 Volume 22 W Warning indicators...
Index A A/V connecting cable...........24, 35 B Backlight 38 Battery 13 C Capturing photos from a movie 30 ... 35 DST SET 15 Dubbing 40 DVDirect Express 31 DVD writer 31 E Easy Handycam operation.........20 Easy PC Back-up 28 Editing movies 30 F Format 37 H Handycam Handbook 45 HELP function 41 HOME MENU 41, 42 I Install 25 L Language... Software 25 Specifications 51 Supplied items 8 T Tripod 38 Troubleshooting 46 Turning the power on 15 TV 24 TV Type 24 U USB 25, 31 Using a wall outlet (wall socket) as a power source 14 V VISUAL INDEX 21 Volume 22 W Warning indicators...


