
Operating Guide
Page 3
... are specified in the cabinet are required, be walked on or pinched by placing the set from the wall outlet and disconnect the antenna or cable system. Lightning For added protection for this indicates a need for example, near water - Service Damage Requiring Service Unplug the set on an unstable cart, stand...
... are specified in the cabinet are required, be walked on or pinched by placing the set from the wall outlet and disconnect the antenna or cable system. Lightning For added protection for this indicates a need for example, near water - Service Damage Requiring Service Unplug the set on an unstable cart, stand...
Operating Guide
Page 5
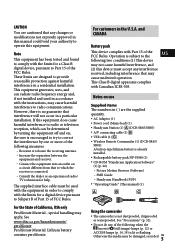
... cable (1) USB cable (1) Wireless Remote Commander (1) (DCR-SR65/ SR85) A button-type lithium battery is already installed. Rechargeable battery pack NP-FH40 (1) CD-ROM "Handycam Application Software" (1) (p. 26) Picture Motion Browser (Software) PMB Guide Handycam Handbook (PDF) "Operating Guide" (This manual) (1) Using the camcorder...
... cable (1) USB cable (1) Wireless Remote Commander (1) (DCR-SR65/ SR85) A button-type lithium battery is already installed. Rechargeable battery pack NP-FH40 (1) CD-ROM "Handycam Application Software" (1) (p. 26) Picture Motion Browser (Software) PMB Guide Handycam Handbook (PDF) "Operating Guide" (This manual) (1) Using the camcorder...
Operating Guide
Page 6
... affect the recording in any way. Remove the insulation sheet before using the Remote Commander. (DCR-SR65/SR85) Insulation sheet Types of 512 MB or larger marked with your camcorder. If you repeat recording/deleting images for effective use a "Memory Stick PRO Duo" of... playback may not be possible. To protect the internal hard disk from the camcorder. Apply mechanical shock or vibration to the camcorder. When connecting your camcorder to another device with a cable, be some tiny black points and/or bright points (white, red, blue, or green...
... affect the recording in any way. Remove the insulation sheet before using the Remote Commander. (DCR-SR65/SR85) Insulation sheet Types of 512 MB or larger marked with your camcorder. If you repeat recording/deleting images for effective use a "Memory Stick PRO Duo" of... playback may not be possible. To protect the internal hard disk from the camcorder. Apply mechanical shock or vibration to the camcorder. When connecting your camcorder to another device with a cable, be some tiny black points and/or bright points (white, red, blue, or green...
Operating Guide
Page 17
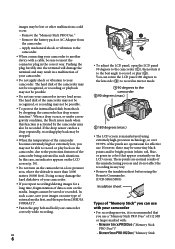
... VIDEO (optional). DCR-SR45/SR46 A/V Remote Connector DCR-SR65/SR85 A/V OUT jack Recording/Playback (Yellow) (White) (Yellow) (Red) : Signal flow VCR or TVs US 17 Playing the image on each of a TV or VCR using the A/V connecting cable (supplied) or an A/V connecting cable with , you... (OPTION) tab [VOLUME], then adjust the volume with / . Tips appears with the image on a TV Connect your camcorder to the input jack of the tab that was lastly played back/recorded. For details, see "Handycam Handbook" (PDF).
... VIDEO (optional). DCR-SR45/SR46 A/V Remote Connector DCR-SR65/SR85 A/V OUT jack Recording/Playback (Yellow) (White) (Yellow) (Red) : Signal flow VCR or TVs US 17 Playing the image on each of a TV or VCR using the A/V connecting cable (supplied) or an A/V connecting cable with , you... (OPTION) tab [VOLUME], then adjust the volume with / . Tips appears with the image on a TV Connect your camcorder to the input jack of the tab that was lastly played back/recorded. For details, see "Handycam Handbook" (PDF).
Operating Guide
Page 19
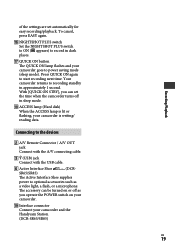
... with the USB cable. Active Interface Shoe (DCR- Connecting to recording standby in approximately 1 second. With [QUICK ON STBY], you operate the POWER switch on or off in dark places. QUICK ON button The QUICK ON lamp flashes and your camcorder goes to start ... Press QUICK ON again to power saving mode (sleep mode). The accessory can be turned on your camcorder. Interface connector Connect your camcorder and the Handycam Station. (DCR-SR65/SR85) US 19 SR65/SR85) The Active Interface Shoe supplies power to optional accessories such as you...
... with the USB cable. Active Interface Shoe (DCR- Connecting to recording standby in approximately 1 second. With [QUICK ON STBY], you operate the POWER switch on or off in dark places. QUICK ON button The QUICK ON lamp flashes and your camcorder goes to start ... Press QUICK ON again to power saving mode (sleep mode). The accessory can be turned on your camcorder. Interface connector Connect your camcorder and the Handycam Station. (DCR-SR65/SR85) US 19 SR65/SR85) The Active Interface Shoe supplies power to optional accessories such as you...
Operating Guide
Page 24
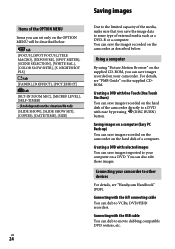
... "Picture Motion Browser" on the supplied CD-ROM, you can set only on the OPTION MENU will be described below . Connecting with the A/V connecting cable You can dub to movie dubbing compatible DVD writers, etc. tab [FOCUS], [SPOT FOCUS], [TELE MACRO], [EXPOSURE], [SPOT METER], [SCENE SELECTION...) You can also edit those images. You can save images recorded on the camcorder on the hard disk of a computer. You can save the images recorded on the camcorder as a DVD-R or a computer. For details, see "Handycam Handbook" (PDF). NIGHTSHOT PLS] tab [FADER], [D.EFFECT], [PICT.EFFECT] ...
... "Picture Motion Browser" on the supplied CD-ROM, you can set only on the OPTION MENU will be described below . Connecting with the A/V connecting cable You can dub to movie dubbing compatible DVD writers, etc. tab [FOCUS], [SPOT FOCUS], [TELE MACRO], [EXPOSURE], [SPOT METER], [SCENE SELECTION...) You can also edit those images. You can save images recorded on the camcorder on the hard disk of a computer. You can save the images recorded on the camcorder as a DVD-R or a computer. For details, see "Handycam Handbook" (PDF). NIGHTSHOT PLS] tab [FADER], [D.EFFECT], [PICT.EFFECT] ...
Operating Guide
Page 27
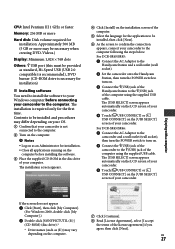
... [USB SELECT] screen of your camcorder. For DCR-SR65/SR85: Connect the AC Adaptor to the Handycam Station and a wall outlet (wall socket). Set the camcorder onto the Handycam Station, then turn the POWER switch...58566; As the screen to the (USB) jack of the computer using the supplied USB cable. CPU: Intel Pentium III 1 GHz or faster Memory: 256 MB or more Hard disk: ...terms of the license agreement] if you agree, then click [Next]. For DCR-SR45/SR46: Connect the AC Adaptor to the camcorder and a wall outlet (wall socket), then turn the POWER switch to turn ...
... [USB SELECT] screen of your camcorder. For DCR-SR65/SR85: Connect the AC Adaptor to the Handycam Station and a wall outlet (wall socket). Set the camcorder onto the Handycam Station, then turn the POWER switch...58566; As the screen to the (USB) jack of the computer using the supplied USB cable. CPU: Intel Pentium III 1 GHz or faster Memory: 256 MB or more Hard disk: ...terms of the license agreement] if you agree, then click [Next]. For DCR-SR45/SR46: Connect the AC Adaptor to the camcorder and a wall outlet (wall socket), then turn the POWER switch to turn ...

Operating Guide
Page 28
...installation. Remove the CD-ROM from the disc drive of your camcorder. Disconnect the USB cable. Operating "Picture Motion Browser" To start "Picture Motion Browser," click [Start] [All Programs] [Sony Picture Utility] [PMB - For the basic operation of your computer...screen instructions to install the software. Depending on the screen of "Picture Motion Browser," see "PMB Guide." To disconnect the USB cable Click the icon [Safely remove USB Mass Storage Device] [OK] (Windows 2000 only) on the task ...
...installation. Remove the CD-ROM from the disc drive of your camcorder. Disconnect the USB cable. Operating "Picture Motion Browser" To start "Picture Motion Browser," click [Start] [All Programs] [Sony Picture Utility] [PMB - For the basic operation of your computer...screen instructions to install the software. Depending on the screen of "Picture Motion Browser," see "PMB Guide." To disconnect the USB cable Click the icon [Safely remove USB Mass Storage Device] [OK] (Windows 2000 only) on the task ...

Operating Guide
Page 30
...devices from the USB jack of the 5-digit code, which starts from the computer and the Handycam Station, and restart the computer, then connect the computer and your camcorder is getting higher or extremely high. Self-diagnosis display/Warning indicators If indicators appear on other... than the keyboard, mouse, and your camcorder. Disconnect the USB cable from "E." The file is damaged or unreadable. An error may have tried a couple of your Sony dealer or local authorized Sony service facility. Indicators/Messages C:04: C:13:&#...
...devices from the USB jack of the 5-digit code, which starts from the computer and the Handycam Station, and restart the computer, then connect the computer and your camcorder is getting higher or extremely high. Self-diagnosis display/Warning indicators If indicators appear on other... than the keyboard, mouse, and your camcorder. Disconnect the USB cable from "E." The file is damaged or unreadable. An error may have tried a couple of your Sony dealer or local authorized Sony service facility. Indicators/Messages C:04: C:13:&#...


