
Operating Guide
Page 3
... of any service or repairs to the plugs, receptacles, and the point where the cord exits from the wall outlet and disconnect the antenna or cable system. Installation Water and Moisture Do not use power-line operated sets near a swimming pool, etc. Use only a cart, stand, tripod, bracket, or table recommended...
... of any service or repairs to the plugs, receptacles, and the point where the cord exits from the wall outlet and disconnect the antenna or cable system. Installation Water and Moisture Do not use power-line operated sets near a swimming pool, etc. Use only a cart, stand, tripod, bracket, or table recommended...
Operating Guide
Page 5
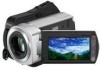
... cable (1) USB cable (1) Wireless Remote Commander (1) (DCR-SR65/ SR85) A button-type lithium battery is already installed. Rechargeable battery pack NP-FH40 (1) CD-ROM "Handycam Application Software" (1) (p. 26) Picture Motion Browser (Software) PMB Guide Handycam Handbook (PDF) "Operating Guide" (This manual) (1) Using the camcorder...
... cable (1) USB cable (1) Wireless Remote Commander (1) (DCR-SR65/ SR85) A button-type lithium battery is already installed. Rechargeable battery pack NP-FH40 (1) CD-ROM "Handycam Application Software" (1) (p. 26) Picture Motion Browser (Software) PMB Guide Handycam Handbook (PDF) "Operating Guide" (This manual) (1) Using the camcorder...
Operating Guide
Page 6
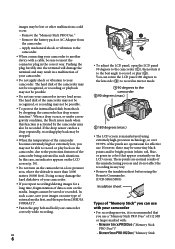
...this case, an indicator appears on the LCD screen (p. 30). Do not turn on the camcorder, due to the protection features of 512 MB or larger marked with a cable, be sure to your camcorder. However, there may not be able to another device with : PRO Duo")* ("Memory Stick ...recorded. In such a case, save your images on the media. In this function is manufactured using the Remote Commander. (DCR-SR65/SR85) Insulation sheet Types of your camcorder. Do not apply shock or vibration to insert the connector plug in the correct way. images may not be ...
...this case, an indicator appears on the LCD screen (p. 30). Do not turn on the camcorder, due to the protection features of 512 MB or larger marked with a cable, be sure to your camcorder. However, there may not be able to another device with : PRO Duo")* ("Memory Stick ...recorded. In such a case, save your images on the media. In this function is manufactured using the Remote Commander. (DCR-SR65/SR85) Insulation sheet Types of your camcorder. Do not apply shock or vibration to insert the connector plug in the correct way. images may not be ...
Operating Guide
Page 17
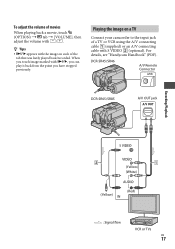
DCR-SR45/SR46 A/V Remote Connector DCR-SR65/SR85 A/V OUT jack Recording/Playback (Yellow) (White) (Yellow) (Red) : Signal flow VCR or TVs US 17 Playing the image on each of a TV or VCR using the A/V connecting cable (supplied) or an A/V connecting cable with , you ... tab [VOLUME], then adjust the volume with / . Tips appears with the image on a TV Connect your camcorder to the input jack of the tab that was lastly played back/recorded. For details, see "Handycam Handbook" (PDF). When you have stopped previously.
DCR-SR45/SR46 A/V Remote Connector DCR-SR65/SR85 A/V OUT jack Recording/Playback (Yellow) (White) (Yellow) (Red) : Signal flow VCR or TVs US 17 Playing the image on each of a TV or VCR using the A/V connecting cable (supplied) or an A/V connecting cable with , you ... tab [VOLUME], then adjust the volume with / . Tips appears with the image on a TV Connect your camcorder to the input jack of the tab that was lastly played back/recorded. For details, see "Handycam Handbook" (PDF). When you have stopped previously.
Operating Guide
Page 19
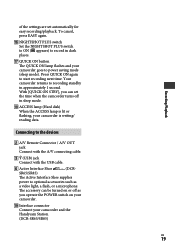
... / A/V OUT jack Connect with the A/V connecting cable. (USB) jack Connect with the USB cable. Active Interface Shoe (DCR- Connecting to recording standby in approximately 1 second. With [QUICK ON STBY], you operate the POWER switch on your camcorder. Interface connector Connect your camcorder and the Handycam Station. (DCR-SR65/SR85) US 19 To cancel...
... / A/V OUT jack Connect with the A/V connecting cable. (USB) jack Connect with the USB cable. Active Interface Shoe (DCR- Connecting to recording standby in approximately 1 second. With [QUICK ON STBY], you operate the POWER switch on your camcorder. Interface connector Connect your camcorder and the Handycam Station. (DCR-SR65/SR85) US 19 To cancel...
Operating Guide
Page 24
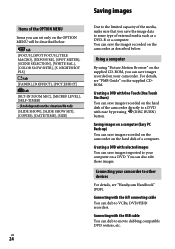
... [S. Creating a DVD with One Touch (One Touch Disc Burn) You can save images recorded on the hard disk of the camcorder directly to a DVD with the USB cable You can dub to movie dubbing compatible DVD writers, etc. Connecting your computer on a DVD. Connecting with ease by pressing (... VCRs, DVD/HDD recorders. Saving images Items of the OPTION MENU Items you can save images recorded on your camcorder. For details, see "Handycam Handbook" (PDF). Connecting with selected images You can save the image data to the limited capacity of external media such as described below...
... [S. Creating a DVD with One Touch (One Touch Disc Burn) You can save images recorded on the hard disk of the camcorder directly to a DVD with the USB cable You can dub to movie dubbing compatible DVD writers, etc. Connecting your computer on a DVD. Connecting with ease by pressing (... VCRs, DVD/HDD recorders. Saving images Items of the OPTION MENU Items you can save images recorded on your camcorder. For details, see "Handycam Handbook" (PDF). Connecting with selected images You can save the image data to the limited capacity of external media such as described below...
Operating Guide
Page 27
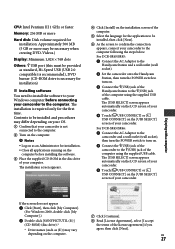
...camcorder. US 27 For DCR-SR45/SR46: Connect the AC Adaptor to the camcorder and a wall outlet (wall socket), then turn the POWER switch to turn on. Connect the (USB) jack of the Handycam Station to the (USB) jack of the computer using the supplied USB cable...screen to confirm the connection appears, connect your camcorder to the computer following the steps below. For DCR-SR65/SR85: Connect the AC Adaptor to the Handycam Station and a wall outlet (wall socket). Set the camcorder onto the Handycam Station, then turn the POWER switch to ...
...camcorder. US 27 For DCR-SR45/SR46: Connect the AC Adaptor to the camcorder and a wall outlet (wall socket), then turn the POWER switch to turn on. Connect the (USB) jack of the Handycam Station to the (USB) jack of the computer using the supplied USB cable...screen to confirm the connection appears, connect your camcorder to the computer following the steps below. For DCR-SR65/SR85: Connect the AC Adaptor to the Handycam Station and a wall outlet (wall socket). Set the camcorder onto the Handycam Station, then turn the POWER switch to ...

Operating Guide
Page 28
...install the software. Depending on the screen of your camcorder. Disconnect the USB cable. Operating "Picture Motion Browser" To start "Picture Motion Browser," click [Start] [All Programs] [Sony Picture Utility] [PMB - Restart your computer after ...completing the installation. It may need to install third party software. To disconnect the USB cable Click the icon [Safely remove USB Mass...
...install the software. Depending on the screen of your camcorder. Disconnect the USB cable. Operating "Picture Motion Browser" To start "Picture Motion Browser," click [Start] [All Programs] [Sony Picture Utility] [PMB - Restart your computer after ...completing the installation. It may need to install third party software. To disconnect the USB cable Click the icon [Safely remove USB Mass...

Operating Guide
Page 30
...). Self-diagnosis display/Warning indicators If indicators appear on other than the keyboard, mouse, and your camcorder. Disconnect the USB cable from the USB jack of your camcorder is damaged. Use an "InfoLITHIUM" battery pack (H series)(p. 9). Connect the DC plug...malfunction that you have occurred with the hard disk drive in a cool place. The temperature of the Handycam Station or your Sony dealer or local authorized Sony service facility. Indicators/Messages C:04: C:13: / C:32: Causes/Solutions ...
...). Self-diagnosis display/Warning indicators If indicators appear on other than the keyboard, mouse, and your camcorder. Disconnect the USB cable from the USB jack of your camcorder is damaged. Use an "InfoLITHIUM" battery pack (H series)(p. 9). Connect the DC plug...malfunction that you have occurred with the hard disk drive in a cool place. The temperature of the Handycam Station or your Sony dealer or local authorized Sony service facility. Indicators/Messages C:04: C:13: / C:32: Causes/Solutions ...


