Operating Guide
Page 6
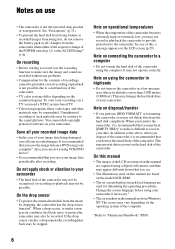
...not turn on the camcorder in this , a message appears on the LCD screen (p.29). When you transfer the camcorder, it difficult to make it...different from the hard disk completely. Change the screen language before using a digital still camera, and thus may damage the hard disk drive of your recorded...camcorder. When a drop occurs, or under a nongravity condition, the block noise to "Handycam Handbook" (PDF). 6 Note on a TV, you need a NTSC system-based TV....; The illustrations used on this manual are based on the model DCR-SR80. • The on-screen displays in each local language are...
...not turn on the camcorder in this , a message appears on the LCD screen (p.29). When you transfer the camcorder, it difficult to make it...different from the hard disk completely. Change the screen language before using a digital still camera, and thus may damage the hard disk drive of your recorded...camcorder. When a drop occurs, or under a nongravity condition, the block noise to "Handycam Handbook" (PDF). 6 Note on a TV, you need a NTSC system-based TV....; The illustrations used on this manual are based on the model DCR-SR80. • The on-screen displays in each local language are...
Operating Guide
Page 11
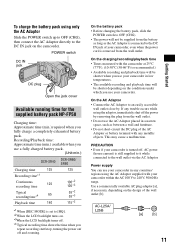
... a fully charged battery pack. (Unit:min.) DCR-SR40 DCR-SR60/ SR80 Charging time 125 Recording time*1 Continuous 125 recording time Typical recording time*4 65 Playback time 140 125 100*2 105*3 55*2 55*3 115*2 *1 When [REC MODE] is set to [HQ]. *2 When the LCD backlight turns on. *3When the LCD backlight turns off. *4 Typical recording time...
... a fully charged battery pack. (Unit:min.) DCR-SR40 DCR-SR60/ SR80 Charging time 125 Recording time*1 Continuous 125 recording time Typical recording time*4 65 Playback time 140 125 100*2 105*3 55*2 55*3 115*2 *1 When [REC MODE] is set to [HQ]. *2 When the LCD backlight turns on. *3When the LCD backlight turns off. *4 Typical recording time...
Operating Guide
Page 12
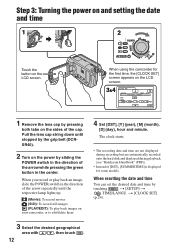
The clock starts. • The recording date and time are not displayed during recording but are automatically recorded onto the hard disk and displayed during playback (see "Handycam Handbook" (PDF)). • Instead of the cap. When you record or play back an image, slide the POWER switch in the center. t [...time 1 2 Touch the button on the sides of [DST], [SUMMERTIME] is displayed for the first time, the [CLOCK SET] screen appears on the LCD screen. 3&4 CLOCK SET AREA26 GMT -5.0 New york , Bogota DST OFF DATE 2006 Y JAN M 1D 12 00 AM OK 1 Remove the lens cap...
The clock starts. • The recording date and time are not displayed during recording but are automatically recorded onto the hard disk and displayed during playback (see "Handycam Handbook" (PDF)). • Instead of the cap. When you record or play back an image, slide the POWER switch in the center. t [...time 1 2 Touch the button on the sides of [DST], [SUMMERTIME] is displayed for the first time, the [CLOCK SET] screen appears on the LCD screen. 3&4 CLOCK SET AREA26 GMT -5.0 New york , Bogota DST OFF DATE 2006 Y JAN M 1D 12 00 AM OK 1 Remove the lens cap...
Operating Guide
Page 13
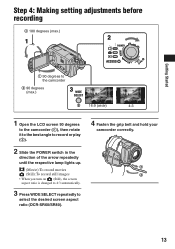
Step 4: Making setting adjustments before recording 2 180 degrees (max.) 1 2 Getting Started 1 90 degrees to the camcorder 2 90 degrees (max.) 3 16:9 (wide) 4:3 1 Open the LCD screen 90 degrees to the camcorder (1), then rotate it to the best angle to record or play (2). 2 Slide the POWER switch in the direction of ... • When you turn on (Still), the screen aspect ratio is changed to 4:3 automatically. 3 Press WIDE SELECT repeatedly to select the desired screen aspect ratio (DCR-SR60/SR80). 4 Fasten the grip belt and hold your camcorder correctly. 13
Step 4: Making setting adjustments before recording 2 180 degrees (max.) 1 2 Getting Started 1 90 degrees to the camcorder 2 90 degrees (max.) 3 16:9 (wide) 4:3 1 Open the LCD screen 90 degrees to the camcorder (1), then rotate it to the best angle to record or play (2). 2 Slide the POWER switch in the direction of ... • When you turn on (Still), the screen aspect ratio is changed to 4:3 automatically. 3 Press WIDE SELECT repeatedly to select the desired screen aspect ratio (DCR-SR60/SR80). 4 Fasten the grip belt and hold your camcorder correctly. 13
Operating Guide
Page 15
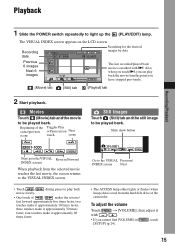
... back • One touch of the camcorder. Slide show button 101-0001 P-MENU Go to the VISUAL Reverse/Forward INDEX screen) When playback from the hard disk drive of / makes the reverse/ fast forward approximately five times faster, two touches make it approximately 10 times faster, three touches make it approximately 30 times... [SETUP] (p.24). , touch 15 Movies Touch (Movie) tab and the movie to light up the (PLAY/EDIT) lamp. The VISUAL INDEX screen appears on the LCD screen. Playback Recording/Playback 1 Slide the POWER switch repeatedly to be played back.
... back • One touch of the camcorder. Slide show button 101-0001 P-MENU Go to the VISUAL Reverse/Forward INDEX screen) When playback from the hard disk drive of / makes the reverse/ fast forward approximately five times faster, two touches make it approximately 10 times faster, three touches make it approximately 30 times... [SETUP] (p.24). , touch 15 Movies Touch (Movie) tab and the movie to light up the (PLAY/EDIT) lamp. The VISUAL INDEX screen appears on the LCD screen. Playback Recording/Playback 1 Slide the POWER switch repeatedly to be played back.
Operating Guide
Page 16
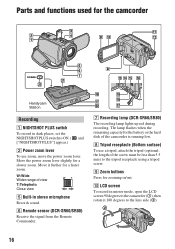
... q; W:Wide Wider range of view T:Telephoto Close view 5 Built-in /out. The lamp flashes when the remaining capacity for the battery or the hard disk of the screw must be less than 5.5 mm) to the tripod receptacle using a tripod screw. 9 Zoom buttons Press for zooming in stereo microphone ...Commander. 7 Recording lamp (DCR-SR60/SR80) The recording lamp lights up red during recording. Move it 180 degrees to the lens side (2). 16 Parts and functions used for the camcorder Handycam Station Recording 1 NIGHTSHOT PLUS switch To record in mirror mode, open the LCD screen 90 degrees to the...
... q; W:Wide Wider range of view T:Telephoto Close view 5 Built-in /out. The lamp flashes when the remaining capacity for the battery or the hard disk of the screw must be less than 5.5 mm) to the tripod receptacle using a tripod screw. 9 Zoom buttons Press for zooming in stereo microphone ...Commander. 7 Recording lamp (DCR-SR60/SR80) The recording lamp lights up red during recording. Move it 180 degrees to the lens side (2). 16 Parts and functions used for the camcorder Handycam Station Recording 1 NIGHTSHOT PLUS switch To record in mirror mode, open the LCD screen 90 degrees to the...

Operating Guide
Page 17
...operate the POWER switch on the LCD screen. 3 Touch the portion you may not use the camcorder with simple operation (Easy Handycam operation). Open the jack cover. 3 Shoe cover (DCR-SR60/SR80) Open when using Active Interface Shoe. 4 Active Interface Shoe (DCR-SR60/SR80) The Active Interface ... or check the remaining battery power. During Easy Handycam operation, you want to 5 times the original size (Playback zoom). 1 Play back the image you can be automatically operated. qh EASY button By pressing the EASY button, most of the LCD screen. 4 Adjust the magnification with W (Wide...
...operate the POWER switch on the LCD screen. 3 Touch the portion you may not use the camcorder with simple operation (Easy Handycam operation). Open the jack cover. 3 Shoe cover (DCR-SR60/SR80) Open when using Active Interface Shoe. 4 Active Interface Shoe (DCR-SR60/SR80) The Active Interface ... or check the remaining battery power. During Easy Handycam operation, you want to 5 times the original size (Playback zoom). 1 Play back the image you can be automatically operated. qh EASY button By pressing the EASY button, most of the LCD screen. 4 Adjust the magnification with W (Wide...
Operating Guide
Page 19
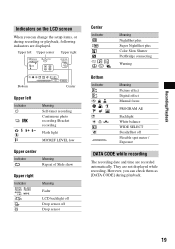
They are displayed. Recording/Playback Indicators on the LCD screen When you can change the setup items, or during playback. 19 n Meaning Picture effect Digital effect Manual focus PROGRAM AE Backlight White balance WIDE ...-timer recording Continuous photo recording /Bracket recording Flash light MICREF LEVEL low Upper center Indicator Meaning Repeat of Slide show Upper right Indicator Meaning Fader LCD backlight off Drop sensor off Flexible spot meter / Exposure DATA CODE while recording The recording date and time are recorded automatically.
They are displayed. Recording/Playback Indicators on the LCD screen When you can change the setup items, or during playback. 19 n Meaning Picture effect Digital effect Manual focus PROGRAM AE Backlight White balance WIDE ...-timer recording Continuous photo recording /Bracket recording Flash light MICREF LEVEL low Upper center Indicator Meaning Repeat of Slide show Upper right Indicator Meaning Fader LCD backlight off Drop sensor off Flexible spot meter / Exposure DATA CODE while recording The recording date and time are recorded automatically.
Operating Guide
Page 24
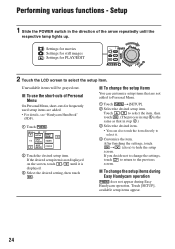
... the item. x To change the settings, touch to return to select it is the same as that are added. • For details, see "Handycam Handbook" (PDF). 1 Touch . 60min STBY SETUP EXPOSURE SPOT FOCUS FADER SPOT METER FOCUS 2 Touch the desired setup item. If you decide not to... does not appear during Easy Handycam operation. Setup 1 Slide the POWER switch in the direction of Personal Menu On Personal Menu, short-cuts for PLAY/EDIT 2 Touch the LCD screen to hide the setup screen. Performing various functions - If the desired setup item is not displayed on the...
... the item. x To change the settings, touch to return to select it is the same as that are added. • For details, see "Handycam Handbook" (PDF). 1 Touch . 60min STBY SETUP EXPOSURE SPOT FOCUS FADER SPOT METER FOCUS 2 Touch the desired setup item. If you decide not to... does not appear during Easy Handycam operation. Setup 1 Slide the POWER switch in the direction of Personal Menu On Personal Menu, short-cuts for PLAY/EDIT 2 Touch the LCD screen to hide the setup screen. Performing various functions - If the desired setup item is not displayed on the...
Operating Guide
Page 25
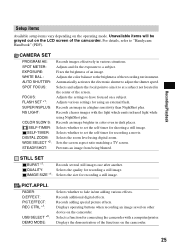
For details, refer to set the self-timer for recording a movie. Adjusts the color balance to the brightness of the camcorder. Selects whether to "Handycam Handbook" (PDF). PICT.APPLI. Selects a function for recording a still image. CAMERA SET PROGRAM AE: SPOT METER: EXPOSURE: WHITE BAL.: AUTO SHUTTER: ... the zoom level using an external flash. Selects the size for using digital zoom. Unavailable items will be grayed out on the LCD screen of the recording environment. Fixes the brightness of the screen. Selects and adjusts the focal point to aim it to have focused...
For details, refer to set the self-timer for recording a movie. Adjusts the color balance to the brightness of the camcorder. Selects whether to "Handycam Handbook" (PDF). PICT.APPLI. Selects a function for recording a still image. CAMERA SET PROGRAM AE: SPOT METER: EXPOSURE: WHITE BAL.: AUTO SHUTTER: ... the zoom level using an external flash. Selects the size for using digital zoom. Unavailable items will be grayed out on the LCD screen of the recording environment. Fixes the brightness of the screen. Selects and adjusts the focal point to aim it to have focused...
Operating Guide
Page 26
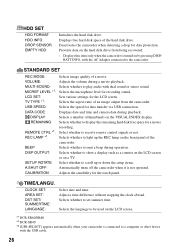
...hard disk free space for the LCD screen. Selects whether to a computer or other device with dual sound or stereo sound. VOLUME: Adjusts the volume during a movie playback. SETUP ROTATE: Select whether to emit a beep during playback. STANDARD SET REC MODE: Selects image quality of thumbnails on the hard disk drive...with the USB cable. 26 DISP OUTPUT: Selects whether to show a display such as a counter on the LCD screen or on the LCD screen. *1 DCR-SR60/SR80 *2 DCR-SR40 *3 [USB SELECT] appears automatically when your camcorder is connected to set summer time.
...hard disk free space for the LCD screen. Selects whether to a computer or other device with dual sound or stereo sound. VOLUME: Adjusts the volume during a movie playback. SETUP ROTATE: Select whether to emit a beep during playback. STANDARD SET REC MODE: Selects image quality of thumbnails on the hard disk drive...with the USB cable. 26 DISP OUTPUT: Selects whether to show a display such as a counter on the LCD screen or on the LCD screen. *1 DCR-SR60/SR80 *2 DCR-SR40 *3 [USB SELECT] appears automatically when your camcorder is connected to set summer time.
Operating Guide
Page 28
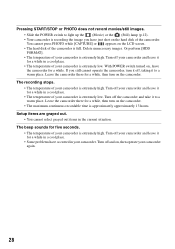
... problems have just shot on , leave the camcorder for a while in a cool place. • The temperature of your camcorder. With POWER switch turned on the hard disk of the camcorder is full. If you have occurred in the current situation. Turn off your camcorder is extremely low. Turn off your camcorder and... camcorder, turn it off, taking it to a warm place. The recording stops. • The temperature of your camcorder again. 28 Turn off and on the LCD screen. • The hard disk of the camcorder.
... problems have just shot on , leave the camcorder for a while in a cool place. • The temperature of your camcorder. With POWER switch turned on the hard disk of the camcorder is full. If you have occurred in the current situation. Turn off your camcorder is extremely low. Turn off your camcorder and... camcorder, turn it off, taking it to a warm place. The recording stops. • The temperature of your camcorder again. 28 Turn off and on the LCD screen. • The hard disk of the camcorder.
Operating Guide
Page 29
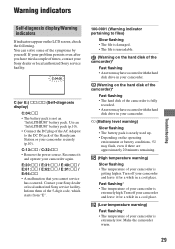
... The file is damaged. • The file is unreadable. (Warning on the hard disk of the camcorder)* Fast flashing • An error may have occurred with the hard disk drive in your camcorder. (Warning on the LCD screen, check the following. Fast flashing* • The temperature of your camcorder ...the 5-digit code, which starts from "E". 100-0001 (Warning indicator pertaining to the DC IN jack of the Handycam Station or your Sony dealer or local authorized Sony service facility. If your problem persists even after you cannot service has occurred. E (Battery level warning) Slow ...
... The file is damaged. • The file is unreadable. (Warning on the hard disk of the camcorder)* Fast flashing • An error may have occurred with the hard disk drive in your camcorder. (Warning on the LCD screen, check the following. Fast flashing* • The temperature of your camcorder ...the 5-digit code, which starts from "E". 100-0001 (Warning indicator pertaining to the DC IN jack of the Handycam Station or your Sony dealer or local authorized Sony service facility. If your problem persists even after you cannot service has occurred. E (Battery level warning) Slow ...
Operating Guide
Page 31
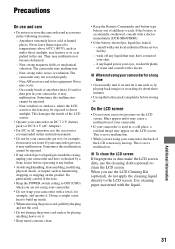
... with a doctor immediately (DCR-SR60/SR80). • If the battery electrolytic liquid has leaked, - Noise may malfunction. - On the LCD screen • Do not exert excessive pressure on the LCD screen. x To clean the LCD screen If fingerprints or dust make the LCD screen dirty, use or store... This is not a malfunction. Anywhere extremely hot or cold or humid places. if any liquid that may have it checked by a Sony dealer before operating it any further. • Avoid rough handling,disassembling, modifying, physical shock, or impact such as by placing anything ...
... with a doctor immediately (DCR-SR60/SR80). • If the battery electrolytic liquid has leaked, - Noise may malfunction. - On the LCD screen • Do not exert excessive pressure on the LCD screen. x To clean the LCD screen If fingerprints or dust make the LCD screen dirty, use or store... This is not a malfunction. Anywhere extremely hot or cold or humid places. if any liquid that may have it checked by a Sony dealer before operating it any further. • Avoid rough handling,disassembling, modifying, physical shock, or impact such as by placing anything ...
Operating Guide
Page 34
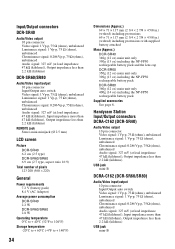
...)), Input impedance more than 47 kΩ (kilohms), Output impedance less than 2.2 kΩ (kilohms) USB jack mini-B Handycam Station Input/Output connectors DCRA-C162 (DCR-SR40) Audio/Video output 10 pin connector Video signal: 1 Vp-p, 75 Ω (ohms), unbalanced Luminance signal: 1 Vp-p,... than 47 kΩ (kilohms), Output impedance less than 2.2 kΩ (kilohms) REMOTE jack Stereo mini-minijack (Ø 2.5 mm) LCD screen Picture DCR-SR40 6.2 cm (2.5 type) DCR-SR60/SR80 6.9 cm (2.7 type, aspect ratio 16:9) Total number of pixels 123 200 (560 × 220) General Power requirements 7.2...
...)), Input impedance more than 47 kΩ (kilohms), Output impedance less than 2.2 kΩ (kilohms) USB jack mini-B Handycam Station Input/Output connectors DCRA-C162 (DCR-SR40) Audio/Video output 10 pin connector Video signal: 1 Vp-p, 75 Ω (ohms), unbalanced Luminance signal: 1 Vp-p,... than 47 kΩ (kilohms), Output impedance less than 2.2 kΩ (kilohms) REMOTE jack Stereo mini-minijack (Ø 2.5 mm) LCD screen Picture DCR-SR40 6.2 cm (2.5 type) DCR-SR60/SR80 6.9 cm (2.7 type, aspect ratio 16:9) Total number of pixels 123 200 (560 × 220) General Power requirements 7.2...


