MovieShaker v3.1 Operating Instructions
Page 1
3-070-303-12(1) MovieShaker Ver.3.1 for MICROMV Operating Instructions Before using MovieShaker, be sure to read carefully the END-USER LICENSE AGREEMENT (the Software License Agreement) at the end of the Operating Instructions. © 2001 Sony Corporation
3-070-303-12(1) MovieShaker Ver.3.1 for MICROMV Operating Instructions Before using MovieShaker, be sure to read carefully the END-USER LICENSE AGREEMENT (the Software License Agreement) at the end of the Operating Instructions. © 2001 Sony Corporation
MovieShaker v3.1 Operating Instructions
Page 9
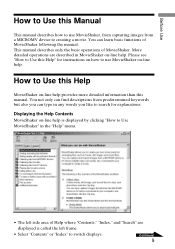
... how to use MovieShaker on -line help provides more detailed information than this Help MovieShaker on -line help. You can find descriptions from a MICROMV device to Use this Help" for explanations. Please see "How to creating a movie. You not only can learn basic functions of Help where...operations of MovieShaker. How to use MovieShaker, from capturing images from predetermined keywords but also you like to search for instructions on how to Use this manual. Continued 9 More detailed operations are displayed is displayed by clicking "How to switch displays.
... how to use MovieShaker on -line help provides more detailed information than this Help MovieShaker on -line help. You can find descriptions from a MICROMV device to Use this Help" for explanations. Please see "How to creating a movie. You not only can learn basic functions of Help where...operations of MovieShaker. How to use MovieShaker, from capturing images from predetermined keywords but also you like to search for instructions on how to Use this manual. Continued 9 More detailed operations are displayed is displayed by clicking "How to switch displays.
MovieShaker v3.1 Operating Instructions
Page 11
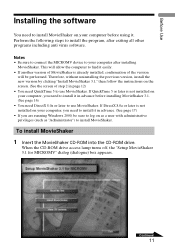
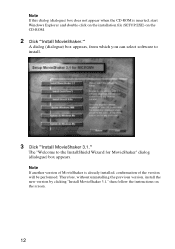
When the CD-ROM drive access lamp turns off, the "Setup MovieShaker 3.1 for MICROMV" dialog (dialogue) box appears. Notes • Be sure to connect the MICROMV device to your computer, you are running Windows 2000, be performed. This will be sure to log on...after installing MovieShaker. Therefore, without uninstalling the previous version, install the new version by clicking "Install MovieShaker 3.1," then follow the instructions on your computer after exiting all other programs including anti virus software. Continued 11 To install MovieShaker 1 Insert the MovieShaker CD-ROM...
When the CD-ROM drive access lamp turns off, the "Setup MovieShaker 3.1 for MICROMV" dialog (dialogue) box appears. Notes • Be sure to connect the MICROMV device to your computer, you are running Windows 2000, be performed. This will be sure to log on...after installing MovieShaker. Therefore, without uninstalling the previous version, install the new version by clicking "Install MovieShaker 3.1," then follow the instructions on your computer after exiting all other programs including anti virus software. Continued 11 To install MovieShaker 1 Insert the MovieShaker CD-ROM...
MovieShaker v3.1 Operating Instructions
Page 12
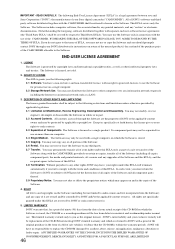
... appears. The "Welcome to install. 3 Click "Install MovieShaker 3.1." Therefore, without uninstalling the previous version, install the new version by clicking "Install MovieShaker 3.1," then follow the instructions on the CD-ROM. 2 Click "Install MovieShaker." Note If this dialog (dialogue) box does not appear when the CD-ROM is already installed, confirmation of...
... appears. The "Welcome to install. 3 Click "Install MovieShaker 3.1." Therefore, without uninstalling the previous version, install the new version by clicking "Install MovieShaker 3.1," then follow the instructions on the CD-ROM. 2 Click "Install MovieShaker." Note If this dialog (dialogue) box does not appear when the CD-ROM is already installed, confirmation of...

MovieShaker v3.1 Operating Instructions
Page 14
Click a folder to select the folder to be sure to click "Yes." 6 Click to display a dialog (dialogue) box. Follow the instructions on the MICROMV device or package. After you click "OK" to finish installation of MovieShaker, you can also directly type a folder name in the path and click "OK" ...
Click a folder to select the folder to be sure to click "Yes." 6 Click to display a dialog (dialogue) box. Follow the instructions on the MICROMV device or package. After you click "OK" to finish installation of MovieShaker, you can also directly type a folder name in the path and click "OK" ...

MovieShaker v3.1 Operating Instructions
Page 16
... MovieShaker" on the screen to use MovieShaker. A dialog (dialogue) box appears, from which you need QuickTime 5 or later to finish the installation. 16 Follow the instructions on the displayed screen (page 11). Note If a version of QuickTime earlier than the English version is installed, uninstall it before installing QuickTime 5 or later.
... MovieShaker" on the screen to use MovieShaker. A dialog (dialogue) box appears, from which you need QuickTime 5 or later to finish the installation. 16 Follow the instructions on the displayed screen (page 11). Note If a version of QuickTime earlier than the English version is installed, uninstall it before installing QuickTime 5 or later.
MovieShaker v3.1 Operating Instructions
Page 17
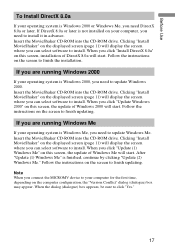
...need to update Windows 2000. After "Update (1) Windows Me" is not installed on this screen, the update of Windows Me will start . Follow the instructions on the screen to click "Yes." 17 Note When you need to install. When the dialog (dialogue) box appears, be sure to finish updating. ...Before Use To Install DirectX 8.0a If your operating system is Windows 2000 or Windows Me, you connect the MICROMV device to your computer for the first time, depending on the computer configuration, the "Version Conflict" dialog (dialogue) box may appear. If you...
...need to update Windows 2000. After "Update (1) Windows Me" is not installed on this screen, the update of Windows Me will start . Follow the instructions on the screen to click "Yes." 17 Note When you need to install. When the dialog (dialogue) box appears, be sure to finish updating. ...Before Use To Install DirectX 8.0a If your operating system is Windows 2000 or Windows Me, you connect the MICROMV device to your computer for the first time, depending on the computer configuration, the "Version Conflict" dialog (dialogue) box may appear. If you...
MovieShaker v3.1 Operating Instructions
Page 19
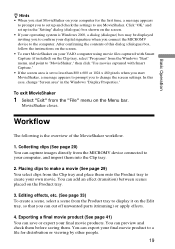
...a message appears to prompt you to create your final movie products. Collecting clips (See page 20) You can capture images directly from the MICROMV device connected to your VAIO computer using movie files captured with Smart Capture (if installed) on the Clip tray, select "Programs" from the ... • When you start MovieShaker on your computer for distribution or viewing by other people. 19 In this dialog (dialogue) box, follow the instructions on the screen. • To start MovieShaker on your computer, and import them . You can preview and check them before saving them into ...
...a message appears to prompt you to create your final movie products. Collecting clips (See page 20) You can capture images directly from the MICROMV device connected to your VAIO computer using movie files captured with Smart Capture (if installed) on the Clip tray, select "Programs" from the ... • When you start MovieShaker on your computer for distribution or viewing by other people. 19 In this dialog (dialogue) box, follow the instructions on the screen. • To start MovieShaker on your computer, and import them . You can preview and check them before saving them into ...
MovieShaker v3.1 Operating Instructions
Page 46
...CAMCORDER. GRANT OF LICENSE This EULA grants you and Sony Corporation ("SONY"), the manufacturer of the CD-ROM not meeting SONY's limited warranty and which is a legal agreement between you the following restrictions and limitations unless otherwise provided by applicable copyright law. You may permanently transfer all of your SONY distributor for instructions... of a bill of the original purchase in part. 3.2 Accessed Contents. SONY's entire liability and your Sony digital camcorder ("CAMCORDER"). You may appear on a single computer. 2.2 Storage/Network Use. LICENSE...
...CAMCORDER. GRANT OF LICENSE This EULA grants you and Sony Corporation ("SONY"), the manufacturer of the CD-ROM not meeting SONY's limited warranty and which is a legal agreement between you the following restrictions and limitations unless otherwise provided by applicable copyright law. You may permanently transfer all of your SONY distributor for instructions... of a bill of the original purchase in part. 3.2 Accessed Contents. SONY's entire liability and your Sony digital camcorder ("CAMCORDER"). You may appear on a single computer. 2.2 Storage/Network Use. LICENSE...
How to shoot a great birthday video.
Page 1
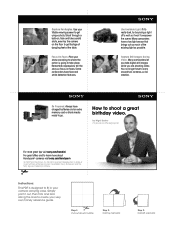
...visit sony.com/howdini For great offers and to carry around outline Step 2: Fold top half back Step 3: Fold left side back All rights reserved. Simply print it won't overpower the scene. Focus On Faces. Many camcorders let you take place. Instructions: ...Professional Photographer For more about Handycam® cameras visit sony.com/handycam © 2009 Sony Electronics Inc. Plan your camera carrying case. Some camcorders have a low light sensor that brings out as much of Sony. Sony, Handycam and the Sony logo are shooting video. Many camcorders have face and smile ...
...visit sony.com/howdini For great offers and to carry around outline Step 2: Fold top half back Step 3: Fold left side back All rights reserved. Simply print it won't overpower the scene. Focus On Faces. Many camcorders let you take place. Instructions: ...Professional Photographer For more about Handycam® cameras visit sony.com/handycam © 2009 Sony Electronics Inc. Plan your camera carrying case. Some camcorders have a low light sensor that brings out as much of Sony. Sony, Handycam and the Sony logo are shooting video. Many camcorders have face and smile ...
How to shoot a great wedding video.
Page 1
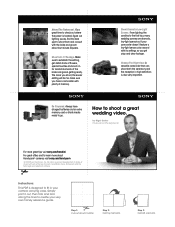
... Shoot Dramatic Low-Light Scenes. If your very own handy reference guide. Sony, Handycam and the Sony logo are dramatic, low-light scenarios. A versatile camcorder that can shoot both the ceremony and the reception in part without written permission is also very important. Instructions: This PDF is located, figure out lighting issues, find the best...
... Shoot Dramatic Low-Light Scenes. If your very own handy reference guide. Sony, Handycam and the Sony logo are dramatic, low-light scenarios. A versatile camcorder that can shoot both the ceremony and the reception in part without written permission is also very important. Instructions: This PDF is located, figure out lighting issues, find the best...

How to take great vacation video.
Page 1
...video. How to learn more about Handycam® cameras visit sony.com/handycam © 2009 Sony Electronics Inc. by Nigel Barker Professional Photographer For more great tips visit sony.com/howdini For great offers and to take great vacation video. Some camcorders feature technologies that ensure crisp images even... and extra memory card or blank media for your camcorder to compensate for camera shake. Step 1: Cut out around your camcorder ready to shoot twilight and sunset shots. Don't Talk While You Are Recording. Hearing instructions or parts of day and where you're shooting...
...video. How to learn more about Handycam® cameras visit sony.com/handycam © 2009 Sony Electronics Inc. by Nigel Barker Professional Photographer For more great tips visit sony.com/howdini For great offers and to take great vacation video. Some camcorders feature technologies that ensure crisp images even... and extra memory card or blank media for your camcorder to compensate for camera shake. Step 1: Cut out around your camcorder ready to shoot twilight and sunset shots. Don't Talk While You Are Recording. Hearing instructions or parts of day and where you're shooting...
Computer Applications Guide
Page 9
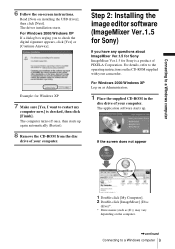
...USB driver], then click [Next]. For Windows 2000/Windows XP If a dialog box urging you have any questions about ImageMixer Ver.1.5 for Sony ImageMixer Ver.1.5 for Windows XP 7 Make sure [Yes, I want to a Windows computer 9 If the screen does not appear 1 ...image editor software (ImageMixer Ver.1.5 for Sony) If you to a Windows computer 6 Follow the on-screen instructions. For details, refer to the operating instructions on the computer. ,continued Connecting to restart my computer now.] is a product of your camcorder. Connecting to check the digital signature appears...
...USB driver], then click [Next]. For Windows 2000/Windows XP If a dialog box urging you have any questions about ImageMixer Ver.1.5 for Sony ImageMixer Ver.1.5 for Windows XP 7 Make sure [Yes, I want to a Windows computer 9 If the screen does not appear 1 ...image editor software (ImageMixer Ver.1.5 for Sony) If you to a Windows computer 6 Follow the on-screen instructions. For details, refer to the operating instructions on the computer. ,continued Connecting to restart my computer now.] is a product of your camcorder. Connecting to check the digital signature appears...
Computer Applications Guide
Page 10
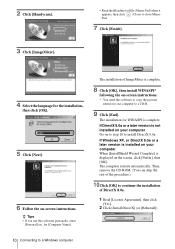
...10 Connecting to close Memo Pad. 7 Click [Finish]. 4 Select the language for the installation, then click [OK]. 5 Click [Next]. 6 Follow the on -screen instructions. * You need this software personally, enter [Personal] etc. If DirectX 8.0a or a later version is complete. Then, remove the CD-ROM. (You can skip the... a CD-R. 9 Click [End]. for WINASPI is not installed on your computer Go on your computer to install DirectX 8.0a. 2 Click [Handycam]. 3 Click [ImageMixer]. • Read the [Readme.txt] file (Memo Pad) when it appears, then click (Close) to a Windows computer
...10 Connecting to close Memo Pad. 7 Click [Finish]. 4 Select the language for the installation, then click [OK]. 5 Click [Next]. 6 Follow the on -screen instructions. * You need this software personally, enter [Personal] etc. If DirectX 8.0a or a later version is complete. Then, remove the CD-ROM. (You can skip the... a CD-R. 9 Click [End]. for WINASPI is not installed on your computer Go on your computer to install DirectX 8.0a. 2 Click [Handycam]. 3 Click [ImageMixer]. • Read the [Readme.txt] file (Memo Pad) when it appears, then click (Close) to a Windows computer

Computer Applications Guide
Page 12
... Image Transfer automatically when the camera, etc., is connected.], then click [Next]. 12 Connecting to complete the installation of your computer. 6 Follow the on-screen instructions. Short-cut icons for Image Transfer and the Image Transfer folder appear on the desktop. 9 Remove the CD-ROM from the disc drive of Image...
... Image Transfer automatically when the camera, etc., is connected.], then click [Next]. 12 Connecting to complete the installation of your computer. 6 Follow the on-screen instructions. Short-cut icons for Image Transfer and the Image Transfer folder appear on the desktop. 9 Remove the CD-ROM from the disc drive of Image...
Computer Applications Guide
Page 16
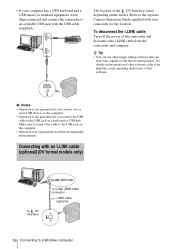
...8226; You can use other software, refer to the help files or the operating instructions of other image editing software that software. The location of the camcorder and disconnect the i.LINK cable from the camcorder and computer. Connecting with the USB cable (supplied). To disconnect the i.LINK ... Camera Operations Guide supplied with your computer has a USB keyboard and a USB mouse as standard equipment, leave them connected and connect the camcorder to an available USB jack with an i.LINK cable (optional) (DV format models only) to DV Interface to i.LINK (IEEE1394) connector...
...8226; You can use other software, refer to the help files or the operating instructions of other image editing software that software. The location of the camcorder and disconnect the i.LINK cable from the camcorder and computer. Connecting with the USB cable (supplied). To disconnect the i.LINK ... Camera Operations Guide supplied with your computer has a USB keyboard and a USB mouse as standard equipment, leave them connected and connect the camcorder to an available USB jack with an i.LINK cable (optional) (DV format models only) to DV Interface to i.LINK (IEEE1394) connector...

Computer Applications Guide
Page 22
... In the [My Documents] folder, double-click the icon of the screen. 2 Search for Sony. 1 Click (Help) at the upper right-hand corner of the Help screen. 22 Managing pictures on -line help for detailed operating instructions for ImageMixer Ver.1.5 for the desired topic from the list, then drag and drop it...
... In the [My Documents] folder, double-click the icon of the screen. 2 Search for Sony. 1 Click (Help) at the upper right-hand corner of the Help screen. 22 Managing pictures on -line help for detailed operating instructions for ImageMixer Ver.1.5 for the desired topic from the list, then drag and drop it...

Computer Applications Guide
Page 25
...imported to the buffer via the USB cable (supplied) (p. 14). 7 Place a new CD-R in the disc drive. a computer equipped with your camcorder. 5 Search for the point on the tape where you cannot add images to the CAMERA-TAPE mode. For details, refer to the separate Camera ...may be able to the Video CD. Touch [P-MENU], [MENU] and [USBCAMERA], then touch to select [USB STREAM]. 6 Connect the camcorder to the operating instructions supplied with Video CDs - a computer equipped with a DVD drive and software compatible with each player for the [Location of Windows Media Player ...
...imported to the buffer via the USB cable (supplied) (p. 14). 7 Place a new CD-R in the disc drive. a computer equipped with your camcorder. 5 Search for the point on the tape where you cannot add images to the CAMERA-TAPE mode. For details, refer to the separate Camera ...may be able to the Video CD. Touch [P-MENU], [MENU] and [USBCAMERA], then touch to select [USB STREAM]. 6 Connect the camcorder to the operating instructions supplied with Video CDs - a computer equipped with a DVD drive and software compatible with each player for the [Location of Windows Media Player ...

Computer Applications Guide
Page 29
...details, refer to the separate Camera Operations Guide supplied with your camcorder. Copying pictures edited on ImageMixer Ver.1.5 for Sony to a "Memory Stick" You can copy pictures edited on ImageMixer Ver.1.5 for your camcorder, then slide the POWER switch repeatedly to select the PLAY/ ... touch to the separate Camera Operations Guide supplied with your camcorder to a "Memory Stick," and use them as materials for detailed operating instructions on the desktop. Refer to select [STD-USB]. 5 Click (Album). 6 Connect your camcorder. 4 Start up automatically. 7 Click the [MEMORY MIX...
...details, refer to the separate Camera Operations Guide supplied with your camcorder. Copying pictures edited on ImageMixer Ver.1.5 for Sony to a "Memory Stick" You can copy pictures edited on ImageMixer Ver.1.5 for your camcorder, then slide the POWER switch repeatedly to select the PLAY/ ... touch to the separate Camera Operations Guide supplied with your camcorder to a "Memory Stick," and use them as materials for detailed operating instructions on the desktop. Refer to select [STD-USB]. 5 Click (Album). 6 Connect your camcorder. 4 Start up automatically. 7 Click the [MEMORY MIX...

Computer Applications Guide
Page 35
...set the POWER switch to another mode on the tape is a recorded disc. A DVD containing the data up and the on-screen instructions appear on the tape. ,continued Other functions 35 Other functions The disc tray comes out and place a new writable DVD in the ... forcibly, it , the message [This is being copied to select [BURN DVD]. Camera Operations Guide supplied with your camcorder. 3 Insert a recorded cassette into your camcorder. 4 Connect your camcorder to DVD Automatic Mode" for details. - If you touch [EXEC], the existing data is completely copied to the computer...
...set the POWER switch to another mode on the tape is a recorded disc. A DVD containing the data up and the on-screen instructions appear on the tape. ,continued Other functions 35 Other functions The disc tray comes out and place a new writable DVD in the ... forcibly, it , the message [This is being copied to select [BURN DVD]. Camera Operations Guide supplied with your camcorder. 3 Insert a recorded cassette into your camcorder. 4 Connect your camcorder to DVD Automatic Mode" for details. - If you touch [EXEC], the existing data is completely copied to the computer...


