MovieShaker v3.1 Operating Instructions
Page 6
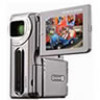
... pixel Hi Color (Colour) (16-bit color (colour)) display driver capability. - MovieShaker allows you to capture or process images efficiently using MovieShaker are as the DV device (digital video camcorder). • All MICROMV cassettes are provided with i.LINK (IEEE1394) terminal • We.../Professional It is MPEG2, the same used : Japanese, English, French, German, Italian, Spanish, and Portuguese About the MICROMV • The MICROMV device can be used with the following capabilities. - Precautions for Use The hardware and software requirements for using an index contained...
... pixel Hi Color (Colour) (16-bit color (colour)) display driver capability. - MovieShaker allows you to capture or process images efficiently using MovieShaker are as the DV device (digital video camcorder). • All MICROMV cassettes are provided with i.LINK (IEEE1394) terminal • We.../Professional It is MPEG2, the same used : Japanese, English, French, German, Italian, Spanish, and Portuguese About the MICROMV • The MICROMV device can be used with the following capabilities. - Precautions for Use The hardware and software requirements for using an index contained...
Computer Applications Guide
Page 2
... speakers • Memory: 64 MB or more • Hard disk: Available memory required for Sony When viewing pictures recorded on a tape on a computer b Note • When you connect your camcorder. The software used differs depending on the size of the image files edited) • Display:...display driver capability (this product will not operate correctly at 800 × 600 dots or less, and 256 colors or less.) • Others: USB port (this first • For camera operations, read the separate Camera Operations Guide supplied with your camcorder. • If your camcorder is a MICROMV ...
... speakers • Memory: 64 MB or more • Hard disk: Available memory required for Sony When viewing pictures recorded on a tape on a computer b Note • When you connect your camcorder. The software used differs depending on the size of the image files edited) • Display:...display driver capability (this product will not operate correctly at 800 × 600 dots or less, and 256 colors or less.) • Others: USB port (this first • For camera operations, read the separate Camera Operations Guide supplied with your camcorder. • If your camcorder is a MICROMV ...
Computer Applications Guide
Page 4
... 1: Installing the USB driver on a computer 8 Step 2: Installing the image editor software (ImageMixer Ver.1.5 for Sony to a "Memory Stick" ......... 29 Connecting to a Macintosh computer ("Memory Stick" only) Step 1: Installing the USB driver on a computer 31 Step 2: Connecting your camcorder to a computer 13 Connecting... movie on your computer 21 Editing pictures on your computer 21 Viewing pictures on your camcorder to a computer 32 Copying pictures recorded on ImageMixer Ver.1.5 for Sony 9 Step 3: Installing the image exchange software (Image Transfer 11 Step 4: Connecting your...
... 1: Installing the USB driver on a computer 8 Step 2: Installing the image editor software (ImageMixer Ver.1.5 for Sony to a "Memory Stick" ......... 29 Connecting to a Macintosh computer ("Memory Stick" only) Step 1: Installing the USB driver on a computer 31 Step 2: Connecting your camcorder to a computer 13 Connecting... movie on your computer 21 Editing pictures on your computer 21 Viewing pictures on your camcorder to a computer 32 Copying pictures recorded on ImageMixer Ver.1.5 for Sony 9 Step 3: Installing the image exchange software (Image Transfer 11 Step 4: Connecting your...
Computer Applications Guide
Page 7
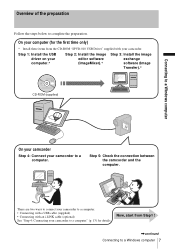
... (Image Transfer).* CD-ROM (supplied) Connecting to a Windows computer On your camcorder Step 4: Connect your camcorder to a Windows computer 7 On your camcorder. Now, start from the CD-ROM "SPVD-010 USB Driver" supplied with an i.LINK cable (optional) See "Step 4: Connecting your camcorder to complete the preparation. Overview of the preparation Follow the steps below...
... (Image Transfer).* CD-ROM (supplied) Connecting to a Windows computer On your camcorder Step 4: Connect your camcorder to a Windows computer 7 On your camcorder. Now, start from the CD-ROM "SPVD-010 USB Driver" supplied with an i.LINK cable (optional) See "Step 4: Connecting your camcorder to complete the preparation. Overview of the preparation Follow the steps below...
Computer Applications Guide
Page 8
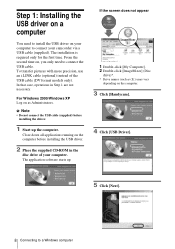
...LINK cable (optional) instead of your camcorder via a USB cable (supplied). The application software starts up the computer. The installation is required only for the first time. Close down all applications running on the computer. 3 Click [Handycam]. 4 Click [USB Driver]. 5 Click [Next]. 8 Connecting... to connect the USB cable. Step 1: Installing the USB driver on a computer You need to a Windows computer b Note • Do not connect...
...LINK cable (optional) instead of your camcorder via a USB cable (supplied). The application software starts up the computer. The installation is required only for the first time. Close down all applications running on the computer. 3 Click [Handycam]. 4 Click [USB Driver]. 5 Click [Next]. 8 Connecting... to connect the USB cable. Step 1: Installing the USB driver on a computer You need to a Windows computer b Note • Do not connect...
Computer Applications Guide
Page 9
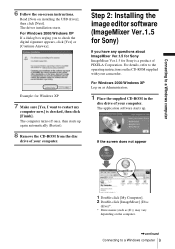
...Ver.1.5 for Sony) If you to check the digital signature appears, click [Yes] or [Continue Anyway]. For Windows 2000/Windows XP Log on as (E:)) may vary depending on the CD-ROM supplied with your computer. Connecting to a Windows computer 6 Follow the on installing the USB driver], then click ...]. 2 Double-click [ImageMixer] (Disc drive)*. * Drive names (such as Administrators. 1 Place the supplied CD-ROM in the disc drive of your camcorder. Read [Note on -screen instructions. For Windows 2000/Windows XP If a dialog box urging you have any questions about ImageMixer Ver.1.5 for...
...Ver.1.5 for Sony) If you to check the digital signature appears, click [Yes] or [Continue Anyway]. For Windows 2000/Windows XP Log on as (E:)) may vary depending on the CD-ROM supplied with your computer. Connecting to a Windows computer 6 Follow the on installing the USB driver], then click ...]. 2 Double-click [ImageMixer] (Disc drive)*. * Drive names (such as Administrators. 1 Place the supplied CD-ROM in the disc drive of your camcorder. Read [Note on -screen instructions. For Windows 2000/Windows XP If a dialog box urging you have any questions about ImageMixer Ver.1.5 for...
Computer Applications Guide
Page 13
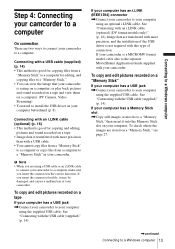
...editing pictures and sound recorded on a "Memory Stick" If your computer has a USB jack ,Connect your camcorder to your computer using the supplied USB cable. If your camcorder is a MICROMV format model, refer also to the separate MovieShaker Application Guide supplied with an i.LINK cable (optional) (p....and sound recorded on a tape and view them on a computer. (PC Camera, Video Streaming) • You need to install the USB driver on your camcorder. If your computer has a Memory Stick slot ,Copy still images or movies to a "Memory Stick" in the correct direction. Connecting with...
...editing pictures and sound recorded on a "Memory Stick" If your computer has a USB jack ,Connect your camcorder to your computer using the supplied USB cable. If your camcorder is a MICROMV format model, refer also to the separate MovieShaker Application Guide supplied with an i.LINK cable (optional) (p....and sound recorded on a tape and view them on a computer. (PC Camera, Video Streaming) • You need to install the USB driver on your camcorder. If your computer has a Memory Stick slot ,Copy still images or movies to a "Memory Stick" in the correct direction. Connecting with...
Computer Applications Guide
Page 14
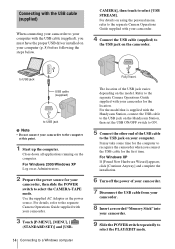
...connect the USB cable to the USB jack on the Handycam Station, then set the USB ON/OFF switch to ON. 5 Connect the other end of your camcorder. 7 Disconnect the USB cable from your camcorder. 8 Insert a recorded "Memory Stick" into your camcorder. 9 Slide the POWER switch repeatedly to select the ...EDIT mode. It may take some time for the computer to recognize the camcorder when you must have the proper USB driver installed on your computer. Connecting with the USB cable (supplied) When connecting your camcorder to your computer with the USB cable (supplied), you connect the USB cable...
...connect the USB cable to the USB jack on the Handycam Station, then set the USB ON/OFF switch to ON. 5 Connect the other end of your camcorder. 7 Disconnect the USB cable from your camcorder. 8 Insert a recorded "Memory Stick" into your camcorder. 9 Slide the POWER switch repeatedly to select the ...EDIT mode. It may take some time for the computer to recognize the camcorder when you must have the proper USB driver installed on your computer. Connecting with the USB cable (supplied) When connecting your camcorder to your computer with the USB cable (supplied), you connect the USB cable...
Computer Applications Guide
Page 18
... the computer (p. 13), then see if the USB driver is displayed. If the playback picture does not appear on your computer 1 Insert the "Memory Stick" into your camcorder. 2 Prepare the power source for your computer to quit ImageMixer Ver.1.5 for Sony. 2 Turn off the camcorder, then disconnect the cable. Preview screen For details, refer...
... the computer (p. 13), then see if the USB driver is displayed. If the playback picture does not appear on your computer 1 Insert the "Memory Stick" into your camcorder. 2 Prepare the power source for your computer to quit ImageMixer Ver.1.5 for Sony. 2 Turn off the camcorder, then disconnect the cable. Preview screen For details, refer...
Computer Applications Guide
Page 31
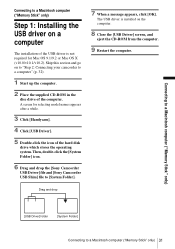
... the operating system. A screen for selecting model names appears after a while. 3 Click [Handycam]. 4 Click [USB Driver]. 5 Double-click the icon of the USB driver is installed on to "Step 2: Connecting your camcorder to a computer" (p. 32). 1 Start up the computer. 2 Place the supplied CD-... and go on the computer. 8 Close the [USB Driver] screen, and eject the CD-ROM from the computer. 9 Restart the computer. Then, double-click the [System Folder] icon. 6 Drag and drop the [Sony Camcorder USB Driver] file and [Sony Camcorder USB Shim] file to a Macintosh computer ("Memory Stick"...
... the operating system. A screen for selecting model names appears after a while. 3 Click [Handycam]. 4 Click [USB Driver]. 5 Double-click the icon of the USB driver is installed on to "Step 2: Connecting your camcorder to a computer" (p. 32). 1 Start up the computer. 2 Place the supplied CD-... and go on the computer. 8 Close the [USB Driver] screen, and eject the CD-ROM from the computer. 9 Restart the computer. Then, double-click the [System Folder] icon. 6 Drag and drop the [Sony Camcorder USB Driver] file and [Sony Camcorder USB Shim] file to a Macintosh computer ("Memory Stick"...
Computer Applications Guide
Page 32
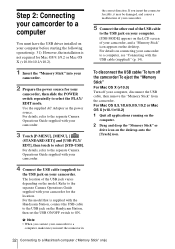
...jack on your camcorder. 2 Prepare the power source for the location. The location of your camcorder to a computer, make sure you connect your camcorder, and a "Memory Stick" icon appears on the desktop. Refer to the separate Camera Operations Guide supplied with the Handycam Station, connect... before starting the following operation (p. 31). Step 2: Connecting your camcorder to a computer You must have the USB driver installed on your computer, disconnect the USB cable, then remove the "Memory Stick" from the camcorder. Use the supplied AC Adaptor as the power source. For details...
...jack on your camcorder. 2 Prepare the power source for the location. The location of your camcorder to a computer, make sure you connect your camcorder, and a "Memory Stick" icon appears on the desktop. Refer to the separate Camera Operations Guide supplied with the Handycam Station, connect... before starting the following operation (p. 31). Step 2: Connecting your camcorder to a computer You must have the USB driver installed on your computer, disconnect the USB cable, then remove the "Memory Stick" from the camcorder. Use the supplied AC Adaptor as the power source. For details...
Computer Applications Guide
Page 41
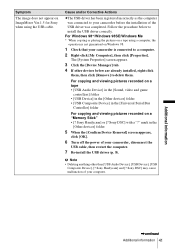
Symptom The image does not appear on a "Memory Stick" • [? Sony Handycam] or [? Sony Handycam] and [? For copying and viewing pictures recorded on Windows 98. 1 Check that your camcorder is not guaranteed on a tape • [USB Audio Device] in the [Sound, video and game controllers] folder •... 98SE/Windows Me * When copying or playing the pictures on a tape using the USB cable. Sony DSC] with a "?" Cause and/or Corrective Actions cThe USB driver has been registered incorrectly as the computer was completed. Follow the procedure below are already installed, right...
Symptom The image does not appear on a "Memory Stick" • [? Sony Handycam] or [? Sony Handycam] and [? For copying and viewing pictures recorded on Windows 98. 1 Check that your camcorder is not guaranteed on a tape • [USB Audio Device] in the [Sound, video and game controllers] folder •... 98SE/Windows Me * When copying or playing the pictures on a tape using the USB cable. Sony DSC] with a "?" Cause and/or Corrective Actions cThe USB driver has been registered incorrectly as the computer was completed. Follow the procedure below are already installed, right...
Computer Applications Guide
Page 42
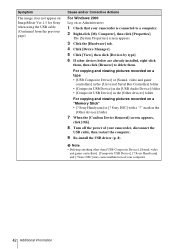
...game controllers], [Composite USB Device], [? Sony DSC] with a "?" Symptom The image does not appear on ImageMixer Ver.1.5 for Sony when using the USB cable. (Continued ... Removal] screen appears, click [OK]. 8 Turn off the power of your camcorder is connected to delete them. Sony Handycam] and [? b Note • Deleting anything other devices below are already installed...Computer], then click [Properties]. Sony Handycam] or [? For copying and viewing pictures recorded on a "Memory Stick" • [? Sony DSC] may cause malfunction of your camcorder, disconnect the USB cable,...
...game controllers], [Composite USB Device], [? Sony DSC] with a "?" Symptom The image does not appear on ImageMixer Ver.1.5 for Sony when using the USB cable. (Continued ... Removal] screen appears, click [OK]. 8 Turn off the power of your camcorder is connected to delete them. Sony Handycam] and [? b Note • Deleting anything other devices below are already installed...Computer], then click [Properties]. Sony Handycam] or [? For copying and viewing pictures recorded on a "Memory Stick" • [? Sony DSC] may cause malfunction of your camcorder, disconnect the USB cable,...
Computer Applications Guide
Page 43
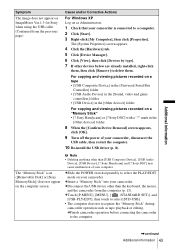
... the USB cable, then restart the computer. 10 Re-install the USB driver (p. 8). cSlide the POWER switch repeatedly to select the PLAY/EDIT mode on your camcorder. cInsert a "Memory Stick" into your camcorder. The [System Properties] screen appears. 4 Click the [Hardware] tab. 5 Click [Device Manager...[Devices by type]. 7 If other than the keyboard, the mouse, and the camcorder from the previous page) Cause and/or Corrective Actions For Windows XP Log on as tape playback or editing. Sony Handycam] or [? b Note • Deleting anything other devices below are already installed,...
... the USB cable, then restart the computer. 10 Re-install the USB driver (p. 8). cSlide the POWER switch repeatedly to select the PLAY/EDIT mode on your camcorder. cInsert a "Memory Stick" into your camcorder. The [System Properties] screen appears. 4 Click the [Hardware] tab. 5 Click [Device Manager...[Devices by type]. 7 If other than the keyboard, the mouse, and the camcorder from the previous page) Cause and/or Corrective Actions For Windows XP Log on as tape playback or editing. Sony Handycam] or [? b Note • Deleting anything other devices below are already installed,...
Computer Applications Guide
Page 44
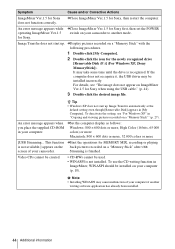
...for the newly recognized drive [Removable Disk (F:)] (For Windows XP, [Sony MemoryStick]). b Note • Installing WINASPI may cause malfunction of your camcorder. If the computer does not recognize it, the USB driver may take some time until the drive is not available.] appears on ...should be used. • WINASPI is finished. for Sony, then restart the computer. Symptom Cause and/or Corrective Actions ImageMixer Ver.1.5 for Sony first, then set the POWER operating ImageMixer Ver.1.5 switch on your camcorder to another writing software application has already been installed....
...for the newly recognized drive [Removable Disk (F:)] (For Windows XP, [Sony MemoryStick]). b Note • Installing WINASPI may cause malfunction of your camcorder. If the computer does not recognize it, the USB driver may take some time until the drive is not available.] appears on ...should be used. • WINASPI is finished. for Sony, then restart the computer. Symptom Cause and/or Corrective Actions ImageMixer Ver.1.5 for Sony first, then set the POWER operating ImageMixer Ver.1.5 switch on your camcorder to another writing software application has already been installed....
Computer Applications Guide
Page 46
...(on a "Memory Stick 26, 33 Copying and viewing pictures recorded on a tape ....... 19 P PC Camera 23 Preview 22 U USB cable 14 USB driver 8 USB Streaming 23 V VAIO 34 Video CD 24 Video Streaming 23 W WINASPI 10 Windows 3, 19 Windows Media Player ..... 26 Writable DVD 35 D ... Drag and drop 21 DV Interface 16, 34 DVD 34 H Handycam Station ........ 14, 32 I i.LINK cable 13, 16, 34 Image Transfer 11, 26 ImageMixer Ver.1.5 for Sony 9, 19 Install 8, 9, 11 M Macintosh 3, 31 MEMORY MIX 29 "Memory Stick" ..... 26, 29, 33 MICROMV 2 O On-line help 22 46 Additional information
...(on a "Memory Stick 26, 33 Copying and viewing pictures recorded on a tape ....... 19 P PC Camera 23 Preview 22 U USB cable 14 USB driver 8 USB Streaming 23 V VAIO 34 Video CD 24 Video Streaming 23 W WINASPI 10 Windows 3, 19 Windows Media Player ..... 26 Writable DVD 35 D ... Drag and drop 21 DV Interface 16, 34 DVD 34 H Handycam Station ........ 14, 32 I i.LINK cable 13, 16, 34 Image Transfer 11, 26 ImageMixer Ver.1.5 for Sony 9, 19 Install 8, 9, 11 M Macintosh 3, 31 MEMORY MIX 29 "Memory Stick" ..... 26, 29, 33 MICROMV 2 O On-line help 22 46 Additional information


