Operating Guide
Page 9
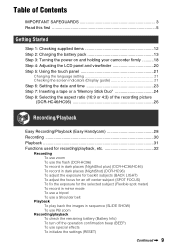
...Getting Started Step 1: Checking supplied items 12 Step 2: Charging the battery pack 13 Step 3: Turning the power on and holding your camcorder firmly ..........18 Step 4: Adjusting the LCD panel and viewfinder 20 Step 5: Using the touch panel 21 Changing the language setting 21 ...(DCR-HC46/HC96 26 Recording/Playback Easy Recording/Playback (Easy Handycam 28 Recording 30 Playback 31 Functions used for recording/playback, etc 32 Recording To use zoom To use the flash (DCR-HC96) To record in dark places (NightShot plus) (DCR-HC36/HC46) To record in dark places (NightShot) (DCR-HC96)...
...Getting Started Step 1: Checking supplied items 12 Step 2: Charging the battery pack 13 Step 3: Turning the power on and holding your camcorder firmly ..........18 Step 4: Adjusting the LCD panel and viewfinder 20 Step 5: Using the touch panel 21 Changing the language setting 21 ...(DCR-HC46/HC96 26 Recording/Playback Easy Recording/Playback (Easy Handycam 28 Recording 30 Playback 31 Functions used for recording/playback, etc 32 Recording To use zoom To use the flash (DCR-HC96) To record in dark places (NightShot plus) (DCR-HC36/HC46) To record in dark places (NightShot) (DCR-HC96)...

Operating Guide
Page 12
...74, 97) CD-ROM "Picture Package Ver.1.5.1" (1) (p. 86) Operating Guide (This manual) (1) 12 Handycam Station (1) (DCR-HC46/HC96) (p. 13) Rechargeable battery pack (1) (p. 13, 126) NP-FP30 (DCR-HC36) NP-FP50 (DCR-HC46/HC96) Wireless Remote Commander (1) (p. 40) A button-type lithium battery is already installed. The number in the... (p. 82, 86) Lens cap (1) (DCR-HC36/HC46) (p. 18, 28, 30) Power cord (1) (p. 13) • To attach the lens cap Attach the lens cap to the metal fittings of that you have following items supplied with your camcorder. See page 6, 123, 124, for compatible...
...74, 97) CD-ROM "Picture Package Ver.1.5.1" (1) (p. 86) Operating Guide (This manual) (1) 12 Handycam Station (1) (DCR-HC46/HC96) (p. 13) Rechargeable battery pack (1) (p. 13, 126) NP-FP30 (DCR-HC36) NP-FP50 (DCR-HC46/HC96) Wireless Remote Commander (1) (p. 40) A button-type lithium battery is already installed. The number in the... (p. 82, 86) Lens cap (1) (DCR-HC36/HC46) (p. 18, 28, 30) Power cord (1) (p. 13) • To attach the lens cap Attach the lens cap to the metal fittings of that you have following items supplied with your camcorder. See page 6, 123, 124, for compatible...
Operating Guide
Page 13
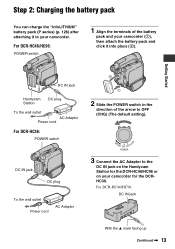
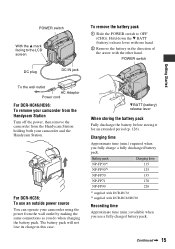
...DC IN jack Handycam Station DC plug To the wall outlet AC Adaptor Power cord For DCR-HC36: POWER switch 2 1 2 Slide the POWER switch in the direction of the battery pack and your camcorder for the DCR-HC46/HC96 or on your camcorder (1), then attach the battery pack and click it to your camcorder. DC IN ...jack DC plug To the wall outlet Power cord AC Adaptor 3 Connect the AC Adaptor to OFF (CHG) (The default setting). For DCR-HC46/HC96: POWER switch 1 Align the terminals of the arrow to the DC IN jack on the Handycam Station for the DCRHC36....
...DC IN jack Handycam Station DC plug To the wall outlet AC Adaptor Power cord For DCR-HC36: POWER switch 2 1 2 Slide the POWER switch in the direction of the battery pack and your camcorder for the DCR-HC46/HC96 or on your camcorder (1), then attach the battery pack and click it to your camcorder. DC IN ...jack DC plug To the wall outlet Power cord AC Adaptor 3 Connect the AC Adaptor to OFF (CHG) (The default setting). For DCR-HC46/HC96: POWER switch 1 Align the terminals of the arrow to the DC IN jack on the Handycam Station for the DCRHC36....
Operating Guide
Page 14
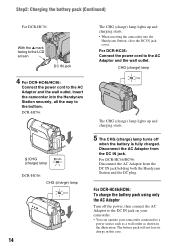
...; When inserting the camcorder into the Handycam Station securely, all the way to the AC Adaptor and the wall outlet. The battery pack will not lose its charge in the illustration. For DCR-HC46/HC96: Disconnect the AC Adaptor from the DC IN jack. Step2: Charging the battery pack (Continued) For DCR-HC36: With the v mark...
...; When inserting the camcorder into the Handycam Station securely, all the way to the AC Adaptor and the wall outlet. The battery pack will not lose its charge in the illustration. For DCR-HC46/HC96: Disconnect the AC Adaptor from the DC IN jack. Step2: Charging the battery pack (Continued) For DCR-HC36: With the v mark...
Operating Guide
Page 15
... Getting Started To the wall outlet AC Adaptor Power cord For DCR-HC46/HC96: To remove your camcorder from the Handycam Station Turn off the power, then remove the camcorder from the Handycam Station holding both your camcorder using the power from the wall outlet by making the same connections... DCR-HC36: To use a fully charged battery pack. Charging time Approximate time (min.) required when you use an outside power source You can operate your camcorder and the Handycam Station. The battery pack will not lose its charge in the direction of the arrow with DCR-HC46/HC96 ...
... Getting Started To the wall outlet AC Adaptor Power cord For DCR-HC46/HC96: To remove your camcorder from the Handycam Station Turn off the power, then remove the camcorder from the Handycam Station holding both your camcorder using the power from the wall outlet by making the same connections... DCR-HC36: To use a fully charged battery pack. Charging time Approximate time (min.) required when you use an outside power source You can operate your camcorder and the Handycam Station. The battery pack will not lose its charge in the direction of the arrow with DCR-HC46/HC96 ...

Operating Guide
Page 21
... (p. 38) that appears on the LCD screen. 1 Touch . 6 0 min MENU 1/3 TELE MACRO SPOT FOCUS -:--:-- Continued , 21 DISP/BATT INFO DCR-HC36/ HC46 DCR-HC96 Touch the button on the LCD screen. • Perform the same actions as time code) on or off. Select the screen language in lines may...Changing the language setting You can easily check the meaning of the LCD panel to support it. DISP GUIDE EXPOSURE FADER Touch [MENU] during Easy Handycam operation (p. 28). 2 Touch [DISP GUIDE]. Getting Started Step 5: Using the touch panel You can play back recorded pictures (p. 31), or change...
... (p. 38) that appears on the LCD screen. 1 Touch . 6 0 min MENU 1/3 TELE MACRO SPOT FOCUS -:--:-- Continued , 21 DISP/BATT INFO DCR-HC36/ HC46 DCR-HC96 Touch the button on the LCD screen. • Perform the same actions as time code) on or off. Select the screen language in lines may...Changing the language setting You can easily check the meaning of the LCD panel to support it. DISP GUIDE EXPOSURE FADER Touch [MENU] during Easy Handycam operation (p. 28). 2 Touch [DISP GUIDE]. Getting Started Step 5: Using the touch panel You can play back recorded pictures (p. 31), or change...

Operating Guide
Page 28
...recorded. *1 Movies are recorded in [FINE] quality on a "Memory Stick Duo." 28 Recording/Playback Easy Recording/Playback (Easy Handycam) With this Easy Handycam operation, most of the camera settings are recorded in SP (Standard Play) mode on a cassette. *2 Still images are ...adjust the focus. F C Movies 1 Slide the POWER switch E to OFF (CHG), slide it while pressing the green button. DCR-HC36/HC46: Remove the lens cap (p. 18). DCR-HC36: B A DCR-HC36/ HC46 DCR-HC96 D E If the POWER switch is set to turn on the CAMERA-TAPE lamp. To stop recording, press F again. 2 ...
...recorded. *1 Movies are recorded in [FINE] quality on a "Memory Stick Duo." 28 Recording/Playback Easy Recording/Playback (Easy Handycam) With this Easy Handycam operation, most of the camera settings are recorded in SP (Standard Play) mode on a cassette. *2 Still images are ...adjust the focus. F C Movies 1 Slide the POWER switch E to OFF (CHG), slide it while pressing the green button. DCR-HC36/HC46: Remove the lens cap (p. 18). DCR-HC36: B A DCR-HC36/ HC46 DCR-HC96 D E If the POWER switch is set to turn on the CAMERA-TAPE lamp. To stop recording, press F again. 2 ...
Operating Guide
Page 42
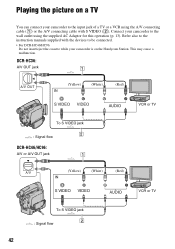
... this operation (p. 13). This may cause a malfunction. DCR-HC36: A/V OUT jack 1 A/V OUT (Yellow) (White) (Red) VCR or TV To S VIDEO jack 2 : Signal flow DCR-HC46/HC96: A/V or A/V OUT jack 1 A/V (Yellow) (White) (Red) VCR or TV To S VIDEO jack 2 : Signal flow 42 Playing the picture on a TV You can connect your camcorder is on the Handycam Station.
... this operation (p. 13). This may cause a malfunction. DCR-HC36: A/V OUT jack 1 A/V OUT (Yellow) (White) (Red) VCR or TV To S VIDEO jack 2 : Signal flow DCR-HC46/HC96: A/V or A/V OUT jack 1 A/V (Yellow) (White) (Red) VCR or TV To S VIDEO jack 2 : Signal flow 42 Playing the picture on a TV You can connect your camcorder is on the Handycam Station.
Operating Guide
Page 47
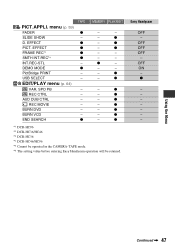
... Continued , 47 REC CTRL - BURN VCD - z - TAPE PICT.APPLI. BURN DVD - z - OFF ON - D. SPD PB - z - - - - EDIT/PLAY menu (p. 64) VAR. REC MOVIE - z - AUD DUB CTRL - z *1 DCR-HC96 *2 DCR-HC36/HC46 *3 DCR-HC36 *4 DCR-HC46/HC96 *5 Cannot be operated in the CAMERA-TAPE mode. *6 The setting value before entering Easy Handycam operation will be retained. z - z - menu (p. 59) FADER z SLIDE SHOW -
... Continued , 47 REC CTRL - BURN VCD - z - TAPE PICT.APPLI. BURN DVD - z - OFF ON - D. SPD PB - z - - - - EDIT/PLAY menu (p. 64) VAR. REC MOVIE - z - AUD DUB CTRL - z *1 DCR-HC96 *2 DCR-HC36/HC46 *3 DCR-HC36 *4 DCR-HC46/HC96 *5 Cannot be operated in the CAMERA-TAPE mode. *6 The setting value before entering Easy Handycam operation will be retained. z - z - menu (p. 59) FADER z SLIDE SHOW -

Operating Guide
Page 48
... OUTPUT z z z MENU ROTATE z z z A.SHUT OFF z z z CALIBRATION - - menu (p. 69) CLOCK SET z z z WORLD TIME z z z LANGUAGE z z z *1 DCR-HC96 *2 DCR-HC36/HC46 *3 DCR-HC36 *4 DCR-HC46/HC96 *5 Cannot be operated in the CAMERA-TAPE mode. *6 The setting value before entering Easy Handycam operation will be retained. DATA CODE - - Easy Handycam SP 12BIT z STEREO - - /NORMAL/ - / NORMAL/ -*6 OFF -*6 -*6 OFF z OFF z AUTO ON ON z LCD PANEL - 5 min -
... OUTPUT z z z MENU ROTATE z z z A.SHUT OFF z z z CALIBRATION - - menu (p. 69) CLOCK SET z z z WORLD TIME z z z LANGUAGE z z z *1 DCR-HC96 *2 DCR-HC36/HC46 *3 DCR-HC36 *4 DCR-HC46/HC96 *5 Cannot be operated in the CAMERA-TAPE mode. *6 The setting value before entering Easy Handycam operation will be retained. DATA CODE - - Easy Handycam SP 12BIT z STEREO - - /NORMAL/ - / NORMAL/ -*6 OFF -*6 -*6 OFF z OFF z AUTO ON ON z LCD PANEL - 5 min -

Operating Guide
Page 56
... ( ) Records still images at the standard image quality level. • Image quality is automatically fixed to [FINE] during Easy Handycam operation. x IMAGE SIZE (DCR-HC46/HC96) For DCR-HC46: B 1.0M ( ) Allows you set a screen ratio of images to be recorded. 56 • If you to ... in high quality. Bottom: [STANDARD] is selected for image quality. x FLD/FRAME (DCR-HC36) B FIELD To record moving subjects correcting jitter (p. 30). STANDARD ( ) Records still images at the fine image quality level. For DCR-HC96: B 3.0M ( ) Records still images clearly. 1.9M ( ) Allows you select ...
... ( ) Records still images at the standard image quality level. • Image quality is automatically fixed to [FINE] during Easy Handycam operation. x IMAGE SIZE (DCR-HC46/HC96) For DCR-HC46: B 1.0M ( ) Allows you set a screen ratio of images to be recorded. 56 • If you to ... in high quality. Bottom: [STANDARD] is selected for image quality. x FLD/FRAME (DCR-HC36) B FIELD To record moving subjects correcting jitter (p. 30). STANDARD ( ) Records still images at the fine image quality level. For DCR-HC96: B 3.0M ( ) Records still images clearly. 1.9M ( ) Allows you select ...
Operating Guide
Page 71
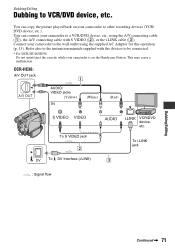
You can connect your camcorder to the instruction manuals supplied with S VIDEO (2), or the i.LINK cable (3). To i.LINK jack Dubbing/Editing Continued , 71 DCR-HC36: A/V OUT jack 1 A/V OUT AUDIO/ VIDEO jacks (Yellow) (White) (Red) To S VIDEO jack 2 DV To DV ...camcorder to the wall outlet using the A/V connecting cable (1), the A/V connecting cable with the devices to be connected. • For DCR-HC46/HC96: Do not insert/eject the cassette while your camcorder is on your camcorder to VCR/DVD device, etc. You can copy the picture played back on the Handycam...
You can connect your camcorder to the instruction manuals supplied with S VIDEO (2), or the i.LINK cable (3). To i.LINK jack Dubbing/Editing Continued , 71 DCR-HC36: A/V OUT jack 1 A/V OUT AUDIO/ VIDEO jacks (Yellow) (White) (Red) To S VIDEO jack 2 DV To DV ...camcorder to the wall outlet using the A/V connecting cable (1), the A/V connecting cable with the devices to be connected. • For DCR-HC46/HC96: Do not insert/eject the cassette while your camcorder is on your camcorder to VCR/DVD device, etc. You can copy the picture played back on the Handycam...
Operating Guide
Page 74
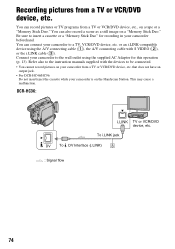
...scene as a still image on the Handycam Station. You can record pictures or TV programs from a TV or VCR/DVD device, etc., on your camcorder from a TV or VCR/DVD device, etc. that does not have an output jack. • For DCR-HC46/HC96: Do not insert/eject the cassette ...an i.LINK-compatible device using the supplied AC Adaptor for recording in your camcorder to the instruction manuals supplied with S VIDEO (2), or the i.LINK cable (3). This may cause a malfunction. Refer also to a TV, VCR/DVD device, etc. DCR-HC36: To i.LINK jack DV To DV Interface (i.LINK) 3 : Signal flow...
...scene as a still image on the Handycam Station. You can record pictures or TV programs from a TV or VCR/DVD device, etc., on your camcorder from a TV or VCR/DVD device, etc. that does not have an output jack. • For DCR-HC46/HC96: Do not insert/eject the cassette ...an i.LINK-compatible device using the supplied AC Adaptor for recording in your camcorder to the instruction manuals supplied with S VIDEO (2), or the i.LINK cable (3). This may cause a malfunction. Refer also to a TV, VCR/DVD device, etc. DCR-HC36: To i.LINK jack DV To DV Interface (i.LINK) 3 : Signal flow...

Operating Guide
Page 79
...a recorded cassette into your camcorder beforehand. 1 Slide the POWER ...the sound by connecting your camcorder to stop recording. Continued ...DCR-HC96) or the internal stereo microphone, the picture will not be output from your camcorder. appears while recording the new sound in stereo 2 (ST2) during playback. On sections recorded in a TV color system other DCR-HC36/HC46/HC96 camcorders...). To connect, press down . • When you want to turn on your camcorder... • For DCR-HC46/HC96: Do not insert/eject the cassette while your camcorder (p. 122). - ...
...a recorded cassette into your camcorder beforehand. 1 Slide the POWER ...the sound by connecting your camcorder to stop recording. Continued ...DCR-HC96) or the internal stereo microphone, the picture will not be output from your camcorder. appears while recording the new sound in stereo 2 (ST2) during playback. On sections recorded in a TV color system other DCR-HC36/HC46/HC96 camcorders...). To connect, press down . • When you want to turn on your camcorder... • For DCR-HC46/HC96: Do not insert/eject the cassette while your camcorder (p. 122). - ...
Operating Guide
Page 82
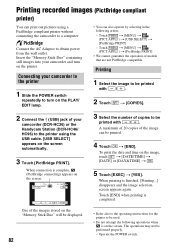
.... Operate the POWER switch. Insert the "Memory Stick Duo" containing still images into your camcorder (DCR-HC36) or the Handycam Station (DCR-HC46/ HC96) to the printer using a PictBridge compliant printer without connecting the camcorder to turn on the printer. Printing 1 Select the image to obtain power from the wall... displayed. 82 3 Select the number of copies to be printed with / . 2 Touch t [COPIES]. 2 Connect the (USB) jack of your camcorder and turn on the PLAY/ EDIT lamp. • You can print out pictures using the USB cable. [USB SELECT] appears on the image, touch...
.... Operate the POWER switch. Insert the "Memory Stick Duo" containing still images into your camcorder (DCR-HC36) or the Handycam Station (DCR-HC46/ HC96) to the printer using a PictBridge compliant printer without connecting the camcorder to turn on the printer. Printing 1 Select the image to obtain power from the wall... displayed. 82 3 Select the number of copies to be printed with / . 2 Touch t [COPIES]. 2 Connect the (USB) jack of your camcorder and turn on the PLAY/ EDIT lamp. • You can print out pictures using the USB cable. [USB SELECT] appears on the image, touch...
Operating Guide
Page 83
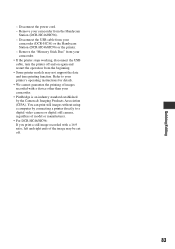
Disconnect the power cord. - Remove the "Memory Stick Duo" from your camcorder (DCR-HC36) or the Handycam Station (DCR-HC46/HC96) or the printer. - Disconnect the USB cable from your camcorder. • If the printer stops working, disconnect the USB cable, turn the printer off . 83 You can print still images without using a computer by the ...
Disconnect the power cord. - Remove the "Memory Stick Duo" from your camcorder (DCR-HC36) or the Handycam Station (DCR-HC46/HC96) or the printer. - Disconnect the USB cable from your camcorder. • If the printer stops working, disconnect the USB cable, turn the printer off . 83 You can print still images without using a computer by the ...
Operating Guide
Page 84
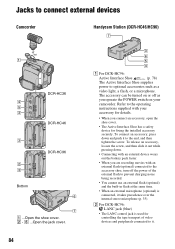
...precedence over the internal stereo microphone (p. 35). Jacks to connect external devices Camcorder Handycam Station (DCR-HC46/HC96) 7 1 DCR-HC36 4 5 3 DCR-HC46 3 DCR-HC96 2 3 Bottom 6 7 1 ...Open the shoe cover. 2 - 6 ...Open the jack cover. 3 6 5 4 A For DCR-HC96: Active Interface Shoe (p. 78) The Active Interface Shoe supplies power to... the same time. • When an external microphone (optional) is used for fixing the installed accessory securely. B For DCR-HC96: LANC jack (blue) • The LANC control jack is connected, it . 84 Refer to the operating instructions supplied...
...precedence over the internal stereo microphone (p. 35). Jacks to connect external devices Camcorder Handycam Station (DCR-HC46/HC96) 7 1 DCR-HC36 4 5 3 DCR-HC46 3 DCR-HC96 2 3 Bottom 6 7 1 ...Open the shoe cover. 2 - 6 ...Open the jack cover. 3 6 5 4 A For DCR-HC96: Active Interface Shoe (p. 78) The Active Interface Shoe supplies power to... the same time. • When an external microphone (optional) is used for fixing the installed accessory securely. B For DCR-HC96: LANC jack (blue) • The LANC control jack is connected, it . 84 Refer to the operating instructions supplied...
Operating Guide
Page 85
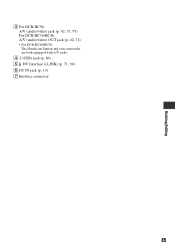
Dubbing/Editing C For DCR-HC96: A/V (audio/video) jack (p. 42, 71, 97) For DCR-HC36/HC46: A/V (audio/video) OUT jack (p. 42, 71) • For DCR-HC46/HC96: The Handycam Station and your camcorder are both equipped with A/V jacks. D (USB) jack (p. 86) E DV Interface (i.LINK) (p. 71, 94) F DC IN jack (p. 13) G Interface connector 85
Dubbing/Editing C For DCR-HC96: A/V (audio/video) jack (p. 42, 71, 97) For DCR-HC36/HC46: A/V (audio/video) OUT jack (p. 42, 71) • For DCR-HC46/HC96: The Handycam Station and your camcorder are both equipped with A/V jacks. D (USB) jack (p. 86) E DV Interface (i.LINK) (p. 71, 94) F DC IN jack (p. 13) G Interface connector 85
Operating Guide
Page 95
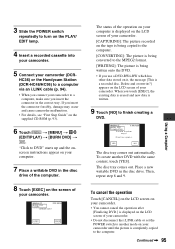
...data is written. 9 Touch [NO] to the MPEG2 format. [WRITING]: The picture is displayed on your camcorder. 60min 0:00:00:00 BURN DVD START CREATE DVD? HC36) or the Handycam Station (DCR-HC46/HC96) to a computer via an i.LINK cable (p. 94). • When you insert the connector forcibly, damage... may occur and cause camcorder malfunction. • For details, see "First Step Guide" on it, the message [...
...data is written. 9 Touch [NO] to the MPEG2 format. [WRITING]: The picture is displayed on your camcorder. 60min 0:00:00:00 BURN DVD START CREATE DVD? HC36) or the Handycam Station (DCR-HC46/HC96) to a computer via an i.LINK cable (p. 94). • When you insert the connector forcibly, damage... may occur and cause camcorder malfunction. • For details, see "First Step Guide" on it, the message [...
Operating Guide
Page 99
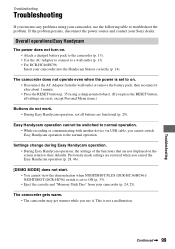
...are restored when you cancel the Easy Handycam operation (p. 28, 46). [DEMO MODE] does not start. • You cannot view the demonstration when NIGHTSHOT PLUS (DCR-HC36/HC46)/ NIGHTSHOT (DCR-HC96) switch is set to on . • Attach a charged battery pack to the camcorder (p. 13). • Use the ... a malfunction. This is set to their defaults. Overall operations/Easy Handycam The power does not turn on . • Disconnect the AC Adaptor from your Sony dealer. The camcorder gets warm. • The camcorder may get warmer while you use the following table to the normal operation...
...are restored when you cancel the Easy Handycam operation (p. 28, 46). [DEMO MODE] does not start. • You cannot view the demonstration when NIGHTSHOT PLUS (DCR-HC36/HC46)/ NIGHTSHOT (DCR-HC96) switch is set to on . • Attach a charged battery pack to the camcorder (p. 13). • Use the ... a malfunction. This is set to their defaults. Overall operations/Easy Handycam The power does not turn on . • Disconnect the AC Adaptor from your Sony dealer. The camcorder gets warm. • The camcorder may get warmer while you use the following table to the normal operation...


